")

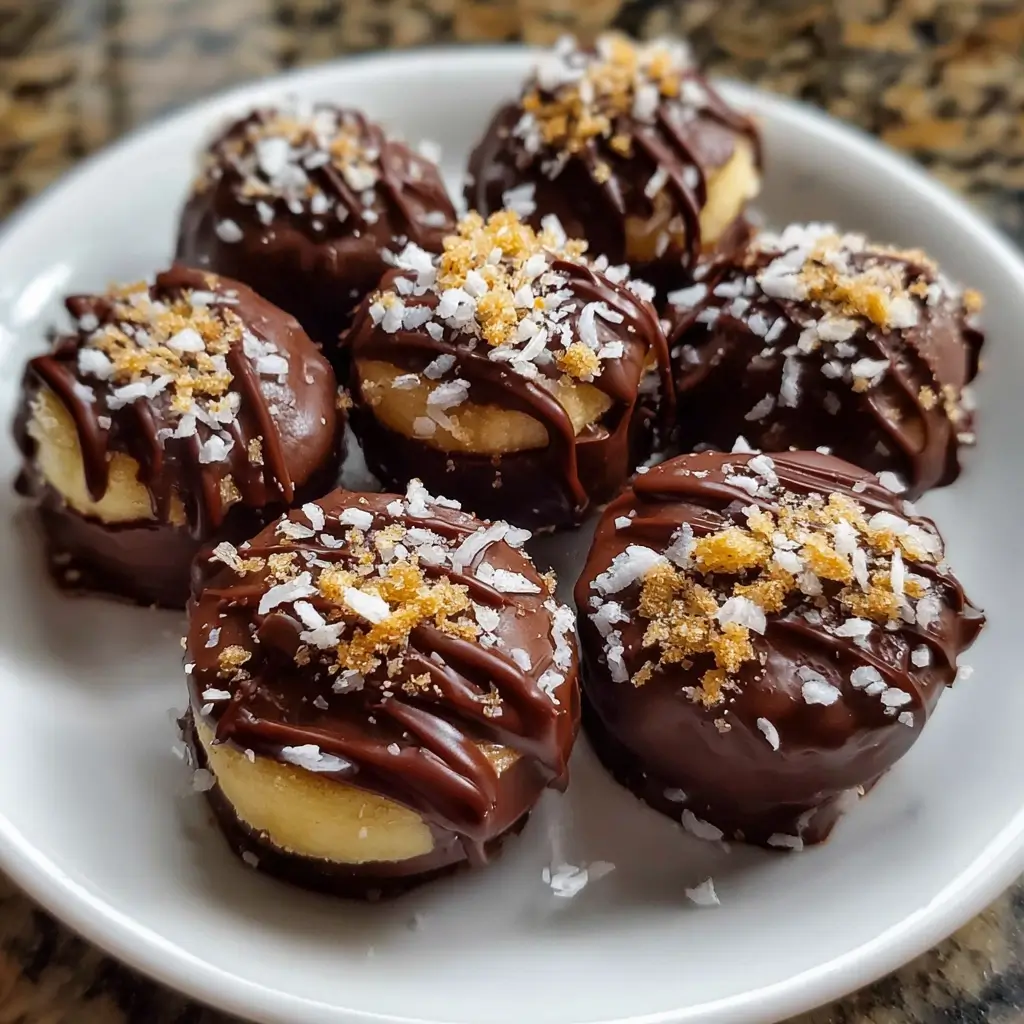

Of all the recipes that have become staples in my kitchen, this one holds a special place, born from a moment of pure, sweet desperation on a sweltering summer afternoon. The kids were restless, the heat was unforgiving, and the chorus of “I want a treat!” was reaching a fever pitch. My usual go-to snacks felt too heavy, and turning on the oven was simply out of the question. I glanced at the fruit bowl and saw a few perfectly ripe bananas, their yellow peels just beginning to speckle with brown sugar spots. An idea sparked. A little bit of chocolate, a quick trip to the freezer, and what emerged was nothing short of magic. These No-Bake Chocolate Banana Bites were an instant sensation. The satisfying snap of the cold, dark chocolate shell giving way to the creamy, frozen banana center was met with wide eyes and happy silence. It was the perfect blend of indulgent and refreshing, a treat that felt decadent but was secretly packed with simple, wholesome goodness. Since that day, they’ve become our official family currency for a good day, a celebration, or just a Tuesday afternoon pick-me-up. They are effortlessly simple, endlessly customizable, and a guaranteed crowd-pleaser for all ages.
Ingredients
- 3 large, ripe bananas – Choose bananas that are sweet and flavourful (a few brown spots are perfect) but still firm enough to hold their shape when sliced. Overly mushy bananas will be difficult to handle.
- 1 cup (about 170g) high-quality dark chocolate chips or chunks – Using a good quality chocolate with at least 70% cacao content provides a deep, rich flavour that beautifully contrasts the banana’s sweetness and results in a less sugary treat. Semi-sweet or milk chocolate can also be used based on your preference.
- 1 tablespoon coconut oil – This is the secret to a perfect chocolate shell. It helps the chocolate melt into a silky-smooth consistency for easy dipping and allows it to harden quickly into a crisp, glossy coating.
- Optional Toppings:
- Flaky sea salt – For a sophisticated sweet and salty combination.
- Finely chopped nuts – Almonds, walnuts, or pecans add a delightful crunch.
- Toasted shredded coconut – Provides a chewy texture and tropical flavour.
- Rainbow or chocolate sprinkles – A fun, kid-friendly option for a pop of colour.
- Hemp seeds or chia seeds – For an extra boost of nutrients and a subtle texture.
Instructions
- Prepare Your Workstation: Begin by preparing your freezing surface. Line a large baking sheet, tray, or plate with parchment paper or wax paper. This is a crucial step that prevents the banana slices from sticking to the tray, ensuring they lift off easily once frozen. Make sure the baking sheet will fit comfortably in your freezer.
- Slice the Bananas: Peel the bananas and slice them into rounds that are approximately ½-inch (about 1.25 cm) thick. This thickness is the sweet spot; it’s substantial enough to hold up during dipping without being overly large, creating the perfect one-bite treat. If the slices are too thin, they can become fragile and mushy. Arrange the banana slices in a single layer on the prepared parchment-lined baking sheet, ensuring they are not touching.
- The Initial Freeze: Place the baking sheet with the banana slices into the freezer. Let them freeze for at least 1 hour. This initial freezing step is essential. It firms up the banana slices, making them cold and solid. This prevents them from turning into a mushy mess when they come into contact with the warm, melted chocolate and helps the chocolate shell set almost instantly upon contact.
- Melt the Chocolate: About 5 minutes before you’re ready to take the bananas out of the freezer, it’s time to melt the chocolate. You can do this using one of two methods:
- Microwave Method: Place the dark chocolate chips and the coconut oil in a microwave-safe bowl. Microwave in 30-second intervals, stirring well after each interval. It is vital to stir thoroughly each time, as the chips will hold their shape even when melted. Continue this process until the chocolate is about 90% melted. Remove from the microwave and keep stirring until the residual heat melts the remaining pieces, resulting in a completely smooth, glossy, and liquid consistency. This prevents the chocolate from overheating and seizing.
- Double Boiler Method: If you prefer, set up a double boiler. Fill a small saucepan with about an inch of water and bring it to a gentle simmer. Place a heatproof bowl (glass or stainless steel) over the saucepan, ensuring the bottom of the bowl does not touch the water. Add the chocolate chips and coconut oil to the bowl. Stir continuously as the gentle steam heat melts the chocolate until it is perfectly smooth and liquid.
- Dip the Banana Slices: Remove the frozen banana slices from the freezer. Working quickly is key here, as the bananas will begin to thaw. Drop one frozen banana slice at a time into the bowl of melted chocolate. Use two forks to gently toss and turn the slice until it is completely coated. Lift the coated banana slice out of the chocolate with one of the forks, allowing any excess chocolate to drip back into the bowl.
- Add Toppings and Set: Carefully place the chocolate-covered banana slice back onto the parchment-lined baking sheet. If you are using any toppings like sea salt, nuts, or sprinkles, sprinkle them on immediately after placing the bite on the sheet. The cold banana causes the chocolate to set very fast, so you only have a few seconds to add your toppings before the shell hardens. Repeat this process with all the remaining banana slices.
- The Final Freeze: Once all the banana bites are dipped and decorated, return the baking sheet to the freezer. Let them freeze for at least another hour, or until the chocolate shell is completely hard and the banana is frozen solid. This final freeze ensures they are firm, crisp, and ready to be enjoyed.
Nutrition Facts
- Servings: This recipe makes approximately 24-30 bites, depending on the size of your bananas.
- Calories: Approximately 65-80 calories per bite.
- Potassium Power: Bananas are a fantastic source of potassium, an essential mineral and electrolyte that helps regulate blood pressure, support heart health, and maintain proper fluid balance in the body.
- Rich in Antioxidants: Using dark chocolate (70% cacao or higher) packs these little bites with flavonoids, powerful antioxidants that help combat oxidative stress and inflammation in the body.
- Source of Healthy Fats: The coconut oil and the natural cocoa butter in dark chocolate provide healthy fats that are important for brain function and can help you feel full and satisfied.
- Dietary Fiber: Each bite contains a small but meaningful amount of dietary fiber from the banana, which aids in digestion and promotes a feeling of fullness, making it a more satisfying snack than a sugary candy.
- Low in Added Sugar: When made with high-cacao dark chocolate, these treats are significantly lower in added sugar compared to most store-bought frozen novelties or desserts, making them a smarter choice for a sweet craving.
Preparation Time
This recipe is prized for its simplicity and minimal hands-on effort. The total time is mostly inactive freezing time, making it perfect for preparing ahead.
- Active Preparation Time: 15-20 minutes
- Inactive Freezing Time: 2 hours minimum
How to Serve
These versatile bites can be served in a variety of delightful ways, transforming them from a simple snack into a memorable dessert. Here are some creative ideas:
- The Classic Pop-able Snack:
- Serve them straight from the freezer on a chilled plate. They are the perfect refreshing treat on a hot day or a quick, satisfying answer to a late-night chocolate craving.
- Elegant Dessert Platter:
- Arrange the chocolate banana bites on a stylish platter or slate board.
- Garnish with fresh mint leaves and a scattering of fresh raspberries or pomegranate seeds for a beautiful colour contrast. This makes for an impressive and effortless dessert for dinner parties.
- As a “Bonbon” with Coffee or Tea:
- Serve one or two bites alongside a hot cup of coffee, espresso, or tea as a sophisticated after-dinner sweet, similar to a chocolate bonbon.
- Creative Ice Cream Topping:
- Roughly chop a few frozen bites and sprinkle them over a bowl of vanilla, strawberry, or even banana ice cream. They add a fantastic crunchy, chewy, and chocolatey texture.
- Build-Your-Own Sundae Bar:
- Make these bites the star of a sundae bar for a kids’ party or family gathering. Set out bowls of the banana bites, scoops of ice cream, whipped cream, sauces, and extra toppings like nuts and sprinkles, and let everyone build their own creation.
- The Ultimate Post-Workout Refuel:
- Enjoy a few bites after a workout. The combination of natural sugars and carbohydrates from the banana provides a quick energy boost, while the potassium helps replenish electrolytes.
- Blended into a Smoothie:
- For a decadent and creamy smoothie, toss 3-4 frozen chocolate banana bites into a blender with a splash of milk (dairy or plant-based) and a spoonful of protein powder or nut butter.
Additional Tips
- Master the Banana Selection: The best bananas are those at the peak of ripeness—sweet, flavourful, but not yet mushy or bruised. A banana that is still firm to the touch will slice cleanly and hold its structure, which is vital for the integrity of the bite. Avoid green bananas as they lack sweetness, and avoid overly black, mushy bananas as they will fall apart.
- Perfect the Chocolate Shell Consistency: The addition of coconut oil is key, but the temperature of your chocolate also matters. If your melted chocolate is too hot, it can start to “cook” the banana on contact. After melting, let the chocolate sit for a minute or two to cool down slightly. It should be liquid and smooth, but not piping hot. This ensures a thicker, more even coating that sets beautifully.
- Prevent Freezer Burn for Long-Term Storage: While these are often eaten quickly, you can make a large batch. To prevent freezer burn and keep them tasting fresh, transfer the fully frozen bites from the baking sheet into an airtight container or a heavy-duty freezer bag. Try to press out as much air as possible before sealing. Layering them between sheets of parchment paper within the container can also prevent them from clumping together.
- Get Creative with Flavour Infusions: Elevate your chocolate by infusing it with flavour. Add a ¼ teaspoon of peppermint extract for a mint-chocolate vibe, a pinch of cinnamon or cayenne pepper for a warming spice, or a ½ teaspoon of instant espresso powder to intensify the deep chocolate notes. Stir the flavouring into the chocolate after it has completely melted.
- Make Banana Bite “Sandwiches”: For an even more decadent treat, create little sandwiches. Slice the bananas slightly thinner (about ¼-inch thick). Spread a thin layer of peanut butter, almond butter, or Nutella on one banana slice and top it with another. Press them together gently, then freeze them as a single unit before dipping in chocolate.
- Utilize Silicone Molds: For perfectly uniform, professional-looking bites, use a small silicone candy or ice cube mold. Pour a small amount of melted chocolate into the bottom of each mold cavity, place a frozen banana slice on top, and then cover with more chocolate. Freeze until solid. This method is less messy and creates beautifully shaped treats.
- The Double-Dip Technique: For an extra-thick, super-satisfying chocolate shell, perform a double dip. Dip the frozen banana slices as directed, let them set completely on the parchment paper in the freezer (about 15-20 minutes), and then dip them a second time in the chocolate. This creates a substantial chocolate shell with an incredible snap.
- Troubleshooting Seized Chocolate: If your chocolate becomes thick, grainy, and hard (a phenomenon known as seizing), it has likely come into contact with a tiny droplet of water or has been overheated. While it’s difficult to fully reverse, you can sometimes salvage it for this recipe by vigorously stirring in another teaspoon of coconut oil or a neutral vegetable oil. This may smooth it out enough for dipping, though the texture might be slightly different.
FAQ Section
1. Can I use milk chocolate or white chocolate instead of dark chocolate?
Absolutely! This recipe is incredibly flexible. Milk chocolate will result in a sweeter, creamier bite, which is often a hit with children. White chocolate offers a unique, vanilla-forward flavour that also pairs wonderfully with banana. The melting process is the same, but be aware that milk and white chocolates contain more milk solids and sugar, making them slightly more sensitive to heat, so be extra careful not to scorch them.
2. My chocolate shell is cracking and falling off. What did I do wrong?
This usually happens for one of two reasons. First, your chocolate coating might be too thin. Ensure you’re getting a nice, even coat on the banana slice. A double-dip (as mentioned in the tips) can solve this. Second, extreme temperature shock can cause cracking. While you want the bananas frozen, if they are covered in a layer of ice crystals, this can interfere with adhesion. Ensure your banana slices are dry before dipping. Let them sit at room temperature for just a minute to let any surface ice melt before they go into the chocolate.
3. How long do these No-Bake Chocolate Banana Bites last in the freezer?
When stored correctly in an airtight container or freezer bag, these banana bites will maintain their best quality for up to two weeks. After that, they are still safe to eat, but the banana’s texture may become slightly icier and less creamy, and they may become more susceptible to freezer burn. For best results, enjoy them within the first week.
4. Are these chocolate banana bites actually a healthy snack?
Yes, they can be considered a healthy snack, especially when compared to traditional desserts or candy. They are made from whole-food ingredients. Bananas provide vitamins and minerals, while high-quality dark chocolate offers antioxidants and less sugar. They are naturally gluten-free and can be made vegan. Portion control is still key, as they contain calories and natural sugars, but they are a much more nutrient-dense option for satisfying a sweet tooth.
5. Can I make this recipe without coconut oil?
Yes, you can. The primary role of coconut oil is to help the chocolate melt smoothly and harden. You can substitute it with a teaspoon of another neutral-flavoured oil, like canola or vegetable oil, to help with the consistency. Alternatively, you can omit the oil altogether. Your chocolate may be slightly thicker and a bit more challenging to dip with, but it will still work. The final shell might be less glossy and have a slightly softer “snap.”
6. Why did my bananas turn brown and mushy after dipping?
This is almost always because the bananas were not frozen solid enough before being dipped in the warm chocolate. The initial one-hour freeze is a minimum; if your freezer isn’t very cold, they may need longer. The warmth of the chocolate will rapidly thaw a partially frozen banana, causing it to become soft and release moisture, which can also affect the chocolate’s texture. Ensure the slices are hard to the touch before you begin the dipping process.
7. Can I use other fruits with this method?
Definitely! This chocolate-dipping method is fantastic with other fruits. Sliced strawberries, whole raspberries, mandarin orange segments, or chunks of pineapple or mango are all excellent choices. The key is to pat the fruit completely dry before freezing, as excess moisture is the enemy of melted chocolate. Freezing times may vary slightly depending on the water content of the fruit.
8. What are the best mess-free toppings for making these with kids?
When making these with children, mess-free and easy-to-handle toppings are your best friend. Sprinkles (rainbow, chocolate, or shaped) are a classic winner. Finely chopped nuts are manageable if you place them in a shallow bowl for easy dipping. Toasted shredded coconut is also great. The easiest method is to have the kids sprinkle the toppings onto the bites right after you’ve placed them on the parchment paper, giving them a fun and specific job.

No-Bake Chocolate Banana Bites
Ingredients
- 3 large, ripe bananas – Choose bananas that are sweet and flavourful (a few brown spots are perfect) but still firm enough to hold their shape when sliced. Overly mushy bananas will be difficult to handle.
- 1 cup (about 170g) high-quality dark chocolate chips or chunks – Using a good quality chocolate with at least 70% cacao content provides a deep, rich flavour that beautifully contrasts the banana’s sweetness and results in a less sugary treat. Semi-sweet or milk chocolate can also be used based on your preference.
- 1 tablespoon coconut oil – This is the secret to a perfect chocolate shell. It helps the chocolate melt into a silky-smooth consistency for easy dipping and allows it to harden quickly into a crisp, glossy coating.
- Optional Toppings:
- Flaky sea salt – For a sophisticated sweet and salty combination.
- Finely chopped nuts – Almonds, walnuts, or pecans add a delightful crunch.
- Toasted shredded coconut – Provides a chewy texture and tropical flavour.
- Rainbow or chocolate sprinkles – A fun, kid-friendly option for a pop of colour.
- Hemp seeds or chia seeds – For an extra boost of nutrients and a subtle texture.
Instructions
- Prepare Your Workstation: Begin by preparing your freezing surface. Line a large baking sheet, tray, or plate with parchment paper or wax paper. This is a crucial step that prevents the banana slices from sticking to the tray, ensuring they lift off easily once frozen. Make sure the baking sheet will fit comfortably in your freezer.
- Slice the Bananas: Peel the bananas and slice them into rounds that are approximately ½-inch (about 1.25 cm) thick. This thickness is the sweet spot; it’s substantial enough to hold up during dipping without being overly large, creating the perfect one-bite treat. If the slices are too thin, they can become fragile and mushy. Arrange the banana slices in a single layer on the prepared parchment-lined baking sheet, ensuring they are not touching.
- The Initial Freeze: Place the baking sheet with the banana slices into the freezer. Let them freeze for at least 1 hour. This initial freezing step is essential. It firms up the banana slices, making them cold and solid. This prevents them from turning into a mushy mess when they come into contact with the warm, melted chocolate and helps the chocolate shell set almost instantly upon contact.
- Melt the Chocolate: About 5 minutes before you’re ready to take the bananas out of the freezer, it’s time to melt the chocolate. You can do this using one of two methods:
- Microwave Method: Place the dark chocolate chips and the coconut oil in a microwave-safe bowl. Microwave in 30-second intervals, stirring well after each interval. It is vital to stir thoroughly each time, as the chips will hold their shape even when melted. Continue this process until the chocolate is about 90% melted. Remove from the microwave and keep stirring until the residual heat melts the remaining pieces, resulting in a completely smooth, glossy, and liquid consistency. This prevents the chocolate from overheating and seizing.
- Double Boiler Method: If you prefer, set up a double boiler. Fill a small saucepan with about an inch of water and bring it to a gentle simmer. Place a heatproof bowl (glass or stainless steel) over the saucepan, ensuring the bottom of the bowl does not touch the water. Add the chocolate chips and coconut oil to the bowl. Stir continuously as the gentle steam heat melts the chocolate until it is perfectly smooth and liquid.
- Dip the Banana Slices: Remove the frozen banana slices from the freezer. Working quickly is key here, as the bananas will begin to thaw. Drop one frozen banana slice at a time into the bowl of melted chocolate. Use two forks to gently toss and turn the slice until it is completely coated. Lift the coated banana slice out of the chocolate with one of the forks, allowing any excess chocolate to drip back into the bowl.
- Add Toppings and Set: Carefully place the chocolate-covered banana slice back onto the parchment-lined baking sheet. If you are using any toppings like sea salt, nuts, or sprinkles, sprinkle them on immediately after placing the bite on the sheet. The cold banana causes the chocolate to set very fast, so you only have a few seconds to add your toppings before the shell hardens. Repeat this process with all the remaining banana slices.
- The Final Freeze: Once all the banana bites are dipped and decorated, return the baking sheet to the freezer. Let them freeze for at least another hour, or until the chocolate shell is completely hard and the banana is frozen solid. This final freeze ensures they are firm, crisp, and ready to be enjoyed.
Nutrition
- Serving Size: one normal portion
- Calories: 80