")

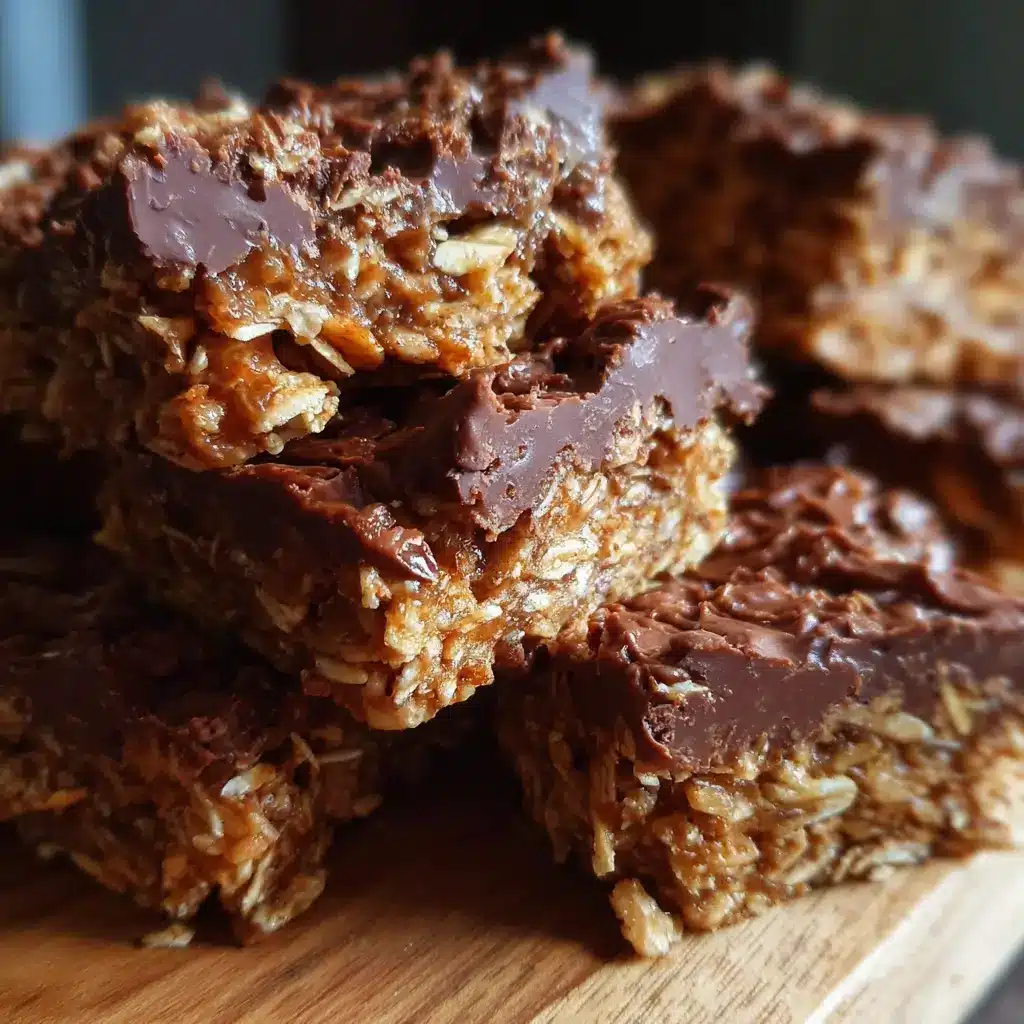

It’s a familiar scene in my house: the mid-afternoon slump hits, and suddenly everyone is on the hunt for a snack. The chorus of “I’m hungry!” echoes from every room, and I’m left searching for something that is both satisfyingly sweet and reasonably wholesome. For the longest time, my options felt limited to pre-packaged snacks or a baking project that would devour my entire afternoon. That all changed when I perfected this recipe for No-Bake Chocolate Oat Bars. The first time I made them, I was skeptical. Could something so simple, with no oven required, really deliver on flavor and texture? The answer was a resounding yes. My kids, who are notoriously picky, devoured them, calling them “fudgy oatmeal brownies.” My husband, who usually reaches for a bag of chips, found himself sneaking back to the fridge for just one more piece. For me, they are the ultimate kitchen victory: a treat that comes together in minutes, uses pantry staples, and pleases every single person in my family. They are chewy, rich, packed with chocolatey goodness, and have a satisfying heartiness from the oats that makes them feel like more than just a dessert. These bars have become our go-to for everything from after-school snacks and lunchbox treats to a quick dessert for unexpected guests.
Ingredients
Here is the simple list of ingredients you’ll need to create these irresistibly chewy and chocolatey oat bars. Each component plays a crucial role in achieving the perfect balance of flavor and texture.
- 2 cups Old-Fashioned Rolled Oats: These are the backbone of the bars, providing a hearty, chewy texture that gives the bars structure and a wholesome feel. Do not use steel-cut or instant oats, as they will not yield the same consistency. For a gluten-free version, ensure you use certified gluten-free rolled oats.
- 1 cup Creamy Peanut Butter: This acts as the primary binder and delivers a rich, nutty flavor and a dose of protein. For the best results, use a natural, creamy peanut butter where the only ingredients are peanuts and salt. Avoid hydrogenated varieties as they can alter the final texture.
- 1/2 cup Honey or Maple Syrup: This is your liquid sweetener and secondary binder. Honey provides a classic, floral sweetness, while pure maple syrup offers a deeper, more caramel-like flavor and makes the recipe vegan. Both work beautifully to hold the bars together.
- 1/4 cup Unsweetened Cocoa Powder: This is where the deep, rich chocolate flavor for the base comes from. Using unsweetened cocoa powder allows you to control the sweetness of the overall bar and provides a more intense, dark chocolate taste that balances the honey or maple syrup.
- 1/4 cup Coconut Oil, melted: Melted coconut oil adds moisture and is essential for helping the bars firm up and solidify when chilled. You can use either refined (no coconut flavor) or unrefined (a subtle coconut flavor) based on your preference.
- 1 teaspoon Vanilla Extract: A small amount of pure vanilla extract enhances all the other flavors in the bar, particularly the chocolate and peanut butter, making them taste richer and more complex.
- 1/4 teaspoon Salt: Do not skip the salt! It is a critical flavor balancer in sweet recipes. It cuts through the richness and prevents the bars from tasting flat or overly sweet.
- 1 cup Semi-Sweet Chocolate Chips: This is for the decadent, glossy topping. When melted and spread over the base, it creates a satisfying chocolate “snap” and an extra layer of indulgence. You can substitute with dark or milk chocolate chips if you prefer.
Instructions
Follow these simple, step-by-step instructions to assemble your no-bake chocolate oat bars. The process is quick, straightforward, and doesn’t require any special equipment.
- Prepare the Pan: Take an 8×8 inch square baking pan and line it with parchment paper, leaving some overhang on two opposite sides. This overhang will act as “handles,” allowing you to easily lift the entire block of bars out of the pan for clean, easy slicing later. Lightly grease the parchment paper and any exposed sides of the pan to prevent sticking.
- Combine the Dry Ingredients: In a large mixing bowl, add the 2 cups of old-fashioned rolled oats, 1/4 cup of unsweetened cocoa powder, and 1/4 teaspoon of salt. Whisk these ingredients together until they are evenly distributed. This ensures that you won’t get clumps of cocoa powder or salt in the finished bars.
- Melt the Wet Ingredients: In a separate, medium-sized microwave-safe bowl, combine the 1 cup of creamy peanut butter, 1/2 cup of honey or maple syrup, and 1/4 cup of coconut oil. Microwave this mixture on high in 30-second intervals, stirring in between each interval, until the mixture is completely melted, smooth, and easily pourable. This usually takes about 60-90 seconds in total. Alternatively, you can melt these ingredients in a small saucepan over low heat on the stovetop, stirring constantly until smooth.
- Combine Wet and Dry: Pour the melted peanut butter mixture over the dry oat mixture in the large bowl. Add the 1 teaspoon of vanilla extract. Using a sturdy spatula or wooden spoon, mix everything together until the oats are thoroughly coated and no dry spots remain. The mixture will be thick and sticky.
- Press the Base into the Pan: Transfer the oat mixture into your prepared 8×8 inch pan. Spread it out into an even layer. This next step is crucial for bars that hold together well: you must press the mixture down very firmly and evenly. You can use the back of your spatula, but for best results, place a piece of parchment paper on top and use the bottom of a flat measuring cup or glass to compact the mixture tightly into all corners. A firm, compacted base will not be crumbly.
- Melt the Chocolate Topping: Place the 1 cup of semi-sweet chocolate chips into a clean, dry, microwave-safe bowl. Microwave in 30-second intervals, stirring well after each one, until the chocolate is almost completely melted. Remove from the microwave and continue stirring until the residual heat melts the remaining chips and the chocolate is glossy and smooth. Be careful not to overheat the chocolate, as it can seize and become grainy.
- Add the Topping: Pour the melted chocolate over the compacted oat base in the pan. Use an offset spatula or the back of a spoon to spread it evenly all the way to the edges, creating a smooth, beautiful top layer.
- Chill to Set: Place the pan in the refrigerator, uncovered, for at least 2-3 hours, or until the base is very firm and the chocolate topping has completely hardened. For a faster set, you can place it in the freezer for about 45-60 minutes. The bars must be thoroughly chilled to slice cleanly.
- Slice and Serve: Once fully chilled and set, use the parchment paper “handles” to lift the entire block out of the pan and onto a cutting board. Use a large, sharp knife to cut the block into 16 squares. For the cleanest cuts, you can run the knife under hot water and wipe it dry between each slice.
Nutrition Facts
While these bars are an indulgent treat, they are packed with more beneficial nutrients than your average candy bar.
- Servings: This recipe makes 16 bars.
- Calories: Approximately 250-280 calories per bar, depending on the specific ingredients (honey vs. maple syrup, type of chocolate chips) used.
- Fiber: Each bar contains a good source of dietary fiber, primarily from the whole-grain rolled oats. Fiber is essential for digestive health and helps promote a feeling of fullness, making these bars surprisingly satisfying.
- Protein: Thanks to the generous amount of peanut butter and the oats, each bar provides a decent dose of plant-based protein. Protein is crucial for muscle repair and contributes to satiety, helping to keep you energized between meals.
- Healthy Fats: The primary fats in this recipe come from peanut butter and coconut oil, which are sources of monounsaturated and medium-chain fats, respectively. These fats are a more nutrient-dense source of energy compared to the fats found in many commercially processed snacks.
Preparation Time
This recipe is prized for its speed and simplicity. The total active preparation time, which includes gathering ingredients, mixing, and pressing into the pan, is only about 15 minutes. The majority of the time required is passive chilling time, which is approximately 2-3 hours in the refrigerator. This makes it an ideal recipe for busy days when you need to prepare something in advance without spending a lot of time in the kitchen.
How to Serve
These versatile bars can be enjoyed in a multitude of ways, fitting into any part of your day. Here are some of the best ways to serve them:
- The Classic Snack:
- Serve them chilled, straight from the refrigerator, for a firm, chewy, and refreshing treat.
- Pair a bar with a tall glass of cold milk (dairy or plant-based) for a classic after-school snack combination.
- Elevated Dessert:
- Let a bar sit at room temperature for 10-15 minutes to soften slightly, making it extra fudgy and rich.
- Gently warm a bar in the microwave for 10-15 seconds and serve it with a scoop of vanilla bean ice cream for a truly decadent dessert experience. The contrast between the warm, gooey bar and the cold, creamy ice cream is divine.
- Drizzle with a little caramel sauce or a sprinkle of flaky sea salt before serving to enhance the flavors.
- Breakfast or Brunch Addition:
- Crumble a bar over a bowl of Greek yogurt or a smoothie bowl for added texture, flavor, and a boost of protein and fiber.
- Serve alongside a cup of hot coffee or tea. The rich chocolate and peanut butter notes pair perfectly with the bitterness of a strong brew.
- On-the-Go Fuel:
- Pack them in lunchboxes for a special treat that is more wholesome than a candy bar.
- Wrap them individually and take them on hikes, road trips, or to sporting events for a convenient and energizing snack that holds up well.
Additional Tips
To ensure your No-Bake Chocolate Oat Bars turn out perfectly every single time, keep these eight expert tips in mind.
- Press, Press, Press! The most common reason for crumbly no-bake bars is that the base was not compacted firmly enough in the pan. Don’t be gentle. After spreading the oat mixture, use the bottom of a flat-bottomed glass or measuring cup to press down with significant force across the entire surface. This mechanical pressure is what helps the binders work their magic and creates a dense, cohesive bar that holds its shape.
- Ingredient Temperature is Important: For the smoothest mixing, ensure your peanut butter and honey/maple syrup are at room temperature before you begin. If you store your natural peanut butter in the fridge, it will be too stiff to mix properly. Using cold ingredients can cause the melted coconut oil to seize and solidify prematurely, resulting in a clumpy, uneven mixture.
- Don’t Scorch the Binders: When melting the peanut butter, honey/syrup, and coconut oil, use low heat on the stovetop or short intervals in the microwave. Overheating or boiling this mixture can cause the sugars in the honey/syrup to caramelize too much or even burn, which will not only taste bitter but will also result in rock-hard, dry bars once they cool. Gentle heat is all that’s needed to make it smooth and pourable.
- Customize Your Mix-Ins: Feel free to get creative by adding up to 1/2 cup of mix-ins to the oat base. Some excellent options include chopped walnuts or pecans for extra crunch, shredded unsweetened coconut for a tropical twist, mini M&Ms for color, or dried fruit like cranberries or chopped dates for extra chewiness and sweetness. Just be sure to mix them in with the dry ingredients before adding the wet.
- The Chill is Non-Negotiable: Be patient and allow the bars to chill for the full recommended time. This step is not just about making them cold; it’s a crucial part of the recipe where the coconut oil and peanut butter solidify, binding everything together. Trying to slice them too early will result in a gooey, sticky mess.
- For Ultra-Clean Slices: The secret to professional-looking, clean-cut squares lies in the knife. After lifting the chilled block from the pan, fill a tall glass with hot water. Dip a long, sharp knife into the hot water for a few seconds, wipe it completely dry with a towel, and then make one clean cut. Repeat this process—dip, wipe, cut—for every single slice. The warm blade will melt through the chocolate and the bar with minimal resistance, preventing jagged edges.
- Sprinkle with Flaky Sea Salt: Before you place the bars in the refrigerator to chill, after you’ve spread the melted chocolate topping, sprinkle a small amount of flaky sea salt (like Maldon) over the top. The salt crystals not only look beautiful but they also provide a delightful crunchy texture and a savory contrast that makes the sweet, rich flavors of the chocolate and peanut butter pop.
- Proper Storage is Key to Longevity: These bars must be stored in the refrigerator. Place them in an airtight container, with layers separated by parchment paper to prevent them from sticking together. They will stay fresh and delicious for up to two weeks. For longer-term storage, they freeze exceptionally well. Wrap them individually in plastic wrap and then place them in a freezer-safe bag or container. They will last for up to 3 months in the freezer.
FAQ
Here are answers to some of the most frequently asked questions about making No-Bake Chocolate Oat Bars.
1. Why did my bars turn out dry and crumbly?
This is the most common issue and usually has one of two causes. First, the oat base was not pressed down firmly enough in the pan. Compacting the mixture is essential for creating a dense, solid bar. Second, you may have used too many dry ingredients or not enough wet binder. Ensure your measurements are accurate. Using dry, stiff peanut butter (from the bottom of the jar) or over-cooking the wet ingredients can also lead to a dry result.
2. Can I make these bars vegan?
Absolutely! It’s a very simple substitution. To make these bars vegan, simply replace the honey with an equal amount of pure maple syrup. Additionally, ensure you are using dairy-free chocolate chips for the topping. Most high-quality dark chocolate chips are naturally vegan, but always check the label to be sure.
3. Can I make this recipe gluten-free?
Yes, this recipe is easily adapted to be gluten-free. Oats are naturally gluten-free, but they are often processed in facilities that also handle wheat, leading to cross-contamination. To ensure the recipe is safe for those with celiac disease or gluten sensitivity, simply purchase and use oats that are explicitly labeled as “certified gluten-free.” All other ingredients in the base recipe are naturally gluten-free.
4. What can I use instead of peanut butter?
If you have a peanut allergy or simply don’t like the taste, you can substitute the peanut butter with another creamy nut or seed butter. Creamy almond butter or cashew butter are excellent alternatives that provide a similar texture and richness. For a nut-free option, creamy sunflower seed butter (SunButter) works wonderfully and is a great choice for school-safe snacks.
5. How long do these no-bake bars last?
Because of the fresh ingredients and lack of preservatives, these bars must be stored in the refrigerator. In an airtight container, they will remain fresh and delicious for up to 2 weeks. They can also be frozen for up to 3 months. If you freeze them, you can enjoy them straight from the freezer for an extra firm and chewy treat, or let them thaw in the fridge for a few hours.
6. Can I use quick-cooking or instant oats instead of rolled oats?
It is not recommended. Old-fashioned rolled oats provide the best texture: a distinct, satisfying chewiness that holds up well. Quick-cooking oats are thinner and more processed, which will result in a softer, mushier, and less structured bar. Steel-cut oats are too hard and will not soften enough in this no-bake application, resulting in a raw, unpleasant texture. Stick with old-fashioned rolled oats for the best results.
7. My chocolate topping cracked when I sliced the bars. How can I prevent this?
This happens when the chocolate layer is completely hard and brittle, and the pressure of the knife causes it to shatter. To prevent this, you can either let the bars sit at room temperature for about 10-15 minutes before slicing to slightly soften the chocolate, or you can add 1 teaspoon of coconut oil or a neutral vegetable oil to your chocolate chips before melting. This small amount of oil makes the chocolate set slightly softer, making it less prone to cracking when cut.
8. Are these No-Bake Chocolate Oat Bars actually healthy?
“Healthy” is a relative term, but these bars are certainly a more wholesome choice than most store-bought candy bars or cookies. They are made with whole-food ingredients like whole-grain oats (fiber), natural peanut butter (protein and healthy fats), and are naturally sweetened with honey or maple syrup instead of refined white sugar. While they are energy-dense and should be enjoyed as a treat, they provide sustained energy and beneficial nutrients that you won’t find in typical processed sweets.

No-Bake Chocolate Oat Bars
Ingredients
Here is the simple list of ingredients you’ll need to create these irresistibly chewy and chocolatey oat bars. Each component plays a crucial role in achieving the perfect balance of flavor and texture.
- 2 cups Old-Fashioned Rolled Oats: These are the backbone of the bars, providing a hearty, chewy texture that gives the bars structure and a wholesome feel. Do not use steel-cut or instant oats, as they will not yield the same consistency. For a gluten-free version, ensure you use certified gluten-free rolled oats.
- 1 cup Creamy Peanut Butter: This acts as the primary binder and delivers a rich, nutty flavor and a dose of protein. For the best results, use a natural, creamy peanut butter where the only ingredients are peanuts and salt. Avoid hydrogenated varieties as they can alter the final texture.
- 1/2 cup Honey or Maple Syrup: This is your liquid sweetener and secondary binder. Honey provides a classic, floral sweetness, while pure maple syrup offers a deeper, more caramel-like flavor and makes the recipe vegan. Both work beautifully to hold the bars together.
- 1/4 cup Unsweetened Cocoa Powder: This is where the deep, rich chocolate flavor for the base comes from. Using unsweetened cocoa powder allows you to control the sweetness of the overall bar and provides a more intense, dark chocolate taste that balances the honey or maple syrup.
- 1/4 cup Coconut Oil, melted: Melted coconut oil adds moisture and is essential for helping the bars firm up and solidify when chilled. You can use either refined (no coconut flavor) or unrefined (a subtle coconut flavor) based on your preference.
- 1 teaspoon Vanilla Extract: A small amount of pure vanilla extract enhances all the other flavors in the bar, particularly the chocolate and peanut butter, making them taste richer and more complex.
- 1/4 teaspoon Salt: Do not skip the salt! It is a critical flavor balancer in sweet recipes. It cuts through the richness and prevents the bars from tasting flat or overly sweet.
- 1 cup Semi-Sweet Chocolate Chips: This is for the decadent, glossy topping. When melted and spread over the base, it creates a satisfying chocolate “snap” and an extra layer of indulgence. You can substitute with dark or milk chocolate chips if you prefer.
Instructions
Follow these simple, step-by-step instructions to assemble your no-bake chocolate oat bars. The process is quick, straightforward, and doesn’t require any special equipment.
- Prepare the Pan: Take an 8×8 inch square baking pan and line it with parchment paper, leaving some overhang on two opposite sides. This overhang will act as “handles,” allowing you to easily lift the entire block of bars out of the pan for clean, easy slicing later. Lightly grease the parchment paper and any exposed sides of the pan to prevent sticking.
- Combine the Dry Ingredients: In a large mixing bowl, add the 2 cups of old-fashioned rolled oats, 1/4 cup of unsweetened cocoa powder, and 1/4 teaspoon of salt. Whisk these ingredients together until they are evenly distributed. This ensures that you won’t get clumps of cocoa powder or salt in the finished bars.
- Melt the Wet Ingredients: In a separate, medium-sized microwave-safe bowl, combine the 1 cup of creamy peanut butter, 1/2 cup of honey or maple syrup, and 1/4 cup of coconut oil. Microwave this mixture on high in 30-second intervals, stirring in between each interval, until the mixture is completely melted, smooth, and easily pourable. This usually takes about 60-90 seconds in total. Alternatively, you can melt these ingredients in a small saucepan over low heat on the stovetop, stirring constantly until smooth.
- Combine Wet and Dry: Pour the melted peanut butter mixture over the dry oat mixture in the large bowl. Add the 1 teaspoon of vanilla extract. Using a sturdy spatula or wooden spoon, mix everything together until the oats are thoroughly coated and no dry spots remain. The mixture will be thick and sticky.
- Press the Base into the Pan: Transfer the oat mixture into your prepared 8×8 inch pan. Spread it out into an even layer. This next step is crucial for bars that hold together well: you must press the mixture down very firmly and evenly. You can use the back of your spatula, but for best results, place a piece of parchment paper on top and use the bottom of a flat measuring cup or glass to compact the mixture tightly into all corners. A firm, compacted base will not be crumbly.
- Melt the Chocolate Topping: Place the 1 cup of semi-sweet chocolate chips into a clean, dry, microwave-safe bowl. Microwave in 30-second intervals, stirring well after each one, until the chocolate is almost completely melted. Remove from the microwave and continue stirring until the residual heat melts the remaining chips and the chocolate is glossy and smooth. Be careful not to overheat the chocolate, as it can seize and become grainy.
- Add the Topping: Pour the melted chocolate over the compacted oat base in the pan. Use an offset spatula or the back of a spoon to spread it evenly all the way to the edges, creating a smooth, beautiful top layer.
- Chill to Set: Place the pan in the refrigerator, uncovered, for at least 2-3 hours, or until the base is very firm and the chocolate topping has completely hardened. For a faster set, you can place it in the freezer for about 45-60 minutes. The bars must be thoroughly chilled to slice cleanly.
- Slice and Serve: Once fully chilled and set, use the parchment paper “handles” to lift the entire block out of the pan and onto a cutting board. Use a large, sharp knife to cut the block into 16 squares. For the cleanest cuts, you can run the knife under hot water and wipe it dry between each slice.
Nutrition
- Serving Size: one normal portion
- Calories: 280