")

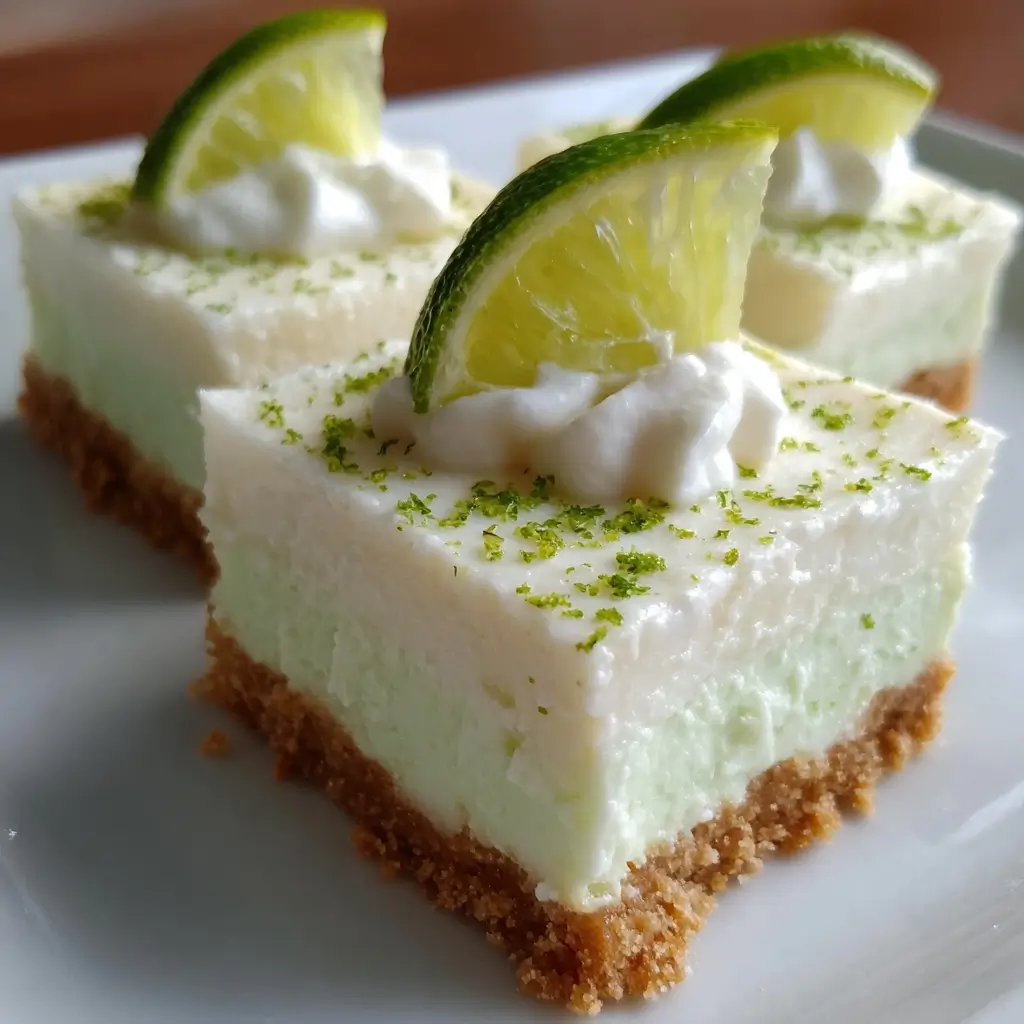

There are certain desserts that just scream “summer,” and for my family, these No-Bake Key Lime Bars are at the very top of that list. I remember the first time I made them. It was one of those relentlessly hot July afternoons where the thought of turning on the oven was simply unbearable. We had friends coming over for a barbecue, and I needed a dessert that was light, refreshing, and wouldn’t heat up the kitchen. I stumbled upon the idea of a no-bake key lime treat, and the rest is history. From the moment our guests took their first bite, there was a collective, blissful silence, followed by a chorus of “You have to give me this recipe!” The tangy, zesty punch of the lime, balanced perfectly by the sweet, creamy filling and the crunchy, buttery graham cracker crust, was an absolute revelation. It’s become our official go-to dessert for potlucks, family gatherings, and those quiet summer evenings when you just need a little slice of sunshine on a plate. It’s so incredibly easy to make, yet it looks and tastes like something you’d find in a high-end bakery.
Ingredients
This recipe relies on a handful of simple, yet crucial, ingredients to achieve its signature taste and texture. Each component plays a vital role in creating the perfect balance of sweet, tart, and creamy.
For the Graham Cracker Crust:
- 2 cups Graham Cracker Crumbs (about 14-15 full cracker sheets): These form the classic, buttery, and slightly sweet base for the bars. You can buy pre-made crumbs or easily make your own by pulsing full sheets in a food processor.
- ½ cup Unsalted Butter, melted: This is the magic ingredient that binds the crumbs together, creating a firm, sliceable crust once chilled. Using unsalted butter allows you to control the overall saltiness of the dessert.
- ¼ cup Granulated Sugar: A touch of sugar enhances the sweetness of the graham crackers and helps the crust caramelize ever so slightly in flavor as it sets.
For the Creamy Key Lime Filling:
- 1 (8-ounce) package Cream Cheese, softened to room temperature: This is the foundation of the filling’s rich and velvety texture. It’s absolutely essential for the cream cheese to be fully softened to avoid any lumps and ensure a silky-smooth consistency.
- 1 (14-ounce) can Sweetened Condensed Milk: This ingredient is a triple-threat: it provides sweetness, contributes to the thick, creamy texture, and its acidity reacts with the lime juice to help the filling set without baking. Do not substitute with evaporated milk.
- ½ cup Key Lime Juice: The star of the show! Key lime juice provides the iconic tart and floral flavor. While freshly squeezed is wonderful, a high-quality bottled Key lime juice (like Nellie & Joe’s) works perfectly and is often more convenient.
- 1 tablespoon Lime Zest: Finely grated zest from the outside of the limes (Key limes or regular Persian limes) adds a powerful, aromatic punch of citrus oil that infuses the entire filling with a fresh, vibrant flavor that juice alone cannot provide.
- Optional Garnishes: Whipped cream, extra lime zest, thin lime slices, or toasted coconut flakes for serving.
Instructions
Follow these step-by-step instructions carefully to ensure your No-Bake Key Lime Bars are a stunning success. The process is divided into creating the crust and whipping up the filling, followed by the crucial chilling period.
Step 1: Prepare the Pan
Begin by preparing your baking pan. Line an 8×8-inch or 9×9-inch square baking pan with parchment paper, leaving a couple of inches of overhang on two opposite sides. This parchment paper “sling” will be your best friend later, allowing you to lift the entire block of bars out of the pan for easy, clean slicing.
Step 2: Make the Graham Cracker Crust
In a medium-sized bowl, combine the graham cracker crumbs, granulated sugar, and melted unsalted butter. Use a fork or a spatula to mix everything together until all the crumbs are evenly moistened. The final texture should resemble wet sand. Pour this mixture into your prepared pan. Using the bottom of a flat measuring cup or a glass, firmly and evenly press the crumbs into the bottom of the pan to create a compact layer. Pay special attention to the corners and edges. Place the pan in the freezer to chill for at least 15-20 minutes while you prepare the filling. This step is crucial for helping the crust firm up quickly.
Step 3: Create the Key Lime Filling
In a large mixing bowl, place the softened block of cream cheese. Using an electric hand mixer (or a stand mixer fitted with the paddle attachment), beat the cream cheese on medium speed for about 1-2 minutes until it is completely smooth and creamy, with no lumps remaining. Be sure to scrape down the sides and bottom of the bowl with a rubber spatula to ensure everything is incorporated.
Step 4: Combine the Wet Ingredients
With the mixer on low speed, slowly pour the can of sweetened condensed milk into the whipped cream cheese. Continue to mix until they are fully combined and the mixture is smooth. Scrape the bowl down again. Now, add the Key lime juice and the fresh lime zest. Increase the mixer speed to medium-high and beat for another 2-3 minutes. The mixture will start to thicken noticeably as the acid from the lime juice reacts with the dairy. It should look luscious, glossy, and hold its shape slightly.
Step 5: Assemble the Bars
Remove the crust from the freezer. Pour the prepared Key lime filling over the chilled graham cracker crust. Use your rubber spatula to spread the filling into an even, level layer, making sure it reaches all the corners of the pan. The top should be as smooth as you can get it.
Step 6: Chill for Perfection
This is the most important—and most difficult—part: waiting! Cover the pan loosely with plastic wrap or aluminum foil (be careful not to let it touch the surface of the filling) and place it in the refrigerator. The bars need to chill for a minimum of 6 hours to set properly, but for the best, firmest texture, chilling overnight is highly recommended. This extended chilling time allows the filling to fully firm up, making for clean, beautiful slices.
Step 7: Slice and Serve
Once the bars are completely firm, remove the pan from the refrigerator. Grasp the parchment paper overhangs and carefully lift the entire slab of Key lime bars out of the pan and onto a cutting board. For the cleanest possible slices, use a large, sharp knife. It’s helpful to run the knife under hot water and wipe it dry between each cut. Cut the slab into your desired size—9 large squares or 16 smaller bars work well. Garnish just before serving, if desired.
Nutrition Facts
- Servings: 16 small bars
- Calories per serving: Approximately 250 kcal
- Fat: This dessert contains a moderate amount of fat, primarily from the butter in the crust and the full-fat cream cheese in the filling, which contributes to its rich, satisfying mouthfeel.
- Carbohydrates: The primary source of energy in these bars, coming from the sugar and graham crackers in the crust and the sweetened condensed milk in the filling.
- Sugars: A significant portion of the carbohydrates comes from sugar, which balances the tartness of the Key lime juice and is essential for the recipe’s classic flavor profile.
- Protein: A small amount of protein is present, mainly from the cream cheese and condensed milk.
- Sodium: A low amount of sodium is present, primarily from the graham crackers and a trace amount in the other dairy ingredients.
Preparation Time
The beauty of this recipe lies in its minimal active preparation time.
- Active Time: 20-25 minutes. This includes crushing the graham crackers, mixing the crust, preparing the pan, and whipping up the filling.
- Chilling Time: 6 hours to overnight. This passive time is non-negotiable and absolutely essential for the filling to set into a firm, sliceable consistency. The longer you can let it chill, the better the final texture will be.
How to Serve
These No-Bake Key Lime Bars are delightful on their own, but a few simple additions can elevate them into a show-stopping dessert. Here are some serving suggestions:
- The Classic Dollop:
- Top each square with a generous dollop or elegant pipe of fresh, homemade whipped cream or a stabilized whipped cream from a can. The airy lightness of the cream cuts through the richness of the filling beautifully.
- A Zesty Garnish:
- Right before serving, grate a small amount of fresh lime zest over the top of the bars or the whipped cream. This not only adds a pop of color but also a fragrant burst of citrus aroma that enhances the tasting experience.
- Toasted Coconut Crunch:
- Sprinkle a generous amount of toasted sweetened or unsweetened coconut flakes over the bars. The nutty, crunchy texture of the coconut provides a fantastic contrast to the smooth, creamy filling.
- Presentation is Key:
- Serve the bars chilled, straight from the refrigerator.
- Arrange them on a clean white platter to make their pale green and golden-brown colors pop.
- For an extra touch of elegance, place a very thin slice of a lime on top of each bar.
Additional Tips
Master this recipe and make it your own with these eight expert tips for guaranteed success and creative variations.
- Room Temperature is Non-Negotiable: For the creamiest, lump-free filling, your cream cheese must be at room temperature. Take it out of the fridge at least 1-2 hours before you begin. If you’re short on time, you can unwrap the block of cream cheese and microwave it in 10-second intervals until softened, but not melted.
- The Perfect Crust Press: To get a super compact and even crust that won’t crumble, use the flat bottom of a drinking glass or a metal measuring cup to press the crumb mixture firmly into the pan. This provides more even pressure than your fingers can.
- Fresh vs. Bottled Juice: While fresh Key lime juice is amazing, it takes a lot of tiny Key limes to get ½ cup of juice. High-quality bottled Key lime juice (often found in the juice aisle or with cocktail mixers) is a fantastic and reliable alternative that provides consistent tartness and flavor. Do not use regular bottled lime concentrate, as its flavor is too harsh.
- Don’t Forget the Zest: The lime zest is not just a garnish; it’s a critical flavor component. The oils in the zest contain a huge amount of lime flavor and aroma. Don’t be tempted to skip it, as it makes a world of difference in the final taste.
- Chill Time is Sacred: Be patient! The chilling process is a chemical reaction. The filling needs undisturbed time in the cold to firm up completely. Cutting into it too early will result in a soupy, disappointing mess. If you can, make it the day before you plan to serve it.
- For Clean Slices, Use a Hot Knife: The secret to professional-looking, clean-edged bars is a hot knife. Fill a tall glass with hot water. Dip a long, sharp knife into the water, wipe it clean and dry with a paper towel, and make one cut. Repeat this process for every single cut. It melts the fat just enough to slide through without dragging the filling or crumbs.
- Get Creative with Your Crust: While graham cracker crust is classic, feel free to experiment! You can substitute the graham crackers with an equal amount of crumbs from other cookies like Biscoff (for a spiced flavor), vanilla wafers, shortbread cookies, or even golden Oreos (scrape out the filling first).
- Make-Ahead and Storage Savvy: These bars are a perfect make-ahead dessert. You can make them up to 3 days in advance and store them, covered, in the refrigerator. They are actually best on day two when the flavors have had more time to meld together.
FAQ Section
Here are answers to some of the most frequently asked questions about making No-Bake Key Lime Bars.
1. What is the difference between Key limes and regular limes?
Key limes (also known as Mexican or West Indian limes) are smaller, rounder, and have a thinner, more yellowish rind than the larger, oval Persian limes we typically see in stores. Their flavor is more aromatic, floral, and intensely tart. Persian limes are less acidic and have a different, more straightforward lime flavor. While both are delicious, Key limes provide the authentic, signature taste for this dessert.
2. Can I use regular Persian lime juice in this recipe?
Yes, you absolutely can! If you can’t find Key limes or bottled Key lime juice, freshly squeezed juice from regular Persian limes will work just fine. The final flavor will be slightly less floral and a bit more of a straightforward tart lime, but the bars will still be incredibly delicious and refreshing. You will use the same amount (½ cup).
3. My filling didn’t set properly. What went wrong?
This is the most common issue, and it usually comes down to one of two things. First, not chilling it long enough. The bars need at least 6 full hours, and preferably overnight, to set. Second, using the wrong ingredients. You must use full-fat block cream cheese (not the whipped kind in a tub) and regular sweetened condensed milk (not evaporated milk or low-fat condensed milk). The fat content and the specific sugar concentration in these ingredients are crucial for the chemical reaction that firms up the filling.
4. How do I store leftover No-Bake Key Lime Bars?
Leftovers should be stored in an airtight container in the refrigerator. They will stay fresh and delicious for up to 4-5 days. The graham cracker crust may soften slightly over time, but the flavor will remain excellent.
5. Can I freeze these key lime bars?
Yes, these bars freeze beautifully! For best results, freeze them uncovered on a baking sheet for about an hour until firm. Then, wrap the individual bars tightly in plastic wrap and place them in a freezer-safe bag or container. They can be frozen for up to 2-3 months. To serve, simply thaw them in the refrigerator for a few hours. They are also delicious served partially frozen for a firmer, ice-cream-like treat.
6. How can I make this recipe gluten-free?
It’s very easy to adapt this recipe to be gluten-free. Simply substitute the regular graham crackers with your favorite brand of gluten-free graham-style crackers. Follow the recipe instructions exactly as written. Ensure your other ingredients, like the sweetened condensed milk, are certified gluten-free if you are serving someone with a severe allergy.
7. Why are my bars “sweating” or have condensation on top?
“Sweating” or condensation usually happens due to a rapid temperature change. If you take the very cold bars directly from the refrigerator and leave them out in a warm or humid room, moisture from the air will condense on the cold surface. This is completely normal and doesn’t affect the taste. To minimize it, try to keep the bars refrigerated until just before serving.
8. Can I double this recipe?
Yes, you can easily double this recipe. Simply double all the ingredient quantities and prepare it in a 9×13-inch baking pan. The preparation steps remain the same. Keep in mind that a larger, thicker slab of bars may require a slightly longer chilling time to ensure the center is fully set, so plan for a full overnight chill for best results.

No-Bake Key Lime Bars Recipe
Ingredients
This recipe relies on a handful of simple, yet crucial, ingredients to achieve its signature taste and texture. Each component plays a vital role in creating the perfect balance of sweet, tart, and creamy.
For the Graham Cracker Crust:
- 2 cups Graham Cracker Crumbs (about 14–15 full cracker sheets): These form the classic, buttery, and slightly sweet base for the bars. You can buy pre-made crumbs or easily make your own by pulsing full sheets in a food processor.
- ½ cup Unsalted Butter, melted: This is the magic ingredient that binds the crumbs together, creating a firm, sliceable crust once chilled. Using unsalted butter allows you to control the overall saltiness of the dessert.
- ¼ cup Granulated Sugar: A touch of sugar enhances the sweetness of the graham crackers and helps the crust caramelize ever so slightly in flavor as it sets.
For the Creamy Key Lime Filling:
- 1 (8-ounce) package Cream Cheese, softened to room temperature: This is the foundation of the filling’s rich and velvety texture. It’s absolutely essential for the cream cheese to be fully softened to avoid any lumps and ensure a silky-smooth consistency.
- 1 (14-ounce) can Sweetened Condensed Milk: This ingredient is a triple-threat: it provides sweetness, contributes to the thick, creamy texture, and its acidity reacts with the lime juice to help the filling set without baking. Do not substitute with evaporated milk.
- ½ cup Key Lime Juice: The star of the show! Key lime juice provides the iconic tart and floral flavor. While freshly squeezed is wonderful, a high-quality bottled Key lime juice (like Nellie & Joe’s) works perfectly and is often more convenient.
- 1 tablespoon Lime Zest: Finely grated zest from the outside of the limes (Key limes or regular Persian limes) adds a powerful, aromatic punch of citrus oil that infuses the entire filling with a fresh, vibrant flavor that juice alone cannot provide.
- Optional Garnishes: Whipped cream, extra lime zest, thin lime slices, or toasted coconut flakes for serving.
Instructions
Follow these step-by-step instructions carefully to ensure your No-Bake Key Lime Bars are a stunning success. The process is divided into creating the crust and whipping up the filling, followed by the crucial chilling period.
Step 1: Prepare the Pan
Begin by preparing your baking pan. Line an 8×8-inch or 9×9-inch square baking pan with parchment paper, leaving a couple of inches of overhang on two opposite sides. This parchment paper “sling” will be your best friend later, allowing you to lift the entire block of bars out of the pan for easy, clean slicing.
Step 2: Make the Graham Cracker Crust
In a medium-sized bowl, combine the graham cracker crumbs, granulated sugar, and melted unsalted butter. Use a fork or a spatula to mix everything together until all the crumbs are evenly moistened. The final texture should resemble wet sand. Pour this mixture into your prepared pan. Using the bottom of a flat measuring cup or a glass, firmly and evenly press the crumbs into the bottom of the pan to create a compact layer. Pay special attention to the corners and edges. Place the pan in the freezer to chill for at least 15-20 minutes while you prepare the filling. This step is crucial for helping the crust firm up quickly.
Step 3: Create the Key Lime Filling
In a large mixing bowl, place the softened block of cream cheese. Using an electric hand mixer (or a stand mixer fitted with the paddle attachment), beat the cream cheese on medium speed for about 1-2 minutes until it is completely smooth and creamy, with no lumps remaining. Be sure to scrape down the sides and bottom of the bowl with a rubber spatula to ensure everything is incorporated.
Step 4: Combine the Wet Ingredients
With the mixer on low speed, slowly pour the can of sweetened condensed milk into the whipped cream cheese. Continue to mix until they are fully combined and the mixture is smooth. Scrape the bowl down again. Now, add the Key lime juice and the fresh lime zest. Increase the mixer speed to medium-high and beat for another 2-3 minutes. The mixture will start to thicken noticeably as the acid from the lime juice reacts with the dairy. It should look luscious, glossy, and hold its shape slightly.
Step 5: Assemble the Bars
Remove the crust from the freezer. Pour the prepared Key lime filling over the chilled graham cracker crust. Use your rubber spatula to spread the filling into an even, level layer, making sure it reaches all the corners of the pan. The top should be as smooth as you can get it.
Step 6: Chill for Perfection
This is the most important—and most difficult—part: waiting! Cover the pan loosely with plastic wrap or aluminum foil (be careful not to let it touch the surface of the filling) and place it in the refrigerator. The bars need to chill for a minimum of 6 hours to set properly, but for the best, firmest texture, chilling overnight is highly recommended. This extended chilling time allows the filling to fully firm up, making for clean, beautiful slices.
Step 7: Slice and Serve
Once the bars are completely firm, remove the pan from the refrigerator. Grasp the parchment paper overhangs and carefully lift the entire slab of Key lime bars out of the pan and onto a cutting board. For the cleanest possible slices, use a large, sharp knife. It’s helpful to run the knife under hot water and wipe it dry between each cut. Cut the slab into your desired size—9 large squares or 16 smaller bars work well. Garnish just before serving, if desired.
Nutrition
- Serving Size: one normal portion
- Calories: 250