")


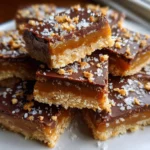
There are certain recipes that become legends in a household, the ones that get requested for every birthday, holiday, and potluck. For my family, these No-Bake Salted Caramel Bars are that legend. I still remember the first time I made them. It was for a last-minute get-together, and I needed something impressive but incredibly simple. I was skeptical that a no-bake dessert could deliver the same satisfying complexity as a baked one, but I was proven wrong from the very first bite. The moment my husband tried one, his eyes widened. He described it as the perfect trifecta of texture and flavor: a sturdy, buttery oatmeal crust that crumbles just right, a thick, luscious layer of homemade salted caramel that’s both sweet and deeply flavorful, and a crisp, dark chocolate topping sprinkled with just enough flaky sea salt to make every single flavor pop. My kids, who are usually the toughest critics, were completely silent as they devoured their squares, their faces smeared with chocolate and happiness. Since that day, these bars have become my secret weapon. They are the ultimate crowd-pleaser, the perfect make-ahead treat, and a delightful indulgence that feels far more decadent and complicated than it actually is. They are, without a doubt, a perfect recipe.
Ingredients
Here is everything you will need to create these unbelievably delicious no-bake bars. Each component is simple, but together they create a symphony of flavor.
For the Buttery Oat Crust:
- 2 ½ cups (250g) Old-Fashioned Rolled Oats: These are the star of the crust, providing a wonderful chewy texture and nutty flavor. Do not use instant or steel-cut oats, as their textures will not work for this base.
- 1 cup (220g) Packed Light Brown Sugar: This adds sweetness and a subtle molasses flavor that complements the oats and caramel perfectly. Packing it ensures you get the right amount of moisture.
- 1 cup (226g or 2 sticks) Unsalted Butter, melted: Melted butter is the binder that holds the entire crust together, creating a rich, firm, and buttery foundation for the layers above. Using unsalted butter allows you to control the overall saltiness of the dish.
For the Silky Salted Caramel Filling:
- 1 cup (226g or 2 sticks) Unsalted Butter, cut into pieces: Using butter in the caramel provides richness and a smooth, creamy mouthfeel that is simply irresistible.
- 1 cup (220g) Packed Light Brown Sugar: This is the base of our caramel’s flavor, melting down into a sweet, amber-colored liquid.
- ½ cup (120ml) Light Corn Syrup: This is a crucial ingredient! Corn syrup acts as an “interfering agent,” preventing the sugar from crystallizing and ensuring your caramel is perfectly smooth and gooey, not grainy.
- 1 (14-ounce or 396g) can Sweetened Condensed Milk: This adds dairy richness, sweetness, and helps create that classic, soft, chewy caramel texture. Do not substitute with evaporated milk.
- 1 teaspoon Pure Vanilla Extract: A splash of vanilla at the end enhances all the other flavors and adds a beautiful aromatic quality to the caramel.
- 1 teaspoon Fine Sea Salt: This salt is mixed into the caramel to balance the sweetness from within. Fine sea salt dissolves easily and distributes evenly.
For the Rich Chocolate Topping:
- 2 cups (340g) High-Quality Semi-Sweet Chocolate Chips: The quality of your chocolate makes a huge difference. A good semi-sweet chocolate provides a rich flavor that beautifully contrasts the sweet caramel.
- 1 tablespoon Coconut Oil or Vegetable Shortening: This is an optional but highly recommended addition. It helps the chocolate melt smoothly and gives the finished topping a lovely sheen and a slightly softer bite, making the bars easier to cut.
- 1 to 2 teaspoons Flaky Sea Salt (like Maldon): This is for sprinkling on top and is non-negotiable for a true salted caramel experience. The large, flaky crystals provide a delightful crunch and a burst of clean, briny flavor that elevates the entire dessert.
Instructions
Follow these detailed steps carefully to ensure your No-Bake Salted Caramel Bars turn out perfectly every single time. The process is straightforward, but precision, especially with the caramel, is key.
Step 1: Prepare the Pan and the Crust
- First, prepare your baking pan. Take a 9×13 inch baking pan and line it with parchment paper, leaving a 2-inch overhang on the two long sides. This overhang will act as “handles,” making it incredibly easy to lift the entire slab of bars out of the pan for cutting later. Lightly grease the parchment paper and any exposed parts of the pan with butter or non-stick spray to guarantee nothing sticks.
- If you’re starting with whole rolled oats, place them in a food processor or a high-powered blender. Pulse them 10-15 times until they are coarsely ground. You’re not looking for a fine flour; you want some texture to remain, with some larger pieces of oats still visible. This texture is what gives the crust its signature chewiness. If you don’t have a food processor, you can use the oats whole for a chewier, more rustic crust.
- In a large mixing bowl, combine the ground oats and the packed light brown sugar. Whisk them together to ensure the sugar is evenly distributed.
- Pour the melted unsalted butter over the oat and sugar mixture. Using a spatula or a wooden spoon, stir everything together until the mixture is thoroughly moistened and resembles wet sand. Every oat flake should be coated in butter.
- Transfer this mixture to your prepared 9×13 inch pan. Dump it into the center and use your spatula to spread it out into an even layer. Then, using the bottom of a flat measuring cup or the palm of your hand, press the mixture down firmly and evenly across the entire bottom of the pan. This is a crucial step – a firmly packed crust will be a stable base that won’t crumble when you cut the bars.
- Place the pan with the crust into the refrigerator to chill and set while you prepare the caramel filling. Chilling for at least 15-20 minutes is ideal.
Step 2: Cook the Salted Caramel
- In a medium to large heavy-bottomed saucepan (a heavy bottom is important to prevent scorching), combine the 1 cup of unsalted butter pieces, 1 cup of packed light brown sugar, light corn syrup, and the can of sweetened condensed milk.
- Place the saucepan over medium heat. Stir the mixture constantly with a heat-resistant spatula or wooden spoon, making sure to scrape the bottom and corners of the pan to prevent the sugar from sticking and burning.
- Continue stirring as the butter melts and the sugar dissolves. The mixture will begin to bubble. Once it reaches a steady, rolling boil, you need to be precise. Reduce the heat slightly to medium-low to maintain a constant, but not violent, boil.
- Boil the mixture, stirring continuously, for 5 to 7 minutes. This is the most critical part of the recipe. Boiling develops the color and, more importantly, cooks the sugar to the “soft ball” stage, which ensures the caramel will set properly once cooled. If you have a candy thermometer, you’re looking for a temperature between 235°F and 240°F (112°C to 115°C). If you don’t have a thermometer, watch the color and consistency. The caramel should thicken noticeably and turn a deep, beautiful amber color.
- Once the caramel has boiled for the correct amount of time or reached the target temperature, immediately remove it from the heat.
- Carefully stir in the pure vanilla extract and the 1 teaspoon of fine sea salt. Be cautious, as the mixture may bubble up when you add the vanilla. Stir until the salt is fully dissolved and everything is well combined.
Step 3: Assemble and Chill
- Remove the pan with the chilled crust from the refrigerator. Immediately and carefully pour the hot caramel mixture over the crust.
- Use an offset spatula or the back of a spoon to quickly spread the caramel into a smooth, even layer, making sure it reaches all the corners.
- Place the pan back into the refrigerator and let it chill uncovered for at least 45 minutes to an hour. The caramel needs to be cool to the touch and partially set before you add the chocolate layer. If the caramel is too warm, the chocolate will not layer properly.
Step 4: Add the Chocolate Topping and Final Chill
- Once the caramel layer is cool and firm, prepare the chocolate topping. Place the semi-sweet chocolate chips and the optional tablespoon of coconut oil or shortening into a microwave-safe bowl.
- Microwave in 30-second intervals, stirring well after each interval, until the chocolate is almost completely melted. Then, just stir until the residual heat melts the remaining chips and the mixture is perfectly smooth and glossy. This gentle heating method prevents the chocolate from seizing or burning. Alternatively, you can melt the chocolate in a double boiler over simmering water.
- Pour the melted chocolate over the set caramel layer. Again, use your offset spatula to spread it into a thin, even layer that covers the entire surface.
- Immediately, while the chocolate is still wet, sprinkle the top generously with the flaky sea salt. Don’t be shy! This final salty crunch is what makes these bars so addictive.
- Return the pan to the refrigerator one last time. Let it chill for at least 2 hours, or until the chocolate is completely firm and the entire bar is set. For best results and the cleanest cuts, chilling for 4 hours or even overnight is recommended.
Step 5: Cut and Serve
- Once fully chilled and set, remove the pan from the refrigerator. Let it sit at room temperature for 10-15 minutes. This slightly softens the chocolate, preventing it from cracking and shattering when you cut into it.
- Grasp the parchment paper “handles” and carefully lift the entire slab of bars out of the pan and onto a cutting board.
- Use a large, sharp chef’s knife to cut the bars. For the cleanest cuts, run the knife under hot water and wipe it dry between each cut. This will melt the chocolate just enough to slice through it cleanly. You can cut them into 24 medium squares or 36 smaller, bite-sized bars.
Nutrition Facts
This is an approximation. Actual values may vary based on specific ingredients used.
- Servings: 24-36 bars
- Calories per serving (approx. for 24 bars): 350-400 kcal. These are a decadent, energy-rich treat, perfect for a special occasion or an indulgent snack. The calories primarily come from the butter, sugar, and chocolate.
- Carbohydrates: The primary source of carbohydrates is the brown sugar, sweetened condensed milk, and oats, providing quick energy.
- Fat: High in fat due to the significant amount of butter and chocolate, contributing to the rich flavor and satisfying texture.
- Sugar: These bars are high in sugar, which is responsible for their sweet, candy-like quality. The salt helps to balance this sweetness beautifully.
- Sodium: The addition of both fine and flaky sea salt contributes to the sodium content, which is essential for enhancing and balancing the overall flavor profile.
Preparation Time
The beauty of this recipe lies in its simplicity and reliance on chilling rather than baking.
- Active Preparation Time: Approximately 20-25 minutes. This includes preparing the crust, cooking the caramel, and assembling the layers.
- Chilling Time: Approximately 3-4 hours minimum. This is the most time-consuming part, but it’s completely hands-off. Proper chilling is absolutely essential for the bars to set up correctly and achieve the perfect texture for slicing.
How to Serve
These bars are spectacular on their own, but they can be dressed up for any occasion. Here are some serving ideas:
- For a Simple Afternoon Treat:
- Serve a single square with a tall glass of cold milk.
- Pair with a hot cup of black coffee or a latte to cut through the richness.
- Enjoy with a simple cup of black or herbal tea.
- For an Elegant Dessert Presentation:
- Place a bar on a dessert plate and add a small scoop of high-quality vanilla bean or coffee ice cream on the side.
- Drizzle the plate with a little extra caramel or chocolate sauce for a restaurant-style look.
- Garnish with a dollop of unsweetened whipped cream to provide a light, airy contrast.
- Sprinkle with a few toasted chopped pecans or almonds for added crunch and nutty flavor.
- For Parties and Potlucks:
- Cut the bars into smaller, bite-sized squares (1×1 inch) and arrange them on a large platter.
- Insert decorative toothpicks into each small square for easy, mess-free grabbing.
- Include them as part of a larger dessert board, alongside fresh berries, cookies, and other sweet treats to offer a variety of choices.
Additional Tips
To ensure your success, here are eight additional tips to perfect your No-Bake Salted Caramel Bars:
- Embrace the Overhang: Do not skip lining the pan with parchment paper and leaving an overhang. It is the single best trick for removing the bars cleanly and avoiding a mess. It makes cutting and serving a thousand times easier.
- Trust the Thermometer: While you can make the caramel by eye, a candy thermometer removes all guesswork. Cooking the caramel to the precise temperature range of 235-240°F (112-115°C) is the most foolproof way to guarantee it sets up to be perfectly chewy and not runny.
- Don’t Substitute the Sweetened Condensed Milk: Sweetened condensed milk is a very specific ingredient. Do not try to substitute it with evaporated milk, regular milk, or cream. The sugar and milk solids concentration is what gives the caramel its unique, soft, and chewy texture.
- The Two-Salt Method: Using two different types of salt is a professional pastry trick. The fine sea salt dissolves into the caramel to season it from within, while the flaky sea salt on top provides a distinct textural crunch and a final burst of flavor. Don’t just use table salt for both.
- Patience is a Virtue (Especially for Chilling): Be patient with the chilling times. Trying to rush the process will result in a messy, gooey bar that doesn’t hold its shape. Chilling the crust, then the caramel layer, and then the final assembled bar is essential. Chilling overnight is even better if you have the time.
- Hot Knife for Clean Cuts: The hot knife trick is a game-changer. Simply run a large, sharp knife under hot tap water for about 15 seconds, wipe it completely dry with a towel, and make a slice. Repeat for every single cut. This will give you perfectly clean, professional-looking squares.
- Ingredient Temperature Matters: For the caramel, starting with room temperature or slightly softened butter (cut into pieces) can help the mixture come together more smoothly than using rock-hard butter straight from the fridge.
- Storage is Key: Store these bars in an airtight container in the refrigerator for up to one week. The layers will stay distinct and the texture will remain perfect. They can also be frozen for up to 3 months. To freeze, place the cut bars on a baking sheet in a single layer and freeze until solid, then transfer to a freezer-safe bag or container. Thaw in the refrigerator before serving.
FAQ Section
Here are answers to some frequently asked questions about this recipe.
1. My caramel layer is runny and didn’t set. What went wrong?
This is the most common issue and it almost always comes down to the cooking time of the caramel. You likely did not boil the caramel long enough or it did not reach the correct temperature (235-240°F / 112-115°C). The mixture needs to boil at a steady rate for 5-7 minutes to cook out enough moisture and allow the sugar to reach the soft-ball stage, which is what makes it firm up when cooled.
2. Can I use quick-cooking oats instead of old-fashioned rolled oats?
It is not recommended. Quick-cooking oats are thinner and more processed. They will absorb the butter differently and can result in a crust that is mushy or pasty rather than pleasantly chewy and textured. For the best result, stick with old-fashioned rolled oats.
3. Can I make these bars gluten-free?
Yes, absolutely! This recipe is very easy to make gluten-free. Simply use certified gluten-free old-fashioned rolled oats. All other ingredients in the recipe are naturally gluten-free, but always double-check your labels for things like chocolate chips and vanilla to be sure.
4. Can I use dark chocolate or milk chocolate instead of semi-sweet?
Of course! The choice of chocolate is up to your personal preference. Semi-sweet is a great middle ground. Dark chocolate (60-72% cacao) will provide a more intense, less sweet contrast to the caramel, which many people love. Milk chocolate will result in a much sweeter, creamier topping, which is often a favorite with kids.
5. I don’t have light corn syrup. Is there a substitute?
Light corn syrup is highly recommended because its chemical structure is ideal for preventing sugar crystallization. However, in a pinch, you can try substituting it with golden syrup or a liquid glucose. Do not substitute with maple syrup or honey, as their flavors are very strong and they have a higher tendency to crystallize.
6. Can I add nuts or other mix-ins?
Yes! These bars are wonderfully versatile. You can add 1 cup of toasted, chopped pecans, walnuts, or almonds to the crust mixture for extra crunch and flavor. You could also sprinkle chopped nuts on top of the chocolate layer along with the sea salt.
7. How far in advance can I make these for an event?
These are the perfect make-ahead dessert. You can make them up to 3-4 days in advance. Prepare them completely and store them uncut, covered, in the refrigerator. Let them sit at room temperature for 15-20 minutes before cutting and serving. This actually allows the flavors to meld and deepen.
8. Why is my chocolate topping cracking when I cut it?
This happens when the chocolate is too cold and brittle. To prevent this, do two things: First, add the optional tablespoon of coconut oil or shortening when melting the chocolate; this keeps it slightly softer when it sets. Second, let the entire pan of bars sit out at room temperature for 15-20 minutes before you attempt to slice into it. This will warm the chocolate just enough to make it pliable.
No-Bake Salted Caramel Bars
Ingredients
Here is everything you will need to create these unbelievably delicious no-bake bars. Each component is simple, but together they create a symphony of flavor.
For the Buttery Oat Crust:
- 2 ½ cups (250g) Old-Fashioned Rolled Oats: These are the star of the crust, providing a wonderful chewy texture and nutty flavor. Do not use instant or steel-cut oats, as their textures will not work for this base.
- 1 cup (220g) Packed Light Brown Sugar: This adds sweetness and a subtle molasses flavor that complements the oats and caramel perfectly. Packing it ensures you get the right amount of moisture.
- 1 cup (226g or 2 sticks) Unsalted Butter, melted: Melted butter is the binder that holds the entire crust together, creating a rich, firm, and buttery foundation for the layers above. Using unsalted butter allows you to control the overall saltiness of the dish.
For the Silky Salted Caramel Filling:
- 1 cup (226g or 2 sticks) Unsalted Butter, cut into pieces: Using butter in the caramel provides richness and a smooth, creamy mouthfeel that is simply irresistible.
- 1 cup (220g) Packed Light Brown Sugar: This is the base of our caramel’s flavor, melting down into a sweet, amber-colored liquid.
- ½ cup (120ml) Light Corn Syrup: This is a crucial ingredient! Corn syrup acts as an “interfering agent,” preventing the sugar from crystallizing and ensuring your caramel is perfectly smooth and gooey, not grainy.
- 1 (14-ounce or 396g) can Sweetened Condensed Milk: This adds dairy richness, sweetness, and helps create that classic, soft, chewy caramel texture. Do not substitute with evaporated milk.
- 1 teaspoon Pure Vanilla Extract: A splash of vanilla at the end enhances all the other flavors and adds a beautiful aromatic quality to the caramel.
- 1 teaspoon Fine Sea Salt: This salt is mixed into the caramel to balance the sweetness from within. Fine sea salt dissolves easily and distributes evenly.
For the Rich Chocolate Topping:
- 2 cups (340g) High-Quality Semi-Sweet Chocolate Chips: The quality of your chocolate makes a huge difference. A good semi-sweet chocolate provides a rich flavor that beautifully contrasts the sweet caramel.
- 1 tablespoon Coconut Oil or Vegetable Shortening: This is an optional but highly recommended addition. It helps the chocolate melt smoothly and gives the finished topping a lovely sheen and a slightly softer bite, making the bars easier to cut.
- 1 to 2 teaspoons Flaky Sea Salt (like Maldon): This is for sprinkling on top and is non-negotiable for a true salted caramel experience. The large, flaky crystals provide a delightful crunch and a burst of clean, briny flavor that elevates the entire dessert.
Instructions
Follow these detailed steps carefully to ensure your No-Bake Salted Caramel Bars turn out perfectly every single time. The process is straightforward, but precision, especially with the caramel, is key.
Step 1: Prepare the Pan and the Crust
- First, prepare your baking pan. Take a 9×13 inch baking pan and line it with parchment paper, leaving a 2-inch overhang on the two long sides. This overhang will act as “handles,” making it incredibly easy to lift the entire slab of bars out of the pan for cutting later. Lightly grease the parchment paper and any exposed parts of the pan with butter or non-stick spray to guarantee nothing sticks.
- If you’re starting with whole rolled oats, place them in a food processor or a high-powered blender. Pulse them 10-15 times until they are coarsely ground. You’re not looking for a fine flour; you want some texture to remain, with some larger pieces of oats still visible. This texture is what gives the crust its signature chewiness. If you don’t have a food processor, you can use the oats whole for a chewier, more rustic crust.
- In a large mixing bowl, combine the ground oats and the packed light brown sugar. Whisk them together to ensure the sugar is evenly distributed.
- Pour the melted unsalted butter over the oat and sugar mixture. Using a spatula or a wooden spoon, stir everything together until the mixture is thoroughly moistened and resembles wet sand. Every oat flake should be coated in butter.
- Transfer this mixture to your prepared 9×13 inch pan. Dump it into the center and use your spatula to spread it out into an even layer. Then, using the bottom of a flat measuring cup or the palm of your hand, press the mixture down firmly and evenly across the entire bottom of the pan. This is a crucial step – a firmly packed crust will be a stable base that won’t crumble when you cut the bars.
- Place the pan with the crust into the refrigerator to chill and set while you prepare the caramel filling. Chilling for at least 15-20 minutes is ideal.
Step 2: Cook the Salted Caramel
- In a medium to large heavy-bottomed saucepan (a heavy bottom is important to prevent scorching), combine the 1 cup of unsalted butter pieces, 1 cup of packed light brown sugar, light corn syrup, and the can of sweetened condensed milk.
- Place the saucepan over medium heat. Stir the mixture constantly with a heat-resistant spatula or wooden spoon, making sure to scrape the bottom and corners of the pan to prevent the sugar from sticking and burning.
- Continue stirring as the butter melts and the sugar dissolves. The mixture will begin to bubble. Once it reaches a steady, rolling boil, you need to be precise. Reduce the heat slightly to medium-low to maintain a constant, but not violent, boil.
- Boil the mixture, stirring continuously, for 5 to 7 minutes. This is the most critical part of the recipe. Boiling develops the color and, more importantly, cooks the sugar to the “soft ball” stage, which ensures the caramel will set properly once cooled. If you have a candy thermometer, you’re looking for a temperature between 235°F and 240°F (112°C to 115°C). If you don’t have a thermometer, watch the color and consistency. The caramel should thicken noticeably and turn a deep, beautiful amber color.
- Once the caramel has boiled for the correct amount of time or reached the target temperature, immediately remove it from the heat.
- Carefully stir in the pure vanilla extract and the 1 teaspoon of fine sea salt. Be cautious, as the mixture may bubble up when you add the vanilla. Stir until the salt is fully dissolved and everything is well combined.
Step 3: Assemble and Chill
- Remove the pan with the chilled crust from the refrigerator. Immediately and carefully pour the hot caramel mixture over the crust.
- Use an offset spatula or the back of a spoon to quickly spread the caramel into a smooth, even layer, making sure it reaches all the corners.
- Place the pan back into the refrigerator and let it chill uncovered for at least 45 minutes to an hour. The caramel needs to be cool to the touch and partially set before you add the chocolate layer. If the caramel is too warm, the chocolate will not layer properly.
Step 4: Add the Chocolate Topping and Final Chill
- Once the caramel layer is cool and firm, prepare the chocolate topping. Place the semi-sweet chocolate chips and the optional tablespoon of coconut oil or shortening into a microwave-safe bowl.
- Microwave in 30-second intervals, stirring well after each interval, until the chocolate is almost completely melted. Then, just stir until the residual heat melts the remaining chips and the mixture is perfectly smooth and glossy. This gentle heating method prevents the chocolate from seizing or burning. Alternatively, you can melt the chocolate in a double boiler over simmering water.
- Pour the melted chocolate over the set caramel layer. Again, use your offset spatula to spread it into a thin, even layer that covers the entire surface.
- Immediately, while the chocolate is still wet, sprinkle the top generously with the flaky sea salt. Don’t be shy! This final salty crunch is what makes these bars so addictive.
- Return the pan to the refrigerator one last time. Let it chill for at least 2 hours, or until the chocolate is completely firm and the entire bar is set. For best results and the cleanest cuts, chilling for 4 hours or even overnight is recommended.
Step 5: Cut and Serve
- Once fully chilled and set, remove the pan from the refrigerator. Let it sit at room temperature for 10-15 minutes. This slightly softens the chocolate, preventing it from cracking and shattering when you cut into it.
- Grasp the parchment paper “handles” and carefully lift the entire slab of bars out of the pan and onto a cutting board.
- Use a large, sharp chef’s knife to cut the bars. For the cleanest cuts, run the knife under hot water and wipe it dry between each cut. This will melt the chocolate just enough to slice through it cleanly. You can cut them into 24 medium squares or 36 smaller, bite-sized bars.
Nutrition
- Serving Size: one normal portion
- Calories: 400