Ingredients
Here is the simple, yet powerful, lineup of ingredients you will need to create this incredibly flavorful dish. Each component plays a crucial role in building the signature sweet and savory profile.
- 1 ½ pounds large shrimp: Peeled and deveined, with tails on or off based on your preference. Using large shrimp (about 21–25 count per pound) ensures they stay plump and juicy without overcooking.
- 2 tablespoons olive oil or butter: This is the base for sautéing our aromatics and searing the shrimp, adding a rich flavor right from the start.
- 6 cloves garlic: Freshly minced. This is the heart of the dish, providing a pungent, aromatic flavor that is essential to the “garlic” in honey garlic shrimp.
- ⅓ cup honey: The star sweetener that provides the signature sticky glaze and caramelizes beautifully in the pan.
- ¼ cup low-sodium soy sauce: This provides the salty, umami backbone of the sauce, perfectly balancing the sweetness of the honey. Using low-sodium gives you more control over the final saltiness.
- 1 tablespoon fresh ginger: Grated or finely minced. Ginger adds a warm, zesty spice that cuts through the richness and adds a wonderful layer of complexity.
- 1 teaspoon sriracha or a pinch of red pepper flakes (optional): For those who enjoy a little kick of heat to contrast the sweetness. Adjust the amount to your personal spice preference.
- 1 tablespoon cornstarch mixed with 2 tablespoons water (cornstarch slurry): This is the secret to a perfectly thick, glossy sauce that clings beautifully to every piece of shrimp.
- Chopped fresh parsley or thinly sliced green onions: For garnish. This adds a pop of fresh, vibrant color and a mild, herby flavor that brightens up the finished dish.
- Toasted sesame seeds (optional garnish): Adds a nutty flavor and a delightful textural crunch.
Instructions
Follow these step-by-step instructions to achieve perfectly cooked, gloriously glazed honey garlic shrimp every time. The process is quick, so it’s best to have all your ingredients prepped and ready to go before you begin cooking.
Step 1: Prepare the Honey Garlic Sauce
In a small to medium-sized bowl, combine the honey, low-sodium soy sauce, minced garlic, and grated ginger. If you’re using sriracha or red pepper flakes for a bit of heat, add them in now. Whisk everything together until the honey is fully dissolved and all the ingredients are well incorporated. This homogenous mixture ensures that the flavor is evenly distributed when you add it to the pan. Set this sauce mixture aside for now.
Step 2: Prepare the Shrimp
Thoroughly pat the peeled and deveined shrimp dry with paper towels. This is a critical step that should not be skipped! Removing excess moisture from the surface of the shrimp is the key to getting a beautiful, golden-brown sear instead of just steaming them in the pan. A good sear develops a deeper, more complex flavor. You can season the shrimp lightly with a pinch of salt and black pepper if desired, but remember the sauce will be very flavorful.
Step 3: Sear the Shrimp
Place a large skillet or non-stick pan over medium-high heat. Once the pan is hot, add the olive oil or butter. When the oil shimmers or the butter is melted and foamy, carefully add the shrimp to the pan in a single layer. Be careful not to overcrowd the pan; cook in two batches if necessary. Crowding the pan will lower the temperature and cause the shrimp to steam instead of sear. Cook the shrimp for about 1-2 minutes per side, just until they turn pink and opaque and develop a light golden color. They do not need to be cooked all the way through at this stage, as they will finish cooking in the sauce.
Step 4: Combine and Simmer
Reduce the heat to medium-low. Pour the prepared honey garlic sauce mixture over the shrimp in the skillet. Stir gently to coat all the shrimp evenly. Bring the sauce to a gentle simmer, allowing the flavors to meld together and the garlic to become fragrant and cooked through. Let it simmer for about 1-2 minutes. The shrimp will finish cooking in the simmering sauce, absorbing all of that wonderful flavor.
Step 5: Thicken the Sauce
While the sauce is simmering, give your cornstarch slurry (the mixture of cornstarch and water) a quick re-whisk to ensure it’s smooth. Pour the slurry into the pan while stirring continuously. Continue to stir and cook for another 30-60 seconds. You will see the sauce transform almost instantly, thickening into a beautiful, glossy glaze that coats the back of a spoon and clings perfectly to each piece of shrimp.
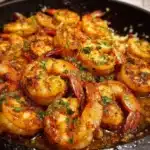
Step 6: Garnish and Serve
Once the sauce has thickened to your liking, immediately remove the pan from the heat to prevent the shrimp from overcooking. Sprinkle generously with your chosen garnishes—freshly chopped parsley, thinly sliced green onions, and toasted sesame seeds all work wonderfully. Serve immediately while hot for the best taste and texture.
Nutrition
- Serving Size: one normal portion
- Calories: 420