")


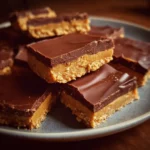
Of all the recipes that have become staples in my household, this one for Peanut Butter Chocolate No-Bake Bars holds a particularly special place. I remember the first time I made them. It was a chaotic Tuesday afternoon, with school projects strewn across the table and the general hum of a busy family life filling the air. I had promised to bring a dessert to a neighborhood potluck that evening and had completely forgotten until the last minute. Panic started to set in. I needed something fast, something that didn’t require turning on the oven, and something that was a guaranteed crowd-pleaser. I stumbled upon a version of this recipe, and it felt like a lifeline. In less than 20 minutes of active time, I had a pan of these glorious bars chilling in the fridge. That evening, they were the first dessert to disappear. People I’d never met were coming up to ask for the recipe, their eyes wide with that “this is the best thing I’ve ever eaten” look. My own kids, notorious for their picky eating habits, devoured them without a second thought. Since that day, these bars have become our go-to for everything: birthday parties, movie nights, after-school snacks, and even simple care packages for friends. They are the perfect symphony of salty, creamy peanut butter and rich, decadent chocolate, all held together by a buttery, crumbly base. They taste like nostalgia and pure comfort, a testament to the fact that the most beloved treats are often the simplest to create. This recipe isn’t just about dessert; it’s about creating moments of joy, effortlessly.
Ingredients
Here is the simple, yet perfect, cast of characters you’ll need to create these irresistible no-bake bars. Each ingredient plays a crucial role in achieving the classic texture and flavor that makes this recipe a timeless favorite.
- 1 cup Unsalted Butter, melted: This is the foundation of the peanut butter layer, providing richness and helping the bars set firmly. Using melted butter ensures it combines smoothly with the other ingredients.
- 2 cups Powdered Sugar: Also known as confectioners’ sugar, this ingredient sweetens the base and dissolves completely, creating a creamy, melt-in-your-mouth texture without any grittiness.
- 1 ½ cups Creamy Peanut Butter, divided: The star of the show! Use a standard commercial brand like Jif or Skippy for the best results, as natural peanut butters can be too oily and cause separation. We’ll use most of it in the base and a little in the topping for a softer chocolate layer.
- 2 cups Graham Cracker Crumbs: This provides structure and a subtle, toasty flavor to the base. You can buy pre-made crumbs or make your own by crushing about 14-15 full graham cracker sheets in a food processor or a zip-top bag with a rolling pin.
- 1 ½ cups Semi-Sweet Chocolate Chips: The perfect counterpart to the sweet peanut butter filling. Semi-sweet chocolate provides a deep, rich flavor that isn’t overly sweet, creating a beautifully balanced dessert.
- 1 teaspoon Pure Vanilla Extract: A small amount of vanilla enhances and rounds out all the other flavors in the peanut butter base, making it taste richer and more complex.
Instructions
Follow these detailed, step-by-step instructions to ensure your Peanut Butter Chocolate No-Bake Bars come out perfectly every single time. We’ll guide you through creating a flawless base, a glossy chocolate topping, and achieving that perfect cut.
Step 1: Prepare Your Pan
First, prepare a 9×13 inch baking pan. To make removing the bars incredibly easy later, create a parchment paper “sling.” Cut a piece of parchment paper to fit the bottom and hang over the two long sides of the pan. Lightly grease the pan or spray it with non-stick spray first to help the parchment paper adhere and stay in place. This simple step will save you a lot of hassle when it’s time to slice and serve.
Step 2: Create the Peanut Butter Base
In a large mixing bowl, combine the melted butter, powdered sugar, and 1 ¼ cups of the creamy peanut butter (reserving the remaining ¼ cup for the topping). Add the pure vanilla extract. Using a wooden spoon or an electric mixer on low speed, mix these ingredients together until they are well-combined and smooth. The mixture will be thick. Now, add the graham cracker crumbs to the bowl. Continue to mix until the crumbs are evenly incorporated. The final texture should resemble a thick, slightly crumbly, sandy dough. Be careful not to overmix, as you just want everything to come together.
Step 3: Press the Base into the Pan
Transfer the entire peanut butter mixture into your prepared 9×13 inch pan. Using a spatula or the back of a large spoon, spread the mixture evenly across the bottom of the pan. The key to a good bar is a firm, compact base. To achieve this, press down firmly and evenly across the entire surface. You can use your clean hands, the bottom of a flat measuring cup, or another smaller pan to press it down tightly. Ensure the layer is level and has consistent thickness from the center to the edges.
Step 4: Make the Chocolate Topping
Now it’s time for that luscious chocolate layer. In a medium, microwave-safe bowl, combine the semi-sweet chocolate chips and the remaining ¼ cup of creamy peanut butter. The addition of peanut butter not only enhances the flavor but also helps the chocolate topping stay slightly soft when chilled, preventing it from cracking when you cut the bars. Microwave the mixture in 30-second intervals, stirring well after each interval. It’s crucial to do this in short bursts to prevent the chocolate from seizing or burning. Continue until the chocolate is almost completely melted, with just a few small lumps remaining. Remove it from the microwave and stir continuously until the residual heat melts the remaining lumps and the mixture is completely smooth and glossy.
Step 5: Spread the Chocolate Topping
Pour the melted chocolate and peanut butter mixture over the prepared peanut butter base in the pan. Working quickly before the chocolate begins to set, use an offset spatula or the back of a spoon to spread it into a smooth, even layer that covers the entire base from edge to edge. You can gently tap the pan on the counter a few times to help the chocolate settle and eliminate any air bubbles, creating a flawless, professional-looking surface.
Step 6: Chill to Perfection
Place the pan, uncovered, into the refrigerator. Let the bars chill for at least 2 to 4 hours, or until both the chocolate topping and the peanut butter base are completely firm. This chilling time is essential for the bars to set properly so they can be cut cleanly. If you’re in a hurry, you can place the pan in the freezer for about 1 hour, but be mindful that the texture may be slightly harder initially.
Step 7: Slice and Serve
Once the bars are fully chilled and firm, it’s time to cut them. Use the parchment paper sling to lift the entire slab out of the pan and onto a cutting board. For the cleanest cuts, use a large, sharp knife. Run the knife under hot water and wipe it dry between each cut. This will warm the blade just enough to slice through the firm chocolate without cracking it. You can cut them into 24 squares for a classic serving size or smaller, bite-sized pieces for a larger crowd.
Nutrition Facts
Please note that these values are an approximation and can vary based on the specific brands of ingredients used.
- Servings: 24 squares
- Calories per serving: Approximately 250 kcal. A rich and satisfying treat that packs a delicious punch in a small square.
- Fat: Approximately 16g. Primarily from the butter, peanut butter, and chocolate, this fat content is what gives the bars their decadent, melt-in-your-mouth quality.
- Carbohydrates: Approximately 24g. Sourced from the powdered sugar and graham crackers, providing the sweetness and structure of the bars.
- Sugar: Approximately 19g. This dessert is an indulgence, with the sugar contributing to its classic, sweet candy-bar flavor profile.
- Protein: Approximately 4g. A modest amount of protein, mainly from the peanut butter, makes it a slightly more substantial treat.
Preparation Time
This recipe is celebrated for its speed and simplicity, making it perfect for last-minute dessert needs.
- Active Preparation Time: 15-20 minutes. This includes gathering ingredients, mixing the base, pressing it into the pan, and melting the chocolate topping.
- Inactive Chilling Time: 2-4 hours. This hands-off time is crucial for the bars to set properly in the refrigerator before they can be sliced and enjoyed.
How to Serve
These Peanut Butter Chocolate No-Bake Bars are wonderfully versatile. While they are perfect on their own, here are a few ways to elevate their presentation and enjoyment:
- The Classic Cut: Serve them chilled, cut into clean, sharp squares. They are a perfect standalone treat with a glass of cold milk or a hot cup of coffee.
- A La Mode: For an extra-decadent dessert, serve a slightly-chilled square with a scoop of high-quality vanilla bean or coffee-flavored ice cream. The contrast between the cold, creamy ice cream and the rich, dense bar is heavenly.
- With a Drizzle: Before the chocolate topping has fully set, you can add an artistic drizzle for extra flair.
- Melted white chocolate for a beautiful visual contrast.
- Warm caramel sauce for a gooey, sweet addition.
- Extra melted peanut butter for an intense flavor boost.
- Finishing Touches: Just after spreading the chocolate topping, sprinkle on some toppings for added texture and flavor.
- A pinch of flaky sea salt (like Maldon) to enhance the sweet and salty dynamic.
- Chopped peanuts or other nuts for a satisfying crunch.
- Festive sprinkles to match a holiday or party theme.
- Mini chocolate chips or Reese’s Pieces for the ultimate chocolate-peanut butter experience.
- On a Dessert Platter: Cut the bars into smaller, bite-sized pieces (1-inch squares) and arrange them on a platter with other small treats like cookies, fruit, and brownie bites for a beautiful and varied dessert spread at parties.
- As a Thoughtful Gift: These bars travel well. Stack them in a decorative tin or box, separated by small squares of parchment paper, to give as a delicious homemade gift for holidays, birthdays, or as a thank-you gesture.
Additional Tips
Here are eight expert tips to help you master this recipe and customize it to your liking, ensuring perfect results every time.
- The Parchment Paper Sling is Non-Negotiable: It might seem like a small step, but lining the pan with a parchment paper sling that hangs over the sides is the secret to getting the bars out of the pan easily and achieving perfectly clean-cut edges. Don’t skip it!
- Peanut Butter Choice is Crucial: For the best texture, stick to a processed, stabilized creamy peanut butter like Jif, Skippy, or a similar store brand. Natural peanut butters, where the oil separates, can make the base greasy and prevent the bars from setting up as firmly.
- Sift Your Powdered Sugar: If your powdered sugar is clumpy, give it a quick sift before adding it to the bowl. This guarantees an ultra-smooth, creamy peanut butter layer with absolutely no lumps, resulting in a superior melt-in-your-mouth texture.
- The Secret to an Even Layer: To avoid a lumpy, uneven base, use the flat bottom of a drinking glass or measuring cup to firmly press the mixture into the pan. This compacts the base tightly, which is essential for holding the bars together when sliced.
- Achieve a Glossy, Crack-Free Topping: Adding a small amount of peanut butter or a teaspoon of a neutral oil (like coconut or vegetable oil) to your chocolate chips before melting does two things: it helps the chocolate melt more smoothly and it keeps the topping slightly soft when chilled, which is the key to preventing it from cracking when you slice the bars.
- Embrace the Salty-Sweet Dynamic: The combination of sweet and salty is what makes this dessert so addictive. Don’t be afraid to use salted butter if that’s what you have. Furthermore, a very light sprinkle of flaky sea salt over the top of the melted chocolate before it sets will elevate the flavor profile from great to unforgettable.
- The Hot Knife Trick for Clean Slices: For bakery-level clean cuts, fill a tall glass with hot water. Dip a large, sharp knife into the water for a few seconds, wipe it completely dry with a paper towel, and then make a slice. Repeat this process for every single cut. The gentle heat from the blade melts through the chocolate cleanly instead of cracking it.
- Proper Storage is Key: These bars must be stored in the refrigerator to maintain their shape and freshness. Keep them in an airtight container for up to one week. For longer storage, they freeze exceptionally well. See the FAQ below for detailed freezing instructions.
Frequently Asked Questions (FAQ)
Here are answers to some of the most common questions about making these Peanut Butter Chocolate No-Bake Bars.
1. Can I use crunchy peanut butter instead of creamy?
Absolutely! Using crunchy peanut butter is a fantastic way to add extra texture and a nutty bite to the bars. Simply substitute it one-for-one for the creamy peanut butter in the base layer. The bars will have a delightful crunch throughout. Just be sure to still use a processed, no-stir variety.
2. Why are my bars too crumbly and not holding their shape?
This is usually due to one of three reasons. First, you may not have used enough melted butter, which acts as the primary binder. Double-check your measurements. Second, the base may not have been pressed firmly enough into the pan. It’s crucial to compact the layer tightly so it solidifies properly. Third, you may have used a natural-style peanut butter, which can be too oily and not bind as well.
3. Can I make these bars gluten-free?
Yes, it’s very easy to make this recipe gluten-free. The only ingredient containing gluten is the graham cracker crumbs. Simply substitute them with an equal amount of gluten-free graham cracker crumbs, which are available in most major supermarkets. Alternatively, you could use crushed gluten-free pretzels or even almond flour for a different flavor profile.
4. How long do these no-bake bars last in the refrigerator?
When stored properly in an airtight container, these bars will stay fresh and delicious in the refrigerator for up to one week. Storing them in the fridge is essential to ensure they remain firm and don’t become too soft at room temperature.
5. Can I freeze these peanut butter bars for later?
Yes, these bars freeze beautifully! To freeze, first let them set completely in the refrigerator and slice them into squares. You can then either place them in a single layer in a freezer-safe container, separated by sheets of parchment paper, or wrap each bar individually in plastic wrap and then place them in a freezer-safe bag. They will keep well in the freezer for up to 3 months. To serve, simply thaw them in the refrigerator for a few hours.
6. My chocolate layer always cracks when I cut it. How can I prevent this?
This is a common issue! The best way to prevent the chocolate from cracking is to add a fat to it, as described in the recipe (¼ cup of peanut butter). This keeps it from becoming completely brittle when cold. Another trick is to let the bars sit at room temperature for 10-15 minutes before slicing. This slightly softens the chocolate, making it easier to cut. Finally, use the hot knife trick mentioned in the tips section for guaranteed clean cuts.
7. Can I use a different type of chocolate for the topping?
Of course! While semi-sweet chocolate offers a classic, balanced flavor, feel free to experiment. Milk chocolate will result in a sweeter, creamier topping, reminiscent of a Reese’s cup. Dark chocolate (60-72% cacao) will provide a more intense, less sweet, and more sophisticated flavor. You could even use white chocolate for a beautiful and unique variation.
8. What can I use as a substitute for graham cracker crumbs?
If you don’t have graham crackers, you have several delicious options. You can crush shortbread cookies, vanilla wafers (like Nilla Wafers), or Biscoff cookies for a different flavor. For a salty-sweet twist, try using crushed pretzels or even potato chips. You can also use quick-cooking oats, though this will result in a chewier, more oatmeal-bar-like texture.
Peanut Butter Chocolate No-Bake Bars
Ingredients
Here is the simple, yet perfect, cast of characters you’ll need to create these irresistible no-bake bars. Each ingredient plays a crucial role in achieving the classic texture and flavor that makes this recipe a timeless favorite.
- 1 cup Unsalted Butter, melted: This is the foundation of the peanut butter layer, providing richness and helping the bars set firmly. Using melted butter ensures it combines smoothly with the other ingredients.
- 2 cups Powdered Sugar: Also known as confectioners’ sugar, this ingredient sweetens the base and dissolves completely, creating a creamy, melt-in-your-mouth texture without any grittiness.
- 1 ½ cups Creamy Peanut Butter, divided: The star of the show! Use a standard commercial brand like Jif or Skippy for the best results, as natural peanut butters can be too oily and cause separation. We’ll use most of it in the base and a little in the topping for a softer chocolate layer.
- 2 cups Graham Cracker Crumbs: This provides structure and a subtle, toasty flavor to the base. You can buy pre-made crumbs or make your own by crushing about 14–15 full graham cracker sheets in a food processor or a zip-top bag with a rolling pin.
- 1 ½ cups Semi-Sweet Chocolate Chips: The perfect counterpart to the sweet peanut butter filling. Semi-sweet chocolate provides a deep, rich flavor that isn’t overly sweet, creating a beautifully balanced dessert.
- 1 teaspoon Pure Vanilla Extract: A small amount of vanilla enhances and rounds out all the other flavors in the peanut butter base, making it taste richer and more complex.
Instructions
Follow these detailed, step-by-step instructions to ensure your Peanut Butter Chocolate No-Bake Bars come out perfectly every single time. We’ll guide you through creating a flawless base, a glossy chocolate topping, and achieving that perfect cut.
Step 1: Prepare Your Pan
First, prepare a 9×13 inch baking pan. To make removing the bars incredibly easy later, create a parchment paper “sling.” Cut a piece of parchment paper to fit the bottom and hang over the two long sides of the pan. Lightly grease the pan or spray it with non-stick spray first to help the parchment paper adhere and stay in place. This simple step will save you a lot of hassle when it’s time to slice and serve.
Step 2: Create the Peanut Butter Base
In a large mixing bowl, combine the melted butter, powdered sugar, and 1 ¼ cups of the creamy peanut butter (reserving the remaining ¼ cup for the topping). Add the pure vanilla extract. Using a wooden spoon or an electric mixer on low speed, mix these ingredients together until they are well-combined and smooth. The mixture will be thick. Now, add the graham cracker crumbs to the bowl. Continue to mix until the crumbs are evenly incorporated. The final texture should resemble a thick, slightly crumbly, sandy dough. Be careful not to overmix, as you just want everything to come together.
Step 3: Press the Base into the Pan
Transfer the entire peanut butter mixture into your prepared 9×13 inch pan. Using a spatula or the back of a large spoon, spread the mixture evenly across the bottom of the pan. The key to a good bar is a firm, compact base. To achieve this, press down firmly and evenly across the entire surface. You can use your clean hands, the bottom of a flat measuring cup, or another smaller pan to press it down tightly. Ensure the layer is level and has consistent thickness from the center to the edges.
Step 4: Make the Chocolate Topping
Now it’s time for that luscious chocolate layer. In a medium, microwave-safe bowl, combine the semi-sweet chocolate chips and the remaining ¼ cup of creamy peanut butter. The addition of peanut butter not only enhances the flavor but also helps the chocolate topping stay slightly soft when chilled, preventing it from cracking when you cut the bars. Microwave the mixture in 30-second intervals, stirring well after each interval. It’s crucial to do this in short bursts to prevent the chocolate from seizing or burning. Continue until the chocolate is almost completely melted, with just a few small lumps remaining. Remove it from the microwave and stir continuously until the residual heat melts the remaining lumps and the mixture is completely smooth and glossy.
Step 5: Spread the Chocolate Topping
Pour the melted chocolate and peanut butter mixture over the prepared peanut butter base in the pan. Working quickly before the chocolate begins to set, use an offset spatula or the back of a spoon to spread it into a smooth, even layer that covers the entire base from edge to edge. You can gently tap the pan on the counter a few times to help the chocolate settle and eliminate any air bubbles, creating a flawless, professional-looking surface.
Step 6: Chill to Perfection
Place the pan, uncovered, into the refrigerator. Let the bars chill for at least 2 to 4 hours, or until both the chocolate topping and the peanut butter base are completely firm. This chilling time is essential for the bars to set properly so they can be cut cleanly. If you’re in a hurry, you can place the pan in the freezer for about 1 hour, but be mindful that the texture may be slightly harder initially.
Step 7: Slice and Serve
Once the bars are fully chilled and firm, it’s time to cut them. Use the parchment paper sling to lift the entire slab out of the pan and onto a cutting board. For the cleanest cuts, use a large, sharp knife. Run the knife under hot water and wipe it dry between each cut. This will warm the blade just enough to slice through the firm chocolate without cracking it. You can cut them into 24 squares for a classic serving size or smaller, bite-sized pieces for a larger crowd.
Nutrition
- Serving Size: one normal portion
- Calories: 250
- Sugar: 19g
- Fat: 16g
- Carbohydrates: 24g
- Protein: 4g