")

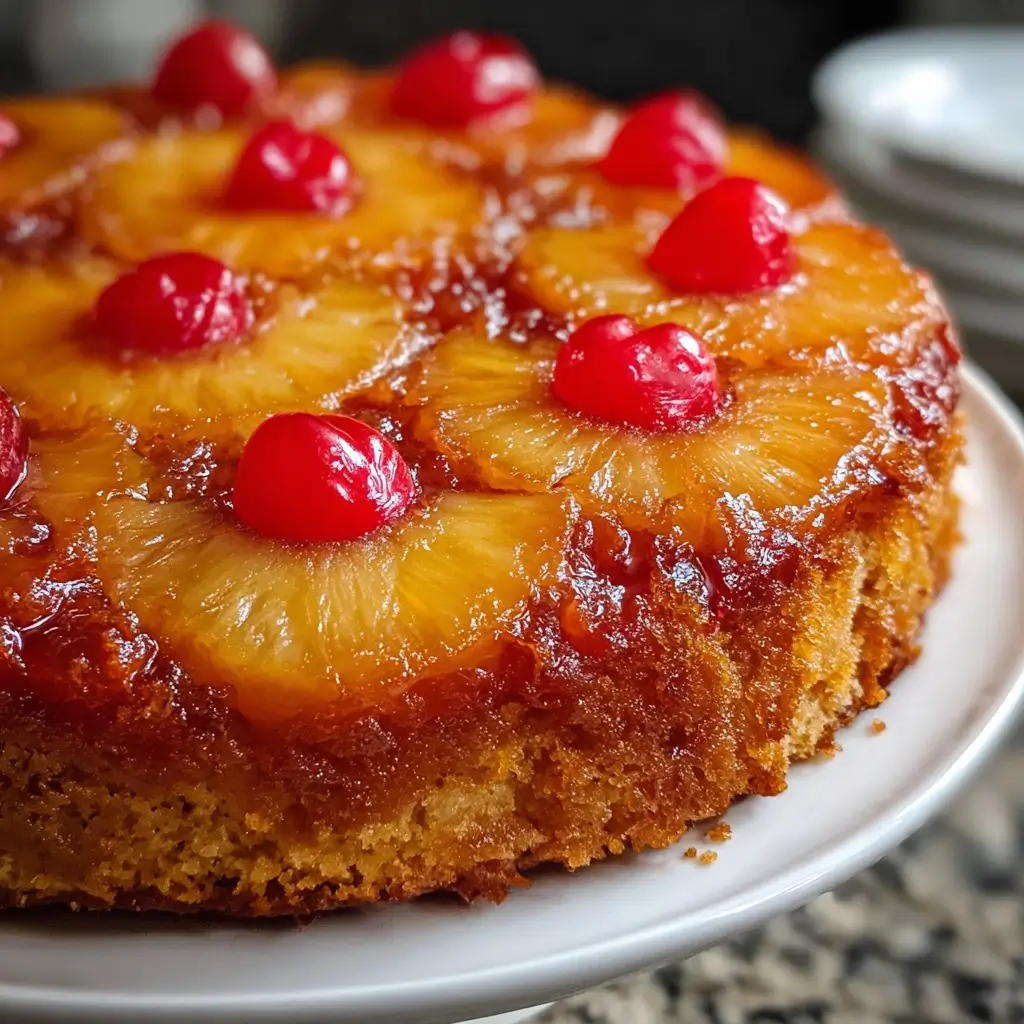

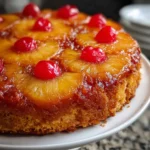
Of all the desserts that evoke a sense of pure, unadulterated nostalgia, the Pineapple Upside Down Cake holds a special place in my heart and my family’s kitchen. I can still vividly recall the first time my grandmother made one for a Sunday dinner. The entire house filled with the intoxicating aroma of melting butter, caramelizing sugar, and sweet, tangy pineapple. The real magic, however, was the “grand reveal.” With bated breath, we’d all gather around as she’d place a platter over the hot skillet and, in one swift, confident motion, flip the entire thing over. Lifting the pan to reveal the perfectly arranged, glistening pineapple rings and jewel-like cherries, now embedded in a rich, amber caramel, always elicited gasps of delight. It looked like a stained-glass window made of pure confectionary joy. That first bite was a revelation—the warm, buttery caramel soaking into a ridiculously moist and tender vanilla cake, with the bright, tropical sweetness of the pineapple cutting through the richness. It wasn’t just a cake; it was an event, a centerpiece, a memory in the making. Over the years, I’ve adopted this recipe as my own, and it never fails to impress. It’s the cake I bring to potlucks, the one I make for birthday requests, and the comforting treat my own kids now ask for. It’s a timeless classic that proves some of the best things in life are simple, sweet, and a little bit upside down. This recipe is more than just a set of instructions; it’s a portal to those warm, happy kitchen memories, and I’m thrilled to share it with you.
Ingredients
This recipe is divided into two main components: the iconic caramelized topping and the rich, moist cake batter that serves as its foundation. Using high-quality, room-temperature ingredients is crucial for achieving the perfect texture and flavor.
For the Topping:
- Unsalted Butter (1/2 cup, or 1 stick): Melted butter forms the base of the caramel sauce. Using unsalted butter allows you to control the overall saltiness of the final cake.
- Light Brown Sugar (1 cup, packed): This is the heart of the caramel. When melted with the butter, it creates a rich, gooey, and beautifully colored topping that seeps into the cake as it bakes.
- Pineapple Rings (one 20-ounce can): The star of the show! Canned pineapple rings packed in 100% juice work best, as they are uniform in size and have the perfect tenderness. Be sure to drain them well and pat them dry.
- Maraschino Cherries (8-10): These vibrant red gems add a pop of color and a classic, sweet almond-like flavor. They are placed in the center of each pineapple ring for that signature look.
For the Cake Batter:
- All-Purpose Flour (1 1/2 cups): The structural backbone of the cake. Standard all-purpose flour provides the perfect balance of tenderness and strength.
- Baking Powder (2 teaspoons): This is the primary leavening agent, responsible for giving the cake its light, airy lift and preventing it from becoming too dense.
- Salt (1/2 teaspoon): A small amount of salt is essential in any sweet recipe. It doesn’t make the cake salty, but rather enhances all the other flavors, from the sweet caramel to the buttery crumb.
- Unsalted Butter (1/2 cup, or 1 stick, softened to room temperature): The fat in the cake batter. Creaming softened butter with sugar incorporates air, leading to a tender, moist, and flavorful crumb.
- Granulated Sugar (3/4 cup): Provides the primary sweetness for the cake batter itself, balancing the richer caramel flavor of the topping.
- Large Eggs (2, at room temperature): Eggs are crucial for structure, moisture, and richness. Bringing them to room temperature helps them incorporate more easily into the batter, creating a smoother, more uniform texture.
- Vanilla Extract (1 teaspoon): A classic flavor enhancer that adds warmth and depth to the cake, complementing the pineapple and caramel beautifully.
- Buttermilk (1/2 cup, at room temperature): The secret ingredient for an incredibly moist and tender cake. The acidity in buttermilk reacts with the baking powder for a better rise and breaks down gluten for a softer crumb.
Instructions
Follow these steps carefully to create a flawless Pineapple Upside Down Cake. The process is straightforward, but attention to detail, especially during the assembly and the final flip, will ensure a picture-perfect result.
Step 1: Preheat and Prepare Your Pan
First things first, preheat your oven to 350°F (175°C). Proper oven temperature is critical for an even bake. Select your pan: a 9-inch or 10-inch well-seasoned cast-iron skillet is the traditional and arguably best choice, as it distributes heat evenly and helps create a perfect caramel. If you don’t have one, a 9-inch round cake pan with deep sides (at least 2 inches) will also work. Do not grease the pan at this stage; the melted butter for the topping will serve that purpose.
Step 2: Create the Caramel Topping
Place the 1/2 cup of unsalted butter for the topping directly into your skillet or cake pan. If using a cake pan, you can melt the butter in a separate saucepan and pour it in. If using a skillet, place it over medium-low heat on the stovetop until the butter is completely melted. Once melted, remove the pan from the heat. Sprinkle the 1 cup of packed light brown sugar evenly over the melted butter. Do not stir; just let the sugar settle into the butter. This mixture will bubble and caramelize in the oven.
Step 3: Arrange the Fruit
This is the artistic part of the process where you create the cake’s beautiful “top.” Take your well-drained pineapple rings and arrange them in a single layer over the brown sugar and butter mixture. A common pattern is to place one ring in the very center and arrange the others around it, fitting them snugly against each other and the sides of the pan. Place a maraschino cherry in the center of each pineapple ring. You can also place additional cherries in the gaps between the rings for extra color and flavor. Set the assembled pan aside while you prepare the cake batter.
Step 4: Combine the Dry Ingredients
In a medium-sized mixing bowl, whisk together the 1 1/2 cups of all-purpose flour, 2 teaspoons of baking powder, and 1/2 teaspoon of salt. Whisking for about 30 seconds serves the same purpose as sifting—it aerates the flour and ensures the leavening agent and salt are evenly distributed throughout. This simple action helps guarantee a consistent rise and flavor in every bite.
Step 5: Cream the Butter and Sugar
In a separate large bowl, using either a stand mixer fitted with the paddle attachment or a handheld electric mixer, beat the 1/2 cup of softened, room-temperature unsalted butter on medium speed until it’s smooth and creamy. Add the 3/4 cup of granulated sugar and continue to beat on medium-high speed for about 3-4 minutes. The mixture should become light, pale, and fluffy. This “creaming” process is vital as it whips tiny air pockets into the butter, which is the key to a light-textured cake.
Step 6: Incorporate the Eggs and Vanilla
Add the room-temperature eggs one at a time, beating well after each addition until it is fully incorporated. Scrape down the sides and bottom of the bowl with a spatula as needed to ensure everything is evenly mixed. Mixing in the eggs one by one helps to create a stable emulsion, resulting in a smoother batter. After the eggs are mixed in, beat in the 1 teaspoon of vanilla extract.
Step 7: Alternate Dry and Wet Ingredients
Now, you will add the dry flour mixture and the wet buttermilk to the creamed butter mixture. To prevent overworking the gluten (which can make the cake tough), add them in alternating additions. Start by adding about one-third of the dry ingredients to the butter mixture, mixing on low speed until just combined. Then, add half of the buttermilk, mixing until just combined. Repeat the process: add another third of the flour mixture, the rest of the buttermilk, and finally, the remaining flour mixture. Mix only until the last streaks of flour have disappeared. Be very careful not to overmix the batter at this stage. A few small lumps are perfectly fine.
Step 8: Assemble and Bake the Cake
Carefully pour or spoon the prepared cake batter over the pineapple and cherry arrangement in your pan. Use an offset spatula or the back of a spoon to gently spread the batter evenly, making sure it reaches all the edges of the pan and covers the fruit completely. Place the pan on the center rack of your preheated 350°F (175°C) oven. Bake for 40 to 45 minutes. The cake is done when it is a deep golden brown on top and a wooden skewer or toothpick inserted into the center comes out clean or with a few moist crumbs attached (but no wet batter).
Step 9: Cool and Flip the Cake
This is the most critical step. Once the cake is out of the oven, place the hot pan on a wire cooling rack and let it cool for exactly 10 minutes. Do not let it cool for longer, or the caramel will harden and stick to the pan. Do not flip it immediately, or the cake may be too fragile and fall apart. After 10 minutes, run a thin knife or spatula around the edge of the cake to loosen it from the sides of the pan. Place a large, flat serving platter or cake stand upside down over the top of the pan. Using oven mitts (the pan will still be very hot!), hold the platter and the pan handles firmly together and, in one quick, decisive motion, flip them over.
Step 10: The Reveal and Final Cooling
Set the platter down on the counter and slowly lift the pan away. If any pineapple or cherries stick to the bottom of the pan, don’t panic. Simply use a spatula to gently lift them off and place them back onto the cake. Let the cake cool for at least another 20-30 minutes before slicing and serving. This allows the hot caramel to set slightly and soak further into the cake.
Nutrition Facts
The nutritional information is an estimate and can vary based on specific ingredients used. This cake is a decadent treat, best enjoyed in moderation.
- Servings: 8-10 slices
- Calories per Serving: Approximately 450-500 kcal. This is a rich, buttery dessert, with most calories coming from the sugar, butter, and flour.
- Carbohydrates: Approximately 70g. The primary source of energy, derived mainly from the sugars in the caramel and cake, as well as the flour.
- Sugar: Approximately 45g. A significant portion of this is from the brown sugar topping and the fruit, giving the cake its signature sweetness.
- Fat: Approximately 18g. Primarily from the generous amount of butter used in both the topping and the cake batter, which contributes to its moist texture and rich flavor.
- Protein: Approximately 4g. Contributed by the eggs, buttermilk, and flour in the cake batter.
Preparation time
This cake is surprisingly quick to assemble, with most of the time dedicated to baking and cooling.
- Active Preparation Time: 20 minutes. This includes gathering and measuring your ingredients, creating the caramel topping, arranging the fruit, and mixing the cake batter.
- Baking Time: 40-45 minutes. The time your cake will spend in the oven transforming into a golden-brown masterpiece.
- Cooling Time: 10 minutes (in-pan) + 20 minutes (on platter). This crucial cooling period ensures the cake sets properly for a clean flip and easy slicing.
- Total Time: Approximately 1 hour and 20 minutes from start to finish.
How to Serve
Pineapple Upside Down Cake is delightful on its own, but it can be elevated to a truly spectacular dessert with the right accompaniments. It is best served warm, but is also delicious at room temperature.
- Classic and Simple:
- Serve a warm slice as is. The gooey caramel topping and moist cake need no help to shine.
- With a Creamy Counterpart:
- Vanilla Bean Ice Cream: The ultimate pairing. A scoop of cold, creamy vanilla ice cream melting over a warm slice of the cake is a classic combination for a reason. The temperature and texture contrast is divine.
- Freshly Whipped Cream: A dollop of lightly sweetened, fluffy whipped cream adds a wonderful lightness that cuts through the richness of the caramel. For an extra touch, infuse the cream with a splash of rum or vanilla.
- Crème Fraîche or Greek Yogurt: For those who prefer a bit of tang, a spoonful of crème fraîche or full-fat Greek yogurt provides a sophisticated, slightly sour counterpoint to the cake’s intense sweetness.
- As Part of a Spread:
- Brunch Centerpiece: This cake is a showstopper at a brunch or luncheon. Its bright, sunny appearance fits perfectly alongside savory dishes.
- After-Dinner Dessert: Serve with a freshly brewed coffee or a cup of black tea. The bitterness of the beverage beautifully balances the sweetness of the cake.
- Potluck Favorite: Because it’s served directly from its platter and holds up well at room temperature, it’s an ideal and impressive dessert to bring to gatherings.
Additional tips
Here are eight expert tips to help you master this recipe and achieve a perfect Pineapple Upside Down Cake every time.
- Room Temperature is Non-Negotiable: This is the most important rule for a tender cake. Softened butter creams better, and room-temperature eggs and buttermilk emulsify into the batter smoothly. This prevents a dense, curdled batter and ensures a light, fluffy final crumb.
- Pat Your Pineapple Dry: After draining your pineapple rings, lay them on a plate lined with paper towels and gently pat the tops. Removing excess moisture prevents the caramel topping from becoming too watery or diluted, ensuring a richer, thicker sauce.
- Master the Flip: Confidence is key. The 10-minute cooling window is your sweet spot. Have your platter ready. When you flip, do it quickly and decisively. Hesitation can cause the cake to split or stick. It’s a single, fluid motion.
- The Cast-Iron Skillet Advantage: While a cake pan works, a cast-iron skillet provides superior, even heat distribution. This helps the brown sugar and butter caramelize more evenly across the entire bottom of the pan, preventing burnt spots or underdone sections.
- Don’t Overmix the Batter: Once you start adding the flour mixture, mix on the lowest speed and only until the ingredients are just combined. Overmixing develops the gluten in the flour, which will result in a tough, dry, and rubbery cake instead of a tender, moist one.
- Customize Your Topping: Feel free to get creative! You can substitute the pineapple rings with peach halves, apple slices (sautéed briefly in butter first), or even a mix of tropical fruits. Pecan or walnut halves placed in the gaps between the pineapple add a wonderful nutty crunch.
- Ensure a Clean Release with Parchment: If you are nervous about the cake sticking, especially in a standard cake pan, you can place a round of parchment paper on the bottom of the pan after you’ve added the melted butter and brown sugar, but before arranging the pineapple. This provides extra insurance for a perfect release.
- Rescue a Stuck Topping: If, despite your best efforts, a few pieces of pineapple stick to the pan after the flip, don’t worry. Gently warm the pan on the stovetop for 30-60 seconds to re-melt the caramel, then use a spatula to easily lift the stuck fruit and place it back on the cake.
FAQ section
Here are answers to some of the most frequently asked questions about making Pineapple Upside Down Cake.
1. Why did my cake stick to the pan?
This is the most common issue and usually happens for one of two reasons. Either the cake was cooled in the pan for too long (more than 10-12 minutes), allowing the sugar-based caramel to cool and harden like candy, effectively gluing the cake to the pan. Or, there wasn’t a sufficient layer of butter and brown sugar to create a liquid barrier between the fruit and the pan.
2. Can I use fresh pineapple instead of canned?
Absolutely! Fresh pineapple will provide a brighter, tangier flavor. However, you will need to peel, core, and slice it yourself into uniform rings. It also contains more moisture, so it’s extra important to pat the slices very dry with paper towels before arranging them in the pan to avoid a soggy topping.
3. How do I store leftover Pineapple Upside Down Cake?
Because of the moist, sugary fruit topping, this cake should be stored in the refrigerator. Cover it tightly with plastic wrap or place it in an airtight container. It will keep well for up to 4 days. The cake is delicious cold, but for the best texture, you can let a slice sit at room temperature for 20 minutes or gently warm it in the microwave for 15-20 seconds before serving.
4. My topping came out runny and watery. What went wrong?
A watery topping is almost always caused by excess moisture. This can come from not draining the canned pineapple sufficiently or not patting fresh pineapple dry. It can also happen if the butter-to-sugar ratio is off. Ensure you are using packed brown sugar to get the correct amount.
5. Can I prepare this cake ahead of time?
This cake is at its absolute best when served the day it is made, preferably while still slightly warm. However, you can bake it a day in advance. Store it, covered, in the refrigerator. Before serving, you can let it come to room temperature or gently re-warm the entire cake in a low-temperature oven (around 250°F or 120°C) for 10-15 minutes.
6. Can I make this recipe in a different-sized pan, like a square pan?
Yes, you can adapt this recipe. A 9×9 inch square pan is a great alternative. The baking time should be roughly the same, but you should start checking for doneness around the 35-minute mark, as pan shape can affect baking. You will also need to get creative with your pineapple arrangement to fit the square shape.
7. Can I make Pineapple Upside Down Cupcakes?
Yes, this recipe adapts wonderfully to cupcakes. Place a small amount of the butter/brown sugar mixture in the bottom of each lined muffin tin. Top with a chunk of pineapple and a piece of a maraschino cherry. Fill the cups 2/3 full with batter and bake for about 20-25 minutes. Let them cool for only 5 minutes before inverting them onto a wire rack.
8. What is the purpose of buttermilk in the cake?
Buttermilk is a magic ingredient for cake baking. Its acidity serves two purposes: it tenderizes the gluten in the flour, which creates a much softer, finer crumb, and it reacts with the baking powder, giving the cake an extra lift and making it light and fluffy. It also adds a subtle, pleasant tang that balances the overall sweetness of the dessert. If you don’t have buttermilk, you can make a substitute by adding 1/2 tablespoon of lemon juice or white vinegar to 1/2 cup of regular milk and letting it sit for 5-10 minutes.
Pineapple Upside Down Cake
Ingredients
This recipe is divided into two main components: the iconic caramelized topping and the rich, moist cake batter that serves as its foundation. Using high-quality, room-temperature ingredients is crucial for achieving the perfect texture and flavor.
For the Topping:
- Unsalted Butter (1/2 cup, or 1 stick): Melted butter forms the base of the caramel sauce. Using unsalted butter allows you to control the overall saltiness of the final cake.
- Light Brown Sugar (1 cup, packed): This is the heart of the caramel. When melted with the butter, it creates a rich, gooey, and beautifully colored topping that seeps into the cake as it bakes.
- Pineapple Rings (one 20-ounce can): The star of the show! Canned pineapple rings packed in 100% juice work best, as they are uniform in size and have the perfect tenderness. Be sure to drain them well and pat them dry.
- Maraschino Cherries (8-10): These vibrant red gems add a pop of color and a classic, sweet almond-like flavor. They are placed in the center of each pineapple ring for that signature look.
For the Cake Batter:
- All-Purpose Flour (1 1/2 cups): The structural backbone of the cake. Standard all-purpose flour provides the perfect balance of tenderness and strength.
- Baking Powder (2 teaspoons): This is the primary leavening agent, responsible for giving the cake its light, airy lift and preventing it from becoming too dense.
- Salt (1/2 teaspoon): A small amount of salt is essential in any sweet recipe. It doesn’t make the cake salty, but rather enhances all the other flavors, from the sweet caramel to the buttery crumb.
- Unsalted Butter (1/2 cup, or 1 stick, softened to room temperature): The fat in the cake batter. Creaming softened butter with sugar incorporates air, leading to a tender, moist, and flavorful crumb.
- Granulated Sugar (3/4 cup): Provides the primary sweetness for the cake batter itself, balancing the richer caramel flavor of the topping.
- Large Eggs (2, at room temperature): Eggs are crucial for structure, moisture, and richness. Bringing them to room temperature helps them incorporate more easily into the batter, creating a smoother, more uniform texture.
- Vanilla Extract (1 teaspoon): A classic flavor enhancer that adds warmth and depth to the cake, complementing the pineapple and caramel beautifully.
- Buttermilk (1/2 cup, at room temperature): The secret ingredient for an incredibly moist and tender cake. The acidity in buttermilk reacts with the baking powder for a better rise and breaks down gluten for a softer crumb.
Instructions
Follow these steps carefully to create a flawless Pineapple Upside Down Cake. The process is straightforward, but attention to detail, especially during the assembly and the final flip, will ensure a picture-perfect result.
Step 1: Preheat and Prepare Your Pan
First things first, preheat your oven to 350°F (175°C). Proper oven temperature is critical for an even bake. Select your pan: a 9-inch or 10-inch well-seasoned cast-iron skillet is the traditional and arguably best choice, as it distributes heat evenly and helps create a perfect caramel. If you don’t have one, a 9-inch round cake pan with deep sides (at least 2 inches) will also work. Do not grease the pan at this stage; the melted butter for the topping will serve that purpose.
Step 2: Create the Caramel Topping
Place the 1/2 cup of unsalted butter for the topping directly into your skillet or cake pan. If using a cake pan, you can melt the butter in a separate saucepan and pour it in. If using a skillet, place it over medium-low heat on the stovetop until the butter is completely melted. Once melted, remove the pan from the heat. Sprinkle the 1 cup of packed light brown sugar evenly over the melted butter. Do not stir; just let the sugar settle into the butter. This mixture will bubble and caramelize in the oven.
Step 3: Arrange the Fruit
This is the artistic part of the process where you create the cake’s beautiful “top.” Take your well-drained pineapple rings and arrange them in a single layer over the brown sugar and butter mixture. A common pattern is to place one ring in the very center and arrange the others around it, fitting them snugly against each other and the sides of the pan. Place a maraschino cherry in the center of each pineapple ring. You can also place additional cherries in the gaps between the rings for extra color and flavor. Set the assembled pan aside while you prepare the cake batter.
Step 4: Combine the Dry Ingredients
In a medium-sized mixing bowl, whisk together the 1 1/2 cups of all-purpose flour, 2 teaspoons of baking powder, and 1/2 teaspoon of salt. Whisking for about 30 seconds serves the same purpose as sifting—it aerates the flour and ensures the leavening agent and salt are evenly distributed throughout. This simple action helps guarantee a consistent rise and flavor in every bite.
Step 5: Cream the Butter and Sugar
In a separate large bowl, using either a stand mixer fitted with the paddle attachment or a handheld electric mixer, beat the 1/2 cup of softened, room-temperature unsalted butter on medium speed until it’s smooth and creamy. Add the 3/4 cup of granulated sugar and continue to beat on medium-high speed for about 3-4 minutes. The mixture should become light, pale, and fluffy. This “creaming” process is vital as it whips tiny air pockets into the butter, which is the key to a light-textured cake.
Step 6: Incorporate the Eggs and Vanilla
Add the room-temperature eggs one at a time, beating well after each addition until it is fully incorporated. Scrape down the sides and bottom of the bowl with a spatula as needed to ensure everything is evenly mixed. Mixing in the eggs one by one helps to create a stable emulsion, resulting in a smoother batter. After the eggs are mixed in, beat in the 1 teaspoon of vanilla extract.
Step 7: Alternate Dry and Wet Ingredients
Now, you will add the dry flour mixture and the wet buttermilk to the creamed butter mixture. To prevent overworking the gluten (which can make the cake tough), add them in alternating additions. Start by adding about one-third of the dry ingredients to the butter mixture, mixing on low speed until just combined. Then, add half of the buttermilk, mixing until just combined. Repeat the process: add another third of the flour mixture, the rest of the buttermilk, and finally, the remaining flour mixture. Mix only until the last streaks of flour have disappeared. Be very careful not to overmix the batter at this stage. A few small lumps are perfectly fine.
Step 8: Assemble and Bake the Cake
Carefully pour or spoon the prepared cake batter over the pineapple and cherry arrangement in your pan. Use an offset spatula or the back of a spoon to gently spread the batter evenly, making sure it reaches all the edges of the pan and covers the fruit completely. Place the pan on the center rack of your preheated 350°F (175°C) oven. Bake for 40 to 45 minutes. The cake is done when it is a deep golden brown on top and a wooden skewer or toothpick inserted into the center comes out clean or with a few moist crumbs attached (but no wet batter).
Step 9: Cool and Flip the Cake
This is the most critical step. Once the cake is out of the oven, place the hot pan on a wire cooling rack and let it cool for exactly 10 minutes. Do not let it cool for longer, or the caramel will harden and stick to the pan. Do not flip it immediately, or the cake may be too fragile and fall apart. After 10 minutes, run a thin knife or spatula around the edge of the cake to loosen it from the sides of the pan. Place a large, flat serving platter or cake stand upside down over the top of the pan. Using oven mitts (the pan will still be very hot!), hold the platter and the pan handles firmly together and, in one quick, decisive motion, flip them over.
Step 10: The Reveal and Final Cooling
Set the platter down on the counter and slowly lift the pan away. If any pineapple or cherries stick to the bottom of the pan, don’t panic. Simply use a spatula to gently lift them off and place them back onto the cake. Let the cake cool for at least another 20-30 minutes before slicing and serving. This allows the hot caramel to set slightly and soak further into the cake.
Nutrition
- Serving Size: one normal portion
- Calories: 500
- Sugar: 45g
- Fat: 18g
- Carbohydrates: 70g
- Protein: 4g