")

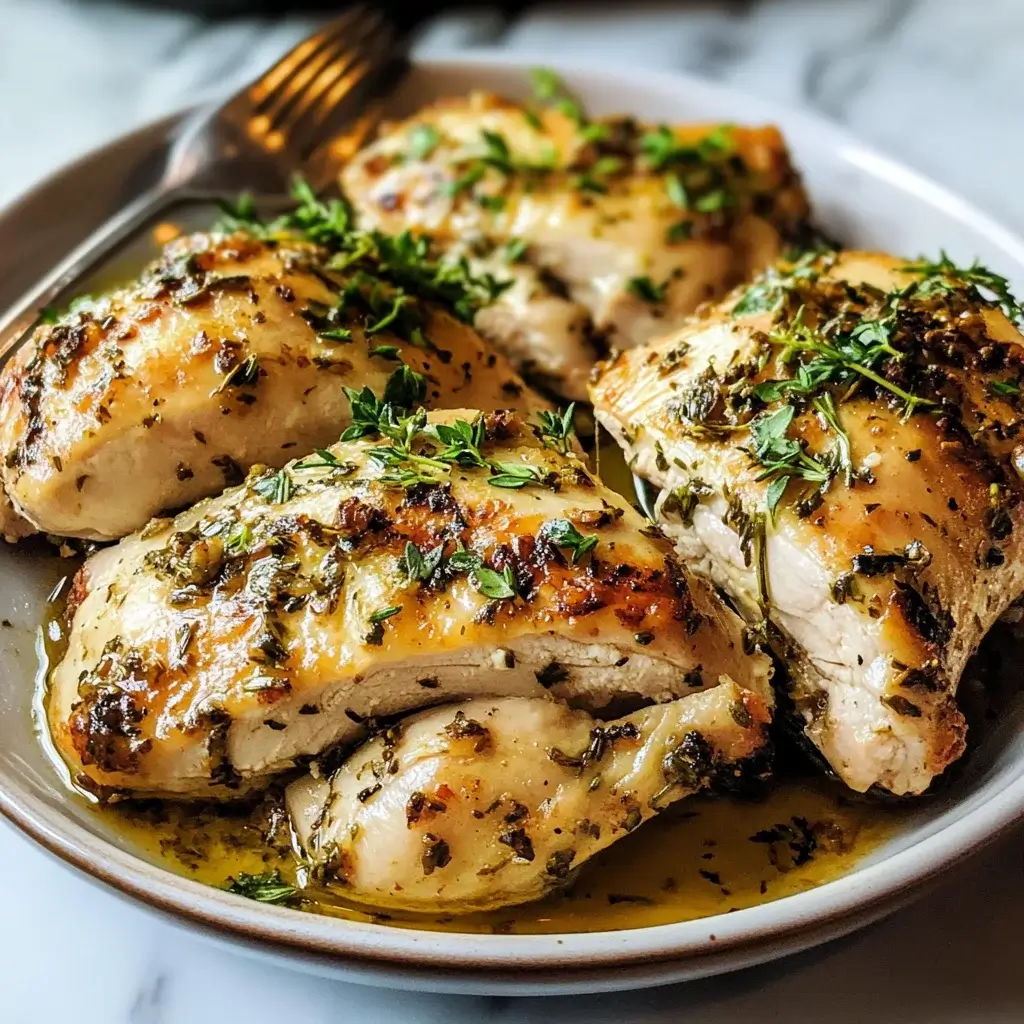

There are some meals that just feel like home, aren’t there? For our family, this Quick Baked Chicken with Herbs has become exactly that. I remember the first time I made it – one of those frantic Tuesday evenings where takeout felt inevitable. I had some chicken breasts thawing, a slightly sad-looking bunch of herbs in the fridge, and about 45 minutes before meltdown o’clock (both mine and the kids’). I vaguely recalled a simple baked chicken recipe, threw together an herb rub with olive oil, salt, and pepper, and hoped for the best. The aroma that started filling the kitchen within 15 minutes was the first sign I was onto something good. Rich, savory, herbaceous scents promising something far more complex than the minimal effort I’d put in. When I pulled the chicken out, golden brown and sizzling slightly, even my pickiest eater’s eyes lit up. The verdict? “Mom, this is the best chicken ever!” High praise indeed. Since then, it’s become a staple. It’s my go-to for busy weeknights, for when guests pop over unexpectedly, or even when I just want a reliable, delicious, and relatively healthy meal without spending hours in the kitchen. It’s proof that simple ingredients, treated well, can create something truly special. The beauty lies in its adaptability – swap herbs, add a pinch of spice, use thighs instead of breasts – it always works. It’s forgiving, flavorful, and fast – the trifecta for any home cook. This recipe isn’t just about feeding the family; it’s about creating those comforting moments around the dinner table, even when time is short. It’s the smell of rosemary and thyme baking, the sight of perfectly cooked chicken, and the sound of happy munching that makes this simple dish so much more than the sum of its parts. It represents ease, comfort, and the little victory of getting a wholesome, home-cooked meal on the table against the odds. Trust me, once you try this, it’ll quickly climb the ranks to become one of your favorites too. It’s the kind of recipe you’ll memorize, adapt, and rely on time and time again.
Ingredients
Here’s what you’ll need to create this simple yet flavorful dish:
- 4 boneless, skinless chicken breasts (about 6-8 oz each): The star of the show. Choose breasts of similar thickness for even cooking. You can also use boneless, skinless thighs, adjusting cooking time accordingly.
- 2 tablespoons olive oil: Extra virgin recommended for flavor, but regular olive oil or avocado oil works too. This helps the herbs stick and promotes browning.
- 1 tablespoon chopped fresh rosemary: Provides a pungent, piney aroma and flavor that pairs beautifully with chicken.
- 1 tablespoon chopped fresh thyme: Adds earthy, slightly floral notes. Lemon thyme is also a wonderful variation.
- 1 tablespoon chopped fresh parsley: Brings a clean, fresh, slightly peppery taste that brightens the dish. Flat-leaf (Italian) parsley is generally preferred for cooking.
- 1 teaspoon garlic powder: Offers savory depth without the hassle of mincing fresh garlic (though 2 cloves of minced fresh garlic can be substituted).
- 1/2 teaspoon onion powder: Adds a subtle, foundational savory flavor.
- 1/2 teaspoon salt (or to taste): Kosher salt or sea salt is recommended for better flavor and texture. Essential for enhancing all the other flavors.
- 1/4 teaspoon black pepper (freshly ground preferred): Adds a touch of warmth and spice. Freshly ground offers significantly more flavor than pre-ground.
- (Optional) Pinch of red pepper flakes: If you like a little bit of heat.
- (Optional) Lemon wedges: For serving, adding a final burst of freshness.
Instructions
Follow these simple steps for perfectly baked herb chicken:
- Preheat Oven & Prepare Pan: Preheat your oven to 400°F (200°C). Lightly grease a baking dish or rimmed baking sheet large enough to hold the chicken breasts without overcrowding. Overcrowding will cause the chicken to steam rather than bake, so give them some space! Using parchment paper can also make cleanup easier.
- Prepare the Chicken: Pat the chicken breasts completely dry with paper towels. This step is crucial! Removing excess moisture helps the olive oil and herbs adhere better and encourages browning, leading to a more flavorful and visually appealing result. If the chicken breasts are particularly thick in one area, you can gently pound them to a more even thickness (around 3/4 inch) using a meat mallet or rolling pin between sheets of plastic wrap. This ensures they cook evenly.
- Mix the Herb Rub: In a small bowl, combine the olive oil, chopped fresh rosemary, chopped fresh thyme, chopped fresh parsley, garlic powder, onion powder, salt, black pepper, and optional red pepper flakes (if using). Stir everything together until well combined into a fragrant herb paste. Taste the mixture (before it touches raw chicken!) and adjust salt and pepper if needed. Remember that flavors will concentrate slightly during baking.
- Coat the Chicken: Place the dried chicken breasts in the prepared baking dish or onto the baking sheet. Spoon the herb mixture evenly over the tops of the chicken breasts. Use the back of the spoon or your fingers (clean hands!) to spread the mixture, ensuring each breast is well-coated. You can also place the chicken and herb mixture in a bowl and toss to coat all sides if you prefer.
- Bake: Place the baking dish or sheet into the preheated oven. Bake for 20-25 minutes. The exact time will depend on the thickness of your chicken breasts. Thicker breasts may need closer to 25-30 minutes, while thinner ones might be done closer to 18-20 minutes.
- Check for Doneness: The chicken is cooked through when it is no longer pink in the center and the juices run clear when pierced with a fork or knife. The most reliable way to check for doneness is using an instant-read meat thermometer. Insert the thermometer into the thickest part of the breast, being careful not to touch any bone if using bone-in chicken. The internal temperature should register 165°F (74°C). This ensures the chicken is safe to eat and helps prevent overcooking, which leads to dryness.
- Rest the Chicken: Once cooked, remove the chicken from the oven. Tent the baking dish loosely with aluminum foil and let the chicken rest for 5-10 minutes before slicing or serving. This critical step allows the juices to redistribute throughout the meat, resulting in a much juicier and more tender piece of chicken. If you slice it immediately, the juices will run out onto the cutting board.
- Serve: Slice the chicken breasts against the grain and serve immediately. Drizzle any pan juices over the chicken for extra flavor. Garnish with extra fresh parsley or serve with lemon wedges on the side, if desired.
Nutrition Facts
(Approximate values per serving, assuming 4 servings from the recipe)
- Servings: 4
- Calories per serving: Approximately 280-350 kcal (This varies based on the exact size of the chicken breast and the amount of oil used). This makes it a relatively lean main course option.
- Protein: Approximately 35-45g. Chicken breast is an excellent source of lean protein, crucial for muscle building, satiety, and overall body function.
- Fat: Approximately 10-15g (primarily unsaturated fat from olive oil). Olive oil contributes healthy monounsaturated fats, beneficial for heart health. The fat content is relatively low compared to fried chicken or fattier cuts of meat.
- Carbohydrates: Approximately 2-3g. Very low in carbohydrates, originating mainly from the herbs and powders, making it suitable for low-carb and ketogenic diets.
- Sodium: Approximately 350-450mg (depending on salt added). Be mindful of added salt if you are monitoring sodium intake. Using fresh herbs and garlic/onion powder adds flavor without significantly increasing sodium.
Disclaimer: These are estimates. Actual nutritional values can vary based on specific ingredients and portion sizes.
Preparation Time
This recipe lives up to its “quick” name:
- Prep time: Approximately 10-15 minutes. This includes gathering ingredients, chopping herbs, patting the chicken dry, and mixing the herb rub. If you need to pound the chicken breasts to an even thickness, add another couple of minutes.
- Cook time: Approximately 20-25 minutes. Baking time can vary slightly based on oven calibration and chicken breast thickness.
- Rest time: 5-10 minutes (essential for juicy chicken!).
- Total time: Approximately 35-50 minutes from start to finish. This makes it an ideal recipe for busy weeknights when you want a delicious, home-cooked meal without spending hours in the kitchen.
How to Serve
This Quick Baked Chicken with Herbs is incredibly versatile. Here are some serving suggestions to create a complete and satisfying meal:
- With Grains:
- Fluffy Quinoa: A nutty, protein-packed side that complements the chicken well. Cook according to package directions, perhaps using chicken broth instead of water for extra flavor.
- Steamed Rice: Simple white or brown rice provides a neutral base to soak up any chicken juices. Jasmine or Basmati rice adds a subtle fragrance.
- Couscous: Plain or pearl couscous cooks very quickly. Toss with a little olive oil, lemon juice, and chopped parsley for a light side.
- Creamy Polenta: Soft, cheesy polenta offers a comforting contrast to the baked chicken.
- Orzo Pasta: Toss cooked orzo with some pesto, cherry tomatoes, and feta for a Mediterranean-inspired side.
- With Potatoes:
- Roasted Potatoes: Cut potatoes (Yukon Gold or red potatoes work well) into chunks, toss with olive oil, salt, pepper, and maybe some extra rosemary, and roast alongside the chicken (they may need a head start depending on size).
- Mashed Potatoes: Creamy mashed potatoes are a classic comfort food pairing. Garlic mashed potatoes would echo the flavors in the chicken.
- Baked Sweet Potatoes: Offer a touch of sweetness and extra nutrients. Serve whole or cut into wedges.
- With Vegetables:
- Roasted Vegetables: Broccoli, asparagus, bell peppers, zucchini, cherry tomatoes, or Brussels sprouts tossed in olive oil and herbs can often be roasted on the same pan as the chicken (add them partway through the chicken’s cooking time depending on the vegetable).
- Steamed Green Beans or Asparagus: A simple, healthy side. Toss with a little butter or olive oil and a squeeze of lemon juice after steaming.
- Sautéed Spinach or Kale: Quickly sautéed with garlic in olive oil for a nutritious green side.
- Fresh Garden Salad: A crisp salad with a light vinaigrette (lemon-based works well) provides a refreshing contrast. Add greens, cucumber, tomatoes, red onion, and maybe some feta or olives.
- Sauces & Garnishes:
- Pan Juices: Always drizzle any accumulated pan juices over the sliced chicken.
- Lemon Wedges: A squeeze of fresh lemon juice brightens all the flavors just before serving.
- Pesto: A dollop of basil pesto on the side adds another layer of herbaceous flavor.
- Plain Yogurt or Tzatziki: A cool, creamy counterpoint, especially if you added a pinch of red pepper flakes to the chicken.
- Extra Fresh Herbs: Garnish with more chopped parsley, thyme, or rosemary for visual appeal and fresh flavor.
- Other Ideas:
- Sliced Over Salad: Let the chicken cool slightly, slice it, and serve it atop a large mixed green salad for a lighter meal or lunch.
- In Sandwiches or Wraps: Leftover chicken is fantastic sliced thin for sandwiches or wraps the next day with lettuce, tomato, and mayo or hummus.
- With Pasta: Slice the chicken and toss it with cooked pasta, olive oil, garlic, cherry tomatoes, and spinach for a simple pasta dish.
Additional Tips
Maximize the deliciousness and ease of this recipe with these extra tips:
- Experiment with Herbs: Don’t feel limited to rosemary, thyme, and parsley. Sage, oregano, marjoram, or even a bit of tarragon can work beautifully. Use combinations you enjoy or what’s available seasonally. Dried herbs can substitute fresh in a pinch (use about 1/3 the amount called for fresh), but fresh herbs provide a brighter, more vibrant flavor here.
- Achieve Crispier Results (if using skin-on chicken): If you opt for skin-on chicken pieces (like thighs or bone-in breasts), ensure the skin is patted very dry. You might also want to start the chicken at a slightly higher temperature (425°F/220°C) for the first 10-15 minutes to help render the fat and crisp the skin, then reduce to 400°F (200°C) for the remainder of the cooking time. Ensure oil gets under the skin too.
- Don’t Overcrowd the Pan: Give the chicken pieces space in the baking dish. If they are too close together, they will steam instead of bake, resulting in pale, softer chicken rather than nicely browned pieces. Use a larger pan or two pans if necessary.
- Even Thickness is Key: As mentioned in the instructions, pounding thicker chicken breasts to a more uniform thickness (around 3/4 inch) is highly recommended. This prevents the thinner parts from drying out while waiting for the thickest part to cook through. It makes a noticeable difference in juiciness.
- Marinate for Deeper Flavor: While this is a “quick” recipe, if you have an extra 30 minutes (or up to 2 hours), you can mix the herb rub and coat the chicken, then let it sit covered in the refrigerator before baking. This allows the flavors to penetrate the meat more deeply. Don’t marinate for too long if using lemon juice in the rub, as the acid can start to “cook” the chicken texture.
- Use a Meat Thermometer: Seriously, this is the single best way to guarantee perfectly cooked chicken – juicy and safe, never dry or undercooked. Aim for 165°F (74°C) in the thickest part. It removes all the guesswork.
- Utilize Pan Juices: Those brown bits and juices left in the pan after baking are liquid gold! Scrape them up and drizzle them over the sliced chicken before serving. For a quick pan sauce, you could remove the chicken, place the baking dish over low heat on the stovetop (if safe), deglaze with a splash of white wine or chicken broth, and whisk in a small knob of butter.
- Storage and Reheating: Store leftover cooked chicken in an airtight container in the refrigerator for up to 3-4 days. Reheat gently in the microwave (covered, perhaps with a splash of water or broth), in a low oven (300°F/150°C) until warmed through, or sliced cold in salads or sandwiches. Avoid high heat when reheating to prevent drying it out.
FAQ
Here are answers to some frequently asked questions about this Quick Baked Chicken with Herbs recipe:
- Can I use chicken thighs instead of breasts?
Absolutely! Boneless, skinless chicken thighs work wonderfully and are often more forgiving than breasts as they have a higher fat content, making them naturally juicier. They may require a slightly longer cooking time, typically 25-35 minutes at 400°F (200°C), depending on size. Use a meat thermometer to ensure they reach an internal temperature of 165°F (74°C) – some even prefer thighs cooked to 175°F (80°C) for optimal texture. Bone-in, skin-on thighs will take longer, closer to 40-45 minutes. - Can I use dried herbs instead of fresh?
Yes, you can substitute dried herbs if fresh aren’t available. The general rule of thumb is to use one-third the amount of dried herbs as fresh herbs called for in the recipe. So, for this recipe, you’d use about 1 teaspoon each of dried rosemary, dried thyme, and dried parsley. Crush the dried herbs between your fingers before adding them to the oil mixture to help release their flavor. While dried herbs work, fresh herbs generally provide a brighter, more potent flavor profile for this particular dish. - My chicken always comes out dry. What am I doing wrong?
Dryness is usually caused by overcooking. Using a meat thermometer to cook the chicken to exactly 165°F (74°C) is the best prevention. Pounding the chicken to an even thickness also helps prevent the thinner parts from drying out before the thicker parts are cooked. Lastly, don’t skip the resting step! Allowing the chicken to rest for 5-10 minutes before slicing lets the juices redistribute, keeping the meat moist. - Can I add vegetables to the pan to cook with the chicken?
Yes, definitely! This is a great way to make it a one-pan meal. Heartier vegetables like chopped potatoes, carrots, or Brussels sprouts might need a head start (roast them for 10-15 minutes before adding the chicken). Quicker-cooking vegetables like broccoli florets, asparagus spears, bell pepper strips, zucchini chunks, or cherry tomatoes can be added during the last 15-20 minutes of the chicken’s cooking time. Toss the vegetables with a little olive oil, salt, and pepper before adding them to the pan. - How do I know when the chicken is safely cooked without a thermometer?
While a thermometer is the most accurate method, you can check for doneness by piercing the thickest part of the chicken with a knife or fork. The juices should run clear, not pink. The meat itself should be opaque and white all the way through. If you cut into it, there should be no pink remaining. However, visual cues can sometimes be misleading, and it’s easy to overcook chicken this way. Investing in an inexpensive instant-read thermometer is highly recommended for food safety and quality. - Can I prepare this recipe ahead of time?
You can prepare parts of it ahead. You can mix the herb rub and store it in an airtight container in the fridge for a day or two. You can also coat the chicken with the rub and store it covered in the fridge for a few hours (up to 2 if no acid like lemon juice is used, maybe up to 4-6 hours without acid, though freshest is often best) before baking. Cooked chicken stores well for leftovers (see storage tip above), but it’s best served freshly baked for optimal texture and juiciness. - Is this recipe gluten-free/dairy-free/keto-friendly?
Yes, as written, this recipe is naturally gluten-free, dairy-free, and very low in carbohydrates, making it suitable for ketogenic diets. Always double-check the labels on your specific ingredients (like garlic/onion powder) if you have severe allergies or sensitivities, but basic chicken, olive oil, herbs, salt, and pepper fit these dietary patterns. - Can I use frozen chicken breasts?
It is strongly recommended to thaw chicken breasts completely before baking using this recipe. Baking chicken from frozen is possible but significantly alters cooking time (usually requiring about 50% longer) and can lead to uneven cooking, potentially resulting in dry edges and an undercooked center. For the best results in terms of texture and even cooking, ensure your chicken is fully thawed in the refrigerator overnight or using a safe thawing method (like cold water immersion). Patting thawed chicken thoroughly dry is also essential.
Quick Baked Chicken with Herbs
Ingredients
Here’s what you’ll need to create this simple yet flavorful dish:
- 4 boneless, skinless chicken breasts (about 6–8 oz each): The star of the show. Choose breasts of similar thickness for even cooking. You can also use boneless, skinless thighs, adjusting cooking time accordingly.
- 2 tablespoons olive oil: Extra virgin recommended for flavor, but regular olive oil or avocado oil works too. This helps the herbs stick and promotes browning.
- 1 tablespoon chopped fresh rosemary: Provides a pungent, piney aroma and flavor that pairs beautifully with chicken.
- 1 tablespoon chopped fresh thyme: Adds earthy, slightly floral notes. Lemon thyme is also a wonderful variation.
- 1 tablespoon chopped fresh parsley: Brings a clean, fresh, slightly peppery taste that brightens the dish. Flat-leaf (Italian) parsley is generally preferred for cooking.
- 1 teaspoon garlic powder: Offers savory depth without the hassle of mincing fresh garlic (though 2 cloves of minced fresh garlic can be substituted).
- 1/2 teaspoon onion powder: Adds a subtle, foundational savory flavor.
- 1/2 teaspoon salt (or to taste): Kosher salt or sea salt is recommended for better flavor and texture. Essential for enhancing all the other flavors.
- 1/4 teaspoon black pepper (freshly ground preferred): Adds a touch of warmth and spice. Freshly ground offers significantly more flavor than pre-ground.
- (Optional) Pinch of red pepper flakes: If you like a little bit of heat.
- (Optional) Lemon wedges: For serving, adding a final burst of freshness.
Instructions
Follow these simple steps for perfectly baked herb chicken:
- Preheat Oven & Prepare Pan: Preheat your oven to 400°F (200°C). Lightly grease a baking dish or rimmed baking sheet large enough to hold the chicken breasts without overcrowding. Overcrowding will cause the chicken to steam rather than bake, so give them some space! Using parchment paper can also make cleanup easier.
- Prepare the Chicken: Pat the chicken breasts completely dry with paper towels. This step is crucial! Removing excess moisture helps the olive oil and herbs adhere better and encourages browning, leading to a more flavorful and visually appealing result. If the chicken breasts are particularly thick in one area, you can gently pound them to a more even thickness (around 3/4 inch) using a meat mallet or rolling pin between sheets of plastic wrap. This ensures they cook evenly.
- Mix the Herb Rub: In a small bowl, combine the olive oil, chopped fresh rosemary, chopped fresh thyme, chopped fresh parsley, garlic powder, onion powder, salt, black pepper, and optional red pepper flakes (if using). Stir everything together until well combined into a fragrant herb paste. Taste the mixture (before it touches raw chicken!) and adjust salt and pepper if needed. Remember that flavors will concentrate slightly during baking.
- Coat the Chicken: Place the dried chicken breasts in the prepared baking dish or onto the baking sheet. Spoon the herb mixture evenly over the tops of the chicken breasts. Use the back of the spoon or your fingers (clean hands!) to spread the mixture, ensuring each breast is well-coated. You can also place the chicken and herb mixture in a bowl and toss to coat all sides if you prefer.
- Bake: Place the baking dish or sheet into the preheated oven. Bake for 20-25 minutes. The exact time will depend on the thickness of your chicken breasts. Thicker breasts may need closer to 25-30 minutes, while thinner ones might be done closer to 18-20 minutes.
- Check for Doneness: The chicken is cooked through when it is no longer pink in the center and the juices run clear when pierced with a fork or knife. The most reliable way to check for doneness is using an instant-read meat thermometer. Insert the thermometer into the thickest part of the breast, being careful not to touch any bone if using bone-in chicken. The internal temperature should register 165°F (74°C). This ensures the chicken is safe to eat and helps prevent overcooking, which leads to dryness.
- Rest the Chicken: Once cooked, remove the chicken from the oven. Tent the baking dish loosely with aluminum foil and let the chicken rest for 5-10 minutes before slicing or serving. This critical step allows the juices to redistribute throughout the meat, resulting in a much juicier and more tender piece of chicken. If you slice it immediately, the juices will run out onto the cutting board.
- Serve: Slice the chicken breasts against the grain and serve immediately. Drizzle any pan juices over the chicken for extra flavor. Garnish with extra fresh parsley or serve with lemon wedges on the side, if desired.
Nutrition
- Serving Size: one normal portion
- Calories: 350
- Sodium: 450mg
- Fat: 15g
- Carbohydrates: 3g
- Protein: 45g


