")

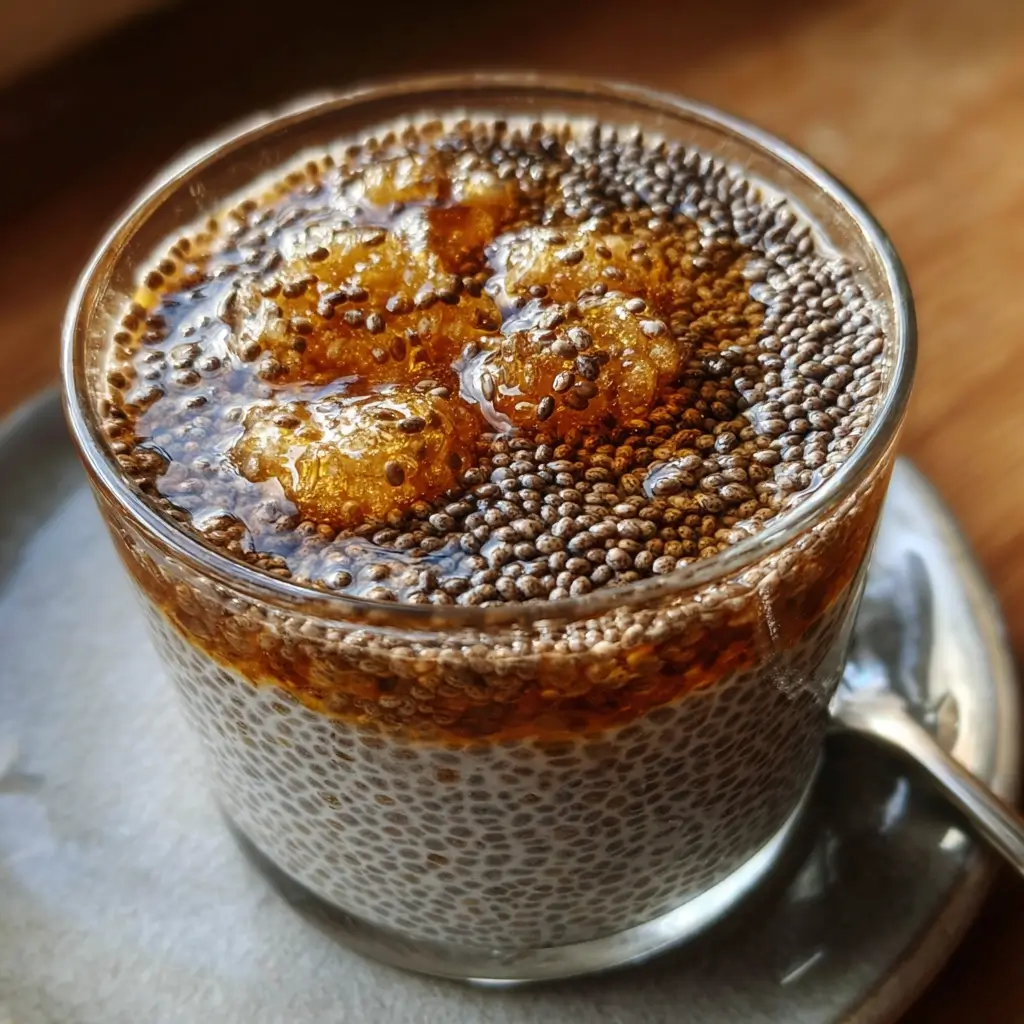

Of all the breakfast revolutions that have happened in my kitchen over the years, none has been as quiet, simple, and profoundly game-changing as the introduction of this Quick Chia Pudding with Honey. My mornings used to be a frantic race against the clock, often culminating in a hastily grabbed piece of toast or a sugary cereal that left me crashing by 10 AM. I was searching for something that was both incredibly easy to prepare and genuinely nourishing—a breakfast that would work for me, not against me. When I first tried making chia pudding, I was skeptical. How could these tiny, unassuming seeds transform into a creamy, satisfying pudding? The first batch was a revelation. With just a few minutes of whisking the night before, I woke up to a perfectly set, ready-to-eat breakfast. I topped it with some berries and a drizzle of honey, and took my first spoonful. It was subtly sweet, wonderfully textured, and surprisingly filling. The real test, however, was my family. They eyed the jar with suspicion at first, but after one taste, they were converts. Now, these little jars of goodness are a staple in our fridge. It has become our go-to healthy breakfast, our favorite afternoon snack, and even a light, guilt-free dessert. It’s the one recipe that has truly simplified our routine while elevating our nutrition, proving that the best things in life are often the simplest.
Ingredients
This recipe relies on a few simple, wholesome ingredients to create a delicious and nutritious pudding. Each component plays a vital role in the final texture and flavor.
- Chia Seeds (1/4 cup / 4 tablespoons): These are the star of the show. Use high-quality black or white chia seeds. They will absorb the liquid and swell up to create the signature gel-like, pudding consistency.
- Milk of Your Choice (1 cup): The liquid base for the pudding. You can use dairy milk (whole, 2%, or skim) or a non-dairy alternative like unsweetened almond milk, coconut milk (from a carton for a lighter pudding, or canned for a richer, creamier result), soy milk, or oat milk.
- Honey (1-2 tablespoons): This is our natural sweetener. The amount can be adjusted based on your personal preference for sweetness. For a truly raw and nutrient-rich option, choose raw, unfiltered honey.
- Vanilla Extract (1/2 teaspoon): A small amount of pure vanilla extract adds a wonderful depth of flavor and a warm, aromatic quality that complements the honey perfectly.
- Pinch of Salt (optional): Just a tiny pinch of sea salt or Himalayan pink salt can enhance all the other flavors and balance the sweetness of the honey.
Instructions
Follow these simple steps to achieve a perfectly smooth and clump-free chia pudding every time. The key is in the initial whisking.
- Combine Dry Ingredients: In a medium-sized bowl or a large jar (a 16-ounce mason jar works perfectly), add the 1/4 cup of chia seeds and the optional pinch of salt. Give them a quick stir to distribute the salt.
- Add Wet Ingredients: Pour the 1 cup of milk, 1-2 tablespoons of honey, and 1/2 teaspoon of vanilla extract into the bowl with the chia seeds.
- The First Whisk: Immediately begin whisking all the ingredients together vigorously for about 1-2 minutes. Your goal here is to fully incorporate the honey and, most importantly, to break up any clumps of chia seeds that are starting to form. Scrape the bottom and sides of the bowl or jar to ensure everything is well-mixed.
- The First Rest: Let the mixture sit at room temperature for 5-10 minutes. During this time, the chia seeds will begin to absorb the liquid and start the gelling process. This initial rest is crucial for preventing clumps.
- The Second Whisk: After the rest, you’ll notice the mixture has started to thicken slightly. Give it another thorough whisk for about 30-60 seconds. This second whisk is your secret weapon against a clumpy or separated pudding. It redistributes the seeds and ensures a uniform, creamy texture.
- Chill and Set: Cover the bowl with plastic wrap or seal your jar with a lid. Place the chia pudding in the refrigerator to chill and set for at least 4 hours. For the best results and a thicker consistency, let it set overnight.
- Serve and Enjoy: Once the pudding has fully set, it will be thick, creamy, and spoonable. Give it a final stir before serving and add your favorite toppings.
Nutrition Facts
This nutritional information is an estimate for one serving, assuming the recipe makes two servings and is prepared with unsweetened almond milk.
- Servings: 2
- Calories per serving: Approximately 210 kcal
- Fiber (Approx. 10g): Chia seeds are an incredible source of dietary fiber, which is essential for digestive health, promoting regularity, and helping you feel full and satisfied for longer.
- Omega-3 Fatty Acids (Approx. 4g): This pudding is packed with plant-based Omega-3s (specifically Alpha-Linolenic Acid or ALA), which are healthy fats known for supporting brain health and reducing inflammation.
- Protein (Approx. 6g): A decent source of plant-based protein, which is vital for building and repairing tissues, supporting muscle mass, and providing sustained energy.
- Calcium (Approx. 20% of RDI): Chia seeds and milk contribute a significant amount of calcium, a mineral crucial for strong bones and teeth, as well as proper nerve and muscle function.
- Iron (Approx. 10% of RDI): This pudding provides a good boost of iron, an essential mineral that helps transport oxygen throughout the body and prevent fatigue.
Preparation Time
This recipe is defined by its minimal active preparation time, making it ideal for busy schedules.
- Active Prep Time: 5 minutes. This includes gathering your ingredients and the two essential whisking periods.
- Chilling Time: 4 hours to overnight. The magic happens while you sleep or go about your day. An overnight chill is highly recommended for the thickest, creamiest texture.
How to Serve
Serving chia pudding is where you can get truly creative. The neutral, subtly sweet base is a perfect canvas for a wide variety of textures and flavors. Here are some ideas to get you started:
- Classic Fruit & Nut Bowl:
- Top with a handful of fresh berries (strawberries, blueberries, raspberries).
- Add sliced banana or mango chunks.
- Sprinkle with chopped almonds, walnuts, or pecans for a satisfying crunch.
- Finish with a drizzle of extra honey or maple syrup.
- The Parfait Method:
- Layer the chia pudding in a clear glass or jar.
- Alternate layers of pudding with layers of your favorite granola.
- Add a layer of fruit puree or jam (like a raspberry coulis).
- Top with a dollop of Greek yogurt or coconut cream and a final sprinkle of granola.
- Decadent Dessert Style:
- Stir in a tablespoon of cacao powder into the pudding before chilling for a chocolate version.
- Top with chocolate shavings or mini chocolate chips.
- Add a spoonful of nut butter (peanut butter, almond butter).
- Sprinkle with toasted coconut flakes for a tropical twist.
- Power-Up Breakfast Jar:
- Top with a sprinkle of hemp seeds, pumpkin seeds, or sunflower seeds for extra protein and healthy fats.
- Add a spoonful of bee pollen for added nutrients.
- Mix in a pinch of cinnamon or cardamom for a warm, spicy flavor.
Additional Tips
Unlock the full potential of your chia pudding with these eight expert tips for perfect results and endless variety.
- For an Ultra-Creamy Texture, Blend It: If you or your family are sensitive to the tapioca-like texture of whole chia seeds, simply blend all the ingredients together in a high-speed blender before chilling. This creates a completely smooth, mousse-like pudding.
- Use a Jar with a Lid for Easy Mixing: Making your pudding directly in a mason jar is a game-changer. You can put the lid on and shake it vigorously instead of whisking. This is not only less mess but also highly effective at preventing clumps. Just remember to shake it, let it rest for 10 minutes, and then shake it again before refrigerating.
- Make a Big Batch for the Week: This recipe is perfect for meal prep. Simply double, triple, or even quadruple the ingredients in a large bowl or pitcher. Prepare it on a Sunday night, and you’ll have grab-and-go breakfasts ready for the busiest days of the week. Portion it out into individual jars after it has set.
- Adjust the Ratio for Your Perfect Consistency: The standard ratio is 1/4 cup of chia seeds to 1 cup of liquid. If you prefer a much thicker, denser pudding, use a little less milk (about 3/4 cup). If you like it thinner and more drinkable, add a little more milk (about 1 1/4 cups).
- Infuse Your Milk for Deeper Flavor: For a gourmet touch, gently warm your milk on the stove with a cinnamon stick, a few cardamom pods, or a strip of orange peel. Let it steep for 15-20 minutes, then strain and let it cool completely before mixing it with the chia seeds.
- Don’t Add Fruit Until Serving (Mostly): While it’s tempting to mix fruit in from the start, it’s best to add most fresh fruit just before serving to keep it from getting mushy and releasing too much water into the pudding. The exception is heartier fruits like mashed banana, which can be mixed in at the beginning.
- Give it a Salty-Sweet Kick: For a more complex flavor profile, try stirring in a tablespoon of smooth peanut butter or almond butter along with the honey and vanilla. The combination of salty nut butter and sweet honey is irresistible.
- Patience is Key: The most important tip is to allow the pudding enough time to set. While it might seem thick enough after 2 hours, letting it sit for at least 4 hours, or ideally overnight, allows the seeds to fully hydrate, resulting in a much better texture and more easily digestible pudding.
FAQ Section
Here are answers to some of the most frequently asked questions about making Quick Chia Pudding with Honey.
1. Why is my chia pudding runny and not thickening?
This is the most common issue and usually has one of three causes. First, the ratio of liquid to chia seeds might be off. Ensure you are using at least 1/4 cup of seeds per 1 cup of liquid. Second, you may not have waited long enough. Chia pudding needs a minimum of 4 hours to gel properly. Third, your chia seeds might be old. Over time, chia seeds can lose some of their ability to absorb liquid. If your pudding consistently fails to set, try a fresh bag of seeds.
2. Can I use ground chia seeds instead of whole ones?
Yes, you absolutely can! Using ground chia seeds (you can buy them ground or grind them yourself in a coffee grinder) will result in a much smoother, less gelatinous texture, similar to a traditional pudding or mousse. The pudding will also set much faster, often in under an hour, because the increased surface area allows the liquid to be absorbed more quickly.
3. How long does chia pudding last in the refrigerator?
When stored in an airtight container, chia pudding will stay fresh in the refrigerator for up to 5 days. This makes it an excellent option for meal prepping. The texture might thicken slightly each day as the seeds continue to absorb any residual moisture. If it becomes too thick, you can stir in a splash of milk before serving.
4. Is this recipe vegan-friendly?
As written with honey, this recipe is not strictly vegan. However, it is incredibly easy to make it vegan! Simply swap the honey for a liquid vegan sweetener like pure maple syrup or agave nectar. Use the same 1-2 tablespoon measurement and follow the instructions exactly. Paired with a non-dairy milk like almond or oat milk, it becomes a delicious 100% plant-based meal.
5. Can I make chia pudding without any sweetener?
Yes, you can. If you’re avoiding added sugars, you can omit the honey entirely. The pudding will have a very neutral, earthy flavor. To add natural sweetness without sweeteners, try mixing in some mashed ripe banana or unsweetened applesauce at the beginning, or top the finished pudding with plenty of sweet fresh fruit like mangoes or peaches.
6. What is the best type of milk to use for chia pudding?
This comes down to personal preference and dietary needs. For the creamiest, most decadent pudding, use full-fat canned coconut milk or a barista-style oat milk. For a lighter, lower-calorie option, unsweetened almond milk or skim dairy milk are excellent choices. Soy milk offers a higher protein content. Experiment with different types to find your favorite!
7. My pudding is clumpy. What did I do wrong?
Clumps happen when the chia seeds stick together before they are fully hydrated. The key to preventing this is vigorous whisking. When you first combine the ingredients, you must whisk well to separate every seed. The second whisk after 5-10 minutes is equally important, as it breaks up any gels that have formed around groups of seeds. If you still have clumps, you can try to break them up with a fork or give the mixture a quick pulse in a blender.
8. Is chia pudding a healthy choice for weight loss?
Chia pudding can be a fantastic tool for weight management when prepared mindfully. It is high in fiber and protein, two nutrients that are well-known for promoting satiety (the feeling of fullness). This can help reduce overall calorie intake by preventing overeating and unnecessary snacking. To keep it weight-loss friendly, be mindful of your toppings—opt for fresh fruit and nuts over high-calorie additions like granola, chocolate, and excessive sweeteners.

Quick Chia Pudding with Honey
Ingredients
This recipe relies on a few simple, wholesome ingredients to create a delicious and nutritious pudding. Each component plays a vital role in the final texture and flavor.
- Chia Seeds (1/4 cup / 4 tablespoons): These are the star of the show. Use high-quality black or white chia seeds. They will absorb the liquid and swell up to create the signature gel-like, pudding consistency.
- Milk of Your Choice (1 cup): The liquid base for the pudding. You can use dairy milk (whole, 2%, or skim) or a non-dairy alternative like unsweetened almond milk, coconut milk (from a carton for a lighter pudding, or canned for a richer, creamier result), soy milk, or oat milk.
- Honey (1-2 tablespoons): This is our natural sweetener. The amount can be adjusted based on your personal preference for sweetness. For a truly raw and nutrient-rich option, choose raw, unfiltered honey.
- Vanilla Extract (1/2 teaspoon): A small amount of pure vanilla extract adds a wonderful depth of flavor and a warm, aromatic quality that complements the honey perfectly.
- Pinch of Salt (optional): Just a tiny pinch of sea salt or Himalayan pink salt can enhance all the other flavors and balance the sweetness of the honey.
Instructions
Follow these simple steps to achieve a perfectly smooth and clump-free chia pudding every time. The key is in the initial whisking.
- Combine Dry Ingredients: In a medium-sized bowl or a large jar (a 16-ounce mason jar works perfectly), add the 1/4 cup of chia seeds and the optional pinch of salt. Give them a quick stir to distribute the salt.
- Add Wet Ingredients: Pour the 1 cup of milk, 1-2 tablespoons of honey, and 1/2 teaspoon of vanilla extract into the bowl with the chia seeds.
- The First Whisk: Immediately begin whisking all the ingredients together vigorously for about 1-2 minutes. Your goal here is to fully incorporate the honey and, most importantly, to break up any clumps of chia seeds that are starting to form. Scrape the bottom and sides of the bowl or jar to ensure everything is well-mixed.
- The First Rest: Let the mixture sit at room temperature for 5-10 minutes. During this time, the chia seeds will begin to absorb the liquid and start the gelling process. This initial rest is crucial for preventing clumps.
- The Second Whisk: After the rest, you’ll notice the mixture has started to thicken slightly. Give it another thorough whisk for about 30-60 seconds. This second whisk is your secret weapon against a clumpy or separated pudding. It redistributes the seeds and ensures a uniform, creamy texture.
- Chill and Set: Cover the bowl with plastic wrap or seal your jar with a lid. Place the chia pudding in the refrigerator to chill and set for at least 4 hours. For the best results and a thicker consistency, let it set overnight.
- Serve and Enjoy: Once the pudding has fully set, it will be thick, creamy, and spoonable. Give it a final stir before serving and add your favorite toppings.
Nutrition
- Serving Size: one normal portion
- Calories: 210
- Fiber: 10g
- Protein: 6g