")

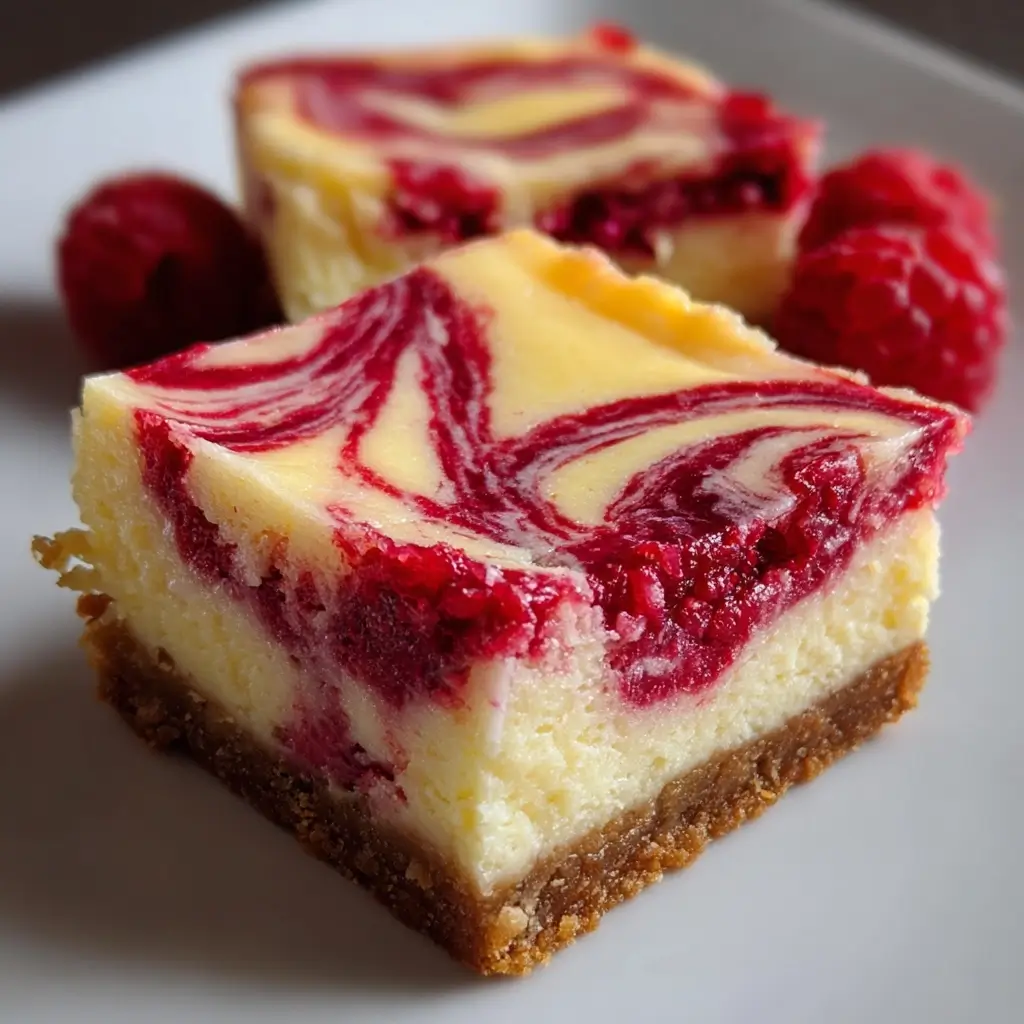

Of all the desserts that grace our family table, there are few that disappear as quickly as these Raspberry Swirl Cheesecake Bars. I first made them for a summer barbecue, thinking they’d be a nice, light alternative to a heavy chocolate cake. I was wrong about the “nice” part—they were spectacular. I was also wrong about the “light” part, because after one bite, my brother-in-law declared them “dangerously delicious” and proceeded to have three. The scene was pure, delightful chaos. My kids, who are usually picky about fruit in their desserts, were mesmerized by the ruby-red swirls and devoured their squares, leaving behind tell-tale smears of pink on their cheeks. The buttery, crisp graham cracker crust giving way to that impossibly creamy, tangy cheesecake filling, all cut through by the bright, sweet-tart explosion of the raspberry swirl… it’s a combination that simply sings. These bars have since become my go-to for potlucks, holidays, and any occasion that calls for a guaranteed crowd-pleaser. They look elegant and complicated, but the secret is they are remarkably forgiving and straightforward to create. This recipe isn’t just a set of instructions; it’s a ticket to becoming the star of your next gathering.
Ingredients
Here is everything you will need to create these stunning and delicious cheesecake bars. Each component plays a vital role in achieving the perfect balance of texture and flavor, from the sturdy, buttery crust to the silky, tangy filling and the vibrant fruit swirl.
For the Graham Cracker Crust:
- 1 ½ cups (150g) graham cracker crumbs: This forms the sweet, sandy, and buttery base of our bars. You can buy pre-made crumbs or make your own by pulsing about 10 full sheets of graham crackers in a food processor.
- ¼ cup (50g) granulated sugar: Adds a touch of sweetness to the crust, complementing the savory notes of the butter and crackers.
- 6 tablespoons (85g) unsalted butter, melted: This is the magic binder that holds the crust together, ensuring it’s firm and crisp, not crumbly, after baking.
For the Cream Cheese Filling:
- 16 ounces (452g) full-fat block cream cheese, softened to room temperature: This is the non-negotiable heart and soul of the cheesecake. Using full-fat, block-style cream cheese at room temperature is absolutely critical for a smooth, creamy, and lump-free texture. Do not use whipped or low-fat varieties.
- ¾ cup (150g) granulated sugar: Provides the primary sweetness for the filling, balancing the tang of the cream cheese and sour cream.
- 2 large eggs, at room temperature: Eggs are essential for the structure and richness of the cheesecake, helping it set into a luscious, custard-like consistency. Room temperature eggs incorporate more easily, preventing over-mixing.
- ¼ cup (60g) full-fat sour cream, at room temperature: This is the secret ingredient for an ultra-creamy texture and a delightful, subtle tang that elevates the flavor profile and cuts through the richness.
- 1 teaspoon pure vanilla extract: Adds a layer of warm, aromatic depth to the cheesecake filling, complementing both the cream cheese and the raspberry.
- 1 tablespoon all-purpose flour: A small amount of flour helps stabilize the filling, preventing it from cracking as it cools.
For the Raspberry Swirl:
- 1 cup (125g) fresh or frozen raspberries: Provides the bright, fruity, and beautifully colored swirl. Either fresh or frozen raspberries work perfectly here without any need to thaw if using frozen.
- 2 tablespoons (25g) granulated sugar: Sweetens the raspberries and helps them break down into a beautiful, syrupy sauce.
- 1 teaspoon lemon juice: Brightens the flavor of the raspberries, enhances their natural tartness, and helps the sauce thicken slightly.
- 1 tablespoon cornstarch mixed with 1 tablespoon cold water: This is our thickening agent. Creating a “slurry” with cold water first prevents lumps and ensures your raspberry sauce is the perfect consistency for swirling.
Instructions
Follow these detailed steps carefully to ensure your Raspberry Swirl Cheesecake Bars turn out perfectly every time. The process is broken down into four key stages: creating the crust, mixing the filling, preparing the raspberry sauce, and finally, assembly and baking. Patience during the cooling process is key!
Step 1: Prepare the Pan and Crust
- Preheat and Prep: Preheat your oven to 350°F (175°C). Line a 9×9 inch square baking pan with parchment paper, leaving a 2-inch overhang on two opposite sides. This “sling” will make it incredibly easy to lift the bars out of the pan for clean cutting later. Lightly grease the paper and any exposed sides of the pan.
- Mix Crust Ingredients: In a medium bowl, combine the graham cracker crumbs and ¼ cup of granulated sugar. Pour in the 6 tablespoons of melted unsalted butter and stir with a fork until all the crumbs are evenly moistened. The mixture should resemble wet sand.
- Press and Bake the Crust: Pour the crumb mixture into the prepared pan. Using the bottom of a flat glass or a measuring cup, press the crumbs down firmly and evenly across the bottom of the pan to create a compact layer. Bake the crust for 10 minutes. This pre-baking step helps create a crispier crust that won’t get soggy from the filling. Once baked, remove the pan from the oven and set it on a wire rack to cool slightly while you prepare the filling.
Step 2: Make the Creamy Cheesecake Filling
- Beat the Cream Cheese: In a large bowl, using a stand mixer with the paddle attachment or a handheld electric mixer, beat the softened block cream cheese on medium speed for about 2-3 minutes until it is completely smooth and creamy, with no lumps remaining. Scrape down the sides and bottom of the bowl frequently to ensure everything is incorporated. This initial step is crucial for a silky-smooth final product.
- Add Sugar and Wet Ingredients: Add the ¾ cup of granulated sugar and the 1 tablespoon of all-purpose flour to the cream cheese. Mix on medium-low speed until just combined. Add the room temperature sour cream and pure vanilla extract, mixing again until smooth. Remember to scrape the bowl after each addition.
- Incorporate the Eggs: Add the room temperature eggs one at a time, mixing on low speed after each addition just until the yolk disappears. Be careful not to overmix once the eggs are in! Over-mixing incorporates too much air, which can cause the cheesecake to puff up in the oven and then crack as it cools.
Step 3: Create the Vibrant Raspberry Swirl
- Cook the Raspberries: In a small saucepan over medium heat, combine the raspberries, 2 tablespoons of granulated sugar, and the teaspoon of lemon juice. Cook, stirring occasionally, until the raspberries have broken down and the mixture starts to simmer, about 5-7 minutes.
- Thicken the Sauce: While stirring the raspberry mixture, slowly pour in the cornstarch slurry (1 tablespoon cornstarch mixed with 1 tablespoon cold water). Continue to cook and stir for another 1-2 minutes until the sauce has noticeably thickened. It should be thick enough to coat the back of a spoon.
- Strain (Optional) and Cool: For a seedless, smoother swirl, press the raspberry sauce through a fine-mesh sieve into a small bowl, using a spatula to push the liquid through and leave the seeds behind. Let the sauce cool for at least 10 minutes before using. A hot sauce will sink into the batter rather than sit on top for swirling.
Step 4: Assemble, Bake, and Chill
- Assemble the Bars: Pour the prepared cheesecake filling over the slightly cooled graham cracker crust and spread it into an even layer with an offset spatula.
- Create the Swirl: Randomly drop spoonfuls of the cooled raspberry sauce over the top of the cheesecake filling. Don’t be too precise; rustic dollops work best.
- Swirl the Sauce: Take a butter knife or a wooden skewer and gently drag it through the raspberry dollops and the cheesecake filling to create a beautiful marbled or swirled pattern. Be careful not to overdo it—a few passes in each direction is all you need to create a stunning design without mixing the colors completely.
- Bake the Cheesecake: Place the pan in the preheated oven and bake for 35-45 minutes. The cheesecake is done when the edges are set and appear slightly puffed, but the very center still has a slight jiggle to it when you gently shake the pan. It should not be completely firm.
- Cooling Process (Crucial!): This multi-step cooling process is the secret to a crack-free cheesecake with the perfect texture.
- Turn off the oven, crack the oven door open, and let the cheesecake cool inside the oven for 1 hour. This gradual temperature change prevents shocking the cheesecake, which can lead to cracks.
- Remove the cheesecake from the oven and let it cool completely on a wire rack at room temperature for another 1-2 hours.
- Once at room temperature, cover the pan loosely with plastic wrap or foil and transfer it to the refrigerator to chill for at least 4 hours, but preferably overnight. This extended chilling time is non-negotiable; it allows the cheesecake to fully set, develop its flavor, and achieve that dense, creamy texture.
- Cut and Serve: Once thoroughly chilled, use the parchment paper overhangs to lift the entire cheesecake slab out of the pan and onto a cutting board. For the cleanest cuts, use a large, sharp knife, wiping it clean with a damp, hot paper towel between each slice. Cut into 16 squares and serve cold.
Nutrition Facts
- Servings: 16 bars
- Calories per serving: Approximately 290 kcal
- Fat: This dessert is rich and satisfying, primarily due to the full-fat cream cheese and butter, which are essential for its signature creamy texture.
- Carbohydrates: The majority of carbs come from the graham cracker crust and the sugars used in the filling and raspberry swirl, providing a quick source of energy.
- Sugar: The sweetness from the sugar perfectly balances the tangy cream cheese and tart raspberries, creating a well-rounded and delightful flavor profile.
Preparation time
The timeline for these bars is a testament to the fact that good things take time, but the active effort is minimal. The process involves about 25 minutes of active preparation (mixing the crust, preparing the filling, and making the sauce), 35-45 minutes of baking time, and a crucial, non-negotiable minimum of 6 hours of cooling and chilling time. For the absolute best results and firmest texture, chilling the bars overnight is highly recommended.
How to Serve
These Raspberry Swirl Cheesecake Bars are a showstopper on their own, but a few simple touches can elevate their presentation and your enjoyment. They are best served chilled, straight from the refrigerator, to maintain their firm, creamy texture.
- For a Simple, Elegant Touch:
- Dust the tops of the bars lightly with powdered sugar just before serving.
- Place a single fresh raspberry on top of each square.
- Add a small, fresh mint sprig next to the raspberry for a pop of color and fresh aroma.
- For a More Decadent Dessert Experience:
- Serve each bar with a generous dollop of freshly whipped cream or a scoop of high-quality vanilla bean ice cream.
- Drizzle the plate with a little extra raspberry sauce (you can reserve some before swirling) or a high-quality chocolate or white chocolate sauce.
- Sprinkle with delicate white chocolate shavings for an extra layer of texture and sweetness.
- Perfect Pairings for Any Occasion:
- Afternoon Treat: Pair with a hot cup of coffee, a creamy latte, or a fragrant cup of Earl Grey tea.
- Summer Barbecue: Serve alongside a pitcher of iced tea or fresh lemonade.
- Celebratory Dessert: Complement the bars with a glass of sparkling wine, Prosecco, or a light dessert wine like a Moscato.
Additional tips
Mastering this recipe is easy, but these eight expert tips will help you troubleshoot common issues and ensure your cheesecake bars are flawless every single time.
- Room Temperature Ingredients are Non-Negotiable: This is the golden rule of cheesecake making. Softened cream cheese, room temperature eggs, and sour cream blend together seamlessly, resulting in a smooth, homogenous, and lump-free batter. Cold ingredients can cause the batter to curdle and will require more mixing, which incorporates excess air and leads to cracks.
- Don’t Over-mix After Adding Eggs: When you add the eggs, mix only on low speed and just until they are incorporated. Over-beating eggs is the number one cause of cracked cheesecakes. It whips too much air into the batter, causing it to rise like a soufflé in the oven and then collapse and crack as it cools.
- The Art of the Perfect Swirl: For a distinct and beautiful swirl pattern, ensure your raspberry sauce has cooled and thickened properly. If the sauce is too warm or thin, it will bleed into the batter. When swirling with your knife or skewer, be decisive but gentle. Less is more; a few confident drags will create a more beautiful marbled effect than frantic stirring.
- Use a Parchment Paper Sling: Lining your pan with parchment paper that hangs over the sides is a game-changer. It eliminates the stress of trying to pry the first piece out of the corner and allows you to lift the entire block of cheesecake out at once for professional-looking, clean cuts.
- The Secret to Clean, Sharp Cuts: For bakery-perfect squares, use a large, sharp chef’s knife. Fill a tall glass with hot water. Dip the knife in the hot water, wipe it completely dry with a paper towel, and make one clean cut. Repeat this process—dip, wipe, cut—for every single slice. This prevents the creamy filling from dragging and smearing.
- Embrace the Long Chill: Do not rush the chilling process! The long, slow chill in the refrigerator is where the magic happens. It allows the cheesecake to fully set, firm up, and for the flavors to meld and deepen. Cutting into a warm cheesecake will result in a soft, messy texture. An overnight chill is always best.
- Make-Ahead Friendly Dessert: These bars are a perfect dessert to make ahead of an event, which frees up your time on the day of the party. You can prepare them completely up to 2 days in advance and store them, covered, in the refrigerator. Their flavor and texture will be even better on the second day.
- Fresh vs. Frozen Raspberries: This recipe is wonderfully flexible. Frozen raspberries work just as well as fresh ones for the sauce, and you don’t even need to thaw them first. They will simply take a minute or two longer to break down in the saucepan. This means you can make these delicious bars any time of year, regardless of what’s in season.
FAQ section
Here are answers to some of the most frequently asked questions about making Raspberry Swirl Cheesecake Bars.
1. Why did my cheesecake crack?
Cracking is the most common cheesecake woe, but it’s usually preventable. The main culprits are: over-mixing the batter (especially after adding eggs), baking at too high a temperature, or cooling the cheesecake too quickly. Following the instructions to mix on low, bake until the center is just slightly wobbly, and follow the multi-stage cooling process (in the oven, then on the counter, then in the fridge) will dramatically reduce the risk of cracks.
2. Can I use a different fruit for the swirl?
Absolutely! This recipe is a fantastic base for other fruit variations. Strawberries, blueberries, cherries, or even a mixed berry blend would be delicious. Simply follow the same instructions for making the sauce, adjusting the sugar slightly depending on the sweetness of your chosen fruit.
3. How can I make this recipe gluten-free?
Making a gluten-free version is very easy. Simply substitute the traditional graham crackers in the crust with your favorite gluten-free graham-style crackers or cookies. You can also make a delicious crust from a mixture of almond flour, melted butter, and a little sugar. The filling is naturally gluten-free.
4. What is the best way to store leftover cheesecake bars?
Store any leftover bars in an airtight container in the refrigerator. This will keep them from drying out or absorbing any other odors from the fridge. They will stay fresh and delicious for up to 4-5 days.
5. Can I freeze these cheesecake bars?
Yes, these bars freeze beautifully! Once they are fully chilled and cut into squares, place them on a baking sheet in a single layer and freeze until solid. Then, wrap each bar individually in plastic wrap and place them in a freezer-safe bag or container. They can be frozen for up to 2-3 months. To serve, simply thaw them in the refrigerator overnight.
6. My raspberry swirl sank to the bottom. What went wrong?
This usually happens for one of two reasons. Either the raspberry sauce was too thin, or it was still too warm when you added it to the cheesecake batter. Ensure you cook the sauce until it’s properly thickened with the cornstarch slurry and allow it to cool for at least 10 minutes so it’s dense enough to sit on top of the filling for swirling.
7. Do I need to use a water bath for these cheesecake bars?
While a water bath (bain-marie) is essential for preventing cracks in large, round cheesecakes, it is generally not necessary for thinner cheesecake bars like these. The shorter baking time and the gradual cooling process outlined in this recipe are sufficient to produce a creamy, crack-free result without the fuss of a water bath.
8. What’s the fastest way to soften cream cheese if I forgot to take it out?
Forgetting to soften the cream cheese is a common mistake! The best quick method is to unwrap the blocks, cut them into small, 1-inch cubes, and spread them out on a plate. They will soften at room temperature in about 20-30 minutes. If you’re in a real pinch, you can microwave the unwrapped blocks on a plate at 50% power for very short bursts of 10-15 seconds, flipping them over between intervals, until just softened but not melted.

Raspberry Swirl Cheesecake Bars
Ingredients
Here is everything you will need to create these stunning and delicious cheesecake bars. Each component plays a vital role in achieving the perfect balance of texture and flavor, from the sturdy, buttery crust to the silky, tangy filling and the vibrant fruit swirl.
For the Graham Cracker Crust:
- 1 ½ cups (150g) graham cracker crumbs: This forms the sweet, sandy, and buttery base of our bars. You can buy pre-made crumbs or make your own by pulsing about 10 full sheets of graham crackers in a food processor.
- ¼ cup (50g) granulated sugar: Adds a touch of sweetness to the crust, complementing the savory notes of the butter and crackers.
- 6 tablespoons (85g) unsalted butter, melted: This is the magic binder that holds the crust together, ensuring it’s firm and crisp, not crumbly, after baking.
For the Cream Cheese Filling:
- 16 ounces (452g) full-fat block cream cheese, softened to room temperature: This is the non-negotiable heart and soul of the cheesecake. Using full-fat, block-style cream cheese at room temperature is absolutely critical for a smooth, creamy, and lump-free texture. Do not use whipped or low-fat varieties.
- ¾ cup (150g) granulated sugar: Provides the primary sweetness for the filling, balancing the tang of the cream cheese and sour cream.
- 2 large eggs, at room temperature: Eggs are essential for the structure and richness of the cheesecake, helping it set into a luscious, custard-like consistency. Room temperature eggs incorporate more easily, preventing over-mixing.
- ¼ cup (60g) full-fat sour cream, at room temperature: This is the secret ingredient for an ultra-creamy texture and a delightful, subtle tang that elevates the flavor profile and cuts through the richness.
- 1 teaspoon pure vanilla extract: Adds a layer of warm, aromatic depth to the cheesecake filling, complementing both the cream cheese and the raspberry.
- 1 tablespoon all-purpose flour: A small amount of flour helps stabilize the filling, preventing it from cracking as it cools.
For the Raspberry Swirl:
- 1 cup (125g) fresh or frozen raspberries: Provides the bright, fruity, and beautifully colored swirl. Either fresh or frozen raspberries work perfectly here without any need to thaw if using frozen.
- 2 tablespoons (25g) granulated sugar: Sweetens the raspberries and helps them break down into a beautiful, syrupy sauce.
- 1 teaspoon lemon juice: Brightens the flavor of the raspberries, enhances their natural tartness, and helps the sauce thicken slightly.
- 1 tablespoon cornstarch mixed with 1 tablespoon cold water: This is our thickening agent. Creating a “slurry” with cold water first prevents lumps and ensures your raspberry sauce is the perfect consistency for swirling.
Instructions
Follow these detailed steps carefully to ensure your Raspberry Swirl Cheesecake Bars turn out perfectly every time. The process is broken down into four key stages: creating the crust, mixing the filling, preparing the raspberry sauce, and finally, assembly and baking. Patience during the cooling process is key!
Step 1: Prepare the Pan and Crust
- Preheat and Prep: Preheat your oven to 350°F (175°C). Line a 9×9 inch square baking pan with parchment paper, leaving a 2-inch overhang on two opposite sides. This “sling” will make it incredibly easy to lift the bars out of the pan for clean cutting later. Lightly grease the paper and any exposed sides of the pan.
- Mix Crust Ingredients: In a medium bowl, combine the graham cracker crumbs and ¼ cup of granulated sugar. Pour in the 6 tablespoons of melted unsalted butter and stir with a fork until all the crumbs are evenly moistened. The mixture should resemble wet sand.
- Press and Bake the Crust: Pour the crumb mixture into the prepared pan. Using the bottom of a flat glass or a measuring cup, press the crumbs down firmly and evenly across the bottom of the pan to create a compact layer. Bake the crust for 10 minutes. This pre-baking step helps create a crispier crust that won’t get soggy from the filling. Once baked, remove the pan from the oven and set it on a wire rack to cool slightly while you prepare the filling.
Step 2: Make the Creamy Cheesecake Filling
- Beat the Cream Cheese: In a large bowl, using a stand mixer with the paddle attachment or a handheld electric mixer, beat the softened block cream cheese on medium speed for about 2-3 minutes until it is completely smooth and creamy, with no lumps remaining. Scrape down the sides and bottom of the bowl frequently to ensure everything is incorporated. This initial step is crucial for a silky-smooth final product.
- Add Sugar and Wet Ingredients: Add the ¾ cup of granulated sugar and the 1 tablespoon of all-purpose flour to the cream cheese. Mix on medium-low speed until just combined. Add the room temperature sour cream and pure vanilla extract, mixing again until smooth. Remember to scrape the bowl after each addition.
- Incorporate the Eggs: Add the room temperature eggs one at a time, mixing on low speed after each addition just until the yolk disappears. Be careful not to overmix once the eggs are in! Over-mixing incorporates too much air, which can cause the cheesecake to puff up in the oven and then crack as it cools.
Step 3: Create the Vibrant Raspberry Swirl
- Cook the Raspberries: In a small saucepan over medium heat, combine the raspberries, 2 tablespoons of granulated sugar, and the teaspoon of lemon juice. Cook, stirring occasionally, until the raspberries have broken down and the mixture starts to simmer, about 5-7 minutes.
- Thicken the Sauce: While stirring the raspberry mixture, slowly pour in the cornstarch slurry (1 tablespoon cornstarch mixed with 1 tablespoon cold water). Continue to cook and stir for another 1-2 minutes until the sauce has noticeably thickened. It should be thick enough to coat the back of a spoon.
- Strain (Optional) and Cool: For a seedless, smoother swirl, press the raspberry sauce through a fine-mesh sieve into a small bowl, using a spatula to push the liquid through and leave the seeds behind. Let the sauce cool for at least 10 minutes before using. A hot sauce will sink into the batter rather than sit on top for swirling.
Step 4: Assemble, Bake, and Chill
- Assemble the Bars: Pour the prepared cheesecake filling over the slightly cooled graham cracker crust and spread it into an even layer with an offset spatula.
- Create the Swirl: Randomly drop spoonfuls of the cooled raspberry sauce over the top of the cheesecake filling. Don’t be too precise; rustic dollops work best.
- Swirl the Sauce: Take a butter knife or a wooden skewer and gently drag it through the raspberry dollops and the cheesecake filling to create a beautiful marbled or swirled pattern. Be careful not to overdo it—a few passes in each direction is all you need to create a stunning design without mixing the colors completely.
- Bake the Cheesecake: Place the pan in the preheated oven and bake for 35-45 minutes. The cheesecake is done when the edges are set and appear slightly puffed, but the very center still has a slight jiggle to it when you gently shake the pan. It should not be completely firm.
- Cooling Process (Crucial!): This multi-step cooling process is the secret to a crack-free cheesecake with the perfect texture.
- Turn off the oven, crack the oven door open, and let the cheesecake cool inside the oven for 1 hour. This gradual temperature change prevents shocking the cheesecake, which can lead to cracks.
- Remove the cheesecake from the oven and let it cool completely on a wire rack at room temperature for another 1-2 hours.
- Once at room temperature, cover the pan loosely with plastic wrap or foil and transfer it to the refrigerator to chill for at least 4 hours, but preferably overnight. This extended chilling time is non-negotiable; it allows the cheesecake to fully set, develop its flavor, and achieve that dense, creamy texture.
- Cut and Serve: Once thoroughly chilled, use the parchment paper overhangs to lift the entire cheesecake slab out of the pan and onto a cutting board. For the cleanest cuts, use a large, sharp knife, wiping it clean with a damp, hot paper towel between each slice. Cut into 16 squares and serve cold.
Nutrition
- Serving Size: one normal portion
- Calories: 290