")

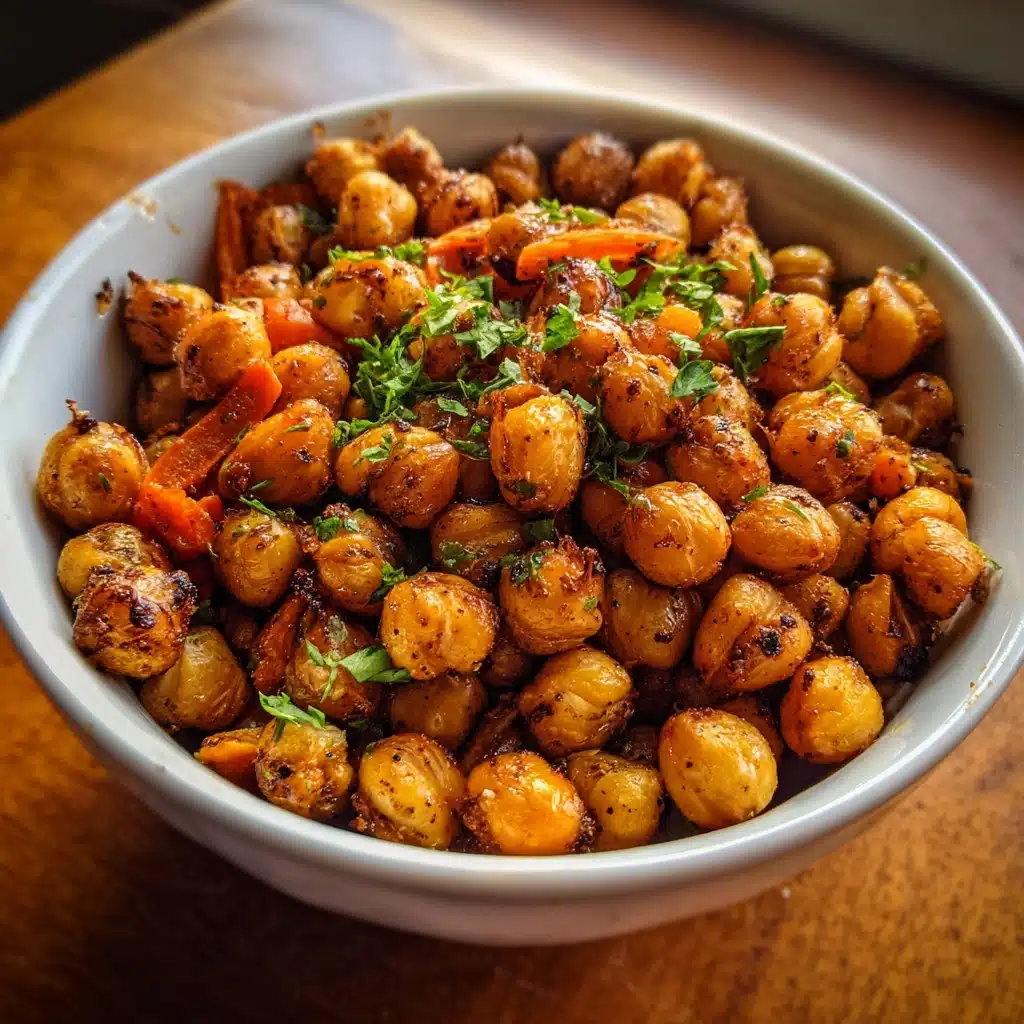

I can still remember the first time I made this Roasted Chickpea Snack Bowl. It was a hectic Tuesday afternoon, and the familiar “I’m hungry!” chorus was starting up from the kids, while I myself was craving something savory and satisfying that wouldn’t derail my healthy eating goals. I had a couple of cans of chickpeas in the pantry and a vague memory of a recipe I’d seen online. On a whim, I decided to give it a try. I wasn’t expecting much, to be honest—just a simple snack to tide everyone over. But what came out of the oven that day was nothing short of a revelation. The chickpeas were impossibly crispy, bursting with smoky, savory flavor. Paired with the creamy avocado, juicy tomatoes, and crisp cucumbers, it was a symphony of textures and tastes. My family, who usually turns their noses up at anything too “healthy,” devoured their bowls in minutes and immediately asked when we could have it again. Since that day, this snack bowl has become our go-to for everything: a quick and filling lunch, an after-school snack, a light dinner, and even a crowd-pleasing appetizer when guests come over. It’s the kind of recipe that makes you feel good from the inside out—wholesome, delicious, and incredibly versatile.
Ingredients
This recipe is built on a foundation of simple, wholesome ingredients that come together to create a complex and satisfying flavor profile. Each component is chosen not just for its taste, but for the unique texture and nutritional value it brings to the bowl.
- For the Roasted Chickpeas:
- 2 (15-ounce) cans of chickpeas (garbanzo beans): The star of the show. Using canned chickpeas makes this recipe incredibly fast and convenient. Look for low-sodium options if possible.
- 2 tablespoons olive oil: This is essential for getting that perfectly crispy, golden-brown exterior. A good quality extra-virgin olive oil will also add a subtle, fruity flavor.
- 1 teaspoon smoked paprika: This spice is the secret weapon, providing a deep, smoky flavor that mimics the savoriness of heartier foods without any of the heaviness.
- 1 teaspoon garlic powder: Adds a foundational savory, aromatic note that pairs beautifully with all the other ingredients.
- ½ teaspoon onion powder: Lends a subtle sweetness and depth of flavor that complements the garlic powder.
- ½ teaspoon salt (or to taste): Crucial for enhancing all the other flavors. Start with a half teaspoon and adjust after roasting.
- ¼ teaspoon black pepper: Provides a gentle hint of warmth and spice.
- For the Snack Bowl Assembly:
- 1 large avocado, diced: Adds a wonderful creamy texture and healthy fats, which make the snack bowl more filling and satisfying.
- 1 cup cherry tomatoes, halved: These provide a burst of juicy sweetness and a beautiful pop of color.
- 1 cup cucumber, diced: Adds a refreshing, cool crunch that contrasts perfectly with the warm, crispy chickpeas.
- ¼ cup red onion, finely diced: Offers a sharp, zesty bite that cuts through the richness of the avocado and the earthiness of the chickpeas.
- 2 tablespoons fresh cilantro or parsley, chopped: Brings a bright, herbaceous freshness that ties the entire bowl together.
- Juice of 1 lime: The acidity is key. It brightens up all the flavors and prevents the avocado from browning too quickly.
Instructions
Follow these detailed steps carefully to ensure your chickpeas are perfectly crispy and your snack bowl is beautifully balanced. The magic is in the method, particularly in how you prepare the chickpeas before they ever see the oven.
- Prepare the Oven and Baking Sheet: First things first, preheat your oven to 400°F (200°C). A hot oven is crucial for achieving that desirable crispy texture. If the oven isn’t fully preheated, the chickpeas will steam rather than roast, resulting in a softer texture. Line a large, rimmed baking sheet with parchment paper for easy cleanup and to prevent the chickpeas from sticking.
- Rinse and Dry the Chickpeas (The Most Important Step!): Open the cans of chickpeas and pour them into a colander. Rinse them thoroughly under cold running water. You’ll notice a foamy liquid washing away; this is aquafaba, and rinsing it off helps the chickpeas get crispier. Now, for the critical part: drying. Spread the rinsed chickpeas out on a clean kitchen towel or a thick layer of paper towels. Gently pat them dry, and then roll them around in the towel to remove as much moisture as possible. The drier the chickpeas, the crispier they will become. Water is the enemy of crispiness! For extra credit, you can let them air-dry on the counter for 30 minutes.
- Remove the Skins (Optional but Recommended): For an even crispier result, take a few extra minutes to remove the loose, translucent skins from the chickpeas. As you gently rub them in the towel, many of the skins will come off on their own. You can then easily pick off the remaining ones. While this step is optional, it makes a noticeable difference in the final texture.
- Season the Chickpeas: Transfer the thoroughly dried chickpeas to a medium-sized bowl. Drizzle them with the 2 tablespoons of olive oil and toss them well until every single chickpea is lightly coated. This layer of fat is what helps conduct the oven’s heat and fry the exterior of the chickpeas. In a separate small bowl, whisk together the smoked paprika, garlic powder, onion powder, salt, and black pepper. Sprinkling this spice blend over the oiled chickpeas and toss again until they are evenly seasoned.
- Roast to Perfection: Spread the seasoned chickpeas in a single, even layer on your prepared baking sheet. It is vital that they are not overcrowded. If they are piled on top of each other, they will steam instead of roast. Use two baking sheets if necessary. Place the baking sheet in the preheated oven and roast for 20-30 minutes.
- Shake and Continue Roasting: After about 15 minutes of roasting, take the baking sheet out and give it a good shake. This helps the chickpeas to brown evenly on all sides. Return them to the oven and continue to roast for another 5-15 minutes. The chickpeas are done when they are a deep golden brown, feel dry to the touch, and are audibly crunchy when you shake the pan. They will get even crispier as they cool.
- Prepare the Bowl Components: While the chickpeas are roasting, you can prepare the fresh ingredients. Dice the avocado, halve the cherry tomatoes, dice the cucumber and red onion, and chop your fresh herbs. Place all of these ingredients into a large mixing bowl.
- Assemble the Snack Bowl: Once the chickpeas are done roasting, remove them from the oven and let them cool on the baking sheet for about 5 minutes. They will continue to crisp up during this time. Add the warm, roasted chickpeas to the bowl with the fresh vegetables. Squeeze the juice of one lime over everything and gently toss to combine.
- Serve Immediately: Divide the mixture into individual serving bowls and enjoy immediately while the chickpeas are at their peak crispiness.
Nutrition Facts
This snack bowl is designed to be as nourishing as it is delicious. It’s packed with plant-based goodness that fuels your body and satisfies your cravings.
- Servings: 4 servings
- Calories per serving: Approximately 350-400 kcal
- High in Plant-Based Protein: Each serving provides a significant amount of protein, primarily from the chickpeas. Protein is essential for building and repairing tissues, supporting muscle health, and keeping you feeling full and satisfied long after you’ve finished eating.
- Excellent Source of Dietary Fiber: This bowl is loaded with fiber from the chickpeas, avocado, and vegetables. Fiber is crucial for digestive health, helping to regulate blood sugar levels, lower cholesterol, and promote a feeling of satiety, which can aid in weight management.
- Rich in Healthy Fats: The avocado and olive oil contribute heart-healthy monounsaturated fats. These beneficial fats are known to support brain health, reduce inflammation, and improve cholesterol levels, making this a truly heart-smart snack.
- Packed with Vitamins and Minerals: This vibrant bowl is a powerhouse of essential micronutrients. You’ll get a healthy dose of iron and folate from the chickpeas, Vitamin C from the tomatoes and lime juice, and potassium from the avocado, all of which are vital for energy production and overall well-being.
- Naturally Gluten-Free and Vegan: Made entirely from plant-based ingredients, this recipe is naturally free from gluten, dairy, and any animal products, making it a fantastic and inclusive option for individuals with various dietary needs and preferences.
Preparation time
The beauty of this recipe lies in its efficiency, making it perfect for busy weekdays or last-minute cravings.
- Active Preparation Time: 15 minutes. This includes rinsing and drying the chickpeas, preparing the spices, and chopping the fresh vegetables for the bowl.
- Cooking Time: 20-30 minutes. This is the hands-off roasting time for the chickpeas in the oven.
- Total Time: 35-45 minutes. From start to finish, you can have this wholesome and incredibly delicious snack bowl on the table in under an hour, with most of that time being passive cooking time.
How to Serve
This Roasted Chickpea Snack Bowl is wonderfully versatile. While it’s perfect on its own, it can be served in a variety of ways to suit any occasion or meal.
- As a Standalone Snack or Light Lunch:
- Serve it warm in individual bowls just as the recipe directs.
- The combination of warm, crispy chickpeas and cool, fresh vegetables is incredibly satisfying on its own.
- It’s a perfect balanced, all-in-one meal for one or two people.
- As a Hearty Salad Topper:
- Use the roasted chickpeas as a protein-packed, crunchy alternative to croutons.
- Sprinkle a generous handful over a bed of mixed greens, spinach, or arugula.
- Drizzle with a simple vinaigrette or a creamy tahini dressing to complement the flavors.
- As a Filling for Wraps or Tacos:
- Spoon the entire mixture into a warm tortilla or a crisp lettuce wrap.
- Add a dollop of Greek yogurt, hummus, or a drizzle of your favorite hot sauce for extra flavor and creaminess.
- This transforms the snack bowl into a portable and satisfying lunch.
- As a Vibrant Party Appetizer:
- Serve the entire mixture in a large, shallow bowl with a serving spoon.
- Provide tortilla chips, pita chips, or sturdy crackers on the side for scooping.
- It functions as a unique, textured salsa or dip that is sure to be a conversation starter.
- As a Component in a “Mezze” Platter:
- Place a bowl of the Roasted Chickpea Snack Bowl on a large board.
- Surround it with other complementary items like hummus, baba ghanoush, feta cheese, olives, and warm pita bread.
- This creates a beautiful and interactive dining experience for guests.
Additional tips
Want to take your snack bowl to the next level or customize it to your liking? Here are eight expert tips to ensure perfect results every time.
- Master the Art of Crispiness: The non-negotiable secret to crispy chickpeas is making them bone dry. After rinsing, don’t just pat them dry—let them sit out on a towel for 30-60 minutes to air dry. The less moisture on their surface, the more they will roast and crisp rather than steam.
- Experiment with Spice Blends: This recipe is a blank canvas. Don’t be afraid to switch up the spices. Try a Mexican-inspired blend with chili powder, cumin, and a pinch of cayenne. For an Italian flair, use dried oregano, basil, and a little red pepper flake. You could even go for a sweet and spicy version with cinnamon, a little sugar, and cayenne.
- The Secret to Storing: Roasted chickpeas are notorious for losing their crunch. The best way to store leftovers is in a container that is not airtight, such as a paper bag or a bowl loosely covered with a paper towel, at room temperature. An airtight container will trap moisture and make them soft. They are best enjoyed within 2 days. To re-crisp, simply toss them in a 400°F oven or an air fryer for 3-5 minutes.
- Embrace the Air Fryer: If you have an air fryer, it’s a fantastic tool for this recipe. Prepare the chickpeas as directed, then cook them in the air fryer at 390°F (195°C) for 12-15 minutes, shaking the basket every 5 minutes, until they are golden and crispy. They often get even crunchier in the air fryer.
- Don’t Crowd the Pan: This tip cannot be overstated. When you spread the chickpeas on the baking sheet, make sure they are in a single layer with a little bit of space between them. This allows the hot air to circulate around each individual chickpea, ensuring they all get evenly roasted and crispy. If your pan is too small, use two.
- Add Hardy Spices Early, Delicate Herbs Late: Spices like paprika, garlic powder, and cumin are robust and can handle the high heat of the oven. However, if you want to add flavor with fresh herbs like rosemary or thyme, it’s best to add them in the last 5-10 minutes of roasting to prevent them from burning and becoming bitter.
- Let Them Cool Before Mixing: For maximum crunch, allow the roasted chickpeas to cool on the baking sheet for at least 5-10 minutes before you toss them with the fresh, wet ingredients like tomatoes and avocado. The initial heat can create steam when it hits the cool vegetables, which can soften the chickpeas’ crispy exterior.
- Don’t Toss the Aquafaba: The liquid from the can of chickpeas (aquafaba) is a magical ingredient in vegan cooking. Don’t pour it down the drain! You can save it and use it as an egg white substitute to make things like vegan meringue, mousse, or fluffy baked goods. Store it in an airtight container in the fridge for a few days.
FAQ section
Here are answers to some of the most common questions about making the perfect Roasted Chickpea Snack Bowl.
1. Why are my roasted chickpeas not crispy?
This is the most common issue, and it almost always comes down to moisture. There are three main culprits: the chickpeas weren’t dried thoroughly enough before roasting, the baking sheet was overcrowded, causing them to steam, or they were stored in an airtight container, which traps humidity. To fix this, ensure they are bone dry, give them plenty of space on the pan, and store them in a container that can breathe.
2. Can I use dried chickpeas instead of canned?
Absolutely! Using dried chickpeas is more economical and can result in an even better texture. You will need to soak them overnight and then cook them until tender before proceeding with the recipe. One cup of dried chickpeas will yield about 3 cups of cooked chickpeas, which is roughly the equivalent of two 15-ounce cans.
3. How long will the assembled snack bowl last?
This snack bowl is best enjoyed immediately after assembly to experience the delightful contrast between the warm, crispy chickpeas and the cool, fresh vegetables. Once mixed, the moisture from the vegetables will begin to soften the chickpeas within an hour or two. If you have leftovers, they will still be delicious but will have a softer texture.
4. Is this recipe healthy?
Yes, this is an exceptionally healthy recipe. It’s balanced with plant-based protein, healthy fats, complex carbohydrates, and high fiber. It’s packed with vitamins and minerals and is free from processed ingredients. It’s the kind of snack that provides sustained energy and genuine nourishment.
5. Can I prepare parts of this recipe in advance?
Yes, you can. You can roast the chickpeas up to two days ahead of time and store them in a paper bag at room temperature. You can also chop the cucumber and red onion and store them in an airtight container in the refrigerator. However, for the best results, wait to dice the avocado and halve the tomatoes until just before you’re ready to assemble and serve.
6. What other vegetables or ingredients can I add to the bowl?
This bowl is highly customizable! Feel free to add other ingredients based on what you have on hand. Some great additions include crumbled feta or goat cheese (if not vegan), chopped bell peppers for extra crunch, corn (canned or roasted), cooked quinoa for more substance, or a handful of Kalamata olives for a salty, briny kick.
7. My spices burned in the oven. What went wrong?
If your spices are burning, your oven temperature might be too high, or you might be using spices with a high sugar content. Ensure your oven rack is in the middle position, not too close to the top heating element. If you want to add a sweetener like maple syrup or honey for a sweet and savory flavor, it’s best to toss the chickpeas in it during the last 2-3 minutes of roasting, as sugars can burn quickly.
8. Is it necessary to remove the chickpea skins?
It is not strictly necessary, and you can still get a very good result without removing them. However, taking the extra 5 minutes to pop off the skins allows the surface of the chickpea to have more direct contact with the hot oil and air, resulting in a lighter, airier, and noticeably crispier final product. We highly recommend it if you’re aiming for ultimate crunch.

Roasted Chickpea Snack Bowl
Ingredients
This recipe is built on a foundation of simple, wholesome ingredients that come together to create a complex and satisfying flavor profile. Each component is chosen not just for its taste, but for the unique texture and nutritional value it brings to the bowl.
- For the Roasted Chickpeas:
- 2 (15-ounce) cans of chickpeas (garbanzo beans): The star of the show. Using canned chickpeas makes this recipe incredibly fast and convenient. Look for low-sodium options if possible.
- 2 tablespoons olive oil: This is essential for getting that perfectly crispy, golden-brown exterior. A good quality extra-virgin olive oil will also add a subtle, fruity flavor.
- 1 teaspoon smoked paprika: This spice is the secret weapon, providing a deep, smoky flavor that mimics the savoriness of heartier foods without any of the heaviness.
- 1 teaspoon garlic powder: Adds a foundational savory, aromatic note that pairs beautifully with all the other ingredients.
- ½ teaspoon onion powder: Lends a subtle sweetness and depth of flavor that complements the garlic powder.
- ½ teaspoon salt (or to taste): Crucial for enhancing all the other flavors. Start with a half teaspoon and adjust after roasting.
- ¼ teaspoon black pepper: Provides a gentle hint of warmth and spice.
- For the Snack Bowl Assembly:
- 1 large avocado, diced: Adds a wonderful creamy texture and healthy fats, which make the snack bowl more filling and satisfying.
- 1 cup cherry tomatoes, halved: These provide a burst of juicy sweetness and a beautiful pop of color.
- 1 cup cucumber, diced: Adds a refreshing, cool crunch that contrasts perfectly with the warm, crispy chickpeas.
- ¼ cup red onion, finely diced: Offers a sharp, zesty bite that cuts through the richness of the avocado and the earthiness of the chickpeas.
- 2 tablespoons fresh cilantro or parsley, chopped: Brings a bright, herbaceous freshness that ties the entire bowl together.
- Juice of 1 lime: The acidity is key. It brightens up all the flavors and prevents the avocado from browning too quickly.
Instructions
Follow these detailed steps carefully to ensure your chickpeas are perfectly crispy and your snack bowl is beautifully balanced. The magic is in the method, particularly in how you prepare the chickpeas before they ever see the oven.
- Prepare the Oven and Baking Sheet: First things first, preheat your oven to 400°F (200°C). A hot oven is crucial for achieving that desirable crispy texture. If the oven isn’t fully preheated, the chickpeas will steam rather than roast, resulting in a softer texture. Line a large, rimmed baking sheet with parchment paper for easy cleanup and to prevent the chickpeas from sticking.
- Rinse and Dry the Chickpeas (The Most Important Step!): Open the cans of chickpeas and pour them into a colander. Rinse them thoroughly under cold running water. You’ll notice a foamy liquid washing away; this is aquafaba, and rinsing it off helps the chickpeas get crispier. Now, for the critical part: drying. Spread the rinsed chickpeas out on a clean kitchen towel or a thick layer of paper towels. Gently pat them dry, and then roll them around in the towel to remove as much moisture as possible. The drier the chickpeas, the crispier they will become. Water is the enemy of crispiness! For extra credit, you can let them air-dry on the counter for 30 minutes.
- Remove the Skins (Optional but Recommended): For an even crispier result, take a few extra minutes to remove the loose, translucent skins from the chickpeas. As you gently rub them in the towel, many of the skins will come off on their own. You can then easily pick off the remaining ones. While this step is optional, it makes a noticeable difference in the final texture.
- Season the Chickpeas: Transfer the thoroughly dried chickpeas to a medium-sized bowl. Drizzle them with the 2 tablespoons of olive oil and toss them well until every single chickpea is lightly coated. This layer of fat is what helps conduct the oven’s heat and fry the exterior of the chickpeas. In a separate small bowl, whisk together the smoked paprika, garlic powder, onion powder, salt, and black pepper. Sprinkling this spice blend over the oiled chickpeas and toss again until they are evenly seasoned.
- Roast to Perfection: Spread the seasoned chickpeas in a single, even layer on your prepared baking sheet. It is vital that they are not overcrowded. If they are piled on top of each other, they will steam instead of roast. Use two baking sheets if necessary. Place the baking sheet in the preheated oven and roast for 20-30 minutes.
- Shake and Continue Roasting: After about 15 minutes of roasting, take the baking sheet out and give it a good shake. This helps the chickpeas to brown evenly on all sides. Return them to the oven and continue to roast for another 5-15 minutes. The chickpeas are done when they are a deep golden brown, feel dry to the touch, and are audibly crunchy when you shake the pan. They will get even crispier as they cool.
- Prepare the Bowl Components: While the chickpeas are roasting, you can prepare the fresh ingredients. Dice the avocado, halve the cherry tomatoes, dice the cucumber and red onion, and chop your fresh herbs. Place all of these ingredients into a large mixing bowl.
- Assemble the Snack Bowl: Once the chickpeas are done roasting, remove them from the oven and let them cool on the baking sheet for about 5 minutes. They will continue to crisp up during this time. Add the warm, roasted chickpeas to the bowl with the fresh vegetables. Squeeze the juice of one lime over everything and gently toss to combine.
- Serve Immediately: Divide the mixture into individual serving bowls and enjoy immediately while the chickpeas are at their peak crispiness.
Nutrition
- Serving Size: one normal portion
- Calories: 400