")


Of all the recipes that have graced my family’s dinner table, few have achieved the legendary status of these Savory Honey Garlic Chicken Thighs. It started on a frantic Tuesday evening, the kind where everyone is hungry and patience is wearing thin. I needed a win—something delicious, relatively quick, and guaranteed to produce clean plates. I stumbled upon the classic honey-garlic combination but decided to lean more into the savory, umami-rich elements to balance the sweetness. As the chicken sizzled in the pan, a magical aroma began to fill the kitchen—a rich, caramelized scent of garlic, ginger, and soy sauce, kissed with the subtle sweetness of honey. My kids, usually engrossed in their own worlds, slowly migrated to the kitchen, drawn in by the promise of what was to come. When I finally served it, glistening and perfect, over a bed of fluffy rice, the silence that followed was the highest compliment. Forks clinked, and the only words spoken were requests for a second helping. It’s more than just a recipe now; it’s our go-to comfort meal, our celebration dish, and the undisputed champion of weeknight dinners. This dish proves that you don’t need complicated techniques or exotic ingredients to create a meal that feels both incredibly special and deeply satisfying. It’s a recipe that builds confidence in the kitchen and creates happy memories around the table, one sticky, savory, and utterly irresistible bite at a time.
Ingredients
Here is the curated list of ingredients you will need to create this culinary masterpiece. Each component plays a vital role in building the layers of savory, sweet, and aromatic flavors that make this dish unforgettable.
- 2 lbs (about 900g) Boneless, Skinless Chicken Thighs: The star of the show. Chicken thighs are chosen for their rich flavor and succulent, juicy texture. They are far more forgiving than chicken breasts and remain tender even when cooked at high heat. Pat them thoroughly dry before cooking to ensure a beautiful golden-brown sear.
- 1 tbsp Olive Oil: A quality olive oil is used for searing the chicken, helping to create a delicious crust and preventing it from sticking to the pan.
- 1/2 cup Low-Sodium Soy Sauce: This is the umami-rich backbone of our sauce. Using a low-sodium version gives you better control over the final saltiness of the dish, allowing the other flavors to shine through.
- 1/3 cup Honey: The sweet counterpoint to the savory soy sauce. It not only adds flavor but also helps create that signature thick, sticky glaze that coats the chicken so beautifully. Any standard liquid honey will work perfectly.
- 4-6 Cloves Garlic, Minced: This is not a time for subtlety with garlic. A generous amount of freshly minced garlic provides a pungent, aromatic depth that is absolutely essential. Avoid pre-minced jarred garlic if possible, as fresh cloves offer a much more vibrant flavor.
- 1 tbsp Freshly Grated Ginger: Ginger adds a warm, zesty spice that cuts through the richness of the sauce and brightens the overall flavor profile. Its aromatic quality complements the garlic perfectly.
- 1 tbsp Rice Vinegar: A secret weapon for balancing the sauce. The gentle acidity of rice vinegar cuts through the sweetness of the honey and the saltiness of the soy sauce, creating a perfectly harmonious and well-rounded flavor.
- 1 tsp Sesame Oil: Used as a finishing touch, toasted sesame oil adds a wonderful nutty aroma and a distinct, deep flavor that elevates the sauce from great to exceptional.
- 1/4 tsp Black Pepper: Freshly ground black pepper adds a mild, woody heat that enhances all the other ingredients.
- 1 tbsp Cornstarch + 2 tbsp Water (for a slurry): This simple mixture is the key to transforming the thin sauce into a thick, luscious glaze that clings to every inch of the chicken.
- For Garnish (Optional): Toasted sesame seeds and thinly sliced green onions (scallions) add a final touch of freshness, a slight crunch, and a beautiful visual appeal to the finished dish.
Instructions
Follow these detailed steps carefully to ensure your chicken thighs are perfectly cooked, wonderfully juicy, and coated in a spectacular honey garlic glaze. The process is broken down into preparing the components, cooking the chicken, and finishing the sauce for an easy-to-follow experience.
Step 1: Prepare the Chicken
First and foremost, prepare your chicken. Remove the boneless, skinless chicken thighs from their packaging and place them on a cutting board lined with paper towels. Use additional paper towels to pat each thigh completely dry on all sides. This is a critical step! Removing excess moisture is the secret to achieving a fantastic, golden-brown sear in the pan. If the chicken is wet, it will steam instead of sear, resulting in a less flavorful and texturally inferior final product. Once dry, season both sides of the chicken thighs lightly with the black pepper. Set aside while you prepare the sauce.
Step 2: Whisk Together the Sauce
In a medium-sized bowl, combine the low-sodium soy sauce, honey, minced garlic, grated ginger, and rice vinegar. Whisk these ingredients together until the honey is fully dissolved and everything is well-incorporated. This aromatic mixture will be the soul of your dish. Set the bowl aside for now.
Step 3: Prepare the Cornstarch Slurry
In a separate small bowl, combine the 1 tablespoon of cornstarch with 2 tablespoons of cold water. Whisk vigorously until the cornstarch is completely dissolved and there are no lumps. This is your cornstarch slurry, which you will use later to thicken the sauce into a beautiful glaze. Setting this up now will make the final steps of cooking smoother and faster.
Step 4: Sear the Chicken Thighs
Place a large skillet or cast-iron pan over medium-high heat. Add the 1 tablespoon of olive oil and let it heat up until it shimmers slightly. Carefully place the prepared chicken thighs in the hot pan, ensuring you don’t overcrowd it. If necessary, cook the chicken in two batches. Cook the thighs for about 5-7 minutes on the first side, undisturbed, until a deep golden-brown crust has formed. Flip the chicken thighs over and cook for another 5-7 minutes on the second side until they are cooked through and equally golden. The internal temperature should reach 165°F (74°C) when checked with a meat thermometer.
Step 5: Create the Glaze
Once the chicken is fully cooked, reduce the heat to low. If you have excess fat in the pan, you can carefully drain some of it off, leaving about a tablespoon for flavor. Pour the prepared honey garlic sauce mixture directly into the skillet with the chicken. The sauce will begin to bubble and simmer immediately. Let it cook for 1-2 minutes, stirring gently and spooning the sauce over the chicken thighs to coat them.
Step 6: Thicken the Sauce and Finish
Now, give your cornstarch slurry a quick re-whisk (as it can settle) and pour it into the simmering sauce in the skillet. Stir continuously. You will see the sauce begin to thicken almost instantly, transforming into a rich, glossy glaze. Continue to cook for another 1-2 minutes, constantly turning the chicken thighs to ensure they are completely coated in the glorious, sticky sauce. The glaze should be thick enough to cling to the back of a spoon.
Step 7: Final Touches and Serving
Remove the skillet from the heat. Stir in the 1 teaspoon of toasted sesame oil for that final burst of nutty aroma and flavor. Let the chicken rest in the pan for a few minutes. To serve, transfer the glazed chicken thighs to a platter. Drizzle any remaining sauce from the pan over the top. Garnish generously with toasted sesame seeds and freshly sliced green onions for a vibrant finish. Serve immediately and enjoy the fruits of your labor!
Nutrition Facts
This recipe is designed for robust flavor, but it’s helpful to understand its nutritional profile. The values are an approximation and can vary based on specific ingredients and portion sizes.
- Servings: This recipe yields approximately 4-6 servings.
- Calories Per Serving: Approximately 380-450 calories per serving.
- Protein: A significant source of high-quality protein, crucial for muscle repair, growth, and overall body function. Chicken thighs provide a substantial amount to keep you feeling full and satisfied.
- Sodium: While we use low-sodium soy sauce to mitigate it, this dish is still savory. Being mindful of your sodium intake throughout the rest of the day is a good practice.
- Sugar: The honey contributes natural sugars, which are responsible for the delicious caramelization and sweet flavor. This is balanced by the savory and acidic components of the sauce.
Preparation Time
This dish is a fantastic option for busy weeknights because it delivers a gourmet taste without requiring hours in the kitchen.
- Active Preparation Time: Approximately 15 minutes. This includes patting the chicken dry, mincing the garlic, grating the ginger, and whisking the sauce together.
- Cooking Time: Approximately 20-25 minutes. This covers the searing of the chicken and the simmering and thickening of the sauce.
- Total Time: From start to finish, you can have these incredible Savory Honey Garlic Chicken Thighs on the table in about 35-40 minutes, making it a true weeknight hero.
How to Serve
The versatility of these Honey Garlic Chicken Thighs is one of their greatest strengths. They can be dressed up or down and pair beautifully with a wide array of side dishes. Here are some fantastic ways to serve them to create a complete and satisfying meal.
- Classic Comfort Pairings:
- Steamed Jasmine or Basmati Rice: This is the ultimate pairing. The light, fluffy grains of rice are the perfect vehicle for soaking up every last drop of the delectable honey garlic glaze.
- Creamy Mashed Potatoes: The rich, savory chicken is a wonderful contrast to smooth, buttery mashed potatoes. The sauce acts as a delicious alternative to traditional gravy.
- Garlic Butter Noodles: Simple egg noodles or spaghetti tossed in garlic butter and parsley create a carb-lover’s dream when served alongside this chicken.
- Healthy and Light Options:
- Quinoa: A protein-packed, nutty-flavored grain that provides a healthy and satisfying base for the chicken.
- Cauliflower Rice: For a low-carb, keto-friendly option, serve the chicken over a bed of steamed or sautéed cauliflower rice.
- Large Leafy Green Salad: A simple salad with a light vinaigrette (like a sesame ginger dressing) can provide a fresh, crisp contrast to the rich, savory chicken.
- Roasted or Steamed Vegetables:
- Roasted Broccoli or Broccolini: The slight bitterness and charred edges of roasted broccoli are a perfect complement to the sweet and savory sauce.
- Steamed Green Beans: A simple side of crisp-tender steamed green beans, perhaps tossed with a few toasted almonds, adds color and a fresh snap to the plate.
- Sautéed Bok Choy: To lean into the Asian-inspired flavors, quickly sauté some baby bok choy with a little extra garlic.
- Creative and Fun Presentations:
- Lettuce Wraps: Slice the cooked chicken into strips and serve with large, crisp lettuce cups (like butter or iceberg), shredded carrots, and cilantro for a fun, interactive meal.
- Chicken Tacos: Shred the chicken and place it in warm tortillas. Top with a quick Asian-inspired slaw made from cabbage, carrots, and a rice vinegar dressing.
- Meal Prep Bowls: Portion the chicken with rice and a steamed vegetable like edamame or broccoli for easy, delicious, and satisfying grab-and-go lunches for the week.
Additional Tips
To help you master this recipe and adapt it to your preferences, here are eight valuable tips that will ensure perfect results every time.
- Don’t Skip the Sear: The initial step of searing the chicken over medium-high heat is crucial. It does more than just cook the chicken; it creates the Maillard reaction, a chemical process that develops deep, complex flavors and a wonderfully golden-brown crust. This texture adds another dimension to the final dish.
- Use a Meat Thermometer: For perfectly juicy chicken every time, the most reliable tool is an instant-read meat thermometer. Chicken thighs are forgiving, but to guarantee they are cooked through (165°F / 74°C) without being overcooked and dry, a thermometer is your best friend.
- Control the Sauce Thickness: The cornstarch slurry is key, but you are in control. If you prefer a thinner sauce, use a little less slurry. If you want an extra-thick, syrupy glaze that really sticks to the chicken, you can add a tiny bit more slurry (start with an extra ½ tsp of cornstarch mixed with water).
- Make Extra Sauce: This sauce is liquid gold. Double the sauce ingredients (soy sauce, honey, garlic, ginger, etc.) from the start. Use half to cook the chicken as directed, and gently warm the other half in a separate saucepan to serve on the side for drizzling over rice, vegetables, or for extra dipping.
- Marinate for More Flavor: If you have an extra 30 minutes to an hour, you can marinate the chicken thighs in about half of the prepared sauce mixture before cooking. This will allow the flavors to penetrate deeper into the meat, resulting in an even more flavorful chicken. Be sure to pat the chicken dry before searing to remove excess surface marinade, which can prevent browning.
- Don’t Burn the Garlic: When you add the sauce to the hot pan, the minced garlic can burn quickly if the heat is too high, which will make the sauce bitter. Be sure to turn the heat down to low before adding the sauce mixture to the skillet to allow it to simmer gently without scorching the garlic.
- Spice It Up: If you enjoy a bit of heat, this recipe is easily adaptable. Add ½ to 1 teaspoon of sriracha, a pinch of red pepper flakes, or a dash of your favorite chili garlic sauce to the sauce mixture for a welcome kick of spice that beautifully complements the sweetness of the honey.
- Alternative Cooking Methods: While a skillet is fantastic, this recipe also works well on the grill or in the oven. For grilling, marinate the chicken, then grill over medium heat until cooked through, basting with the reserved sauce during the last few minutes of cooking. For baking, sear the chicken in an oven-safe skillet, then pour the sauce over and bake at 400°F (200°C) for 15-20 minutes, or until cooked through.
FAQ Section
Here are answers to some of the most frequently asked questions about making Savory Honey Garlic Chicken Thighs.
1. Can I use chicken breasts instead of thighs?
Yes, you absolutely can. However, chicken breasts are much leaner and can dry out more easily. To avoid this, it’s best to use breasts that are pounded to an even thickness. You will also need to adjust the cooking time; they will likely cook faster than thighs, so use a meat thermometer and pull them from the heat as soon as they reach an internal temperature of 165°F (74°C).
2. Is this recipe gluten-free?
To make this recipe gluten-free, you need to make one simple substitution. Regular soy sauce contains wheat. Simply replace the low-sodium soy sauce with an equal amount of gluten-free tamari or coconut aminos. All other ingredients in the recipe are naturally gluten-free.
3. How do I store and reheat leftovers?
Leftovers are fantastic! Store any leftover chicken and sauce in an airtight container in the refrigerator for up to 3-4 days. To reheat, you can gently warm the chicken in a skillet over low heat with a splash of water or chicken broth to loosen the sauce. Alternatively, you can microwave it in 30-second intervals until heated through.
4. Can I make this recipe ahead of time?
Yes, you can do some prep in advance. You can mix the sauce ingredients together and store them in a jar in the refrigerator for up to 2-3 days. When you’re ready to cook, all you need to do is sear the chicken and finish the dish. You can also cook the entire dish ahead of time, as it reheats very well, making it great for meal prepping.
5. My sauce isn’t thickening. What did I do wrong?
There are two common reasons for this. First, ensure the sauce is at a gentle simmer when you add the cornstarch slurry; the heat is what activates the cornstarch’s thickening properties. Second, make sure your slurry was well-mixed and hadn’t settled at the bottom of the bowl. If it still won’t thicken, you can make a little more slurry (e.g., 1 tsp cornstarch + 2 tsp water) and add it to the simmering sauce until you reach your desired consistency.
6. Can I use bone-in, skin-on chicken thighs?
Definitely! Bone-in, skin-on thighs will result in incredibly crispy skin and even juicier meat. The cooking process will take longer. Sear them skin-side down first to render the fat and get the skin crispy. Then, you may want to finish them in a 400°F (200°C) oven until cooked through before adding the sauce in the skillet on the stovetop to avoid burning the glaze.
7. Can I substitute the honey with another sweetener?
Yes, maple syrup is an excellent substitute for honey and will create a similarly delicious glaze with a slightly different, warmer flavor profile. You can use it in a 1:1 ratio. Brown sugar can also work, but you will need to ensure it fully dissolves in the sauce.
8. What if I don’t have fresh ginger or garlic?
Fresh is always best for the most vibrant flavor. However, in a pinch, you can substitute with dried powders. As a general rule, use 1 teaspoon of garlic powder for every 4 cloves of fresh garlic, and about ¼ to ½ teaspoon of ground ginger for every 1 tablespoon of fresh grated ginger. Be aware that the final flavor will be less pungent and aromatic.
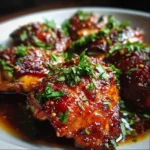
Savory Honey Garlic Chicken Thighs
Ingredients
Here is the curated list of ingredients you will need to create this culinary masterpiece. Each component plays a vital role in building the layers of savory, sweet, and aromatic flavors that make this dish unforgettable.
- 2 lbs (about 900g) Boneless, Skinless Chicken Thighs: The star of the show. Chicken thighs are chosen for their rich flavor and succulent, juicy texture. They are far more forgiving than chicken breasts and remain tender even when cooked at high heat. Pat them thoroughly dry before cooking to ensure a beautiful golden-brown sear.
- 1 tbsp Olive Oil: A quality olive oil is used for searing the chicken, helping to create a delicious crust and preventing it from sticking to the pan.
- 1/2 cup Low-Sodium Soy Sauce: This is the umami-rich backbone of our sauce. Using a low-sodium version gives you better control over the final saltiness of the dish, allowing the other flavors to shine through.
- 1/3 cup Honey: The sweet counterpoint to the savory soy sauce. It not only adds flavor but also helps create that signature thick, sticky glaze that coats the chicken so beautifully. Any standard liquid honey will work perfectly.
- 4–6 Cloves Garlic, Minced: This is not a time for subtlety with garlic. A generous amount of freshly minced garlic provides a pungent, aromatic depth that is absolutely essential. Avoid pre-minced jarred garlic if possible, as fresh cloves offer a much more vibrant flavor.
- 1 tbsp Freshly Grated Ginger: Ginger adds a warm, zesty spice that cuts through the richness of the sauce and brightens the overall flavor profile. Its aromatic quality complements the garlic perfectly.
- 1 tbsp Rice Vinegar: A secret weapon for balancing the sauce. The gentle acidity of rice vinegar cuts through the sweetness of the honey and the saltiness of the soy sauce, creating a perfectly harmonious and well-rounded flavor.
- 1 tsp Sesame Oil: Used as a finishing touch, toasted sesame oil adds a wonderful nutty aroma and a distinct, deep flavor that elevates the sauce from great to exceptional.
- 1/4 tsp Black Pepper: Freshly ground black pepper adds a mild, woody heat that enhances all the other ingredients.
- 1 tbsp Cornstarch + 2 tbsp Water (for a slurry): This simple mixture is the key to transforming the thin sauce into a thick, luscious glaze that clings to every inch of the chicken.
- For Garnish (Optional): Toasted sesame seeds and thinly sliced green onions (scallions) add a final touch of freshness, a slight crunch, and a beautiful visual appeal to the finished dish.
Instructions
Follow these detailed steps carefully to ensure your chicken thighs are perfectly cooked, wonderfully juicy, and coated in a spectacular honey garlic glaze. The process is broken down into preparing the components, cooking the chicken, and finishing the sauce for an easy-to-follow experience.
Step 1: Prepare the Chicken
First and foremost, prepare your chicken. Remove the boneless, skinless chicken thighs from their packaging and place them on a cutting board lined with paper towels. Use additional paper towels to pat each thigh completely dry on all sides. This is a critical step! Removing excess moisture is the secret to achieving a fantastic, golden-brown sear in the pan. If the chicken is wet, it will steam instead of sear, resulting in a less flavorful and texturally inferior final product. Once dry, season both sides of the chicken thighs lightly with the black pepper. Set aside while you prepare the sauce.
Step 2: Whisk Together the Sauce
In a medium-sized bowl, combine the low-sodium soy sauce, honey, minced garlic, grated ginger, and rice vinegar. Whisk these ingredients together until the honey is fully dissolved and everything is well-incorporated. This aromatic mixture will be the soul of your dish. Set the bowl aside for now.
Step 3: Prepare the Cornstarch Slurry
In a separate small bowl, combine the 1 tablespoon of cornstarch with 2 tablespoons of cold water. Whisk vigorously until the cornstarch is completely dissolved and there are no lumps. This is your cornstarch slurry, which you will use later to thicken the sauce into a beautiful glaze. Setting this up now will make the final steps of cooking smoother and faster.
Step 4: Sear the Chicken Thighs
Place a large skillet or cast-iron pan over medium-high heat. Add the 1 tablespoon of olive oil and let it heat up until it shimmers slightly. Carefully place the prepared chicken thighs in the hot pan, ensuring you don’t overcrowd it. If necessary, cook the chicken in two batches. Cook the thighs for about 5-7 minutes on the first side, undisturbed, until a deep golden-brown crust has formed. Flip the chicken thighs over and cook for another 5-7 minutes on the second side until they are cooked through and equally golden. The internal temperature should reach 165°F (74°C) when checked with a meat thermometer.
Step 5: Create the Glaze
Once the chicken is fully cooked, reduce the heat to low. If you have excess fat in the pan, you can carefully drain some of it off, leaving about a tablespoon for flavor. Pour the prepared honey garlic sauce mixture directly into the skillet with the chicken. The sauce will begin to bubble and simmer immediately. Let it cook for 1-2 minutes, stirring gently and spooning the sauce over the chicken thighs to coat them.
Step 6: Thicken the Sauce and Finish
Now, give your cornstarch slurry a quick re-whisk (as it can settle) and pour it into the simmering sauce in the skillet. Stir continuously. You will see the sauce begin to thicken almost instantly, transforming into a rich, glossy glaze. Continue to cook for another 1-2 minutes, constantly turning the chicken thighs to ensure they are completely coated in the glorious, sticky sauce. The glaze should be thick enough to cling to the back of a spoon.
Step 7: Final Touches and Serving
Remove the skillet from the heat. Stir in the 1 teaspoon of toasted sesame oil for that final burst of nutty aroma and flavor. Let the chicken rest in the pan for a few minutes. To serve, transfer the glazed chicken thighs to a platter. Drizzle any remaining sauce from the pan over the top. Garnish generously with toasted sesame seeds and freshly sliced green onions for a vibrant finish. Serve immediately and enjoy the fruits of your labor!
Nutrition
- Serving Size: one normal portion
- Calories: 450