")


Nestled in the heart of countless Filipino households, the Graham Cake is more than just a dessert; it’s a nostalgic trip down memory lane, a symbol of effortless gatherings, and a testament to the beauty of simplicity in the culinary world. For my family, it’s become our go-to treat for potlucks, birthdays, or even just a random Tuesday craving something sweet and satisfying without the fuss of baking. The beauty of this recipe lies in its sheer simplicity. It’s the kind of dessert that even kitchen novices can master on their first try, and yet, it consistently delivers smiles and satisfied sighs. Every time I assemble this no-bake wonder, layering the creamy sweetness between the subtly honeyed graham crackers, I’m reminded of the joy in creating something delicious with minimal effort. The kids love helping out, and the adults love devouring it – it’s a universal crowd-pleaser in our home, and I’m thrilled to share this foolproof recipe with you, hoping it brings the same joy to your table.
Ingredients for a Simple Graham Cake
This recipe champions simplicity, needing only a handful of readily available ingredients. Each component plays a crucial role in creating the delightful texture and flavor that makes Graham Cake so irresistible.
- Graham Crackers: The star of the show! These subtly sweet, slightly coarse crackers form the structural base of our cake. Look for whole graham crackers, not the crumbs. Their unique flavor and texture are essential for the authentic Graham Cake experience.
- All-Purpose Cream: This provides the rich, creamy body of the filling. Chilling the cream beforehand is crucial for achieving the perfect whipped consistency. It’s the luscious layer that binds the crackers together and delivers that melt-in-your-mouth sensation.
- Sweetened Condensed Milk: The sweetness and richness of sweetened condensed milk are key. It perfectly complements the all-purpose cream, adding a delightful caramel-like note and contributing to the overall creamy texture. Ensure you are using sweetened condensed milk and not evaporated milk.
- Lemon or Calamansi Juice (Optional but Recommended): A splash of citrus juice, whether lemon or calamansi (Filipino lime), adds a refreshing tang that cuts through the richness of the cream and condensed milk. It brightens the flavor profile and prevents the cake from being overly sweet. Calamansi juice provides a more distinct, slightly floral citrus note, while lemon juice offers a classic tang.
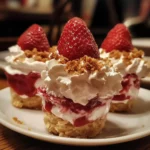
- Mangoes, Peaches, or Other Fruits (Optional for Topping): Fresh fruit toppings elevate the Graham Cake to another level. Slices of ripe mangoes or peaches are classic choices in the Philippines, adding natural sweetness, vibrant color, and a juicy contrast to the creamy layers. You can also experiment with berries, cherries, or any fruit you enjoy.
Simple Graham Cake Instructions: A Step-by-Step Guide
Creating a Graham Cake is delightfully straightforward. Follow these simple steps, and you’ll have a delectable dessert ready in no time. Remember, the key is in the layering and chilling!
- Prepare the Cream Mixture: Begin by chilling your all-purpose cream in the refrigerator for at least 30 minutes, or even better, for a couple of hours. Cold cream whips up much more easily and to a greater volume. Once chilled, pour the all-purpose cream into a large mixing bowl.
- Whip the Cream: Using an electric mixer (hand mixer or stand mixer), whip the chilled all-purpose cream until it forms soft peaks. Be careful not to overwhip, as this can result in a grainy texture. Soft peaks are just beginning to hold their shape when you lift the beaters.
- Combine with Sweetened Condensed Milk: Gradually pour in the sweetened condensed milk into the whipped cream while continuing to mix on low speed. Mix until the sweetened condensed milk is fully incorporated and the mixture is smooth and creamy. Avoid overmixing at this stage to maintain the airy texture of the whipped cream.
- Add Citrus Juice (Optional): If using lemon or calamansi juice, add it to the cream mixture now. Start with a tablespoon and taste. You can add a little more to reach your desired level of tanginess. Mix gently to combine the citrus juice evenly throughout the cream. This step is crucial for balancing the sweetness and adding a refreshing element.
- Prepare Your Pan or Dish: Choose a rectangular or square dish, or even individual serving dishes. The size will depend on how thick you want your cake layers and how many servings you desire. A standard 9×13 inch dish works well for a family-sized cake.
- Start Layering: Begin by spreading a thin layer of the cream mixture at the bottom of your chosen dish. This base layer will prevent the graham crackers from sticking directly to the dish and make serving easier.
- Arrange Graham Crackers: Carefully arrange a layer of graham crackers over the cream base. You may need to break some crackers to fit snugly and cover the entire bottom surface of the dish in a single layer. There should be minimal gaps between the crackers for a neat and sturdy cake.
- Spread Cream Filling: Spoon a generous layer of the cream mixture evenly over the graham cracker layer. Use a spatula or the back of a spoon to spread it smoothly, ensuring all crackers are covered.
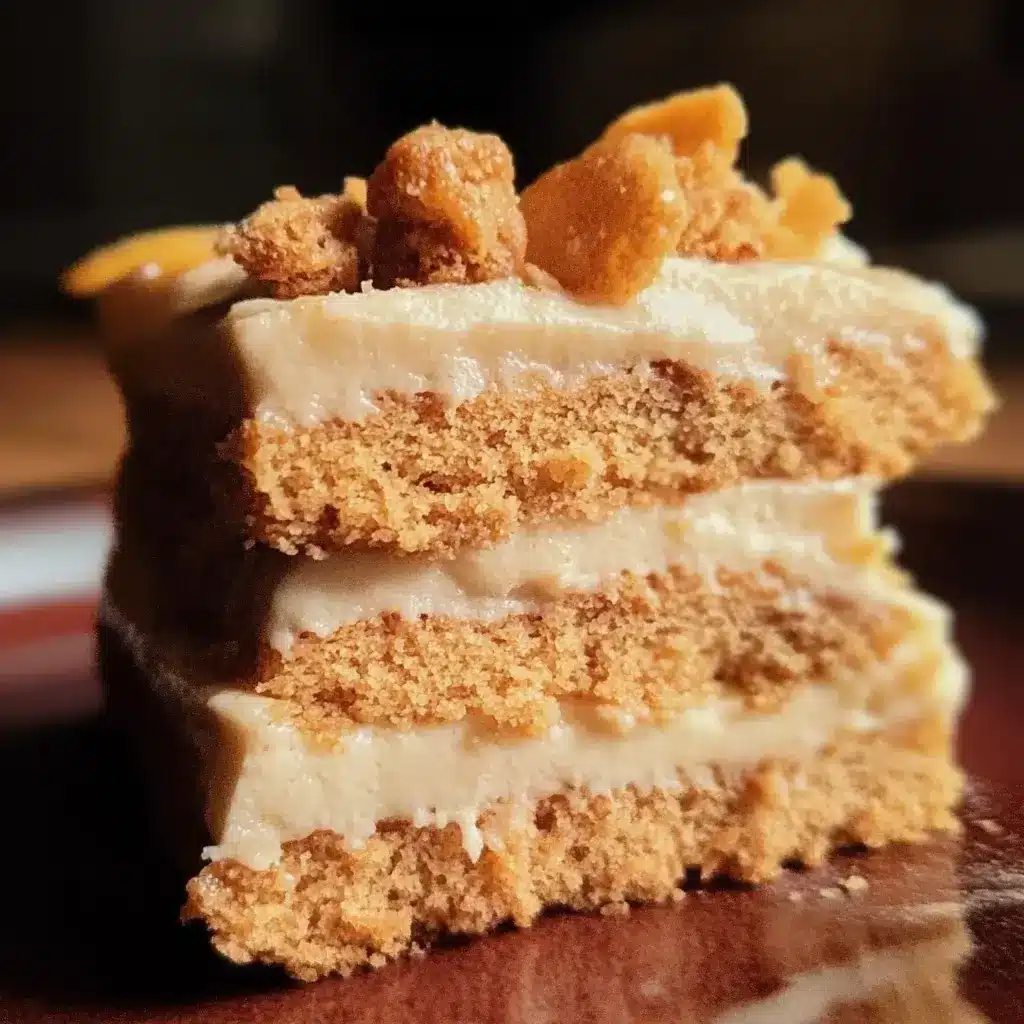
- Repeat Layers: Repeat layers of graham crackers and cream mixture, typically aiming for 3-4 layers of crackers and cream in total. The final layer should be a layer of the cream mixture.
- Add Toppings (Optional): If using fruit toppings, arrange slices of mangoes, peaches, or your chosen fruit attractively on top of the final cream layer. You can create patterns or simply scatter the fruit evenly. You can also add other toppings like graham cracker crumbs, chocolate shavings, or a drizzle of honey or caramel.
- Chill in the Refrigerator: This is the most crucial step! Cover the Graham Cake tightly with plastic wrap or a lid and refrigerate for at least 4-6 hours, or preferably overnight. Chilling allows the graham crackers to soften and absorb the moisture from the cream, transforming them into a cake-like texture. The flavors also meld together beautifully during chilling.
- Serve and Enjoy: Once chilled, the Graham Cake is ready to serve! Cut into squares or slices and enjoy. The cake is best served cold directly from the refrigerator.
Graham Cake Nutrition Facts (Estimated)
Please note that these are estimated values and can vary based on specific ingredients used, brand, and serving size. This is based on an estimated serving size of 1 slice (approximately 1/8 of a 9×13 inch cake).
- Servings: Approximately 8 servings
- Calories per Serving: 350-450 kcal (estimated)
- Total Fat: 20-30g
- Saturated Fat: 15-20g
These values are estimates and should be used as a general guide. For more precise nutritional information, you can use online nutritional calculators and input the specific brands and quantities of ingredients you use. Remember that Graham Cake is a dessert and should be enjoyed in moderation as part of a balanced diet.
Preparation Time for Graham Cake
The beauty of Graham Cake lies not only in its deliciousness but also in its minimal preparation time. It’s a perfect dessert when you need something impressive without spending hours in the kitchen.
- Prep Time: 20-30 minutes (This includes chilling the cream, whipping the cream mixture, and assembling the layers.)
- Chill Time: Minimum 4-6 hours (Ideally overnight for best texture and flavor.)
- Total Time (Active + Inactive): Approximately 4 hours 20 minutes to overnight.
Most of the time is spent chilling in the refrigerator, which is passive time. The active hands-on time is remarkably short, making it an ideal make-ahead dessert for parties or gatherings. You can easily prepare it the day before and simply chill it overnight until you’re ready to serve.
How to Serve Graham Cake
Graham Cake is a versatile dessert that can be served in various ways to suit different occasions and preferences. Here are some delightful serving suggestions:
- Classic Slices: The most common and straightforward way to serve Graham Cake is to cut it into neat squares or slices. This is perfect for casual gatherings, potlucks, or everyday enjoyment.
- Individual Servings: For a more elegant presentation, assemble Graham Cake in individual serving dishes like small bowls, glasses, or ramekins. This is ideal for dinner parties or special occasions.
- Garnished with Toppings: Enhance the visual appeal and flavor by garnishing each serving with extra toppings. Consider:
- Fresh Fruit: A few slices of fresh mango, peach, berries, or cherries on top add a burst of freshness and color.
- Graham Cracker Crumbs: Sprinkle crushed graham crackers for added texture and a visual cue to the main ingredient.
- Chocolate Shavings or Drizzle: A sprinkle of chocolate shavings or a drizzle of melted chocolate or chocolate syrup adds a touch of indulgence.
- Whipped Cream: A dollop of freshly whipped cream provides extra creaminess and a classic dessert touch.
- Caramel Drizzle: A swirl of caramel sauce complements the sweetness and adds a rich, buttery flavor.
- Chopped Nuts: For added crunch and flavor, sprinkle chopped nuts like almonds, walnuts, or pecans.
- With Beverages: Graham Cake pairs wonderfully with various drinks:
- Coffee or Tea: The creamy sweetness of the cake is balanced beautifully by the slight bitterness of coffee or tea, whether hot or iced.
- Milk: A cold glass of milk is a classic and comforting pairing, especially for children.
- Fruit Juice: A refreshing glass of fruit juice like orange juice or mango juice complements the fruity notes of the cake, especially if topped with fresh fruit.
- Dessert Wine (for adults): For a more sophisticated pairing, consider a light dessert wine like Moscato d’Asti or a late-harvest Riesling.
- Frozen Graham Cake: For a refreshing twist, try serving Graham Cake slightly frozen. It transforms into a delightful icebox cake with a firmer texture, perfect for hot weather.
Additional Tips for the Perfect Graham Cake
While Graham Cake is incredibly simple, these extra tips can help you achieve dessert perfection every time:
- Use Cold Cream: Chilling the all-purpose cream thoroughly before whipping is non-negotiable. Cold cream whips up much faster and to a greater volume, resulting in a light and airy cream mixture. Place the can or carton of cream in the refrigerator for at least 30 minutes, or even better, for a few hours before you begin.
- Don’t Overwhip the Cream: While whipping cream is essential, be careful not to overwhip it. Overwhipped cream can become grainy and lose its smooth texture. Stop whipping as soon as soft peaks form. Soft peaks are when the cream holds its shape briefly when you lift the beaters, but the peaks gently fold over.
- Sweeten to Taste: While sweetened condensed milk provides the primary sweetness, you can adjust the sweetness level to your preference. If you prefer a less sweet cake, you can slightly reduce the amount of sweetened condensed milk. Conversely, if you have a very sweet tooth, you can add a touch more. Taste the cream mixture after combining and adjust accordingly.
- Citrus is Your Friend: Don’t skip the citrus juice! The lemon or calamansi juice is crucial for balancing the sweetness and adding a refreshing tang. It prevents the cake from becoming cloyingly sweet and brightens the overall flavor profile. Experiment with the amount of citrus juice to find your perfect balance.
- Soak Crackers (Optional for Softer Cake): If you prefer an even softer, more cake-like texture, you can briefly dip each graham cracker in milk or juice before layering. Be careful not to soak them for too long, as they can become soggy and fall apart. A quick dip is sufficient to slightly soften them.
- Layer Evenly: Pay attention to layering the graham crackers and cream mixture evenly. Ensure each layer of crackers is fully covered with cream, and each layer of cream is spread smoothly. This will result in a visually appealing and structurally sound cake.
- Chill for Long Enough: Patience is key! Chilling the Graham Cake for at least 4-6 hours, or ideally overnight, is crucial for the crackers to soften and absorb the moisture from the cream. This chilling process transforms the layers into the signature cake-like texture. Don’t rush the chilling process for the best results.
- Experiment with Flavors and Toppings: Once you master the basic Graham Cake recipe, feel free to get creative! Experiment with different flavor extracts in the cream mixture (like vanilla, almond, or coffee extract). Try layering with different fruits, jams, or spreads. Explore various toppings like chocolate, nuts, caramel, or even savory elements like a sprinkle of sea salt for a salted caramel twist.
Frequently Asked Questions (FAQ) about Graham Cake
Here are some common questions people have when making Graham Cake:
Q1: Can I use evaporated milk instead of sweetened condensed milk?
A: No, you should not substitute evaporated milk for sweetened condensed milk in this recipe. Sweetened condensed milk is crucial for both sweetness and the creamy texture of the filling. Evaporated milk is unsweetened and has a different consistency, which will result in a very different and less desirable outcome.
Q2: Can I make Graham Cake ahead of time?
A: Absolutely! In fact, Graham Cake is an ideal make-ahead dessert. It needs to chill for several hours anyway, and it actually tastes even better the next day as the flavors meld together and the crackers soften further. You can prepare it a day or two in advance and store it in the refrigerator.
Q3: How long does Graham Cake last in the refrigerator?
A: Graham Cake will typically last for 3-4 days in the refrigerator when stored properly in an airtight container. However, it’s usually best enjoyed within the first 2-3 days for optimal texture and freshness.
Q4: Can I freeze Graham Cake?
A: Yes, you can freeze Graham Cake. Wrap it tightly in plastic wrap and then foil, or place it in an airtight freezer-safe container. It can be frozen for up to 1-2 months. Thaw it in the refrigerator overnight before serving. The texture might be slightly softer after thawing, but it will still be delicious.
Q5: What if I don’t have lemon or calamansi juice? Can I skip it?
A: While you can technically skip the citrus juice, it is highly recommended. The citrus juice adds a crucial element of tanginess that balances the sweetness and richness of the cream and condensed milk. Without it, the cake can be overly sweet and less refreshing. If you don’t have lemon or calamansi, you can use lime juice or even a splash of vinegar as a very last resort, but lemon or calamansi are the best options.
Q6: My graham crackers are still hard after chilling. What did I do wrong?
A: There could be a few reasons why your graham crackers are still hard:
Not enough chilling time: Ensure you chill the cake for at least 4-6 hours, preferably overnight.
Not enough moisture: Make sure the cream mixture is sufficiently moist and covers the crackers completely. If the cream mixture is too thick or dry, the crackers might not soften properly.
Type of graham crackers: Some brands of graham crackers might be denser or less porous than others. Try using a different brand next time.
Too many cracker layers: If you used too many layers of crackers and not enough cream, the crackers might not have enough moisture to soften.
Q7: Can I use different types of crackers instead of graham crackers?
A: While graham crackers are traditional for Graham Cake, you can experiment with other types of crackers if you wish. Digestive biscuits, Maria cookies, or even vanilla wafers could work as alternatives. However, using graham crackers gives the cake its signature flavor and slightly coarse texture.
Q8: How can I make Graham Cake less sweet?
A: If you find Graham Cake too sweet, you can try these adjustments:
Reduce sweetened condensed milk: Start by reducing the amount of sweetened condensed milk slightly.
Increase citrus juice: Add a bit more lemon or calamansi juice to balance the sweetness with tanginess.
Use unsweetened whipped cream: If you prefer, you can use heavy cream and sweeten it yourself with a smaller amount of sugar, instead of relying solely on sweetened condensed milk.
Add unsweetened toppings: Use fresh fruit toppings that are naturally sweet but not overly sugary. Avoid overly sweet toppings like caramel or chocolate syrup if you want to reduce overall sweetness.
With its simple ingredients, easy instructions, and crowd-pleasing flavor, Graham Cake is truly a dessert for everyone. Whether you are a seasoned baker or just starting out in the kitchen, this no-bake wonder is sure to become a favorite in your home too. Enjoy the sweet simplicity!
Print
Simple Graham Cake Recipe
Ingredients
This recipe champions simplicity, needing only a handful of readily available ingredients. Each component plays a crucial role in creating the delightful texture and flavor that makes Graham Cake so irresistible.
- Graham Crackers: The star of the show! These subtly sweet, slightly coarse crackers form the structural base of our cake. Look for whole graham crackers, not the crumbs. Their unique flavor and texture are essential for the authentic Graham Cake experience.
- All-Purpose Cream: This provides the rich, creamy body of the filling. Chilling the cream beforehand is crucial for achieving the perfect whipped consistency. It’s the luscious layer that binds the crackers together and delivers that melt-in-your-mouth sensation.
- Sweetened Condensed Milk: The sweetness and richness of sweetened condensed milk are key. It perfectly complements the all-purpose cream, adding a delightful caramel-like note and contributing to the overall creamy texture. Ensure you are using sweetened condensed milk and not evaporated milk.
- Lemon or Calamansi Juice (Optional but Recommended): A splash of citrus juice, whether lemon or calamansi (Filipino lime), adds a refreshing tang that cuts through the richness of the cream and condensed milk. It brightens the flavor profile and prevents the cake from being overly sweet. Calamansi juice provides a more distinct, slightly floral citrus note, while lemon juice offers a classic tang.
- Mangoes, Peaches, or Other Fruits (Optional for Topping): Fresh fruit toppings elevate the Graham Cake to another level. Slices of ripe mangoes or peaches are classic choices in the Philippines, adding natural sweetness, vibrant color, and a juicy contrast to the creamy layers. You can also experiment with berries, cherries, or any fruit you enjoy.
Instructions
Creating a Graham Cake is delightfully straightforward. Follow these simple steps, and you’ll have a delectable dessert ready in no time. Remember, the key is in the layering and chilling!
- Prepare the Cream Mixture: Begin by chilling your all-purpose cream in the refrigerator for at least 30 minutes, or even better, for a couple of hours. Cold cream whips up much more easily and to a greater volume. Once chilled, pour the all-purpose cream into a large mixing bowl.
- Whip the Cream: Using an electric mixer (hand mixer or stand mixer), whip the chilled all-purpose cream until it forms soft peaks. Be careful not to overwhip, as this can result in a grainy texture. Soft peaks are just beginning to hold their shape when you lift the beaters.
- Combine with Sweetened Condensed Milk: Gradually pour in the sweetened condensed milk into the whipped cream while continuing to mix on low speed. Mix until the sweetened condensed milk is fully incorporated and the mixture is smooth and creamy. Avoid overmixing at this stage to maintain the airy texture of the whipped cream.
- Add Citrus Juice (Optional): If using lemon or calamansi juice, add it to the cream mixture now. Start with a tablespoon and taste. You can add a little more to reach your desired level of tanginess. Mix gently to combine the citrus juice evenly throughout the cream. This step is crucial for balancing the sweetness and adding a refreshing element.
- Prepare Your Pan or Dish: Choose a rectangular or square dish, or even individual serving dishes. The size will depend on how thick you want your cake layers and how many servings you desire. A standard 9×13 inch dish works well for a family-sized cake.
- Start Layering: Begin by spreading a thin layer of the cream mixture at the bottom of your chosen dish. This base layer will prevent the graham crackers from sticking directly to the dish and make serving easier.
- Arrange Graham Crackers: Carefully arrange a layer of graham crackers over the cream base. You may need to break some crackers to fit snugly and cover the entire bottom surface of the dish in a single layer. There should be minimal gaps between the crackers for a neat and sturdy cake.
- Spread Cream Filling: Spoon a generous layer of the cream mixture evenly over the graham cracker layer. Use a spatula or the back of a spoon to spread it smoothly, ensuring all crackers are covered.
- Repeat Layers: Repeat layers of graham crackers and cream mixture, typically aiming for 3-4 layers of crackers and cream in total. The final layer should be a layer of the cream mixture.
- Add Toppings (Optional): If using fruit toppings, arrange slices of mangoes, peaches, or your chosen fruit attractively on top of the final cream layer. You can create patterns or simply scatter the fruit evenly. You can also add other toppings like graham cracker crumbs, chocolate shavings, or a drizzle of honey or caramel.
- Chill in the Refrigerator: This is the most crucial step! Cover the Graham Cake tightly with plastic wrap or a lid and refrigerate for at least 4-6 hours, or preferably overnight. Chilling allows the graham crackers to soften and absorb the moisture from the cream, transforming them into a cake-like texture. The flavors also meld together beautifully during chilling.
- Serve and Enjoy: Once chilled, the Graham Cake is ready to serve! Cut into squares or slices and enjoy. The cake is best served cold directly from the refrigerator.
Nutrition
- Serving Size: one normal portion
- Calories: 450
- Fat: 30g
- Saturated Fat: 20g