")


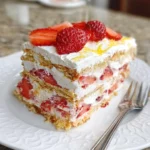
Of all the desserts that have graced my family’s table over the years, few are met with the same universal cheer as this Simple Strawberry Icebox Cake. I first made it on a sweltering July afternoon, the kind of day where the mere thought of turning on the oven feels like a culinary crime. I needed something spectacular for a last-minute backyard barbecue, something that was refreshing, easy, and didn’t require a sweat-inducing baking session. I remembered a tattered recipe card from my grandmother, simply titled “Refrigerator Cake.” With a few modern tweaks and a heaping dose of fresh, ruby-red strawberries, this recipe was born. The moment I served it, a hush fell over the patio. The creamy, cloud-like filling, the tender, cake-like graham crackers, and the bright, juicy burst of fresh berries in every bite—it was an instant sensation. My kids now request it for birthdays, my husband asks for it “just because,” and it has become my go-to, never-fail dessert for any summer gathering. It’s more than just a cake; it’s a taste of pure, effortless sunshine.
Ingredients
- Heavy Whipping Cream (2 cups, cold): This is the foundation of our luscious filling. Ensure it’s very cold straight from the refrigerator, as this helps it whip up to its maximum volume, creating a light and airy texture.
- Full-Fat Cream Cheese (8 ounces, softened to room temperature): Using full-fat, block-style cream cheese provides the necessary structure and a subtle, tangy richness that perfectly balances the sweetness. Softening it is crucial to avoid any lumps in your final filling.
- Powdered Sugar (1 cup, sifted): Also known as confectioners’ sugar, this dissolves instantly into the cream, ensuring a smooth, grit-free sweetness. Sifting prevents clumps.
- Vanilla Extract (2 teaspoons): A high-quality pure vanilla extract enhances all the other flavors, adding a warm, aromatic depth to the cream filling.
- Fresh Strawberries (2 pounds, hulled and thinly sliced): The star of the show! Look for vibrant, ripe, and fragrant strawberries. You’ll need about one pound for layering inside the cake and another pound for decorating the top.
- Graham Crackers (18-20 full sheets): These humble crackers are the secret to the “cake” in this no-bake dessert. As they sit in the creamy filling, they soften to an incredible cake-like consistency. Standard honey-flavored crackers work best.
Instructions
- Prepare the Pan and Strawberries: Lightly grease a 9×13 inch baking dish or line it with parchment paper, leaving an overhang on the two long sides. This overhang will act as a handle, making it much easier to lift the cake out for slicing and serving later. Wash, hull, and thinly slice all of your strawberries. Set them aside in a bowl.
- Make the Cream Filling: In a large, chilled mixing bowl, use an electric hand mixer or a stand mixer fitted with the whisk attachment to beat the softened cream cheese on medium speed until it is completely smooth and creamy, with no lumps. This should take about 1-2 minutes. Scrape down the sides of the bowl.
- Sweeten the Filling: With the mixer on low speed, gradually add the sifted powdered sugar. Once it’s mostly incorporated, add the vanilla extract. Increase the speed back to medium and beat until everything is well combined and silky smooth.
- Whip the Cream: In a separate, large, chilled bowl, pour in the cold heavy whipping cream. Using clean beaters, whip the cream on medium-high speed. It will go through stages: first bubbly, then soft peaks will form (the peaks flop over), and finally, you’ll reach stiff peaks. Stiff peaks mean that when you lift the beaters out, the cream stands up straight without collapsing. This is the stage you want for a stable filling. Be careful not to overbeat, or it will turn into butter.
- Combine the Fillings: Gently fold about one-third of the whipped cream into the cream cheese mixture using a rubber spatula. This lightens the cream cheese base, making it easier to incorporate the rest of the whipped cream without deflating it. Once that’s combined, add the remaining whipped cream and continue to fold gently until no white streaks remain and the mixture is uniform.
- Assemble the First Layer: Spread a very thin layer of the cream filling on the bottom of your prepared 9×13 inch dish. This acts like a “glue” to hold the first layer of graham crackers in place. Arrange a single layer of graham crackers over the cream, breaking them as needed to fit snugly and cover the entire bottom of the dish.
- Layer the Cake: Evenly spread about one-third of the remaining cream filling over the graham cracker layer. Then, arrange a single layer of sliced strawberries over the cream, using about half of the strawberries designated for the filling.
- Repeat the Layers: Place another single layer of graham crackers on top of the strawberries. Gently press them down. Spread another third of the cream filling over the crackers, followed by the rest of the sliced strawberries for the filling.
- Final Layers: Top with one final layer of graham crackers. Spread the remaining cream filling smoothly and evenly over the top, making sure to cover the entire surface right to the edges.
- Chill for Perfection: Cover the dish tightly with plastic wrap or a lid. Place the cake in the refrigerator to chill for at least 6 hours, but overnight is highly recommended. This chilling time is essential! It allows the graham crackers to absorb the moisture from the filling and transform into a soft, cake-like texture, and it gives the flavors time to meld together beautifully.
- Garnish and Serve: Just before serving, decorate the top of the cake with the remaining fresh strawberries. You can arrange them in a beautiful pattern, pile them in the center, or slice them artfully. Use the parchment paper overhang to lift the cake from the dish, place it on a cutting board, and slice into squares to serve.
Nutrition Facts
- Servings: 12-15 servings
- Calories per serving: Approximately 420 kcal (This is an estimate and can vary based on specific ingredients used).
- Fat: The majority of the fat content comes from the full-fat cream cheese and heavy whipping cream, which are essential for the cake’s rich flavor and stable structure.
- Carbohydrates: Primarily from the graham crackers and powdered sugar, providing the cake’s structure and sweetness. The fresh strawberries also contribute natural sugars and fiber.
- Sugar: A combination of added powdered sugar and natural sugars from the strawberries creates the perfectly balanced sweet and tart flavor profile.
- Protein: A modest amount of protein is present from the dairy components (cream cheese and heavy cream).
Preparation Time
This dessert is celebrated for its minimal active preparation time, requiring only about 25-30 minutes of hands-on work. This includes slicing the berries, whipping the cream, and assembling the layers. The magic, however, happens during the passive chilling time. A minimum of 6 hours in the refrigerator is necessary, though for the absolute best texture and flavor fusion, an overnight chill (8-12 hours) is strongly recommended.
How to Serve
Serving this Simple Strawberry Icebox Cake is a joy, and a little extra flair can make it even more special. Here are some wonderful ways to present and enjoy your creation:
- Chilled and Simple: The cake is at its absolute best served cold, directly from the refrigerator. The coolness makes it exceptionally refreshing on a warm day.
- Garnish Creatively:
- Arrange a beautiful mosaic of sliced strawberries on top.
- For a touch of green, tuck a few fresh mint leaves among the berries.
- Dust the top with a light flurry of powdered sugar right before serving for a professional look.
- A drizzle of strawberry or raspberry coulis over each slice adds an extra punch of fruit flavor.
- For a decadent twist, a light drizzle of melted white or dark chocolate offers a lovely contrast.
- Perfect Pairings:
- Serve a slice with a hot cup of coffee or a chilled iced latte.
- It pairs beautifully with a tall glass of homemade lemonade or iced tea.
- For an adult-friendly dessert course, it’s delightful with a glass of crisp rosé wine, Prosecco, or a light dessert wine.
- Presentation is Key:
- To get clean, beautiful slices, use a long, sharp knife.
- For extra-clean cuts, dip the knife in hot water and wipe it clean between each slice. This prevents the cream from dragging and smearing.
- Serve on chilled dessert plates to help the cake hold its shape longer.
Additional Tips
- The Secret to Fluffy, Lump-Free Filling: The single most important step for a smooth filling is ensuring your cream cheese is truly at room temperature. If it’s even slightly cool, it will create small lumps when beaten. Take it out of the fridge at least 1-2 hours before you begin.
- Choose Your Strawberries Wisely: The flavor of your cake is heavily dependent on the quality of your berries. Look for strawberries that are bright red all the way to the stem, fragrant, and firm to the touch. Avoid any that are bruised, mushy, or have white or green shoulders, as they will be less flavorful.
- Don’t Underestimate the Chill: The chilling time is not optional; it’s a core part of the recipe’s process. During this time, the graham crackers absorb moisture and soften into a tender, cake-like layer, and all the flavors meld together. Rushing this step will result in a dessert with crunchy crackers and a less cohesive flavor. Overnight is always best.
- Graham Cracker Variations: While classic honey graham crackers are perfect, don’t be afraid to experiment! Chocolate graham crackers would create a delicious “chocolate-covered strawberry” flavor profile. Cinnamon graham crackers can also add a lovely warm spice note that pairs surprisingly well with strawberries.
- Boost the Flavor: A small addition can make a big impact. Try adding the zest of half a lemon to the cream cheese mixture along with the vanilla. The citrus brightens the strawberry flavor and cuts through the richness of the cream beautifully.
- The Perfect Whipped Cream: For cream that whips up tall and stable, make sure everything is cold. Not just the cream itself, but also the mixing bowl and the beaters or whisk attachment. Pop them in the freezer for 10-15 minutes before you start for guaranteed success.
- Slicing Like a Pastry Chef: The “hot knife” trick is a game-changer for serving. Fill a tall glass with hot water. Dip your knife into the water for a few seconds, then wipe it dry with a paper towel before making a cut. Repeat for every single slice. This melts the cream just enough to glide through for perfectly clean edges.
- Make-Ahead Perfection: This is an ideal dessert to make a day in advance. Assemble the cake completely, cover it, and let it chill overnight. This not only saves you time on the day of your event but also results in a better-tasting cake. Just wait to add the fresh strawberry garnish on top until right before you serve to keep them looking their best.
FAQ Section
1. Can I use other fruits instead of strawberries in this icebox cake?
Absolutely! This recipe is incredibly versatile. You could create a triple berry version with a mix of blueberries, raspberries, and blackberries. Sliced peaches or nectarines are fantastic in late summer. You could even make a tropical version with thinly sliced mangoes and a little lime zest in the cream. Just be sure to use fruits that aren’t overly watery.
2. My cream filling seems a bit runny. What did I do wrong?
A runny filling is usually caused by one of two things. First, the heavy cream may not have been whipped to stiff peaks. It’s crucial that the cream can hold its shape firmly before you fold it into the cream cheese. Second, if your cream cheese was too soft (perhaps microwaved to soften it), it can lose some of its structure. Always let it soften naturally at room temperature.
3. Is it possible to make a gluten-free version of this strawberry icebox cake?
Yes, making this recipe gluten-free is very simple. Just substitute the regular graham crackers with your favorite brand of gluten-free graham-style crackers. The assembly and instructions remain exactly the same. They will soften just as nicely and create a delicious gluten-free dessert.
4. Can I use frozen strawberries if I can’t find good fresh ones?
You can, but it requires a slight adjustment. Thaw the frozen strawberries completely and then drain them very well, patting them dry with a paper towel. Excess water from frozen berries can make the cake soggy. Frozen berries are best used for the inside layers, as they can be a bit soft for the garnish. You’ll still want a few fresh berries for decorating the top.
5. How long does this icebox cake last in the refrigerator?
Your strawberry icebox cake will be at its peak texture and flavor for up to 3 days when stored properly in the refrigerator. It needs to be covered tightly with plastic wrap or stored in an airtight container to prevent it from drying out or absorbing other fridge odors. After the third day, the crackers may become overly soft, but it will still be delicious.
6. Can I freeze my strawberry icebox cake to save it for later?
While you technically can freeze it, the texture will change upon thawing. The fresh strawberries can become a bit watery and mushy, and the cream filling may separate slightly. It’s best enjoyed fresh from the refrigerator. If you must freeze it, wrap it very well and eat it semi-frozen, like an ice cream cake, rather than fully thawed.
7. Why is it called an “icebox cake”?
The name is a charming holdover from the early 20th century. Before modern electric refrigerators were common household items, people used insulated “iceboxes,” which were kept cold with a large block of ice. These simple, no-bake layered desserts that were “baked” or set by the cold of the icebox earned the name, and it has stuck ever since!
8. Can I assemble this in a different shaped pan?
Of course! A 9-inch round springform pan works wonderfully and creates a beautiful, round cake that’s easy to release and serve. You could also use an 8×8 square dish for a smaller, thicker cake, or even a loaf pan to create slices that look like a terrine. You may need to adjust the number of graham crackers to fit your chosen pan.
Simple Strawberry Icebox Cake
Ingredients
- Heavy Whipping Cream (2 cups, cold): This is the foundation of our luscious filling. Ensure it’s very cold straight from the refrigerator, as this helps it whip up to its maximum volume, creating a light and airy texture.
- Full-Fat Cream Cheese (8 ounces, softened to room temperature): Using full-fat, block-style cream cheese provides the necessary structure and a subtle, tangy richness that perfectly balances the sweetness. Softening it is crucial to avoid any lumps in your final filling.
- Powdered Sugar (1 cup, sifted): Also known as confectioners’ sugar, this dissolves instantly into the cream, ensuring a smooth, grit-free sweetness. Sifting prevents clumps.
- Vanilla Extract (2 teaspoons): A high-quality pure vanilla extract enhances all the other flavors, adding a warm, aromatic depth to the cream filling.
- Fresh Strawberries (2 pounds, hulled and thinly sliced): The star of the show! Look for vibrant, ripe, and fragrant strawberries. You’ll need about one pound for layering inside the cake and another pound for decorating the top.
- Graham Crackers (18-20 full sheets): These humble crackers are the secret to the “cake” in this no-bake dessert. As they sit in the creamy filling, they soften to an incredible cake-like consistency. Standard honey-flavored crackers work best.
Instructions
- Prepare the Pan and Strawberries: Lightly grease a 9×13 inch baking dish or line it with parchment paper, leaving an overhang on the two long sides. This overhang will act as a handle, making it much easier to lift the cake out for slicing and serving later. Wash, hull, and thinly slice all of your strawberries. Set them aside in a bowl.
- Make the Cream Filling: In a large, chilled mixing bowl, use an electric hand mixer or a stand mixer fitted with the whisk attachment to beat the softened cream cheese on medium speed until it is completely smooth and creamy, with no lumps. This should take about 1-2 minutes. Scrape down the sides of the bowl.
- Sweeten the Filling: With the mixer on low speed, gradually add the sifted powdered sugar. Once it’s mostly incorporated, add the vanilla extract. Increase the speed back to medium and beat until everything is well combined and silky smooth.
- Whip the Cream: In a separate, large, chilled bowl, pour in the cold heavy whipping cream. Using clean beaters, whip the cream on medium-high speed. It will go through stages: first bubbly, then soft peaks will form (the peaks flop over), and finally, you’ll reach stiff peaks. Stiff peaks mean that when you lift the beaters out, the cream stands up straight without collapsing. This is the stage you want for a stable filling. Be careful not to overbeat, or it will turn into butter.
- Combine the Fillings: Gently fold about one-third of the whipped cream into the cream cheese mixture using a rubber spatula. This lightens the cream cheese base, making it easier to incorporate the rest of the whipped cream without deflating it. Once that’s combined, add the remaining whipped cream and continue to fold gently until no white streaks remain and the mixture is uniform.
- Assemble the First Layer: Spread a very thin layer of the cream filling on the bottom of your prepared 9×13 inch dish. This acts like a “glue” to hold the first layer of graham crackers in place. Arrange a single layer of graham crackers over the cream, breaking them as needed to fit snugly and cover the entire bottom of the dish.
- Layer the Cake: Evenly spread about one-third of the remaining cream filling over the graham cracker layer. Then, arrange a single layer of sliced strawberries over the cream, using about half of the strawberries designated for the filling.
- Repeat the Layers: Place another single layer of graham crackers on top of the strawberries. Gently press them down. Spread another third of the cream filling over the crackers, followed by the rest of the sliced strawberries for the filling.
- Final Layers: Top with one final layer of graham crackers. Spread the remaining cream filling smoothly and evenly over the top, making sure to cover the entire surface right to the edges.
- Chill for Perfection: Cover the dish tightly with plastic wrap or a lid. Place the cake in the refrigerator to chill for at least 6 hours, but overnight is highly recommended. This chilling time is essential! It allows the graham crackers to absorb the moisture from the filling and transform into a soft, cake-like texture, and it gives the flavors time to meld together beautifully.
- Garnish and Serve: Just before serving, decorate the top of the cake with the remaining fresh strawberries. You can arrange them in a beautiful pattern, pile them in the center, or slice them artfully. Use the parchment paper overhang to lift the cake from the dish, place it on a cutting board, and slice into squares to serve.
Nutrition
- Serving Size: one normal portion
- Calories: 420