")


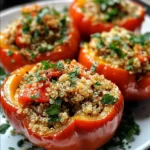
Of all the recipes that have become staples in my kitchen, this one for Stuffed Cherry Peppers with Quinoa holds a special place. I first made them for a casual backyard barbecue, thinking they’d be a nice, healthy alternative to the usual chips and dip. I underestimated their power. They were an absolute sensation. My cousin, who typically avoids anything with “quinoa” in the title, couldn’t stop eating them. My kids, drawn in by their vibrant, jewel-like appearance, dubbed them “flavor bombs.” They disappeared from the platter in minutes, with guests asking for the recipe before they’d even finished chewing. What makes them so magical is the perfect trifecta of flavor, texture, and appearance. You get the sharp, tangy-sweet burst from the pickled cherry pepper, followed by the savory, herby, and wonderfully textured quinoa filling, all tied together with a salty kiss of feta and a bright hint of lemon. They are the ultimate party food: impressive enough for a fancy gathering but simple enough for a weeknight treat. They are a conversation starter, a crowd-pleaser, and a testament to how simple, wholesome ingredients can come together to create something truly spectacular.
A Symphony of Flavors: Ingredients for Stuffed Cherry Peppers with Quinoa
Crafting these delightful bites is all about balancing textures and tastes. Each ingredient is chosen not just for its individual flavor, but for how it complements the others to create a harmonious and unforgettable appetizer.
- Jarred Whole Sweet Cherry Peppers (16-ounce jar): These are the star of the show. Look for peppers that are pickled in a sweet and tangy brine, which infuses them with incredible flavor and tenderizes them to the perfect consistency. They provide the vibrant color and the initial burst of zesty flavor that defines the dish.
- Quinoa (1/2 cup, uncooked): The foundation of our filling. This ancient grain is a nutritional powerhouse, offering a complete protein and a delightful, slightly nutty flavor. When cooked, its fluffy texture is perfect for absorbing the other flavors in the filling.
- Vegetable Broth or Water (1 cup): Used for cooking the quinoa. Using vegetable broth instead of water is a simple trick to infuse the quinoa with a savory depth of flavor from the very beginning.
- Crumbled Feta Cheese (1/2 cup): This brings a salty, briny, and creamy element that cuts through the sweetness of the peppers and the earthiness of the quinoa. It’s the flavor counterpoint that makes every bite interesting.
- Fresh Parsley (1/4 cup, finely chopped): Adds a clean, bright, and slightly peppery freshness. It lightens up the filling and contributes a beautiful green fleck of color.
- Fresh Mint (2 tablespoons, finely chopped): A secret weapon for freshness. Mint provides a cool, aromatic lift that pairs wonderfully with the lemon and feta, elevating the entire flavor profile.
- Red Onion (1/4 cup, finely minced): Offers a sharp, pungent bite and a subtle sweetness. Mincing it very finely ensures it integrates seamlessly into the filling without overpowering it.
- Extra Virgin Olive Oil (2 tablespoons): Used to bind the filling together, add richness, and contribute a smooth, fruity flavor that complements all the Mediterranean-inspired ingredients.
- Lemon (1, for zest and juice): Both the zest and the juice are crucial. The zest provides an aromatic, floral citrus note, while the juice adds a bright acidity that wakes up all the other flavors and balances the richness of the olive oil and feta.
- Garlic (1 clove, minced): A small amount of fresh garlic adds a foundational savory, pungent kick that deepens the overall flavor of the quinoa stuffing.
- Salt and Black Pepper (to taste): Essential for seasoning. Be mindful with the salt, as the feta and pickled peppers are already quite salty. A few grinds of fresh black pepper add a touch of warmth.
Step-by-Step Guide to Crafting the Perfect Quinoa Stuffed Cherry Peppers
Follow these instructions carefully to assemble your vibrant and delicious stuffed peppers. The process is straightforward and can be broken down into preparing the components and then bringing them all together.
Step 1: Prepare the Cherry Peppers
First, you need to get your vessels ready. Carefully open the jar of cherry peppers and drain them thoroughly, reserving a tablespoon of the pickling liquid (brine) for later. Place the peppers on a plate lined with paper towels, cut-side down, to allow any excess liquid to drain away. This step is crucial to prevent a watery final product. Using a small spoon, a grapefruit spoon, or even your fingers, gently scoop out and discard any seeds from inside the peppers. Be careful not to tear the pepper walls. Set the hollowed-out peppers aside.
Step 2: Cook the Quinoa
Rinsing the quinoa is a non-negotiable step for the best flavor and texture. Place the uncooked quinoa in a fine-mesh sieve and rinse it under cold running water for at least 30 seconds. This removes the natural coating called saponin, which can taste bitter or soapy. Once rinsed, combine the quinoa and the 1 cup of vegetable broth (or water) in a small saucepan. Bring the mixture to a boil over medium-high heat. Once it’s boiling, reduce the heat to low, cover the saucepan with a tight-fitting lid, and let it simmer for about 15 minutes, or until all the liquid has been absorbed.
Step 3: Fluff and Cool the Quinoa
Once the quinoa is cooked, remove it from the heat but keep the lid on. Let it sit and steam for 5 minutes. This allows the grains to firm up and separate. After 5 minutes, remove the lid and gently fluff the quinoa with a fork. Transfer the fluffed quinoa to a medium-sized mixing bowl and spread it out a bit to help it cool down faster. You want it to be at room temperature or just slightly warm before you add the other ingredients, especially the cheese and fresh herbs.
Step 4: Prepare the Filling
While the quinoa is cooling, you can prepare the rest of your filling ingredients. Ensure your red onion, parsley, mint, and garlic are all very finely chopped or minced. This is key to creating a cohesive filling where no single flavor is overwhelming. Zest the lemon first, then cut it in half to juice it.
Step 5: Combine the Filling Ingredients
To the bowl of cooled quinoa, add the crumbled feta cheese, finely chopped parsley, mint, red onion, and minced garlic. Drizzle in the 2 tablespoons of extra virgin olive oil, the juice of half a lemon, and all of the lemon zest. Add the 1 tablespoon of reserved pepper brine—this adds an extra layer of tangy flavor that ties the filling to the peppers.
Step 6: Mix and Season
Gently fold all the ingredients together with a spatula or spoon until everything is evenly distributed. You want to see a beautiful mosaic of white from the feta, green from the herbs, and red from the onion scattered throughout the quinoa. Now, it’s time to taste and season. Add a pinch of salt and a few grinds of black pepper. Taste again. Does it need more brightness? Add a little more lemon juice. More saltiness? Be cautious, but you can add a tiny bit more. The filling should be vibrant, fresh, and well-seasoned.
Step 7: Stuff the Peppers
Now for the fun part! Hold a hollowed-out cherry pepper in one hand and use a small spoon (an espresso spoon works perfectly) or your fingertips to carefully fill it with the quinoa mixture. Pack the filling in firmly but gently, allowing it to mound slightly over the top. The contrast between the smooth, red pepper and the textured, mounded filling is visually appealing. Repeat this process with all the remaining peppers.
Step 8: Chill and Serve
Arrange the stuffed cherry peppers on a serving platter. For the best flavor, it’s recommended to cover them and let them chill in the refrigerator for at least 30 minutes. This allows the flavors in the filling to meld and intensify. It also ensures they are served cool and crisp, which is incredibly refreshing. When ready to serve, you can give them a final, light drizzle of extra virgin olive oil or a sprinkle of fresh parsley for presentation.
Understanding the Nutrition: A Healthy Bite
These Stuffed Cherry Peppers aren’t just delicious; they’re packed with nutritional benefits, making them a smart choice for any occasion. They are a perfect example of how indulgent-tasting food can also be good for you.
- Servings: This recipe makes approximately 24-30 stuffed peppers, serving 6-8 people as an appetizer.
- Calories per Serving: Approximately 150-180 calories per serving (based on 4 peppers).
Key Nutrition Facts:
- Rich in Complete Protein: Quinoa is one of the few plant-based foods that contains all nine essential amino acids, making it a complete protein. This is crucial for muscle repair, immune function, and overall body maintenance, making these bites surprisingly satisfying and sustaining.
- High in Fiber: With a substantial amount from both the quinoa and the peppers, this appetizer is a good source of dietary fiber. Fiber is essential for digestive health, helps regulate blood sugar levels, and contributes to a feeling of fullness, preventing overeating.
- Source of Vitamin C: Cherry peppers are loaded with Vitamin C, a powerful antioxidant that supports the immune system, promotes healthy skin by aiding in collagen production, and helps protect cells from damage by free radicals.
- Contains Healthy Fats: The extra virgin olive oil and the fats found in feta cheese are primarily monounsaturated and polyunsaturated. These healthy fats are beneficial for heart health, helping to lower bad cholesterol levels and reduce inflammation.
- Gluten-Free and Vegetarian: This recipe is naturally gluten-free and vegetarian, making it an inclusive and safe option to serve at gatherings with guests who have various dietary needs and preferences.
Quick & Easy: Preparation Time Breakdown
One of the best aspects of this recipe is its efficiency. While the final product looks intricate and impressive, it comes together relatively quickly, with most of the time being hands-off.
- Preparation Time: 20 minutes. This includes rinsing the quinoa, draining and seeding the peppers, and chopping the herbs and onion.
- Cooking Time: 15 minutes. This is the time it takes for the quinoa to simmer and cook through.
- Total Time: Approximately 35 minutes (plus an optional 30 minutes of chilling time).
The workflow is designed for multitasking. While the quinoa is cooking and then cooling, you have the perfect window to prepare the peppers and all the other filling ingredients, ensuring a smooth and stress-free cooking experience.
The Art of Presentation: How to Serve Your Stuffed Cherry Peppers
Presentation is key to making these little jewels shine. Their vibrant color makes them a beautiful addition to any table. Here are several ways to serve them:
- The Classic Appetizer Platter:
- Arrange the stuffed peppers on a clean, white ceramic platter to make their red color pop.
- Garnish with a sprinkle of extra chopped parsley and a few fresh mint leaves.
- Serve alongside a small bowl of olives, some cubes of high-quality cheese, and gluten-free crackers.
- As Part of a Meze or Antipasto Board:
- Integrate the peppers onto a large wooden board.
- Surround them with complementary items like hummus, pita bread (or gluten-free alternative), marinated artichoke hearts, slices of prosciutto or salami, and crunchy vegetable sticks like cucumber and carrots.
- The Light Lunch Duo:
- Serve a portion of 5-6 stuffed peppers alongside a simple arugula salad dressed with lemon vinaigrette.
- This creates a balanced, healthy, and satisfying light lunch that’s full of flavor and texture.
- As an Elegant Garnish:
- Use a single, beautifully stuffed pepper to garnish a main course.
- It pairs wonderfully as a side bite for grilled chicken, fish, or a hearty lentil soup, adding a pop of color and a burst of tangy flavor.
- For a Cocktail Party:
- Spear each stuffed pepper with a decorative cocktail pick. This makes them easy for guests to grab and eat without needing plates or cutlery, perfect for a standing-room-only event.
Pro Tips for Perfection: Elevating Your Stuffed Peppers
While the base recipe is fantastic, a few expert tips can take your Stuffed Cherry Peppers from great to unforgettable.
- Toast Your Quinoa for Nutty Depth: Before adding the broth, toast the rinsed and drained quinoa in the dry saucepan over medium heat for 2-3 minutes, stirring constantly until it becomes fragrant. This simple step deepens its natural nutty flavor.
- Don’t Skip the Brine: That tablespoon of reserved pickling liquid from the pepper jar is a game-changer. It infuses the filling with the same tangy-sweet DNA as the peppers, creating a more cohesive and flavorful bite.
- Achieve the Perfect Mince: The texture of the filling is paramount. Take the extra minute to mince the red onion and garlic as finely as possible. This ensures their flavors meld into the background instead of creating harsh, chunky bites.
- Balance is Key: After mixing the filling, always taste it before stuffing the peppers. It might need a touch more lemon for brightness, a pinch more pepper for warmth, or even a tiny drizzle of honey if you want to lean into the sweet-and-savory profile.
- Make-Ahead Masterpiece: You can prepare the quinoa filling up to two days in advance and store it in an airtight container in the refrigerator. When you’re ready to serve, simply stuff the peppers and chill. This makes party prep a breeze.
- Cheese Variations: While feta is classic, don’t be afraid to experiment. Crumbled goat cheese would add a tangy creaminess, while finely grated Parmesan or Pecorino Romano would bring a sharper, saltier, umami-rich flavor.
- Add a Crunch: For an unexpected textural element, toast a couple of tablespoons of pine nuts or chopped walnuts and fold them into the quinoa filling. The crunch provides a delightful contrast to the soft filling and tender pepper.
- The Finishing Touch: Just before serving, drizzle a high-quality balsamic glaze over the arranged peppers. The sweet, syrupy glaze complements the tangy peppers and savory filling beautifully and adds a professional, elegant look.
Your Questions Answered: Stuffed Cherry Pepper FAQ
Here are answers to some of the most common questions about making this recipe.
1. Can I make these stuffed peppers ahead of time?
Absolutely! This is one of the best features of this recipe. You can fully assemble the stuffed peppers up to 24 hours in advance. Store them in a single layer in an airtight container in the refrigerator. The flavors will actually meld and become even more delicious overnight.
2. Are these cherry peppers spicy?
Most jarred sweet cherry peppers are mild and tangy, not spicy. However, some brands do produce a “hot” version. Be sure to check the label carefully when purchasing. If you want to add a kick, you can mix a pinch of red pepper flakes into the quinoa filling.
3. Can I use fresh cherry peppers instead of jarred ones?
Yes, but it requires extra preparation. Fresh cherry peppers are much firmer and lack the tangy flavor of the pickled variety. To use them, you would need to slice off the tops, scoop out the seeds, and then blanch them in boiling water for 2-3 minutes or roast them at 400°F (200°C) for 10-15 minutes until they are tender-crisp. You’ll also need to season your filling more aggressively with salt and lemon juice to make up for the lack of brine flavor.
4. How should I store the leftovers?
Store any leftover stuffed peppers in an airtight container in the refrigerator for up to 3-4 days. They are delicious eaten cold straight from the fridge. The texture may soften slightly over time, but the flavor will remain excellent.
5. Is this recipe vegan? How can I adapt it?
The recipe as written is vegetarian, but not vegan due to the feta cheese. To make it vegan, simply substitute the feta cheese with a high-quality vegan feta alternative. Many brands now offer excellent plant-based versions that crumble and taste very similar. Ensure you are using vegetable broth, not chicken broth, for the quinoa.
6. What other grains can I use instead of quinoa?
If you don’t have quinoa or want to try something different, several other grains work well. Couscous is a fantastic and quick-cooking alternative. Millet would provide a similar texture. You could also use bulgur wheat (not gluten-free) or even a well-seasoned cauliflower rice for a low-carb, grain-free option.
7. My quinoa filling seems too dry or too wet. What did I do wrong?
If the filling is too dry, it’s likely the quinoa was a bit undercooked or you didn’t add enough olive oil or lemon juice. Simply stir in another teaspoon of olive oil or a squeeze of lemon juice until it reaches the desired consistency. If the filling is too wet, it’s often because the quinoa wasn’t drained well or was overcooked and mushy. You can try to fix this by adding a bit more crumbled feta or even some gluten-free breadcrumbs to help absorb the excess moisture.
8. Can I freeze these Stuffed Cherry Peppers?
It is generally not recommended to freeze the finished stuffed peppers. The cherry peppers, having been pickled, can become very soft and watery upon thawing, which will negatively affect the texture of the entire appetizer. However, you can successfully freeze the quinoa filling on its own for up to 3 months. Thaw it in the refrigerator overnight, then bring to room temperature and stuff fresh peppers when ready to serve.
Stuffed Cherry Peppers with Quinoa
Ingredients
Crafting these delightful bites is all about balancing textures and tastes. Each ingredient is chosen not just for its individual flavor, but for how it complements the others to create a harmonious and unforgettable appetizer.
- Jarred Whole Sweet Cherry Peppers (16-ounce jar): These are the star of the show. Look for peppers that are pickled in a sweet and tangy brine, which infuses them with incredible flavor and tenderizes them to the perfect consistency. They provide the vibrant color and the initial burst of zesty flavor that defines the dish.
- Quinoa (1/2 cup, uncooked): The foundation of our filling. This ancient grain is a nutritional powerhouse, offering a complete protein and a delightful, slightly nutty flavor. When cooked, its fluffy texture is perfect for absorbing the other flavors in the filling.
- Vegetable Broth or Water (1 cup): Used for cooking the quinoa. Using vegetable broth instead of water is a simple trick to infuse the quinoa with a savory depth of flavor from the very beginning.
- Crumbled Feta Cheese (1/2 cup): This brings a salty, briny, and creamy element that cuts through the sweetness of the peppers and the earthiness of the quinoa. It’s the flavor counterpoint that makes every bite interesting.
- Fresh Parsley (1/4 cup, finely chopped): Adds a clean, bright, and slightly peppery freshness. It lightens up the filling and contributes a beautiful green fleck of color.
- Fresh Mint (2 tablespoons, finely chopped): A secret weapon for freshness. Mint provides a cool, aromatic lift that pairs wonderfully with the lemon and feta, elevating the entire flavor profile.
- Red Onion (1/4 cup, finely minced): Offers a sharp, pungent bite and a subtle sweetness. Mincing it very finely ensures it integrates seamlessly into the filling without overpowering it.
- Extra Virgin Olive Oil (2 tablespoons): Used to bind the filling together, add richness, and contribute a smooth, fruity flavor that complements all the Mediterranean-inspired ingredients.
- Lemon (1, for zest and juice): Both the zest and the juice are crucial. The zest provides an aromatic, floral citrus note, while the juice adds a bright acidity that wakes up all the other flavors and balances the richness of the olive oil and feta.
- Garlic (1 clove, minced): A small amount of fresh garlic adds a foundational savory, pungent kick that deepens the overall flavor of the quinoa stuffing.
- Salt and Black Pepper (to taste): Essential for seasoning. Be mindful with the salt, as the feta and pickled peppers are already quite salty. A few grinds of fresh black pepper add a touch of warmth.
Instructions
Follow these instructions carefully to assemble your vibrant and delicious stuffed peppers. The process is straightforward and can be broken down into preparing the components and then bringing them all together.
Step 1: Prepare the Cherry Peppers
First, you need to get your vessels ready. Carefully open the jar of cherry peppers and drain them thoroughly, reserving a tablespoon of the pickling liquid (brine) for later. Place the peppers on a plate lined with paper towels, cut-side down, to allow any excess liquid to drain away. This step is crucial to prevent a watery final product. Using a small spoon, a grapefruit spoon, or even your fingers, gently scoop out and discard any seeds from inside the peppers. Be careful not to tear the pepper walls. Set the hollowed-out peppers aside.
Step 2: Cook the Quinoa
Rinsing the quinoa is a non-negotiable step for the best flavor and texture. Place the uncooked quinoa in a fine-mesh sieve and rinse it under cold running water for at least 30 seconds. This removes the natural coating called saponin, which can taste bitter or soapy. Once rinsed, combine the quinoa and the 1 cup of vegetable broth (or water) in a small saucepan. Bring the mixture to a boil over medium-high heat. Once it’s boiling, reduce the heat to low, cover the saucepan with a tight-fitting lid, and let it simmer for about 15 minutes, or until all the liquid has been absorbed.
Step 3: Fluff and Cool the Quinoa
Once the quinoa is cooked, remove it from the heat but keep the lid on. Let it sit and steam for 5 minutes. This allows the grains to firm up and separate. After 5 minutes, remove the lid and gently fluff the quinoa with a fork. Transfer the fluffed quinoa to a medium-sized mixing bowl and spread it out a bit to help it cool down faster. You want it to be at room temperature or just slightly warm before you add the other ingredients, especially the cheese and fresh herbs.
Step 4: Prepare the Filling
While the quinoa is cooling, you can prepare the rest of your filling ingredients. Ensure your red onion, parsley, mint, and garlic are all very finely chopped or minced. This is key to creating a cohesive filling where no single flavor is overwhelming. Zest the lemon first, then cut it in half to juice it.
Step 5: Combine the Filling Ingredients
To the bowl of cooled quinoa, add the crumbled feta cheese, finely chopped parsley, mint, red onion, and minced garlic. Drizzle in the 2 tablespoons of extra virgin olive oil, the juice of half a lemon, and all of the lemon zest. Add the 1 tablespoon of reserved pepper brine—this adds an extra layer of tangy flavor that ties the filling to the peppers.
Step 6: Mix and Season
Gently fold all the ingredients together with a spatula or spoon until everything is evenly distributed. You want to see a beautiful mosaic of white from the feta, green from the herbs, and red from the onion scattered throughout the quinoa. Now, it’s time to taste and season. Add a pinch of salt and a few grinds of black pepper. Taste again. Does it need more brightness? Add a little more lemon juice. More saltiness? Be cautious, but you can add a tiny bit more. The filling should be vibrant, fresh, and well-seasoned.
Step 7: Stuff the Peppers
Now for the fun part! Hold a hollowed-out cherry pepper in one hand and use a small spoon (an espresso spoon works perfectly) or your fingertips to carefully fill it with the quinoa mixture. Pack the filling in firmly but gently, allowing it to mound slightly over the top. The contrast between the smooth, red pepper and the textured, mounded filling is visually appealing. Repeat this process with all the remaining peppers.
Step 8: Chill and Serve
Arrange the stuffed cherry peppers on a serving platter. For the best flavor, it’s recommended to cover them and let them chill in the refrigerator for at least 30 minutes. This allows the flavors in the filling to meld and intensify. It also ensures they are served cool and crisp, which is incredibly refreshing. When ready to serve, you can give them a final, light drizzle of extra virgin olive oil or a sprinkle of fresh parsley for presentation.
Nutrition
- Serving Size: one normal portion
- Calories: 180