")

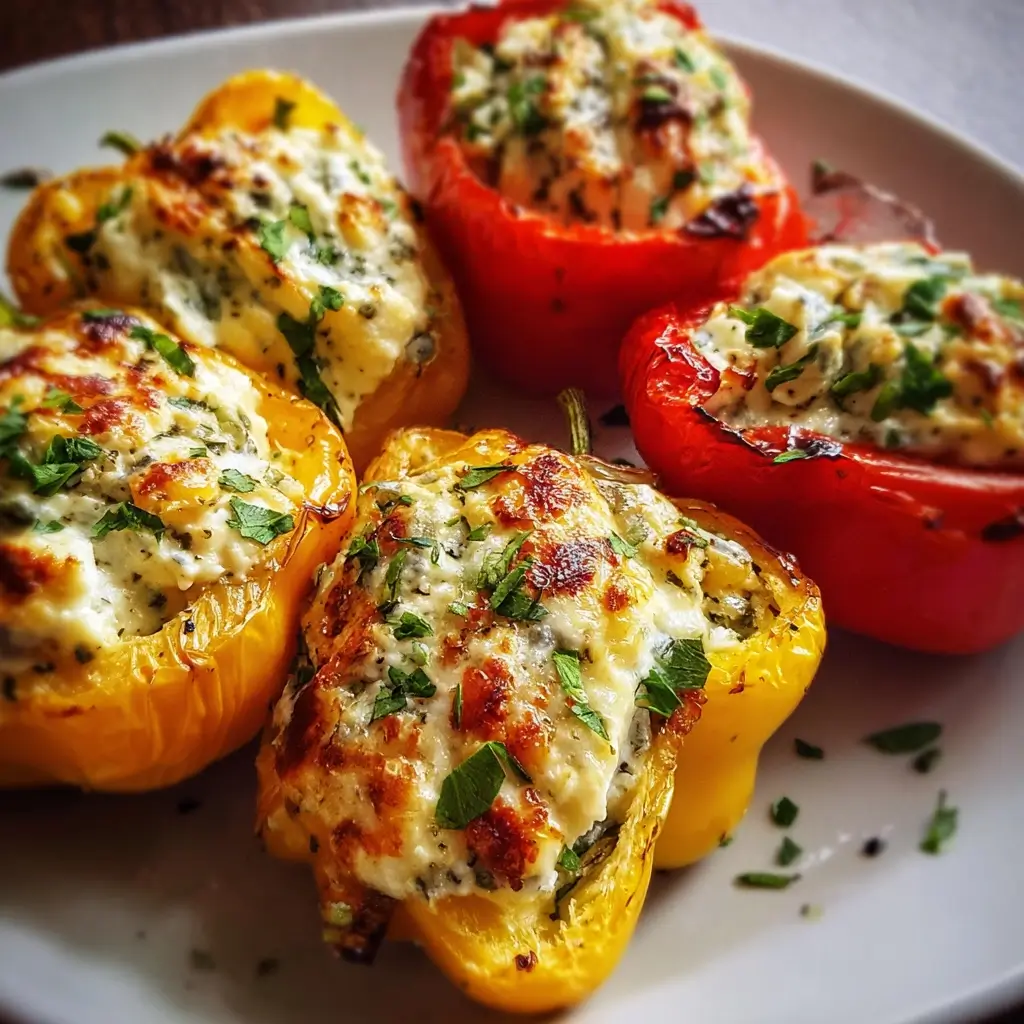

Of all the appetizers in my culinary arsenal, there’s one that consistently steals the show, disappearing from the platter within minutes of being served. It’s a recipe that has seen me through last-minute potlucks, elegant holiday gatherings, and quiet weeknight cravings. I’m talking about these vibrant, jewel-toned Stuffed Mini Bell Peppers with a gloriously creamy feta filling. The first time I made them for a family barbecue, I watched as my notoriously picky nephew, who usually avoids anything green (or red, or yellow), tentatively picked one up. He took a bite, his eyes widened, and he immediately reached for another. That was the moment I knew this recipe was a keeper. It’s the perfect marriage of textures and flavors: the sweet, tender crunch of the roasted pepper, the tangy, salty richness of the whipped feta and cream cheese, and the fresh, aromatic burst of herbs and garlic. They look like they took hours to prepare, a beautiful mosaic of color on any table, but the secret is they are deceptively simple to create. This isn’t just an appetizer; it’s a conversation starter, a guaranteed crowd-pleaser, and a wonderfully healthy way to indulge. Whether you’re a seasoned cook or just starting your kitchen adventures, this recipe will make you look like a culinary superstar.
Ingredients
- 1 lb (about 450g) Mini Bell Peppers: These are the vibrant, edible vessels for our creamy filling. Look for a bag with a mix of red, orange, and yellow peppers for a visually stunning presentation. Ensure they are firm with glossy, unblemished skin. Their small size makes them the perfect bite-sized appetizer.
- 8 oz (226g) Feta Cheese: The heart of our filling, providing a salty, tangy flavor. For the creamiest possible texture, I strongly recommend using a block of feta packed in brine rather than pre-crumbled feta, which is often drier and contains anti-caking agents.
- 4 oz (113g) Cream Cheese: This is the secret to the ultra-creamy, smooth consistency of the filling. Use a full-fat block of cream cheese, softened to room temperature, to ensure it blends seamlessly with the feta without any lumps.
- 2 Cloves Garlic: Finely minced or pressed, fresh garlic adds a pungent, aromatic depth that cuts through the richness of the cheeses. The amount can be adjusted based on your love for garlic.
- 2 tablespoons Fresh Dill: Finely chopped. Dill brings a fresh, slightly anise-like flavor that pairs beautifully with feta. You can substitute with fresh parsley or chives if you prefer.
- 1 tablespoon Olive Oil: A good quality extra virgin olive oil is used to bind the filling and can also be used to lightly coat the peppers, helping them to roast perfectly and preventing them from drying out in the oven.
- 1/4 teaspoon Black Pepper: Freshly ground black pepper adds a subtle hint of spice and balances the saltiness of the feta cheese.
- Optional Garnish: Additional fresh dill, chopped chives, or a sprinkle of smoked paprika.
Instructions
Creating these delicious bites is a straightforward process. Following these detailed steps will ensure your stuffed mini peppers are perfect every time, with tender-crisp peppers and a warm, creamy, and flavorful filling.
Step 1: Prepare the Oven and Peppers
First, preheat your oven to 400°F (200°C). This high heat is crucial for roasting the peppers quickly, making them tender while still retaining a slight bite, and for getting that beautiful golden-brown color on the filling. While the oven is preheating, it’s time to prepare your peppers. Wash the mini peppers thoroughly under cool running water and pat them dry with a paper towel. Slice each pepper in half lengthwise, from the stem to the tip. Use a small spoon or your fingers to gently scoop out the white membranes and any seeds. The goal is to create a clean, hollowed-out “boat” for the filling. Arrange the pepper halves, cut-side up, in a single layer on a large baking sheet. To prevent sticking and make cleanup a breeze, you can line the baking sheet with parchment paper.
Step 2: Create the Creamy Feta Filling
In a medium-sized mixing bowl, combine the softened cream cheese and the block of feta cheese. It’s very important that your cream cheese is at room temperature to achieve a smooth, lump-free mixture. You can crumble the feta block with your fingers as you add it to the bowl. Using a hand mixer on low speed or a sturdy fork, beat the cheeses together until they are well combined and relatively smooth. Don’t worry if there are still a few small lumps of feta; they add a nice textural contrast.
Step 3: Add Flavor to the Filling
Once the cheeses are blended, add the finely minced garlic, the chopped fresh dill, the tablespoon of olive oil, and the freshly ground black pepper to the bowl. Continue to mix with the hand mixer or fork until all the ingredients are fully incorporated and the filling is light and creamy. Take a moment to taste the filling. Depending on the saltiness of your feta, you may or may not need to add a pinch of salt. Most of the time, the feta provides all the salinity you need.
Step 4: Stuff the Peppers
Now for the fun part. Using a small spoon or a butter knife, carefully fill each pepper half with the creamy feta mixture. Be generous, but try not to overfill them, as the filling will expand slightly as it bakes. A small mound of filling in each pepper boat is perfect. If you want to be extra precise or are making a large batch, you can transfer the filling to a piping bag (or a zip-top bag with the corner snipped off) to fill the peppers quickly and neatly.
Step 5: Bake to Perfection
Place the baking sheet with the stuffed peppers into the preheated oven. Bake for 15-20 minutes. You’re looking for two key indicators of doneness: the peppers should be tender and slightly wrinkled at the edges, and the feta filling should be heated through, soft, and just beginning to turn a light golden brown on top. Keep a close eye on them during the last 5 minutes to prevent the tops from burning.
Step 6: Garnish and Serve
Once baked, carefully remove the baking sheet from the oven. Let the stuffed peppers cool for a few minutes, as they will be extremely hot. This brief cooling period also allows the filling to set up slightly. Just before serving, sprinkle them with your choice of garnish. A little extra fresh dill, some finely chopped chives, or a light dusting of smoked paprika for color and a hint of smoky flavor all work beautifully. Serve them warm.
Nutrition Facts
- Servings: 6-8 appetizer servings
- Calories per serving: Approximately 165 calories
- Vitamin C: The mini bell peppers are an excellent source of Vitamin C, a powerful antioxidant that supports immune function and skin health. Roasting them makes this nutrient readily available.
- Protein: A respectable amount of protein, primarily from the feta and cream cheese, makes this appetizer more satisfying and helps in muscle repair and maintenance.
- Healthy Fats: The olive oil and cheese contribute monounsaturated and saturated fats, which provide energy and help in the absorption of fat-soluble vitamins.
- Low in Carbohydrates: This recipe is naturally low in carbohydrates, making it a fantastic option for those following a low-carb or ketogenic lifestyle.
Preparation Time
This recipe is wonderfully efficient, making it perfect for both planned parties and spontaneous snacking. The total time from start to finish is approximately 35 minutes.
- Prep Time: 15 minutes. This includes washing and halving the peppers, removing the seeds, and mixing the creamy feta filling.
- Cook Time: 20 minutes. This is the time the peppers spend in the oven, roasting to tender perfection while the filling becomes warm and golden.
How to Serve
These versatile stuffed mini peppers can be presented in numerous ways to suit any occasion. Here are some of my favorite ways to serve them:
As a Party Appetizer:
- Arrange them on a large white platter or a rustic wooden board to make their vibrant colors pop.
- Garnish generously with fresh herbs right before serving to add a touch of elegance and fresh aroma.
- Serve them alongside other bite-sized appetizers like olives, cheese cubes, and cured meats for a complete Mediterranean-inspired grazing board.
- Insert a decorative toothpick into each pepper for easy, mess-free handling by guests.
As a Healthy Side Dish:
- Pair them with a main course of grilled chicken, steak, or fish. Their creamy, tangy flavor cuts through the richness of grilled meats beautifully.
- Serve them alongside a simple green salad dressed with a lemon vinaigrette for a light, healthy, and complete lunch.
- Place them next to a serving of quinoa or couscous; the warm, creamy filling acts almost like a sauce for the grains.
For Meal Prep and Lunchboxes:
- These peppers are delicious at room temperature, making them a perfect addition to an adult lunchbox or bento box.
- Pack them with some whole-grain crackers, hummus, and fresh veggies for a well-rounded and exciting midday meal.
- They can be made ahead and stored in the fridge, ready to be enjoyed as a quick and healthy snack when hunger strikes.
Additional Tips
To elevate your stuffed mini peppers from great to absolutely unforgettable, here are eight tips to keep in mind.
1. The Secret to Ultra-Creamy Filling
For the smoothest, most luxurious filling, ensure both your cream cheese and feta cheese are at room temperature before you begin. Even better, use a hand mixer or a small food processor to whip the cheeses together. This incorporates air into the mixture, making it incredibly light and fluffy.
2. Don’t Discard the Stems
When slicing the peppers in half, try to cut right through the stem, leaving a small piece attached to each half. This not only looks more rustic and appealing but also provides a convenient little “handle” for picking them up.
3. Make-Ahead Magic
You can fully prepare these peppers ahead of time, which is a lifesaver for party planning. Assemble the stuffed peppers completely, arrange them on the baking sheet, cover them tightly with plastic wrap, and refrigerate for up to 24 hours. When you’re ready to serve, simply remove the plastic wrap and bake as directed, adding a few extra minutes to the cooking time to account for them being chilled.
4. Introduce a Protein Boost
To make these peppers a more substantial snack or even a light main course, consider adding a protein source to the filling. A half-cup of finely chopped cooked chicken, shredded ham, or crumbled and cooked ground beef or turkey would mix in beautifully with the cheese.
5. Play with Herb Variations
While dill is a classic pairing with feta, don’t be afraid to experiment. Finely chopped fresh parsley, chives, oregano, or even a touch of mint can completely transform the flavor profile. A combination of parsley and chives is a fresh, all-purpose choice.
6. Spice It Up
If you enjoy a bit of heat, add a pinch of red pepper flakes or a dash of cayenne pepper to the cheese filling. For a smoky heat, a quarter teaspoon of chipotle powder would be delicious. This adds a surprising and delightful kick that contrasts with the cool creaminess of the cheese.
7. Getting the Perfect Roast on the Peppers
For peppers that are more tender and have a deeper roasted flavor, you can pre-roast them. Place the empty pepper halves on the baking sheet, drizzle lightly with olive oil, and bake for 10 minutes at 400°F (200°C) before you fill them. Then, stuff them and return them to the oven for the final 10-15 minutes until the filling is golden.
8. Storage and Reheating
Leftover stuffed peppers can be stored in an airtight container in the refrigerator for up to 3 days. While they are tasty cold or at room temperature, you can easily reheat them. The best way is in an air fryer at 350°F (175°C) for 3-5 minutes or in a toaster oven. This will crisp the pepper skin back up and warm the filling without making them soggy, which can happen in a microwave.
Frequently Asked Questions (FAQ)
Q1: Can I use large bell peppers instead of mini ones?
Absolutely! This recipe works wonderfully with large bell peppers to create a more substantial side dish or a vegetarian main course. Simply slice the large peppers in half, remove the seeds and membranes, and fill them. You will need to increase the baking time to 30-40 minutes, or until the peppers are fully tender and the filling is hot and bubbly.
Q2: Are these stuffed mini peppers keto-friendly?
Yes, they are an excellent keto-friendly appetizer or snack. Bell peppers are low in net carbs, and the filling is made primarily of cheese and healthy fats. To ensure it fits your macros, use full-fat cream cheese and feta and enjoy them as part of a balanced ketogenic diet.
Q3: My filling seems too runny. What went wrong?
A runny filling is usually caused by one of two things: using a “light” or “whipped” cream cheese product, which contains more water and stabilizers, or not using feta from a block. Block feta is much firmer and less watery than crumbled varieties. To fix a slightly runny filling, you can try chilling it in the refrigerator for 30 minutes before stuffing the peppers, which will help it firm up.
Q4: Can I make this recipe vegan?
Yes, you can easily adapt this recipe to be vegan. There are many excellent plant-based cream cheese and feta cheese alternatives available in most grocery stores today. Simply substitute them in equal amounts. Ensure you choose a vegan feta that crumbles well for the best texture.
Q5: Can I freeze the stuffed peppers?
While you technically can, I generally advise against freezing the finished, baked peppers. The texture of the bell peppers can become quite soft and watery upon thawing, and the creamy cheese filling can sometimes separate. However, you can freeze the unbaked, stuffed peppers for up to a month. Arrange them on a baking sheet, freeze until solid, then transfer to a freezer-safe bag. Bake them directly from frozen, adding about 10-15 minutes to the original baking time.
Q6: What other cheeses can I use in the filling?
Feta is the star, but you can certainly create delicious variations. For a milder, tangier flavor, try substituting goat cheese (chèvre) for the feta. For a richer, meltier filling, you could mix in some grated Parmesan, Asiago, or even a low-moisture mozzarella. A Boursin-style garlic and herb cheese could even replace both the cream cheese and herbs for a super quick shortcut.
Q7: How do I choose the best mini bell peppers at the store?
Look for a bag of peppers that feels heavy for its size. The peppers themselves should be firm to the touch with tight, glossy skin. Avoid any peppers that have soft spots, wrinkles, or blemishes. A variety of colors (red, yellow, orange) not only looks beautiful but also offers a slight variation in sweetness.
Q8: Can I make these in an air fryer?
Yes, an air fryer is a fantastic way to cook these stuffed mini peppers! It’s faster and can result in an even crispier top. Preheat your air fryer to 370°F (185°C). Place the stuffed peppers in a single layer in the air fryer basket (you may need to work in batches). Air fry for 8-10 minutes, or until the peppers are tender and the filling is golden brown and bubbling.

Stuffed Mini Bell Peppers with Creamy Feta
Ingredients
- 1 lb (about 450g) Mini Bell Peppers: These are the vibrant, edible vessels for our creamy filling. Look for a bag with a mix of red, orange, and yellow peppers for a visually stunning presentation. Ensure they are firm with glossy, unblemished skin. Their small size makes them the perfect bite-sized appetizer.
- 8 oz (226g) Feta Cheese: The heart of our filling, providing a salty, tangy flavor. For the creamiest possible texture, I strongly recommend using a block of feta packed in brine rather than pre-crumbled feta, which is often drier and contains anti-caking agents.
- 4 oz (113g) Cream Cheese: This is the secret to the ultra-creamy, smooth consistency of the filling. Use a full-fat block of cream cheese, softened to room temperature, to ensure it blends seamlessly with the feta without any lumps.
- 2 Cloves Garlic: Finely minced or pressed, fresh garlic adds a pungent, aromatic depth that cuts through the richness of the cheeses. The amount can be adjusted based on your love for garlic.
- 2 tablespoons Fresh Dill: Finely chopped. Dill brings a fresh, slightly anise-like flavor that pairs beautifully with feta. You can substitute with fresh parsley or chives if you prefer.
- 1 tablespoon Olive Oil: A good quality extra virgin olive oil is used to bind the filling and can also be used to lightly coat the peppers, helping them to roast perfectly and preventing them from drying out in the oven.
- 1/4 teaspoon Black Pepper: Freshly ground black pepper adds a subtle hint of spice and balances the saltiness of the feta cheese.
- Optional Garnish: Additional fresh dill, chopped chives, or a sprinkle of smoked paprika.
Instructions
Creating these delicious bites is a straightforward process. Following these detailed steps will ensure your stuffed mini peppers are perfect every time, with tender-crisp peppers and a warm, creamy, and flavorful filling.
Step 1: Prepare the Oven and Peppers
First, preheat your oven to 400°F (200°C). This high heat is crucial for roasting the peppers quickly, making them tender while still retaining a slight bite, and for getting that beautiful golden-brown color on the filling. While the oven is preheating, it’s time to prepare your peppers. Wash the mini peppers thoroughly under cool running water and pat them dry with a paper towel. Slice each pepper in half lengthwise, from the stem to the tip. Use a small spoon or your fingers to gently scoop out the white membranes and any seeds. The goal is to create a clean, hollowed-out “boat” for the filling. Arrange the pepper halves, cut-side up, in a single layer on a large baking sheet. To prevent sticking and make cleanup a breeze, you can line the baking sheet with parchment paper.
Step 2: Create the Creamy Feta Filling
In a medium-sized mixing bowl, combine the softened cream cheese and the block of feta cheese. It’s very important that your cream cheese is at room temperature to achieve a smooth, lump-free mixture. You can crumble the feta block with your fingers as you add it to the bowl. Using a hand mixer on low speed or a sturdy fork, beat the cheeses together until they are well combined and relatively smooth. Don’t worry if there are still a few small lumps of feta; they add a nice textural contrast.
Step 3: Add Flavor to the Filling
Once the cheeses are blended, add the finely minced garlic, the chopped fresh dill, the tablespoon of olive oil, and the freshly ground black pepper to the bowl. Continue to mix with the hand mixer or fork until all the ingredients are fully incorporated and the filling is light and creamy. Take a moment to taste the filling. Depending on the saltiness of your feta, you may or may not need to add a pinch of salt. Most of the time, the feta provides all the salinity you need.
Step 4: Stuff the Peppers
Now for the fun part. Using a small spoon or a butter knife, carefully fill each pepper half with the creamy feta mixture. Be generous, but try not to overfill them, as the filling will expand slightly as it bakes. A small mound of filling in each pepper boat is perfect. If you want to be extra precise or are making a large batch, you can transfer the filling to a piping bag (or a zip-top bag with the corner snipped off) to fill the peppers quickly and neatly.
Step 5: Bake to Perfection
Place the baking sheet with the stuffed peppers into the preheated oven. Bake for 15-20 minutes. You’re looking for two key indicators of doneness: the peppers should be tender and slightly wrinkled at the edges, and the feta filling should be heated through, soft, and just beginning to turn a light golden brown on top. Keep a close eye on them during the last 5 minutes to prevent the tops from burning.
Step 6: Garnish and Serve
Once baked, carefully remove the baking sheet from the oven. Let the stuffed peppers cool for a few minutes, as they will be extremely hot. This brief cooling period also allows the filling to set up slightly. Just before serving, sprinkle them with your choice of garnish. A little extra fresh dill, some finely chopped chives, or a light dusting of smoked paprika for color and a hint of smoky flavor all work beautifully. Serve them warm.
Nutrition
- Serving Size: one normal portion
- Calories: 165