")

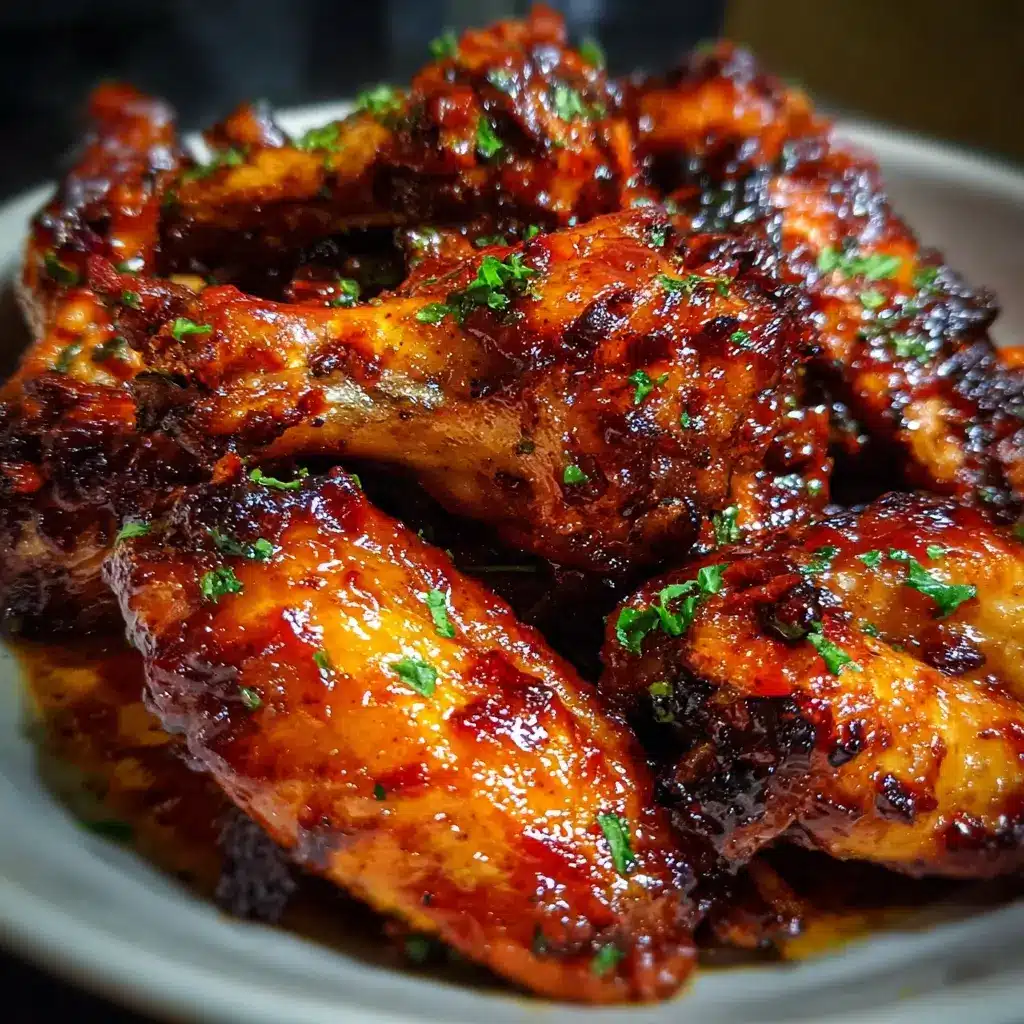

Of all the recipes that have graced my kitchen, few have achieved the legendary status of these Sweet Chili Glazed Chicken Wings. It all started on a frantic Saturday afternoon. I had promised to bring the star dish for our weekly family get-together, and frankly, I was out of ideas. Scouring the pantry, I found a bottle of sweet chili sauce, and a plan began to form. An hour later, I pulled a tray of glistening, impossibly crispy wings from the oven. The aroma alone—a tantalizing mix of sweet, spicy, and savory—stopped everyone in their tracks. When I set them on the table, a moment of silence was followed by a symphony of crunches and happy murmurs. My nephew, a notoriously picky eater, declared them “the best wings in the history of the world,” a title he doesn’t bestow lightly. They disappeared in under ten minutes, leaving behind a pile of clean bones and a chorus of requests for the recipe. These aren’t just chicken wings; they are a guaranteed crowd-pleaser, a surefire way to become the hero of any party, potluck, or game day. The magic lies in the method: a simple technique that yields an incredibly crunchy skin without a single drop of deep-frying oil, all cloaked in a sticky, addictive glaze that hits every single flavor note. Prepare to be amazed.
Ingredients for Unforgettable Sweet Chili Glazed Chicken Wings
Here is the simple yet powerful list of ingredients you’ll need to create this masterpiece. Each component plays a crucial role in building layers of flavor and texture.
- 3 lbs Chicken Wings: You can use a mix of drumettes and flats (wingettes), or your personal favorite. Patting them completely dry is the non-negotiable first step to achieving crispy skin.
- 1 tablespoon Cornstarch: This is the secret weapon. It draws moisture from the skin, creating a dry, porous surface that crisps up beautifully in the oven, mimicking a deep-fried texture.
- 1 teaspoon Salt: Essential for seasoning the chicken from the inside out and enhancing all the other flavors.
- 1/2 teaspoon Black Pepper: Adds a mild, earthy heat that complements the sweetness of the glaze.
- 1/2 teaspoon Garlic Powder: Provides a savory, aromatic base note to the chicken itself, ensuring it’s flavorful even before the glaze is applied.
- 1 cup Sweet Chili Sauce: The star of the show. Use a good quality store-bought Thai-style sweet chili sauce for a perfect balance of sweet, savory, and tangy with a mild kick.
- 2 tablespoons Soy Sauce (or Tamari): Adds a deep, umami-rich saltiness that cuts through the sweetness of the chili sauce and gives the glaze its beautiful dark color. Use tamari for a gluten-free option.
- 1 tablespoon Rice Vinegar: This acidic element is crucial for balancing the glaze. It brightens all the flavors and prevents the sauce from becoming cloyingly sweet.
- 1 teaspoon Grated Fresh Ginger: Lends a warm, zesty, and slightly peppery bite that elevates the glaze from good to great.
- 1 Clove Garlic, Minced: Fresh garlic adds a pungent, savory depth that you simply can’t get from powder alone.
- Optional Garnishes: Toasted sesame seeds and finely chopped fresh cilantro or green onions for a final flourish of texture, color, and freshness.
Step-by-Step Instructions for Perfect Wings
Follow these detailed steps carefully. The technique is just as important as the ingredients for achieving that signature crunch and perfectly lacquered glaze.
- Prepare the Oven and Baking Sheet: Begin by preheating your oven to 425°F (220°C). Position a rack in the upper-middle section of the oven. Line a large baking sheet with aluminum foil for easy cleanup. Place an oven-safe wire rack on top of the foil-lined sheet. This setup is critical; the wire rack allows hot air to circulate completely around each wing, rendering the fat and crisping the skin on all sides, preventing a soggy bottom.
- Dry and Season the Wings: This is the most important step for crispy skin. Place the chicken wings on a tray lined with paper towels. Use more paper towels to pat each wing thoroughly dry. Any excess moisture will steam the chicken skin instead of crisping it. In a large bowl, combine the completely dry wings with the cornstarch, salt, black pepper, and garlic powder. Toss vigorously until every wing is lightly and evenly coated. The cornstarch mixture should look like a very thin, dusty film on the chicken.
- Arrange for Baking: Carefully arrange the seasoned wings on the prepared wire rack in a single layer. Make sure there is space between each wing. Overcrowding the pan will trap steam and prevent the wings from getting crispy. If necessary, use two baking sheets to ensure proper spacing.
- First Bake for Crispiness: Place the baking sheet in the preheated oven and bake for 45-50 minutes, flipping the wings halfway through the cooking time. The wings are done with this first bake when they are golden brown, the skin is visibly crispy, and they are cooked through. This initial high-heat bake is designed to render the fat and achieve that perfect crunch.
- Prepare the Sweet Chili Glaze: While the wings are in their final 10 minutes of baking, prepare the glaze. In a small saucepan over medium heat, combine the sweet chili sauce, soy sauce, rice vinegar, grated ginger, and minced garlic. Whisk to combine and bring the mixture to a gentle simmer. Let it simmer for 2-3 minutes, stirring occasionally, until the sauce has thickened slightly and the flavors have melded together. The raw edge of the garlic and ginger will cook off, creating a smooth, cohesive sauce. Remove from the heat and set aside.
- Glaze the Wings: Once the wings are golden brown and crispy, carefully remove them from the oven. Place the hot wings into a large, clean bowl. Pour about three-quarters of the warm glaze over the wings. Using tongs, toss the wings gently but thoroughly until each one is beautifully coated in the sticky sauce.
- Second Bake to Set the Glaze: Return the glazed wings to the wire rack on the baking sheet. Place them back in the 425°F oven for an additional 5-7 minutes. This final, short bake is crucial. It helps the glaze caramelize and “set” onto the wings, making them wonderfully sticky and locking in the flavor without making the crispy skin soggy. Watch them closely during this step to prevent the sugars in the glaze from burning.
- Serve and Garnish: Remove the wings from the oven. Let them rest for a minute or two. Transfer them to a serving platter. If desired, drizzle with any remaining glaze. For a final touch of elegance and flavor, sprinkle generously with toasted sesame seeds and freshly chopped cilantro or green onions before serving immediately.
A Quick Look at the Nutrition Facts
While these are an indulgence, it’s helpful to know what you’re enjoying. The following information is an estimate based on the recipe serving 4 people (approximately 6-7 wings per person).
- Servings: 4
- Calories Per Serving: Approximately 580 kcal
- Protein: Around 35g. Chicken wings are a fantastic source of protein, which is essential for muscle repair, growth, and overall body function.
- Fat: Around 38g. A significant portion of this comes from the chicken skin, which is what makes them so juicy and flavorful. The baking method on a wire rack helps a lot of this fat render and drip away.
- Carbohydrates: Around 25g. The majority of the carbohydrates come from the sugars in the sweet chili sauce and the cornstarch coating.
- Sugar: Around 18g. This is primarily from the sweet chili sauce, giving the glaze its signature sweetness. The rice vinegar helps to balance this out.
- Sodium: Around 950mg. This comes from the salt used to season the chicken and the soy sauce in the glaze. This contributes significantly to the savory, umami flavor profile.
Preparation and Cooking Time
This recipe is surprisingly quick and straightforward, with most of the time being hands-off while the oven does the hard work.
- Preparation Time: 15 minutes. This includes patting the wings dry, mixing the seasonings, and preparing the simple glaze.
- Cooking Time: 50-60 minutes. This is the total time the wings spend in the oven, including the initial crisping bake and the final bake to set the glaze.
- Total Time: Approximately 1 hour and 15 minutes from start to finish. It’s the perfect timeline for a weeknight treat or an easy-to-manage party appetizer.
How to Serve Your Masterpiece
Presentation and pairings can elevate your delicious wings into a full, unforgettable meal experience. Think about textures and flavors that will complement the sweet, spicy, and sticky nature of the wings.
- Classic Dipping Sauces:
- Creamy Ranch Dressing: The cool, herby, and tangy profile of ranch is a classic pairing that cuts through the richness and spice.
- Chunky Blue Cheese Dressing: For those who love a bold flavor, the funky, sharp taste of blue cheese dressing stands up perfectly to the sweet chili glaze.
- Cool and Crunchy Vegetables (A Must-Have):
- Celery and Carrot Sticks: There’s a reason this is the universal side for wings. Their cool, watery crunch provides a refreshing contrast and acts as a perfect palate cleanser between bites.
- Sliced Cucumbers: Another fantastic cooling element, sliced English or Persian cucumbers are crisp and refreshing.
- Substantial Side Dishes:
- Crispy French Fries or Tater Tots: Lean into the comfort food angle with a side of perfectly salted, crispy potatoes.
- Creamy Coleslaw: A tangy, creamy coleslaw offers a cool contrast in both temperature and texture.
- Simple Steamed Rice: A bowl of fluffy white or brown rice is excellent for soaking up any extra glaze and turning the wings into a more complete dinner.
- Asian-Inspired Noodle Salad: A cold soba noodle or rice vermicelli salad with sesame dressing can provide a sophisticated and complementary side.
- Garnishes and Finishes:
- Toasted Sesame Seeds: Add a nutty flavor and a delightful, subtle crunch.
- Fresh Cilantro or Sliced Green Onions: These fresh herbs add a vibrant green color and a burst of freshness that cuts through the richness of the glaze.
- Lime Wedges: A fresh squeeze of lime juice right before eating can brighten up all the flavors and add a final pop of acidity.
Additional Tips for Wing Perfection
Unlock the full potential of your sweet chili wings with these eight expert tips.
- The Dry Skin Secret is Non-Negotiable: We can’t stress this enough. For the crispiest skin, pat the wings as dry as you possibly can with paper towels. For ultimate crispiness, you can even leave the wings uncovered on a wire rack in the refrigerator for a few hours (or overnight) to air-dry the skin before seasoning.
- The Wire Rack is Your Best Friend: Don’t bake wings directly on the foil or pan. Using a wire rack elevates the wings, allowing hot air to circulate underneath. This ensures the bottom of the wings get just as crispy as the top and allows excess fat to drip away.
- Don’t Overcrowd the Pan: Give your wings personal space on the rack. If they are too close together, they will steam each other and you will end up with soft, rubbery skin instead of a crispy shell. Use two baking sheets if you’re making a large batch.
- Air Fryer Conversion: For an even faster and crispier result, you can use an air fryer. Pat dry and season the wings as directed. Place them in a single layer in the air fryer basket and cook at 380°F (193°C) for 20-25 minutes, flipping halfway through. Once crispy, toss them in the prepared glaze and return to the air fryer for another 2-3 minutes at 400°F (200°C) to set the sauce.
- Adjust the Heat Level: This recipe has a mild-to-medium spice level. If you want more fire, add a teaspoon (or more) of sriracha, a pinch of red pepper flakes, or a dash of your favorite hot sauce to the glaze mixture. If you prefer it milder, ensure you’re using a mild sweet chili sauce.
- Make the Glaze Ahead: The sweet chili glaze can be made up to 3 days in advance and stored in an airtight container in the refrigerator. This is a great time-saver for party prep. Just gently reheat it on the stovetop or in the microwave before tossing it with the freshly baked wings.
- Reheating Leftovers the Right Way: The best way to reheat leftover wings and revive their crispiness is in the oven or an air fryer. Place them on a wire rack and heat at 375°F (190°C) for 5-10 minutes, or until warmed through and re-crisped. Microwaving will make the skin soft.
- Whole Wings vs. Separated: If you buy whole chicken wings, you can easily separate them yourself. Find the joint between the drumette and the flat (wingette) and slice firmly through it with a sharp knife. You can discard the wingtip or save it in the freezer to make flavorful chicken stock later.
Frequently Asked Questions (FAQ)
Here are answers to some of the most common questions about making perfect Sweet Chili Glazed Chicken Wings.
1. Can I use frozen chicken wings for this recipe?
Yes, you can, but you must thaw them completely first. Once thawed, it is even more critical to pat them thoroughly dry with paper towels, as thawed poultry releases a lot of excess water. Do not attempt to bake them from a frozen state, as they will not get crispy.
2. How do I get my oven-baked wings EXTRA crispy?
The two most important factors are dryness and high heat. First, ensure the wings are bone-dry by patting them with paper towels. For an advanced technique, add 1 teaspoon of baking powder (not baking soda!) to your cornstarch mixture. Baking powder is alkaline and helps break down the proteins in the skin, leading to superior browning and crisping. The wire rack method is also essential.
3. Can I make these wings in an air fryer?
Absolutely! The air fryer is fantastic for making crispy wings. Follow the instructions in “Tip #4” above: season the wings, cook them in a single layer at 380°F (193°C) for 20-25 minutes (flipping halfway), then toss in the glaze and return for 2-3 minutes at 400°F (200°C) to set the glaze.
4. Is there a substitute for cornstarch?
Yes, the best substitute is baking powder (make sure it’s aluminum-free for the best taste). Use one tablespoon of baking powder instead of the cornstarch. Another option is potato starch, which works similarly to cornstarch to create a crispy coating.
5. How do I properly store and reheat leftover wings?
Store any leftover wings in an airtight container in the refrigerator for up to 3-4 days. To reheat and maintain crispiness, avoid the microwave. The best method is to use an air fryer at 375°F (190°C) for 3-5 minutes or an oven on a wire rack at the same temperature for 5-10 minutes, until heated through.
6. Can I prepare these wings ahead of time for a party?
Yes, you can do most of the prep in advance. You can perform the initial bake (Step 4) hours ahead of time. Let the cooked, un-glazed wings cool and store them in the refrigerator. When you’re ready to serve, place them back in a 425°F oven for about 10 minutes to reheat and re-crisp, then proceed with glazing and the final bake (Steps 6 & 7).
7. My glaze seems too thin or too thick. What should I do?
If your glaze is too thin, simply let it simmer on the stove for a few more minutes until it reduces and thickens to your desired consistency. If it’s too thick, you can thin it out by whisking in a teaspoon or two of water or a little extra rice vinegar until it reaches the right viscosity for coating the wings.
8. What is the best brand of sweet chili sauce to use?
While many brands work well, a popular and widely available choice is Mae Ploy Sweet Chilli Sauce, which has a great balance of flavors. Other excellent options include Trader Joe’s Sweet Chili Sauce or Blue Dragon Sweet Chilli. Ultimately, the “best” one is the one you enjoy the most! You can even make your own at home with rice vinegar, sugar, water, garlic, and sambal oelek.

Sweet Chili Glazed Chicken Wings
Ingredients
Here is the simple yet powerful list of ingredients you’ll need to create this masterpiece. Each component plays a crucial role in building layers of flavor and texture.
- 3 lbs Chicken Wings: You can use a mix of drumettes and flats (wingettes), or your personal favorite. Patting them completely dry is the non-negotiable first step to achieving crispy skin.
- 1 tablespoon Cornstarch: This is the secret weapon. It draws moisture from the skin, creating a dry, porous surface that crisps up beautifully in the oven, mimicking a deep-fried texture.
- 1 teaspoon Salt: Essential for seasoning the chicken from the inside out and enhancing all the other flavors.
- 1/2 teaspoon Black Pepper: Adds a mild, earthy heat that complements the sweetness of the glaze.
- 1/2 teaspoon Garlic Powder: Provides a savory, aromatic base note to the chicken itself, ensuring it’s flavorful even before the glaze is applied.
- 1 cup Sweet Chili Sauce: The star of the show. Use a good quality store-bought Thai-style sweet chili sauce for a perfect balance of sweet, savory, and tangy with a mild kick.
- 2 tablespoons Soy Sauce (or Tamari): Adds a deep, umami-rich saltiness that cuts through the sweetness of the chili sauce and gives the glaze its beautiful dark color. Use tamari for a gluten-free option.
- 1 tablespoon Rice Vinegar: This acidic element is crucial for balancing the glaze. It brightens all the flavors and prevents the sauce from becoming cloyingly sweet.
- 1 teaspoon Grated Fresh Ginger: Lends a warm, zesty, and slightly peppery bite that elevates the glaze from good to great.
- 1 Clove Garlic, Minced: Fresh garlic adds a pungent, savory depth that you simply can’t get from powder alone.
- Optional Garnishes: Toasted sesame seeds and finely chopped fresh cilantro or green onions for a final flourish of texture, color, and freshness.
Instructions
Follow these detailed steps carefully. The technique is just as important as the ingredients for achieving that signature crunch and perfectly lacquered glaze.
- Prepare the Oven and Baking Sheet: Begin by preheating your oven to 425°F (220°C). Position a rack in the upper-middle section of the oven. Line a large baking sheet with aluminum foil for easy cleanup. Place an oven-safe wire rack on top of the foil-lined sheet. This setup is critical; the wire rack allows hot air to circulate completely around each wing, rendering the fat and crisping the skin on all sides, preventing a soggy bottom.
- Dry and Season the Wings: This is the most important step for crispy skin. Place the chicken wings on a tray lined with paper towels. Use more paper towels to pat each wing thoroughly dry. Any excess moisture will steam the chicken skin instead of crisping it. In a large bowl, combine the completely dry wings with the cornstarch, salt, black pepper, and garlic powder. Toss vigorously until every wing is lightly and evenly coated. The cornstarch mixture should look like a very thin, dusty film on the chicken.
- Arrange for Baking: Carefully arrange the seasoned wings on the prepared wire rack in a single layer. Make sure there is space between each wing. Overcrowding the pan will trap steam and prevent the wings from getting crispy. If necessary, use two baking sheets to ensure proper spacing.
- First Bake for Crispiness: Place the baking sheet in the preheated oven and bake for 45-50 minutes, flipping the wings halfway through the cooking time. The wings are done with this first bake when they are golden brown, the skin is visibly crispy, and they are cooked through. This initial high-heat bake is designed to render the fat and achieve that perfect crunch.
- Prepare the Sweet Chili Glaze: While the wings are in their final 10 minutes of baking, prepare the glaze. In a small saucepan over medium heat, combine the sweet chili sauce, soy sauce, rice vinegar, grated ginger, and minced garlic. Whisk to combine and bring the mixture to a gentle simmer. Let it simmer for 2-3 minutes, stirring occasionally, until the sauce has thickened slightly and the flavors have melded together. The raw edge of the garlic and ginger will cook off, creating a smooth, cohesive sauce. Remove from the heat and set aside.
- Glaze the Wings: Once the wings are golden brown and crispy, carefully remove them from the oven. Place the hot wings into a large, clean bowl. Pour about three-quarters of the warm glaze over the wings. Using tongs, toss the wings gently but thoroughly until each one is beautifully coated in the sticky sauce.
- Second Bake to Set the Glaze: Return the glazed wings to the wire rack on the baking sheet. Place them back in the 425°F oven for an additional 5-7 minutes. This final, short bake is crucial. It helps the glaze caramelize and “set” onto the wings, making them wonderfully sticky and locking in the flavor without making the crispy skin soggy. Watch them closely during this step to prevent the sugars in the glaze from burning.
- Serve and Garnish: Remove the wings from the oven. Let them rest for a minute or two. Transfer them to a serving platter. If desired, drizzle with any remaining glaze. For a final touch of elegance and flavor, sprinkle generously with toasted sesame seeds and freshly chopped cilantro or green onions before serving immediately.
Nutrition
- Serving Size: one normal portion
- Calories: 580
- Sugar: 18g
- Sodium: 950mg
- Fat: 38g
- Carbohydrates: 25g
- Protein: 35g