Ingredients
Here is the complete list of ingredients, or “potion components,” you’ll need to conjure up these magical Witch Hat Cupcake Cones. Each element plays a crucial role in creating the perfect balance of flavor, texture, and spooky aesthetics.
For the Chocolate Cupcake Batter (Fills Approx. 12-15 Cones):
- 1 ½ cups all-purpose flour: This is the structural foundation of our moist cupcake base, giving it a soft and tender crumb.
- 1 cup granulated sugar: Provides the essential sweetness to balance the rich cocoa and creates a wonderfully soft texture.
- ⅓ cup unsweetened cocoa powder: The heart of our chocolate flavor. Use a good quality cocoa for a deeper, more decadent taste.
- 1 teaspoon baking soda: This leavening agent reacts with the acidic ingredients to create lift, making the cupcakes light and airy.
- ½ teaspoon baking powder: Works alongside the baking soda for an extra boost of lift, ensuring the cupcakes don’t become too dense inside the cones.
- ½ teaspoon salt: A vital ingredient that enhances the chocolate flavor and balances the overall sweetness.
- 1 large egg, at room temperature: Acts as a binder, holding the ingredients together and adding richness. Room temperature eggs incorporate more easily into the batter.
- ½ cup whole milk: Adds moisture and richness, contributing to the tender texture of the final cupcake.
- ¼ cup vegetable oil: Guarantees a supremely moist cupcake that won’t dry out during baking.
- 1 teaspoon pure vanilla extract: Adds a layer of aromatic warmth that complements the deep chocolate flavor beautifully.
- ½ cup boiling water (or hot coffee): This is the secret trick! The hot liquid blooms the cocoa powder, intensifying the chocolate flavor, and creates an incredibly moist, fluffy cupcake. Using hot coffee will make the chocolate taste even richer.
For the Assembly and Decoration:
- 12–15 flat-bottomed ice cream cones (cake cones): These will serve as the pointed shape of our witch hats and the vessel for the delicious cupcake inside.
- 1 ½ cups semi-sweet chocolate chips: To be melted down for a rich, glossy frosting that perfectly coats the cone.
- ½ cup heavy whipping cream: When heated and combined with the chocolate chips, this creates a smooth, pourable ganache-like frosting.
- 12–15 thin, round chocolate cookies (like Oreos without the filling, or chocolate wafer cookies): These form the essential brim of the witch’s hat, providing a stable base and a delightful crunch.
- Optional Decorative Frosting: A small amount of yellow, orange, or green buttercream or store-bought frosting in a piping bag with a small round tip. This is used to create the classic hat buckle.
- Assorted Halloween sprinkles: For adding a final touch of festive color and fun. Think orange, purple, green, and black nonpareils or jimmies.
Instructions
Follow these detailed steps to assemble your bewitching treats. The process is broken down into baking the cupcakes within the cones and then decorating them to complete the magical transformation.
Step 1: Preheat and Prepare Your Baking Station
First, preheat your oven to 350°F (175°C). The key to baking cupcake cones is stability. To prevent the cones from tipping over, you have two excellent options. The easiest method is to place each cone into a well of a standard muffin tin. If the cones are a bit wobbly, you can gently crumple small balls of aluminum foil and pack them around the base of each cone inside the muffin cup to hold them securely upright. Alternatively, you can use a 9×13 inch baking pan and place the cones about an inch apart, using a similar aluminum foil method to secure their bases. Set your prepared cones aside.
Step 2: Mix the Dry Ingredients
In a large mixing bowl, combine the all-purpose flour, granulated sugar, unsweetened cocoa powder, baking soda, baking powder, and salt. Use a whisk to stir these ingredients together for about 30 seconds. This step is more important than it seems; it ensures the leavening agents are evenly distributed, which is crucial for a consistent rise and a perfect cupcake texture.
Step 3: Combine the Wet Ingredients
In a separate medium-sized bowl, whisk together the large egg, whole milk, vegetable oil, and pure vanilla extract until they are smooth and well combined.
Step 4: Create the Cupcake Batter
Pour the wet ingredient mixture into the bowl of dry ingredients. Using an electric mixer on low speed or a whisk, mix until just combined. Be careful not to overmix at this stage; a few small lumps are perfectly fine. Overmixing develops the gluten in the flour, which can result in a tough, dense cupcake.
Step 5: The Secret to Moist Chocolate Cake
Carefully pour the ½ cup of boiling water (or hot coffee) into the batter. The batter will be very thin at this point—this is completely normal! Gently whisk everything together until the batter is smooth and glossy. This hot liquid is what “blooms” the cocoa powder, unlocking its deepest chocolate potential and creating an incredibly moist crumb.
Step 6: Fill the Cones
Now it’s time to fill your prepared cones. For a clean and easy transfer, pour the thin batter into a liquid measuring cup with a spout or into a piping bag. Carefully fill each ice cream cone about two-thirds full. It is very important not to overfill them. The batter will rise significantly as it bakes, and overfilling will cause it to spill over the sides of the cone, creating a messy overflow rather than a neat, domed top.
Step 7: Bake to Perfection
Carefully place your muffin tin or baking pan into the preheated oven. Bake for 20-25 minutes. To check for doneness, insert a wooden skewer or toothpick into the center of a cupcake. If it comes out clean or with a few moist crumbs attached, they are ready. If there is wet batter on the skewer, they need a few more minutes.
Step 8: Cool Completely
Once baked, remove the pan from the oven and let the cupcake cones cool in the tin for about 10 minutes before carefully transferring them to a wire rack. It is absolutely essential that the cupcake cones cool completely to room temperature before you begin decorating. If they are even slightly warm, the frosting will melt and slide right off. This can take at least an hour.
Step 9: Prepare the Chocolate Frosting
While the cupcakes are cooling, prepare the rich chocolate coating. Place the semi-sweet chocolate chips in a heatproof, medium-sized bowl. Heat the heavy whipping cream in a small saucepan over medium heat until it just begins to simmer around the edges (do not let it come to a rolling boil). Immediately pour the hot cream over the chocolate chips. Let the mixture sit undisturbed for 5 minutes. This allows the heat from the cream to gently melt the chocolate. After 5 minutes, whisk the mixture slowly and gently until it becomes a completely smooth, glossy, and luscious ganache. Let it cool and thicken slightly for about 10-15 minutes.
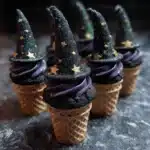
Step 10: Assemble the Witch Hats
Set up your decorating station with the cooled cupcake cones, the bowl of chocolate frosting, the chocolate cookies (brims), and your sprinkles. Hold a cupcake cone by its base and dip the top pointed part into the chocolate frosting, turning it to coat it evenly. Alternatively, you can use an offset spatula or the back of a spoon to spread the frosting over the cone.
Step 11: Add the Brim and Final Touches
Immediately after frosting the cone, place a chocolate cookie onto the base of the frosted area to create the witch hat’s brim. The frosting will act as the “glue.” Once the brim is attached, place the hat upright on a piece of parchment paper. Before the chocolate sets, add your Halloween sprinkles for a pop of color.
Step 12: Create the Buckle
For the final, classic touch, use your small tube of decorative yellow, orange, or green frosting with a small tip to pipe a small square buckle on the front of the hat, just above the brim.
Step 13: Let Them Set
Allow the finished Witch Hat Cupcake Cones to sit at room temperature for about 30-60 minutes, or until the chocolate frosting is fully set and firm to the touch. Once set, they are ready to enchant your guests!
Nutrition
- Serving Size: one normal portion
- Calories: 380