")


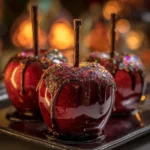
When the crisp autumn air begins to bite and the leaves crunch underfoot, my family’s excitement for Halloween reaches a fever pitch. We carve pumpkins, decorate the house with cobwebs, and plan our costumes, but the real kickoff to the season happens in the kitchen. For years, I searched for a signature Halloween treat that was more than just candy in a bowl—something dramatic, a little spooky, and utterly delicious. That search ended the moment I perfected my recipe for Witch’s Brew Candy Apples. The first time I made them, my kids’ eyes went wide with a mixture of awe and a little bit of delicious fear. These aren’t your typical, cheerful red candy apples from the county fair. These are something straight out of a sorceress’s cauldron—an enigmatic, glossy black coating that shatters with a satisfying crack, revealing the crisp, tart green apple beneath. The kitchen fills with the intoxicating scent of bubbling sugar and vanilla, a sweet potion that signals the start of our favorite holiday. They have become the centerpiece of our annual Halloween party, perched on a dark platter like forbidden fruit from a haunted forest. Watching friends and family, both kids and adults, tentatively take a bite and then break into a smile of pure delight is the best part. These Witch’s Brew Candy Apples are more than a recipe; they are an experience, a memory-maker, and the most magical way to say, “Happy Halloween.”
Ingredients
- 8 medium Granny Smith apples: These are the ideal choice for candy apples. Their firm texture holds up to the hot candy coating without turning mushy, and their pronounced tartness provides the perfect counterbalance to the intense sweetness of the candy shell.
- 2 cups granulated sugar: The primary component of our candy coating. It dissolves to create the sweet, hard shell that defines a classic candy apple.
- 1 cup water: The solvent for the sugar and corn syrup, which allows them to melt evenly into a liquid state before boiling.
- ¾ cup light corn syrup: This is the secret ingredient to a perfect, glass-like candy shell. It acts as an “interfering agent,” preventing the sugar from recrystallizing and turning grainy, ensuring a smooth, non-gritty texture.
- 1 teaspoon black gel food coloring: To achieve that deep, mysterious, cauldron-black color, gel food coloring is essential. It’s highly concentrated, so a small amount provides a vibrant, opaque color without watering down the candy mixture like liquid coloring might.
- 1 teaspoon vanilla extract: Added at the very end, vanilla provides a warm, aromatic depth of flavor to the candy, transforming it from simply sweet to something more complex and inviting.
- 8 sturdy candy apple sticks: These can be traditional wooden skewers, decorative twigs (ensure they are food-safe and clean), or colorful lollipop sticks. They must be strong enough to securely hold the weight of the apple during and after dipping.
Instructions
- Prepare the Apples: The success of your candy apples begins with this crucial first step. Apples from the grocery store are coated in a thin layer of food-grade wax to preserve their freshness and give them a shine. This wax will prevent the candy coating from adhering properly. To remove it, bring a pot of water to a boil. Carefully dip each apple into the boiling water for 5-10 seconds, then immediately remove it. You may see a faint white film appear—this is the wax melting. Immediately wipe the apple dry with a clean kitchen towel. The apple skin should feel natural and slightly rough, not slick. Once all apples are de-waxed, dry them with meticulous care. Any lingering moisture will create steam and cause the candy to slide right off.
- Set Up Your Dipping Station: Working with hot sugar requires speed and efficiency. Before you even begin making the candy, prepare your workspace. Lay a large sheet of parchment paper or a silicone baking mat on a heat-safe countertop. This will be the landing zone for your finished apples. Firmly and carefully insert a candy apple stick into the stem end of each apple, pushing it about halfway through. This ensures a secure handle for dipping. Have all your measured ingredients, including the food coloring and vanilla, ready and within arm’s reach of the stove.
- Combine the Candy Ingredients: In a medium to large, heavy-bottomed saucepan, combine the granulated sugar, water, and light corn syrup. A heavy-bottomed pan is critical as it distributes heat more evenly, reducing the risk of hot spots that can scorch the sugar.
- Cook the Candy Mixture: Place the saucepan over medium-high heat. Stir the mixture gently with a heat-proof spatula or wooden spoon only until the sugar has completely dissolved. Once the sugar is dissolved and the mixture begins to boil, stop stirring completely. Attach a candy thermometer to the side of the pan, making sure the tip is submerged in the syrup but not touching the bottom of the pan. Stirring at this stage can agitate the sugar crystals and cause the entire batch to seize up and crystallize, ruining the texture. If you see sugar crystals forming on the sides of the pan, you can use a pastry brush dipped in water to gently wash them down.
- Reach the Hard Crack Stage: Allow the mixture to boil undisturbed. Watch the candy thermometer closely. The temperature will rise steadily. You are aiming for the “hard crack” stage, which is between 300°F and 310°F (149°C to 154°C). This is the point at which the sugar concentration is so high that the resulting candy will be hard, brittle, and glass-like when cooled. This process can take anywhere from 15 to 25 minutes, depending on your stove. Be patient and do not walk away from the pot.
- Add Color and Flavor: Once the thermometer reaches the target temperature, immediately remove the pan from the heat. The mixture will be extremely hot and will continue to bubble. Let it sit for about 30 seconds for the most vigorous bubbling to subside. Now, working carefully to avoid the hot steam that will erupt, add the black gel food coloring and the vanilla extract. Swirl the pan gently to incorporate the color and flavor evenly throughout the molten candy. Do not use a spoon to stir, as this can still introduce air bubbles or trigger crystallization.
- Dip the Apples: This is the most exciting part! Working quickly but safely, take one prepared apple by its stick. Tilt the saucepan to pool the black candy on one side. Dip the apple into the hot candy, rotating it by the stick to coat it evenly all the way up to the top. Lift the apple out of the candy and let any excess drip back into the pan for a few seconds. A thin, even coat is more pleasant to eat than a thick, goopy one.
- Cool and Harden: As soon as the excess has dripped off, place the coated apple on your prepared parchment paper to cool and harden completely. Repeat the dipping process with the remaining apples. You must work relatively fast, as the candy will begin to thicken as it cools. If the candy becomes too thick to dip, you can return it to the stove over very low heat for 30-60 seconds to loosen it, but be careful not to burn it. Allow the Witch’s Brew Candy Apples to sit at room temperature for at least 30-60 minutes, or until the candy shell is completely hard, cool, and non-tacky to the touch.
Nutrition Facts
- Servings: 8 candy apples
- Calories per serving: Approximately 380-420 calories
- Carbohydrates: This treat is rich in carbohydrates, primarily from the granulated sugar in the candy coating and the natural fructose in the apple, providing a quick source of energy.
- Sugars: The majority of the calories come from sugar. The hard candy shell is almost entirely pure sugar, making this an indulgent dessert best enjoyed in moderation.
- Fiber: Each serving contains a good amount of dietary fiber, thanks to the whole apple. Fiber is essential for digestive health and helps to provide a sense of fullness.
- Sodium: The sodium content is very low, making this a suitable treat for those monitoring their sodium intake.
- Fat: This recipe is virtually fat-free, as the ingredients consist almost entirely of sugar and fruit.
Preparation Time
The entire process, from start to finish, takes approximately 60-75 minutes. This includes about 20 minutes of active preparation time for washing apples and setting up the station, 20-25 minutes of cooking time for the candy to reach the correct temperature, and about 30-60 minutes of hands-off cooling time for the candy shell to fully harden and set.
How to Serve
Presenting your Witch’s Brew Candy Apples is half the fun! Their dramatic appearance makes them a natural centerpiece for any Halloween gathering. Here are some creative and spooky ways to serve them:
- The Enchanted Forest Platter: Arrange the black candy apples on a rustic wooden board or a dark slate platter. Scatter edible “moss” (crumbled green-dyed cake or cookies), fake spiders, and a few gnarled twigs (that are clean and food-safe) around them to create a scene from a haunted forest.
- A Cauldron’s Bounty: For a truly theatrical display, place a small bowl of dry ice in the center of your serving platter and carefully pour a small amount of warm water over it just before guests arrive. The resulting fog will swirl mysteriously around the base of the candy apples, making it look like they were just plucked from a bubbling cauldron.
- Individual Party Favors: Make your guests feel special by turning the candy apples into party favors. Once completely hardened, wrap each apple in a clear cellophane bag and tie it at the top with a festive black, orange, or purple ribbon. It’s a memorable and delicious takeaway from your event.
- The “Slice and Share” Station: Let’s be honest, biting into a whole candy apple can be a challenge. Set up a station where an adult can use a large, sharp knife to carefully slice the apples into wedges for easier eating, especially for younger children. Serve the slices with napkins for a mess-free experience.
- Pair with a Salty Counterpart: The intense sweetness of the candy apple is beautifully balanced by something savory. Serve them on a dessert board alongside salty pretzels, sharp cheddar cheese cubes, or a bowl of salty popcorn to cleanse the palate between sweet bites.
Additional Tips
- The Apple Wax Is Your Nemesis: Do not underestimate the importance of removing the wax coating. If the wax isn’t fully removed, the candy will form a shell around it, but it won’t truly bond to the apple skin. This can cause the entire candy coating to slide off in one piece after the first bite. The boiling water dip is the most effective method.
- Temperature Is Everything: A reliable candy thermometer is your best friend for this recipe. The difference between the “soft crack” and “hard crack” stage is only a few degrees but makes a world of difference in the final product. “Hard crack” ensures a glassy, non-sticky shell. If you don’t have a thermometer, you can use the cold water test: drop a small amount of the syrup into a bowl of ice water. If it instantly forms hard, brittle threads that snap when bent, it’s ready. If it’s pliable, it needs more time.
- Work with Speed and Safety: Molten sugar is incredibly hot (hotter than boiling water) and can cause severe burns. Keep a bowl of ice water nearby just in case of an accidental splash on your skin. Have everything prepped and ready to go before the sugar reaches temperature, as the window for dipping is short. Keep children and pets out of the kitchen during this process.
- Achieving the Deepest Black: For that truly opaque, witchy black, gel food coloring is non-negotiable. Liquid food coloring is less concentrated and contains more water, which can alter the sugar-to-water ratio of your candy and potentially affect the final texture. Add a little more gel coloring than you think you need for a truly dramatic effect.
- Bubble Trouble and How to Avoid It: Air bubbles in your candy shell are usually caused by over-agitating the mixture after it has boiled or by dipping the apple too quickly. To minimize them, swirl the pan to mix in the color instead of stirring, and dip the apple with a slow, steady twisting motion. A few small bubbles are inevitable, but this technique will help you get that perfect, glassy finish.
- The Perfect Stick Insertion: When inserting the sticks, aim for the center of the core. Push it in straight and firmly, but not so far that it pokes through the bottom. A securely placed stick is crucial for a stable dipping experience. If the apple wobbles on the stick, it will be very difficult to get an even coat.
- Storing Your Bewitching Creations: Candy apples are best enjoyed within 24-48 hours. Humidity is their greatest enemy, as it will make the hard candy shell become sticky and soft. Store them in a single layer in a cool, dry place at room temperature. Do not refrigerate them, as the condensation that forms when you take them out will dissolve the sugar and make them weep.
- Add a Touch of Sparkle: To elevate your Witch’s Brew apples even further, sprinkle them with edible glitter or black sanding sugar immediately after dipping, while the candy is still molten. This will give them a magical, starry-night effect that looks stunning under party lighting.
FAQ Section
1. Why did my candy coating turn grainy instead of smooth?
This is a classic case of sugar crystallization. It happens when the sugar crystals don’t dissolve properly or are agitated after the mixture boils. The most common causes are stirring the syrup after it has come to a boil, or having stray sugar crystals on the sides of the pan fall back into the mixture. The light corn syrup in the recipe is specifically there to help prevent this, but the “no-stir” rule is the most important one to follow for a perfectly smooth, glass-like finish.
2. Why won’t the candy stick to my apples? It just slides off!
This problem almost always comes down to one of two things: wax or water. If you didn’t thoroughly remove the waxy coating from the apples, the candy has nothing to grip onto. If even a tiny bit of moisture was left on the apple skin after washing, it will turn to steam when it hits the hot candy, creating a barrier that prevents the candy from adhering. Go back to step one and ensure your apples are completely “naked” and bone-dry before dipping.
3. Can I make these candy apples without a candy thermometer?
Yes, it is possible, but it is much more challenging and less reliable. You would need to use the cold water test. Periodically drop a tiny bit of the boiling syrup into a glass of ice water. In the early stages, it will form soft threads. As it gets hotter, it will form a firm ball. You are ready to dip when the syrup instantly forms hard, brittle threads that break easily when you try to bend them. A thermometer removes all the guesswork and is a worthwhile investment for candy making.
4. My candy coating is too thick and clumpy (or too thin and runny). What went wrong?
This is entirely related to the temperature of the candy. If the coating was too thick and difficult to dip, it means the sugar syrup either got too hot (beyond 310°F) or it cooled down too much in the pan before you finished dipping all the apples. If the coating was too thin and pooled at the bottom of the apple, it means you didn’t let it cook long enough to reach the hard crack stage (300°F).
5. What are the best apples to use besides Granny Smith?
Granny Smith apples are the gold standard due to their exceptional firmness and tart flavor. However, if you can’t find them, other good options include Honeycrisp, Braeburn, or Gala. The key is to choose a very firm, crisp apple that won’t get mushy from the heat. Avoid softer varieties like Red Delicious, as they can have a mealy texture that doesn’t pair as well with the hard candy shell.
6. How far in advance can I make Witch’s Brew Candy Apples for a party?
For the best quality and a perfectly hard, non-sticky shell, it’s best to make them no more than one or two days in advance. The longer they sit, the more likely they are to be affected by ambient humidity, which can soften the candy. The moisture from the apple itself will also eventually start to break down the sugar. Make them the day of or the day before your event for optimal results.
7. Can I use a different color for the candy coating?
Absolutely! This recipe is a fantastic base for any color you can imagine. For a different spooky theme, try a deep blood red for vampire apples, a vibrant purple for a potion-themed party, or a ghoulish bright green for monster apples. The process remains exactly the same; just swap out the black gel food coloring for your desired shade.
8. My finished candy apples are sticky to the touch. Is there any way to fix them?
Unfortunately, once the apples have cooled and are sticky, there isn’t a reliable way to “fix” them back to a hard, glassy state. Stickiness is a sign that the candy either didn’t reach the full hard crack temperature or it has been exposed to too much humidity. While you can’t re-harden them, you can try to manage the stickiness by dusting them lightly with cornstarch (this will dull the shine) or by wrapping them individually in wax paper to prevent them from sticking to everything else.
Witch’s Brew Candy Apples
Ingredients
- 8 medium Granny Smith apples: These are the ideal choice for candy apples. Their firm texture holds up to the hot candy coating without turning mushy, and their pronounced tartness provides the perfect counterbalance to the intense sweetness of the candy shell.
- 2 cups granulated sugar: The primary component of our candy coating. It dissolves to create the sweet, hard shell that defines a classic candy apple.
- 1 cup water: The solvent for the sugar and corn syrup, which allows them to melt evenly into a liquid state before boiling.
- ¾ cup light corn syrup: This is the secret ingredient to a perfect, glass-like candy shell. It acts as an “interfering agent,” preventing the sugar from recrystallizing and turning grainy, ensuring a smooth, non-gritty texture.
- 1 teaspoon black gel food coloring: To achieve that deep, mysterious, cauldron-black color, gel food coloring is essential. It’s highly concentrated, so a small amount provides a vibrant, opaque color without watering down the candy mixture like liquid coloring might.
- 1 teaspoon vanilla extract: Added at the very end, vanilla provides a warm, aromatic depth of flavor to the candy, transforming it from simply sweet to something more complex and inviting.
- 8 sturdy candy apple sticks: These can be traditional wooden skewers, decorative twigs (ensure they are food-safe and clean), or colorful lollipop sticks. They must be strong enough to securely hold the weight of the apple during and after dipping.
Instructions
- Prepare the Apples: The success of your candy apples begins with this crucial first step. Apples from the grocery store are coated in a thin layer of food-grade wax to preserve their freshness and give them a shine. This wax will prevent the candy coating from adhering properly. To remove it, bring a pot of water to a boil. Carefully dip each apple into the boiling water for 5-10 seconds, then immediately remove it. You may see a faint white film appear—this is the wax melting. Immediately wipe the apple dry with a clean kitchen towel. The apple skin should feel natural and slightly rough, not slick. Once all apples are de-waxed, dry them with meticulous care. Any lingering moisture will create steam and cause the candy to slide right off.
- Set Up Your Dipping Station: Working with hot sugar requires speed and efficiency. Before you even begin making the candy, prepare your workspace. Lay a large sheet of parchment paper or a silicone baking mat on a heat-safe countertop. This will be the landing zone for your finished apples. Firmly and carefully insert a candy apple stick into the stem end of each apple, pushing it about halfway through. This ensures a secure handle for dipping. Have all your measured ingredients, including the food coloring and vanilla, ready and within arm’s reach of the stove.
- Combine the Candy Ingredients: In a medium to large, heavy-bottomed saucepan, combine the granulated sugar, water, and light corn syrup. A heavy-bottomed pan is critical as it distributes heat more evenly, reducing the risk of hot spots that can scorch the sugar.
- Cook the Candy Mixture: Place the saucepan over medium-high heat. Stir the mixture gently with a heat-proof spatula or wooden spoon only until the sugar has completely dissolved. Once the sugar is dissolved and the mixture begins to boil, stop stirring completely. Attach a candy thermometer to the side of the pan, making sure the tip is submerged in the syrup but not touching the bottom of the pan. Stirring at this stage can agitate the sugar crystals and cause the entire batch to seize up and crystallize, ruining the texture. If you see sugar crystals forming on the sides of the pan, you can use a pastry brush dipped in water to gently wash them down.
- Reach the Hard Crack Stage: Allow the mixture to boil undisturbed. Watch the candy thermometer closely. The temperature will rise steadily. You are aiming for the “hard crack” stage, which is between 300°F and 310°F (149°C to 154°C). This is the point at which the sugar concentration is so high that the resulting candy will be hard, brittle, and glass-like when cooled. This process can take anywhere from 15 to 25 minutes, depending on your stove. Be patient and do not walk away from the pot.
- Add Color and Flavor: Once the thermometer reaches the target temperature, immediately remove the pan from the heat. The mixture will be extremely hot and will continue to bubble. Let it sit for about 30 seconds for the most vigorous bubbling to subside. Now, working carefully to avoid the hot steam that will erupt, add the black gel food coloring and the vanilla extract. Swirl the pan gently to incorporate the color and flavor evenly throughout the molten candy. Do not use a spoon to stir, as this can still introduce air bubbles or trigger crystallization.
- Dip the Apples: This is the most exciting part! Working quickly but safely, take one prepared apple by its stick. Tilt the saucepan to pool the black candy on one side. Dip the apple into the hot candy, rotating it by the stick to coat it evenly all the way up to the top. Lift the apple out of the candy and let any excess drip back into the pan for a few seconds. A thin, even coat is more pleasant to eat than a thick, goopy one.
- Cool and Harden: As soon as the excess has dripped off, place the coated apple on your prepared parchment paper to cool and harden completely. Repeat the dipping process with the remaining apples. You must work relatively fast, as the candy will begin to thicken as it cools. If the candy becomes too thick to dip, you can return it to the stove over very low heat for 30-60 seconds to loosen it, but be careful not to burn it. Allow the Witch’s Brew Candy Apples to sit at room temperature for at least 30-60 minutes, or until the candy shell is completely hard, cool, and non-tacky to the touch.
Nutrition
- Serving Size: one normal portion
- Calories: 420