")


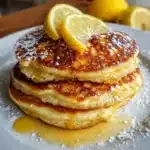
Of all the weekend breakfast traditions in our home, none are met with more excitement than the announcement of “pancake morning.” But these aren’t just any pancakes. A few years ago, on a whim, I decided to elevate our standard recipe. I had a tub of creamy ricotta in the fridge and a bowl of bright, fragrant lemons on the counter. The result was nothing short of a revelation. These Zesty Lemon Ricotta Pancakes have since become the undisputed champion of our breakfast table. The first time I served them, the kitchen fell silent, which, with a full house, is a rare and precious event. The silence was quickly replaced by murmurs of “Wow, what’s in these?” and “They’re so light!” They possess a magical quality—an incredibly moist and creamy interior thanks to the ricotta, with a texture that’s almost custardy, yet impossibly light and fluffy. The bright, zesty punch from the fresh lemon cuts through the richness, creating a perfectly balanced flavor that feels both indulgent and refreshingly sophisticated. They’ve turned ordinary Saturday mornings into special occasions, a simple pleasure that the whole family looks forward to. This recipe is more than just a set of instructions; it’s a guaranteed way to create a memorable meal that will have everyone asking for the recipe.
Ingredients
- 1 ½ cups (190g) All-Purpose Flour: The structural foundation of the pancakes, providing the perfect base for a fluffy texture.
- 3 tablespoons (38g) Granulated Sugar: Adds a subtle sweetness that complements the tangy lemon without being overly sugary.
- 2 teaspoons Baking Powder: The primary leavening agent, crucial for creating that signature airy lift and fluffiness.
- ½ teaspoon Baking Soda: Works in tandem with the acidic lemon juice to provide an extra boost of leavening, ensuring a light crumb.
- ½ teaspoon Salt: Essential for balancing the flavors and enhancing the sweetness of the sugar and the brightness of the lemon.
- 1 cup (245g) Whole Milk Ricotta Cheese: The star ingredient. Use full-fat for the creamiest, most luxurious texture and moisture.
- 1 ¼ cups (300ml) Buttermilk: The acidity in buttermilk tenderizes the gluten, resulting in incredibly soft pancakes. If you don’t have it, see our tips for a quick substitute.
- 2 Large Eggs: Preferably at room temperature, these act as a binder and add richness and structure to the batter.
- 2 tablespoons Unsalted Butter, melted and slightly cooled: Adds richness, flavor, and helps create those deliciously crisp, golden edges.
- 1 tablespoon Fresh Lemon Zest (from about 1 large lemon): This is where the “zesty” magic happens. It provides an intense, aromatic lemon flavor without the sourness of the juice.
- 1 tablespoon Fresh Lemon Juice: Adds a bright, tangy note that activates the baking soda and balances the richness of the ricotta.
- 1 teaspoon Vanilla Extract: A background note that rounds out the flavors and adds a touch of warmth and complexity.
- Butter or Neutral Oil for the Griddle: For cooking the pancakes and preventing them from sticking.
Instructions
- Combine the Dry Ingredients: In a large mixing bowl, add the all-purpose flour, granulated sugar, baking powder, baking soda, and salt. Use a whisk to thoroughly combine everything. Whisking for about 30 seconds not only mixes the ingredients but also aerates the flour, which is a key step towards achieving a light and fluffy final product. Set this bowl aside.
- Combine the Wet Ingredients: In a separate medium-sized bowl, add the whole milk ricotta cheese. Whisk it vigorously for a moment to break up any large clumps and make it smoother. To the ricotta, add the buttermilk, the two large eggs, the melted and slightly cooled butter, the fresh lemon zest, fresh lemon juice, and the vanilla extract. Whisk these wet ingredients together until they are just combined and smooth. It’s okay if the mixture has a few small lumps from the ricotta.
- Marry the Wet and Dry: Pour the wet ingredient mixture into the large bowl containing the dry ingredients. Using a rubber spatula or a wooden spoon, gently fold the ingredients together. It is absolutely critical not to overmix the batter. Mix only until the flour streaks have just disappeared. A few lumps in the batter are not only acceptable but desirable—they are pockets of flavor and a sign that you haven’t overworked the gluten, which is the secret to tender, not tough, pancakes.
- Rest the Batter: Let the prepared batter rest on the counter for at least 10 to 15 minutes. Do not skip this step. This resting period allows the gluten to relax after mixing and gives the baking powder and baking soda time to start their leavening action. This will result in noticeably thicker, fluffier, and more tender pancakes.
- Prepare the Cooking Surface: While the batter is resting, place a large non-stick skillet or a griddle over medium heat. You want the surface to be hot enough to sizzle when a drop of water hits it, but not so hot that it’s smoking. Getting the temperature right is key to perfectly golden-brown pancakes that are cooked through.
- Cook the Pancakes: Lightly grease the hot griddle or skillet with a small amount of unsalted butter or a neutral oil. Using a ¼-cup measuring cup or a small ladle, pour the batter onto the hot surface to form pancakes of your desired size, leaving a couple of inches between each one to allow for spreading.
- Flip to Perfection: Cook the pancakes for about 2-3 minutes on the first side. You’ll know they’re ready to flip when the edges look set and bubbles begin to form on the surface and pop. Using a thin, wide spatula, carefully flip the pancakes and cook for another 1-2 minutes on the other side, or until they are a beautiful golden brown and cooked through.
- Serve Immediately: Transfer the cooked pancakes to a plate. You can keep them warm in a 200°F (95°C) oven on a baking sheet while you cook the remaining batter. Serve them warm with your favorite toppings and enjoy the delicious results of your efforts.
Nutrition Facts
- Servings: This recipe makes approximately 12-14 medium-sized pancakes, serving 4-6 people.
- Calories per Serving (Approx. 3 pancakes): Approximately 420-480 kcal.
- Protein: Rich in protein from the ricotta, eggs, and milk, which helps in keeping you full and satisfied longer than traditional pancakes.
- Carbohydrates: Provides a great source of energy from the flour and sugar to kickstart your day.
- Fat: Contains a moderate amount of fat, primarily from the whole milk ricotta and butter, which contributes to the rich flavor and creamy texture.
Preparation Time
This recipe is surprisingly quick for such a gourmet result. The total time from start to finish is approximately 30-35 minutes. This includes 10 minutes of active preparation for mixing the batter, a crucial 10-15 minute resting period for the batter, and about 10-15 minutes of cooking time, depending on the size of your griddle and how many batches you need to make.
How to Serve
These Zesty Lemon Ricotta Pancakes are a fantastic canvas for a wide array of toppings. You can go classic, decadent, or fresh. Here are some serving suggestions to inspire your perfect pancake breakfast:
- The Classic and Simple:
- A simple pat of high-quality salted butter that melts into the warm pancakes.
- A generous drizzle of pure maple syrup. The sweetness of the maple is a perfect counterpoint to the zesty lemon.
- The Fresh and Fruity:
- Blueberry Compote: A warm, homemade blueberry compote is arguably the best pairing. The sweet and slightly tart berries complement the lemon flavor beautifully.
- Fresh Berries: A colorful medley of fresh raspberries, blueberries, and sliced strawberries adds a fresh, light touch.
- Lemon Curd: For the ultimate lemon lover, a dollop of tangy and sweet lemon curd on top amplifies the zesty notes.
- The Rich and Decadent:
- Dusting of Powdered Sugar: A simple dusting of powdered sugar makes for a beautiful presentation and adds a touch of sweetness.
- Dollop of Whipped Cream: Freshly whipped cream adds a luxurious, airy texture that melts in your mouth.
- Extra Ricotta: A small spoonful of fresh ricotta on top, perhaps sweetened with a little honey or maple syrup, enhances the creamy theme.
- The Savory Side:
- While sweet toppings are the norm, don’t be afraid to serve these alongside savory breakfast items. Their subtle sweetness and tangy flavor pair wonderfully with a side of savory breakfast ham, a perfectly cooked beef sausage, or a simple fried egg.
Additional Tips
- Don’t Overmix the Batter: This is the most important rule in pancake making. Overmixing develops the gluten in the flour, which will result in tough, dense, and rubbery pancakes instead of light and fluffy ones. Mix only until the wet and dry ingredients are just combined. A lumpy batter is a good batter!
- The Importance of Room Temperature Ingredients: For the best results, try to have your eggs, buttermilk, and ricotta at room temperature. This helps the ingredients emulsify together more easily into a smooth, uniform batter, which contributes to a more even texture and rise.
- DIY Buttermilk in a Pinch: If you don’t have buttermilk on hand, you can easily make a substitute. For every 1 cup of regular milk, stir in 1 tablespoon of white vinegar or fresh lemon juice. Let it sit for 5-10 minutes. It will curdle slightly and be ready to use in your recipe.
- Zest, Don’t Pith: When zesting the lemon, be careful to only remove the yellow outer layer. The white layer underneath, called the pith, is very bitter and will impart an unpleasant taste to your pancakes. A microplane zester is the best tool for this job.
- Master Your Griddle Temperature: The perfect pancake requires even, medium heat. If the heat is too high, the outside will burn before the inside is cooked. If it’s too low, the pancakes won’t get that beautiful golden color and will absorb too much oil, becoming greasy. Test the heat with a small drop of batter; it should sizzle gently upon contact.
- Give the Batter a Rest: The 10-15 minute rest period is not optional if you want the fluffiest pancakes possible. This allows the flour to fully hydrate and gives the leavening agents (baking powder and soda) a head start, creating air pockets that expand during cooking.
- Flip Just Once: Resist the temptation to press down on the pancakes with your spatula or to flip them multiple times. Flipping them only once ensures they stay light and airy. Pressing down on them will deflate all the air bubbles you worked so hard to create, leading to dense pancakes.
- Keep Them Warm for a Crowd: If you’re cooking for multiple people, you’ll likely need to cook in batches. To ensure everyone gets to eat warm pancakes together, preheat your oven to a low temperature, around 200°F (95°C). Place a wire rack on a baking sheet and transfer the cooked pancakes to the rack in a single layer. This keeps them warm and prevents them from getting soggy.
FAQ Section
1. Can I use low-fat or fat-free ricotta cheese?
You can, but for the best flavor and texture, whole milk ricotta is highly recommended. Low-fat or fat-free versions contain more water and less fat, which can result in pancakes that are less creamy, less rich, and potentially a bit drier. The full-fat version is what gives these pancakes their signature custardy, luxurious interior.
2. Why are my pancakes coming out flat instead of fluffy?
There are a few common culprits. The most likely reason is overmixing the batter, which develops gluten and makes them tough. Another possibility is that your baking powder or baking soda is old and has lost its potency (they typically last 6-12 months after opening). Lastly, not letting the batter rest can also lead to flatter pancakes, as the leavening agents haven’t had time to activate properly.
3. Can I make the pancake batter ahead of time?
It’s best not to make the complete batter too far in advance. The baking powder and baking soda are activated as soon as they are combined with the wet ingredients. If you let the batter sit for too long (e.g., overnight), they will lose their leavening power, and your pancakes will be flat. If you need to prep ahead, you can mix all the dry ingredients in one bowl and all the wet ingredients in another. Store them separately in the refrigerator, and then combine them just before you’re ready to cook.
4. How do I store and reheat leftover pancakes?
Leftover pancakes store wonderfully! Let them cool completely, then stack them with a small piece of parchment paper between each one to prevent sticking. Store them in an airtight container or a zip-top bag in the refrigerator for up to 3 days. To reheat, you can pop them in the toaster or a toaster oven for a minute or two, which will make them warm and slightly crisp. You can also microwave them, but they will be softer.
5. Is it okay to use bottled lemon juice instead of fresh?
For the lemon juice component, bottled is an acceptable substitute in a pinch. However, for the lemon zest, there is no substitute for fresh. The zest provides the most potent, aromatic, and bright lemon flavor that defines this recipe. The majority of the “zesty” flavor comes from the oils in the fresh peel, which you won’t get from bottled juice.
6. Can I make these pancakes gluten-free?
Yes, you can substitute the all-purpose flour with a high-quality 1-to-1 gluten-free baking flour blend (one that contains xanthan gum). The texture might be slightly different—sometimes a bit denser or grittier depending on the brand—but they will still be delicious. Follow the recipe as written, but be extra careful not to overmix, as gluten-free batters can become gummy.
7. Can I freeze these lemon ricotta pancakes?
Absolutely! They freeze exceptionally well. First, let the pancakes cool completely. Place them in a single layer on a baking sheet and flash-freeze them for about an hour. Once they are solid, you can transfer them to a freezer-safe bag or container, separating layers with parchment paper. They can be stored in the freezer for up to 2 months. Reheat them directly from frozen in a toaster, toaster oven, or microwave.
8. What is the best type of pan to use for making pancakes?
A well-seasoned cast-iron skillet or a heavy-bottomed non-stick griddle are the two best options. Cast iron provides excellent, even heat retention, which results in a uniformly golden-brown pancake. A non-stick griddle is great for beginners as it makes flipping easier and requires less oil or butter. The key is to use a pan that distributes heat evenly to avoid hot spots that can burn your pancakes.
Zesty Lemon Ricotta Pancakes
Ingredients
- 1 ½ cups (190g) All-Purpose Flour: The structural foundation of the pancakes, providing the perfect base for a fluffy texture.
- 3 tablespoons (38g) Granulated Sugar: Adds a subtle sweetness that complements the tangy lemon without being overly sugary.
- 2 teaspoons Baking Powder: The primary leavening agent, crucial for creating that signature airy lift and fluffiness.
- ½ teaspoon Baking Soda: Works in tandem with the acidic lemon juice to provide an extra boost of leavening, ensuring a light crumb.
- ½ teaspoon Salt: Essential for balancing the flavors and enhancing the sweetness of the sugar and the brightness of the lemon.
- 1 cup (245g) Whole Milk Ricotta Cheese: The star ingredient. Use full-fat for the creamiest, most luxurious texture and moisture.
- 1 ¼ cups (300ml) Buttermilk: The acidity in buttermilk tenderizes the gluten, resulting in incredibly soft pancakes. If you don’t have it, see our tips for a quick substitute.
- 2 Large Eggs: Preferably at room temperature, these act as a binder and add richness and structure to the batter.
- 2 tablespoons Unsalted Butter, melted and slightly cooled: Adds richness, flavor, and helps create those deliciously crisp, golden edges.
- 1 tablespoon Fresh Lemon Zest (from about 1 large lemon): This is where the “zesty” magic happens. It provides an intense, aromatic lemon flavor without the sourness of the juice.
- 1 tablespoon Fresh Lemon Juice: Adds a bright, tangy note that activates the baking soda and balances the richness of the ricotta.
- 1 teaspoon Vanilla Extract: A background note that rounds out the flavors and adds a touch of warmth and complexity.
- Butter or Neutral Oil for the Griddle: For cooking the pancakes and preventing them from sticking.
Instructions
- Combine the Dry Ingredients: In a large mixing bowl, add the all-purpose flour, granulated sugar, baking powder, baking soda, and salt. Use a whisk to thoroughly combine everything. Whisking for about 30 seconds not only mixes the ingredients but also aerates the flour, which is a key step towards achieving a light and fluffy final product. Set this bowl aside.
- Combine the Wet Ingredients: In a separate medium-sized bowl, add the whole milk ricotta cheese. Whisk it vigorously for a moment to break up any large clumps and make it smoother. To the ricotta, add the buttermilk, the two large eggs, the melted and slightly cooled butter, the fresh lemon zest, fresh lemon juice, and the vanilla extract. Whisk these wet ingredients together until they are just combined and smooth. It’s okay if the mixture has a few small lumps from the ricotta.
- Marry the Wet and Dry: Pour the wet ingredient mixture into the large bowl containing the dry ingredients. Using a rubber spatula or a wooden spoon, gently fold the ingredients together. It is absolutely critical not to overmix the batter. Mix only until the flour streaks have just disappeared. A few lumps in the batter are not only acceptable but desirable—they are pockets of flavor and a sign that you haven’t overworked the gluten, which is the secret to tender, not tough, pancakes.
- Rest the Batter: Let the prepared batter rest on the counter for at least 10 to 15 minutes. Do not skip this step. This resting period allows the gluten to relax after mixing and gives the baking powder and baking soda time to start their leavening action. This will result in noticeably thicker, fluffier, and more tender pancakes.
- Prepare the Cooking Surface: While the batter is resting, place a large non-stick skillet or a griddle over medium heat. You want the surface to be hot enough to sizzle when a drop of water hits it, but not so hot that it’s smoking. Getting the temperature right is key to perfectly golden-brown pancakes that are cooked through.
- Cook the Pancakes: Lightly grease the hot griddle or skillet with a small amount of unsalted butter or a neutral oil. Using a ¼-cup measuring cup or a small ladle, pour the batter onto the hot surface to form pancakes of your desired size, leaving a couple of inches between each one to allow for spreading.
- Flip to Perfection: Cook the pancakes for about 2-3 minutes on the first side. You’ll know they’re ready to flip when the edges look set and bubbles begin to form on the surface and pop. Using a thin, wide spatula, carefully flip the pancakes and cook for another 1-2 minutes on the other side, or until they are a beautiful golden brown and cooked through.
- Serve Immediately: Transfer the cooked pancakes to a plate. You can keep them warm in a 200°F (95°C) oven on a baking sheet while you cook the remaining batter. Serve them warm with your favorite toppings and enjoy the delicious results of your efforts.
Nutrition
- Serving Size: one normal portion
- Calories: 480