")


In our house, the question ‘What’s for dinner?’ can sometimes feel like a high-stakes negotiation. Between hectic work schedules, after-school activities, and the ever-present challenge of pleasing picky eaters, finding a meal that is quick, easy, and universally loved can seem like an impossible dream. That’s where this 5-Ingredient Garlic Chicken recipe entered our lives and became an absolute game-changer. I remember the first time I made it, drawn in by its sheer simplicity. I was skeptical. Could just five ingredients really create something memorable? The moment the chicken hit the hot pan and the intoxicating aroma of sizzling garlic and butter began to fill the kitchen, my doubts started to melt away. When I served it, a rare silence fell over the dinner table, broken only by the sound of appreciative chewing. The skin was impossibly crispy and golden, the meat was tender and bursting with juice, and every single bite was infused with a rich, savory garlic flavor. My kids, who often turn their noses up at new things, asked for seconds. My partner, a discerning foodie, declared it “restaurant-quality.” Since that day, this has become our go-to weeknight hero, our “I don’t feel like cooking” savior, and the recipe I share with every friend who laments their dinner-time struggles. It’s proof that you don’t need a pantry full of obscure ingredients or hours of complicated prep to create a meal that feels special and brings the whole family together.
Ingredients
This recipe’s beauty lies in its minimalist approach, where each component is chosen to deliver maximum flavor and impact. You only need five core ingredients to create this masterpiece.
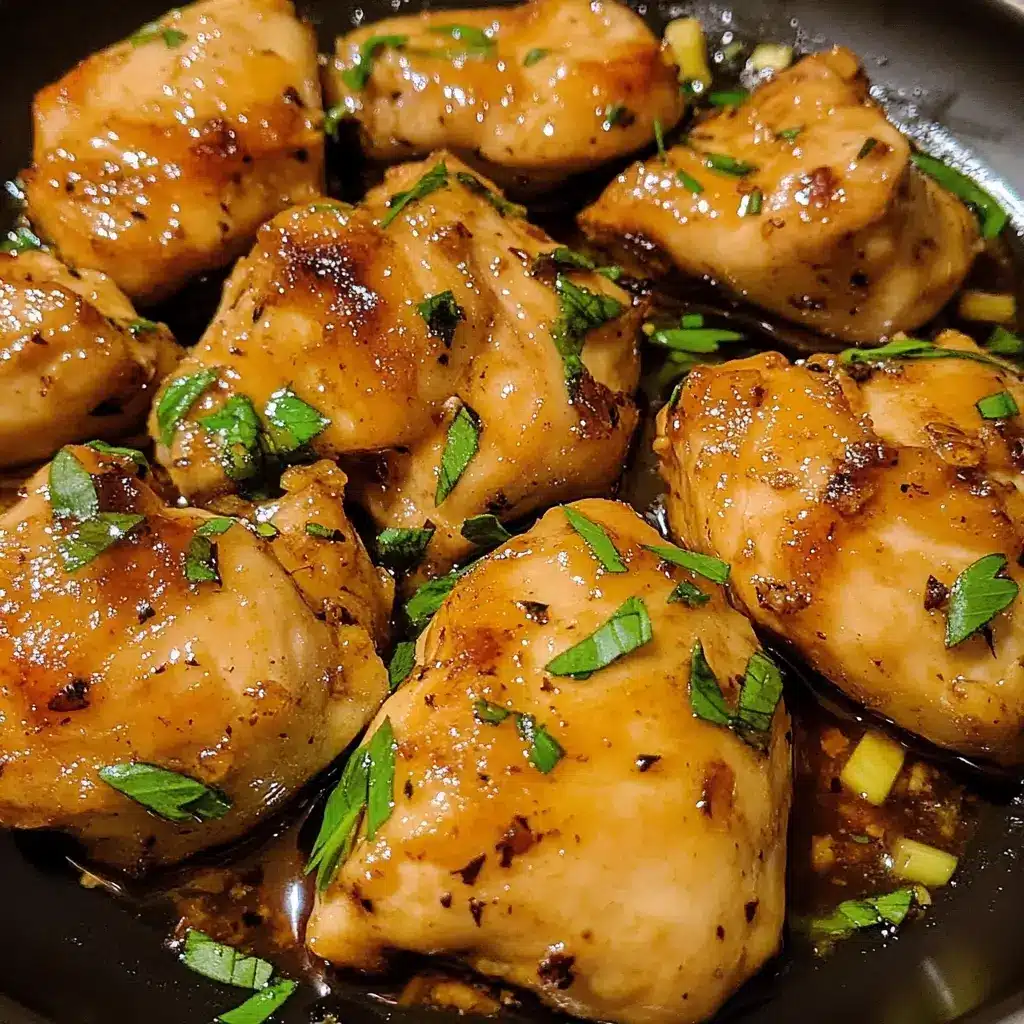
- 4 bone-in, skin-on chicken thighs (about 2 lbs total): The star of the show. Using bone-in, skin-on thighs is crucial for two reasons: the skin crisps up to a delectable, crackling texture, and the bone helps keep the meat incredibly moist and flavorful during cooking.
- 2 tablespoons unsalted butter: This adds richness, helps brown the chicken skin beautifully, and forms the luxurious base of our simple pan sauce. Unsalted butter allows you to control the final seasoning of the dish.
- 8-10 cloves of garlic, thinly sliced or roughly chopped: This is not the time to be shy. A generous amount of fresh garlic provides the bold, aromatic, and savory backbone of the recipe. The way it mellows and sweetens in the butter is pure magic.
- 1 tablespoon olive oil: Used in combination with the butter, olive oil has a higher smoke point, which helps prevent the butter from burning while you get that perfect, deep golden-brown sear on the chicken skin.
- Salt and freshly ground black pepper, to taste: These are the essential seasonings that elevate all the other flavors. Seasoning generously is key to a delicious final product.
Instructions
Follow these steps carefully to ensure your chicken is perfectly cooked, with crispy skin and juicy meat every single time. The process is straightforward and designed for success, even for beginner cooks.
- Prepare the Chicken: The secret to crispy skin begins before the chicken even touches the pan. Remove the chicken thighs from their packaging and pat them completely dry on all sides with paper towels. Any excess moisture will steam the chicken skin instead of searing it. Once dry, season both sides generously with salt and freshly ground black pepper. Be more liberal with the seasoning than you think you need; some will be lost in the pan.
- Heat the Pan: Place a large, heavy-bottomed skillet (cast iron is ideal, but stainless steel works well too) over medium-high heat. Add the olive oil. Once the oil is hot and begins to shimmer, add the unsalted butter and let it melt completely, swirling the pan to combine them.
- Sear the Chicken: Carefully place the seasoned chicken thighs into the hot skillet, skin-side down. You should hear a satisfying sizzle immediately. It is crucial to place them in a single layer without overcrowding the pan. If necessary, cook in two batches. Let the chicken cook, undisturbed, for 6-8 minutes. Resist the urge to move it around. This allows the skin to render its fat and develop a deep, golden-brown, and incredibly crispy crust.
- Flip and Add Garlic: Using tongs, flip the chicken thighs over. The skin should be beautifully browned and easily release from the pan. Reduce the heat to medium-low to prevent the garlic from burning. Scatter the sliced or chopped garlic cloves into the pan around the chicken, allowing them to sizzle and toast in the rendered chicken fat and butter.
- Finish Cooking: Continue to cook the chicken for another 10-15 minutes on the second side. As it cooks, you can spoon some of the garlic-infused butter from the bottom of the pan over the top of the chicken to baste it with flavor. The chicken is done when it is cooked through and the internal temperature reaches 165°F (74°C) when checked with a meat thermometer inserted into the thickest part of the thigh, avoiding the bone.
- Rest and Serve: Remove the chicken from the skillet and transfer it to a clean plate or cutting board. Let the chicken rest for at least 5-10 minutes before serving. This allows the juices to redistribute throughout the meat, ensuring every bite is moist and tender. You can spoon the remaining garlic and butter from the pan over the chicken just before serving.
Nutrition Facts
While this is a rich and satisfying dish, it can easily fit into a balanced diet. The nutritional information is an estimate and can vary based on the exact size of the chicken thighs and the amount of butter used.
- Servings: 4
- Calories per serving: Approximately 450 kcal
- Protein (Approx. 35g): An excellent source of high-quality protein, which is vital for muscle building, tissue repair, and keeping you feeling full and satisfied long after your meal.
- Fat (Approx. 32g): The majority of the fat comes from the chicken skin and butter. While high, it’s what makes the dish so flavorful and satiating. Much of the chicken fat renders out into the pan.
- Carbohydrates (Approx. 2g): This recipe is naturally very low in carbohydrates, with the minimal amount coming from the garlic, making it an excellent choice for those following a low-carb or ketogenic diet.
- Sodium (Varies): The sodium content is entirely dependent on how much salt you add. Using unsalted butter gives you full control.
- Saturated Fat (Approx. 12g): A portion of the fat content is saturated fat from the butter and chicken. Enjoyed as part of a varied diet, it contributes to the dish’s incredible richness.
Preparation Time
This recipe is designed for efficiency, making it a perfect solution for busy weeknights without sacrificing flavor or quality.
- Prep Time: 10 Minutes. This includes un-packaging the chicken, patting it dry, and seasoning it, as well as slicing or chopping your garlic. It’s a quick and simple setup.
- Cook Time: 25-30 Minutes. The total time in the skillet, from the initial sear to the final moments of cooking, will take around half an hour, giving you just enough time to prepare a simple side dish.
How to Serve
This versatile garlic chicken pairs beautifully with a wide variety of side dishes. You can dress it up for a special occasion or keep it simple for a weeknight family dinner. Here are some serving suggestions to complete your meal:
- Classic Comfort Pairings:
- Creamy Mashed Potatoes: The ultimate comfort food. Fluffy mashed potatoes are the perfect vehicle for soaking up the delicious garlic butter pan sauce.
- Roasted Root Vegetables: Carrots, parsnips, and potatoes tossed in a little olive oil and roasted until tender and caramelized complement the savory chicken perfectly.
- Steamed Green Beans or Asparagus: A simple, vibrant green vegetable adds a fresh crunch and a pop of color to the plate. Toss them with a little lemon juice to brighten the meal.
- Lighter & Healthier Options:
- Quinoa Salad: A fluffy bed of quinoa, perhaps mixed with some fresh parsley, lemon zest, and cherry tomatoes, makes for a wholesome and balanced meal.
- Large Garden Salad: A crisp salad with a light vinaigrette provides a refreshing contrast to the richness of the chicken.
- Sautéed Spinach or Kale: Quickly wilt some leafy greens with a bit of garlic and a squeeze of lemon for a nutrient-packed side.
- Low-Carb & Keto-Friendly Sides:
- Cauliflower Mash: A creamy, low-carb alternative to mashed potatoes that is equally delicious for soaking up the pan drippings.
- Zucchini Noodles (Zoodles): Sautéed zucchini noodles tossed in the garlic butter from the pan create a complete, keto-friendly meal.
- Roasted Broccoli: Roasting broccoli brings out its nutty sweetness, which is a fantastic counterpoint to the savory garlic.
- For Soaking Up the Sauce:
- Crusty Bread: A slice of warm, crusty baguette or sourdough is non-negotiable for mopping up every last drop of the incredible garlic butter sauce left in the skillet.
- Simple Rice Pilaf: Fluffy white or brown rice is another excellent base that readily absorbs the delicious flavors of the pan sauce.
Additional tips
Take your 5-Ingredient Garlic Chicken from great to absolutely exceptional with these eight professional tips and tricks.
- The Importance of a Hot Pan: Don’t rush the preheating process. A properly heated pan is the number one key to achieving that coveted crispy skin. When the chicken hits the pan, it should sizzle loudly. If it doesn’t, the pan isn’t hot enough, and the skin will stick and steam rather than sear.
- Don’t Crowd the Pan: Giving each chicken thigh its own space is crucial. If you overcrowd the pan, the temperature will drop, and the chicken will release moisture, creating a steamy environment. This prevents browning and results in pale, rubbery skin. If your skillet isn’t large enough, it’s always better to cook the chicken in two separate batches.
- Making an Easy Pan Sauce: After you’ve removed the chicken to rest, don’t clean the pan! You have a base of “fond” (the browned bits stuck to the bottom), rendered chicken fat, and toasted garlic. Return the pan to medium heat and deglaze it with a splash of dry white wine or chicken broth, scraping up the browned bits with a wooden spoon. Let it simmer and reduce for a minute, then swirl in an extra tablespoon of butter to create a velvety, restaurant-quality sauce to pour over your chicken.
- Mastering the Garlic: Garlic can go from perfectly toasted to acrid and bitter in a matter of seconds. To prevent this, always add the garlic after you’ve flipped the chicken and reduced the heat. Slicing the garlic (instead of mincing it) also gives you larger pieces that are less prone to burning.
- Using Chicken Breasts Instead: If you prefer chicken breasts, you can absolutely use them. Because they are leaner, they cook faster and are more prone to drying out. It’s best to use bone-in, skin-on breasts. If using boneless, skinless breasts, pound them to an even thickness first, and reduce the cooking time significantly. Use a meat thermometer and pull them from the heat as soon as they reach 165°F.
- The Critical Role of Salt: Salting the chicken isn’t just for flavor; it also helps to draw out moisture from the skin, which aids in crisping. For an even better result, you can dry-brine the chicken by seasoning it with salt and letting it sit, uncovered, on a rack in the refrigerator for a few hours or up to a day before cooking.
- Let The Chicken Rest: This might be the most overlooked but most important step in cooking any meat. When you let the chicken rest for 5-10 minutes after cooking, the muscle fibers relax and reabsorb the juices. If you cut into it immediately, all that flavorful juice will run out onto your cutting board, leaving you with dry meat.
- Storage and Reheating for Best Results: Store any leftover chicken in an airtight container in the refrigerator for up to 3 days. The skin will lose its crispiness upon refrigeration. To bring it back to life, the best way to reheat it is in an air fryer at 375°F for 4-5 minutes or on a baking sheet in a 400°F oven until warmed through and the skin is re-crisped. Avoid the microwave, as it will make the skin soggy.
FAQ section
Here are answers to some of the most frequently asked questions about making this simple and delicious garlic chicken recipe.
1. Can I use boneless, skinless chicken thighs instead?
Yes, you absolutely can use boneless, skinless thighs. They are a great option if you want to speed up the cooking time slightly. Because they lack the protective skin and bone, they will cook faster. Sear them for about 4-5 minutes per side over medium-high heat until they develop a nice golden-brown crust. Ensure they are cooked through to an internal temperature of 165°F. The result will still be juicy and flavorful, though you will miss out on the crispy skin texture.
2. Is fresh garlic necessary, or can I use pre-minced jarred garlic or garlic powder?
For the absolute best flavor, fresh garlic is highly recommended. The pungent, bright flavor of freshly sliced or chopped garlic is a central component of this dish. Pre-minced jarred garlic often has a slightly muted or sour taste due to the preservatives it’s packed in. Garlic powder can be used in a pinch to season the chicken itself (use about 1 teaspoon), but you will lose the delicious texture and aroma of toasted garlic cloves in the pan sauce. If you must use jarred garlic, add it in the last minute of cooking as it burns very easily.
3. My garlic burned and tasted bitter. What did I do wrong?
This is a very common issue! Garlic has a high sugar content, which means it can burn very quickly, especially over high heat. The key is to manage your timing and temperature. Always add the garlic to the pan after you’ve seared the first side of the chicken and turned the heat down to medium or medium-low. This allows the garlic to toast gently in the rendered fat and butter without scorching, releasing its sweet, aromatic flavor instead of turning bitter.
4. Can I make this recipe in the oven or an air fryer instead of a skillet?
Yes, both are excellent alternatives.
- For the Oven: Sear the chicken skin-side down in an oven-safe skillet on the stovetop as directed. Flip the chicken, add the garlic, and then transfer the entire skillet to a preheated 400°F (200°C) oven. Roast for 15-20 minutes, or until the chicken is cooked through.
- For the Air Fryer: Pat the chicken dry and season it. Mix the melted butter, olive oil, and chopped garlic together. Toss the chicken in this mixture to coat. Place the chicken in the air fryer basket, skin-side up, in a single layer. Air fry at 380°F (190°C) for 20-25 minutes, flipping halfway through, until the skin is crispy and the internal temperature reaches 165°F.
5. How can I be sure my chicken is fully cooked without a meat thermometer?
While a meat thermometer is the most accurate way to check for doneness, you can also use visual cues. The juices of the chicken should run clear when you pierce the thickest part with a fork or the tip of a knife. If you see any pink, it needs more time. The meat should be opaque all the way through, and the leg should feel slightly loose if you wiggle it. However, investing in an inexpensive instant-read thermometer is the best way to guarantee perfectly cooked, safe-to-eat chicken every time.
6. Can I add other herbs or spices to this recipe?
Absolutely! This 5-ingredient recipe is a fantastic base for experimentation.
- Herbs: Add a few sprigs of fresh thyme or rosemary to the pan along with the garlic for an earthy, aromatic flavor.
- Spices: A pinch of red pepper flakes will add a welcome kick of heat. You could also season the chicken with a bit of smoked paprika for a smoky flavor and deeper color.
- Citrus: A squeeze of fresh lemon juice over the finished chicken will brighten all the flavors and cut through the richness of the butter.
7. Is this recipe gluten-free and/or keto-friendly?
Yes, this recipe is naturally both gluten-free and keto-friendly. All five core ingredients (chicken, butter, olive oil, garlic, salt/pepper) contain no gluten and are extremely low in carbohydrates. This makes it a perfect entree for anyone following these dietary plans. Just be mindful of your side dishes; serve it with low-carb vegetables or cauliflower rice to keep the entire meal compliant.
8. Can I make this recipe ahead of time or freeze the leftovers?
You can certainly cook the chicken ahead of time. Store it in an airtight container in the refrigerator for up to 3 days. For freezing, allow the cooked chicken to cool completely, then wrap each piece individually in plastic wrap and place them in a freezer-safe bag or container. It can be frozen for up to 3 months. To reheat, thaw the chicken in the refrigerator overnight and then reheat in the oven or air fryer to restore the skin’s crispiness.

5-Ingredient Garlic Chicken Recipe
Ingredients
This recipe’s beauty lies in its minimalist approach, where each component is chosen to deliver maximum flavor and impact. You only need five core ingredients to create this masterpiece.
- 4 bone-in, skin-on chicken thighs (about 2 lbs total): The star of the show. Using bone-in, skin-on thighs is crucial for two reasons: the skin crisps up to a delectable, crackling texture, and the bone helps keep the meat incredibly moist and flavorful during cooking.
- 2 tablespoons unsalted butter: This adds richness, helps brown the chicken skin beautifully, and forms the luxurious base of our simple pan sauce. Unsalted butter allows you to control the final seasoning of the dish.
- 8–10 cloves of garlic, thinly sliced or roughly chopped: This is not the time to be shy. A generous amount of fresh garlic provides the bold, aromatic, and savory backbone of the recipe. The way it mellows and sweetens in the butter is pure magic.
- 1 tablespoon olive oil: Used in combination with the butter, olive oil has a higher smoke point, which helps prevent the butter from burning while you get that perfect, deep golden-brown sear on the chicken skin.
- Salt and freshly ground black pepper, to taste: These are the essential seasonings that elevate all the other flavors. Seasoning generously is key to a delicious final product.
Instructions
Follow these steps carefully to ensure your chicken is perfectly cooked, with crispy skin and juicy meat every single time. The process is straightforward and designed for success, even for beginner cooks.
- Prepare the Chicken: The secret to crispy skin begins before the chicken even touches the pan. Remove the chicken thighs from their packaging and pat them completely dry on all sides with paper towels. Any excess moisture will steam the chicken skin instead of searing it. Once dry, season both sides generously with salt and freshly ground black pepper. Be more liberal with the seasoning than you think you need; some will be lost in the pan.
- Heat the Pan: Place a large, heavy-bottomed skillet (cast iron is ideal, but stainless steel works well too) over medium-high heat. Add the olive oil. Once the oil is hot and begins to shimmer, add the unsalted butter and let it melt completely, swirling the pan to combine them.
- Sear the Chicken: Carefully place the seasoned chicken thighs into the hot skillet, skin-side down. You should hear a satisfying sizzle immediately. It is crucial to place them in a single layer without overcrowding the pan. If necessary, cook in two batches. Let the chicken cook, undisturbed, for 6-8 minutes. Resist the urge to move it around. This allows the skin to render its fat and develop a deep, golden-brown, and incredibly crispy crust.
- Flip and Add Garlic: Using tongs, flip the chicken thighs over. The skin should be beautifully browned and easily release from the pan. Reduce the heat to medium-low to prevent the garlic from burning. Scatter the sliced or chopped garlic cloves into the pan around the chicken, allowing them to sizzle and toast in the rendered chicken fat and butter.
- Finish Cooking: Continue to cook the chicken for another 10-15 minutes on the second side. As it cooks, you can spoon some of the garlic-infused butter from the bottom of the pan over the top of the chicken to baste it with flavor. The chicken is done when it is cooked through and the internal temperature reaches 165°F (74°C) when checked with a meat thermometer inserted into the thickest part of the thigh, avoiding the bone.
- Rest and Serve: Remove the chicken from the skillet and transfer it to a clean plate or cutting board. Let the chicken rest for at least 5-10 minutes before serving. This allows the juices to redistribute throughout the meat, ensuring every bite is moist and tender. You can spoon the remaining garlic and butter from the pan over the chicken just before serving.
Nutrition
- Serving Size: one normal portion
- Calories: 450
- Fat: 32g
- Saturated Fat: 12g
- Carbohydrates: 2g
- Protein: 35g


