")


Of all the recipes in my culinary arsenal, there are a few that I return to time and time again, not just for their taste, but for the memories they evoke. These Baked Parmesan Garlic Mushrooms are one such treasure. I first made them on a crisp autumn evening when the family was craving something savory and comforting to nibble on before dinner. I wasn’t prepared for the reaction. As they baked, an intoxicating aroma of roasting garlic, nutty Parmesan, and earthy mushrooms filled the entire house, drawing everyone to the kitchen. When I pulled the sizzling skillet from the oven, they looked like little jewels—golden brown, bubbling, and glistening with garlic butter. The first bite was a revelation: a tender, juicy mushroom cap giving way to a crunchy, cheesy, intensely flavorful topping. They disappeared from the platter in minutes, accompanied by a chorus of “You have to make these again!” Now, they are a non-negotiable staple for holiday gatherings, game nights, and any time we need a little bite of pure, unadulterated comfort. They are simple, elegant, and proof that sometimes, the most unforgettable dishes are made from the humblest of ingredients.
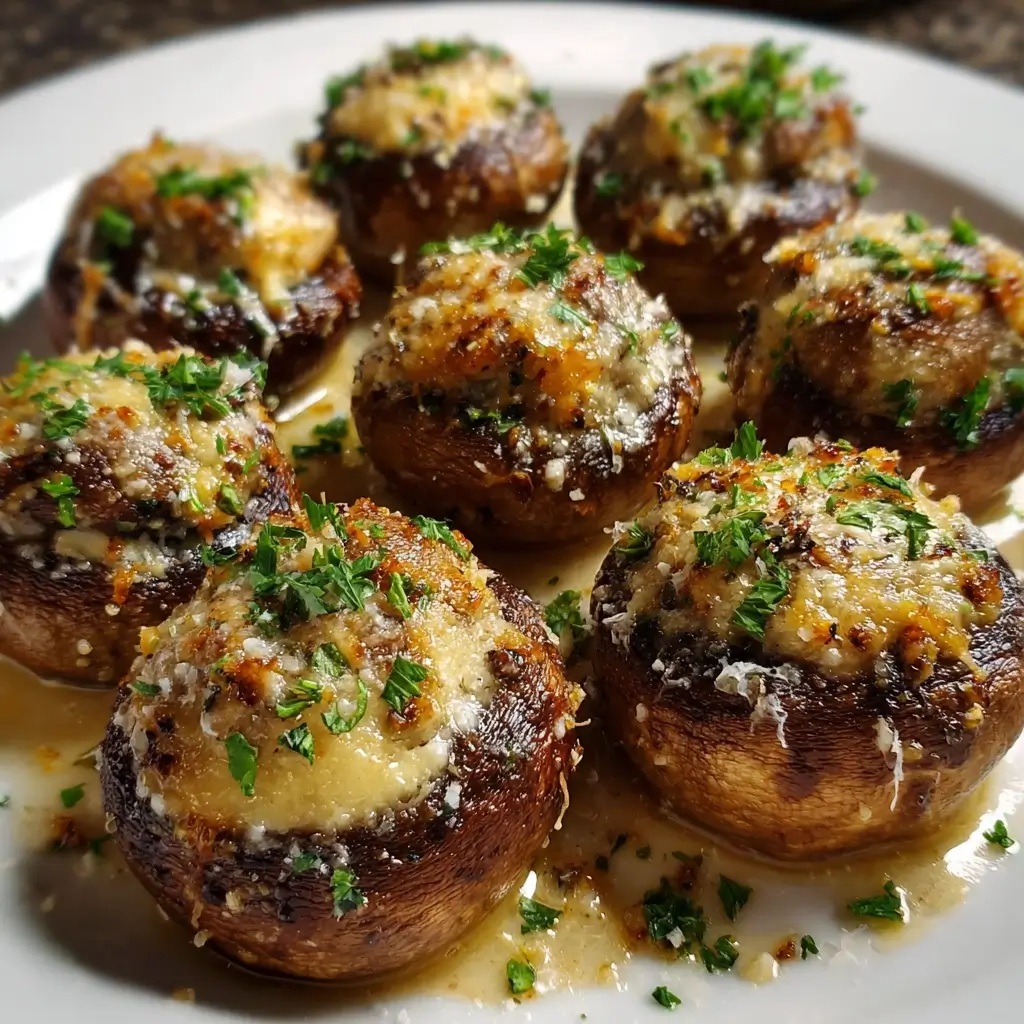
The Ultimate Baked Parmesan Garlic Mushrooms: A Symphony of Flavor
This isn’t just a recipe; it’s a guide to creating the most irresistible, flavor-packed mushrooms you’ve ever tasted. Perfectly suited as a sophisticated appetizer for a dinner party or a rustic, savory side dish for a weeknight meal, these mushrooms are versatility at its finest. The magic lies in the balance of textures and tastes: the meaty tenderness of the baked mushroom, the sharp, salty bite of quality Parmesan cheese, the aromatic warmth of fresh garlic, and the rich decadence of butter, all tied together with a hint of fresh herbs. Forget watery, bland mushrooms; this method ensures a deep, concentrated flavor and a perfectly golden, crispy top.
Why This Recipe is a Guaranteed Hit
- Incredibly Flavorful: The combination of garlic, butter, and Parmesan is a classic for a reason. It creates a rich, umami-packed experience that is simply addictive.
- Wonderful Texture: You get the best of both worlds—a tender, juicy mushroom base with a delightfully crunchy and cheesy topping.
- Simple to Prepare: Despite their elegant appearance and gourmet taste, these baked mushrooms are surprisingly easy to make with common pantry staples.
- Highly Versatile: Serve them as a starter, a side dish, or even a light vegetarian main. They pair beautifully with almost anything.
Ingredients You’ll Need
Crafting the perfect Baked Parmesan Garlic Mushrooms starts with selecting high-quality ingredients. Each component plays a crucial role in building the layers of flavor and texture that make this dish so special.
- 24 oz (1.5 lbs) Cremini Mushrooms: Often called “baby bellas,” these are the ideal choice. They have a firmer texture and a deeper, earthier flavor than white button mushrooms, allowing them to stand up well to baking without becoming watery. Ensure they are whole and firm.
- 1/2 cup Unsalted Butter: The foundation of our garlic-parmesan topping. Using unsalted butter allows you to control the final saltiness of the dish, which is important as Parmesan cheese is already quite salty. Let it melt to a liquid state for easy mixing.
- 6-8 Cloves Fresh Garlic: This is not a time for powdered garlic. Freshly minced garlic cloves provide an aromatic, pungent kick that is central to the recipe’s flavor profile. Feel free to adjust the quantity based on your love for garlic.
- 1 cup Grated Parmesan Cheese: For the best results, buy a block of authentic Parmigiano-Reggiano and grate it yourself. Pre-shredded cheeses often contain anti-caking agents that prevent them from melting as smoothly and lack the nutty, complex flavor of a freshly grated block.
- 1/2 cup Panko Breadcrumbs: These Japanese-style breadcrumbs are the secret to an extra-crispy topping. They are lighter and flakier than traditional breadcrumbs, so they absorb less oil and brown beautifully in the oven.
- 1/4 cup Fresh Parsley: Finely chopped fresh parsley adds a burst of freshness and color that cuts through the richness of the butter and cheese. A small amount will be mixed into the topping, with more reserved for garnishing.
- 2 tablespoons Olive Oil: A light drizzle of olive oil helps the mushrooms cook evenly and prevents them from drying out in the oven’s heat before the topping is added.
- 1 teaspoon Salt: Or to taste. Essential for bringing out the flavors of all the other ingredients.
- 1/2 teaspoon Black Pepper: Freshly ground black pepper provides a subtle warmth and spice that complements the earthy mushrooms.
Step-by-Step Instructions for Perfect Baked Mushrooms
Follow these detailed instructions carefully to ensure your mushrooms are juicy, your topping is crispy, and your final dish is nothing short of spectacular. The process is broken down into simple, manageable steps.
Step 1: Preheat and Prepare the Mushrooms
First things first, preheat your oven to 400°F (200°C). A hot oven is crucial for roasting the mushrooms effectively and achieving that beautiful golden-brown color.
Next, prepare your mushrooms. It’s a common misconception that mushrooms should be soaked in water. Mushrooms are like little sponges and will absorb water, leading to a soggy, diluted final product. Instead, clean the mushrooms by gently wiping them with a damp paper towel to remove any dirt. Once clean, carefully snap off the stems. You can do this by gently wiggling the stem back and forth until it pops out. Set the stems aside—we’ll use them later! Arrange the mushroom caps, cavity-side up, in a single layer in a large oven-safe skillet or a 9×13 inch baking dish. Drizzle them with the 2 tablespoons of olive oil and sprinkle lightly with salt and pepper.
Step 2: Create the Aromatic Garlic Butter Filling
While the oven is preheating, let’s create the star of the show: the filling. Finely chop the mushroom stems you set aside earlier. The stems have a wonderful flavor and add bulk and texture to the filling, ensuring nothing goes to waste.
In a medium bowl, combine the melted unsalted butter and the finely minced fresh garlic. Whisk them together until the garlic is fragrant and evenly distributed. Now, add the chopped mushroom stems, the Panko breadcrumbs, 3/4 cup of the grated Parmesan cheese (reserving the other 1/4 cup for topping), and half of your chopped fresh parsley. Season this mixture with the remaining salt and pepper. Stir everything together until you have a thick, paste-like mixture. This is your flavor-packed filling.
Step 3: The Art of Stuffing
Using a small spoon or your clean fingers, generously fill the cavity of each mushroom cap with the Parmesan garlic mixture. Don’t be shy here; mound the filling on top. The goal is to have a substantial, crusty layer after baking. As the mushrooms cook, they will release some moisture and shrink slightly, so a generous amount of filling is key.
Step 4: Baking to Golden Perfection
Place the filled mushrooms in the preheated oven. Bake for 15-20 minutes. You’re looking for two signs of perfection: the mushrooms should be tender and have released some of their natural juices, and the Panko-Parmesan topping should be starting to turn a light golden color.
After the initial bake, carefully remove the skillet or baking dish from the oven. Sprinkle the remaining 1/4 cup of grated Parmesan cheese over the top of the mushrooms. This final layer of cheese will melt and create an extra-crispy, savory crust.
Step 5: The Final Broil and Garnish
Return the dish to the oven and switch the setting to BROIL on high. This step is critical for getting that irresistible crunchy top, but it happens very quickly, so do not walk away! Broil for 1-3 minutes, watching closely, until the cheese is bubbling and the topping is a deep golden brown.
Once they are perfectly browned, carefully remove them from the oven. Let them rest for a few minutes, as they will be incredibly hot. Just before serving, garnish generously with the remaining fresh chopped parsley. This adds a final touch of freshness and vibrant color.
Nutrition Facts: A Guilt-Free Indulgence
While this dish feels decadent, it’s packed with wholesome ingredients. Here is a general nutritional overview.
- Servings: This recipe makes approximately 6 appetizer-sized servings.
- Calories per Serving: Approximately 250-300 calories per serving.
- Protein: A good source of protein, primarily from the Parmesan cheese, which helps in muscle repair and keeps you feeling full.
- Dietary Fiber: Mushrooms are a natural source of dietary fiber, which is essential for digestive health and maintaining stable blood sugar levels.
- Healthy Fats: The use of olive oil provides monounsaturated fats, which are beneficial for heart health.
Preparation and Cooking Time
This elegant appetizer comes together quicker than you might think, making it perfect for both planned parties and last-minute cravings.
- Preparation Time: 15 minutes. This includes cleaning the mushrooms, chopping the garlic and stems, and mixing the filling.
- Cooking Time: 20-25 minutes. This covers the initial baking time and the final broil to get that perfect crispy crust.
- Total Time: Approximately 35-40 minutes from start to finish.
How to Serve Your Parmesan Garlic Mushrooms
These mushrooms are incredibly versatile. Here are some fantastic ways to serve them to impress your guests and family:
- As a Crowd-Pleasing Appetizer:
- Arrange them on a large wooden board or ceramic platter.
- Serve them warm, straight from the oven, for the best texture and flavor.
- Provide small forks or toothpicks for easy handling at a party.
- Place them alongside other small bites like olives, cheese cubes, and charcuterie for a complete appetizer spread.
- As a Savory Side Dish:
- These mushrooms are the perfect companion to a variety of main courses.
- Serve alongside a perfectly grilled beef steak, where their earthy flavor complements the richness of the meat.
- Pair them with roasted chicken or a pan-seared chicken breast.
- Accompany a creamy risotto or a simple pasta dish with aglio e olio (garlic and oil).
- As a Topping for Main Courses:
- Roughly chop the baked mushrooms and use them as a decadent topping for a burger.
- Spoon them over a piece of grilled polenta for a hearty vegetarian meal.
- Use them to elevate a simple bowl of mashed potatoes.
- Wine and Beverage Pairings:
- White Wine: A crisp, dry white wine like a Sauvignon Blanc or Pinot Grigio will cut through the richness of the cheese and butter.
- Red Wine: A light-to-medium-bodied red wine like a Pinot Noir complements the earthy flavor of the mushrooms without overpowering them.
- Beer: A crisp lager or a flavorful amber ale would also be an excellent pairing.
Additional Tips for Mushroom Mastery
Take your baked mushrooms from great to unforgettable with these eight professional tips and tricks.
- Don’t Crowd the Pan: Ensure the mushrooms are in a single layer with a little space between each one. Overcrowding the pan will cause the mushrooms to steam instead of roast, resulting in a watery texture. Use a larger dish or two smaller ones if necessary.
- Achieve a Crispier Topping: For an even crunchier topping, toast the Panko breadcrumbs in a dry skillet over medium heat for 2-3 minutes before mixing them into the filling. Stir constantly until they are fragrant and lightly golden.
- Make-Ahead Magic: You can prepare these mushrooms ahead of time to save stress on the day of a party. Clean and stuff the mushrooms as directed, arrange them in your baking dish, cover tightly with plastic wrap, and refrigerate for up to 24 hours. When ready to serve, simply bake as instructed, adding a few extra minutes to the initial baking time.
- Cheese Variations: While Parmesan is classic, feel free to experiment with other hard, salty cheeses. A combination of Parmesan and Pecorino Romano works wonderfully. You could also add a little shredded mozzarella or Gruyère to the filling for a gooier, meltier texture.
- Spice It Up: If you enjoy a bit of heat, add a pinch of red pepper flakes to the garlic butter mixture. A dash of smoked paprika can also add a lovely, smoky depth of flavor that pairs beautifully with the mushrooms.
- Herbaceous Swaps: Parsley is fantastic, but other herbs can be used too. Try adding finely chopped fresh thyme or rosemary to the filling for a more robust, woodsy flavor profile. A little fresh chive can add a mild oniony note.
- Don’t Discard the Juice: After baking, you’ll notice a delicious, savory liquid at the bottom of the pan. This is liquid gold! Don’t throw it away. You can drizzle it back over the mushrooms before serving or sop it up with a piece of crusty bread.
- Choosing Mushroom Size: For an appetizer, look for mushrooms that are relatively uniform in size and about 1.5-2 inches in diameter. This makes them the perfect two-bite treat. If serving as a side, you can use larger Cremini mushrooms.
Frequently Asked Questions (FAQ)
Here are answers to some of the most common questions about making Baked Parmesan Garlic Mushrooms.
1. Why did my mushrooms turn out watery?
This is the most common issue and usually happens for two reasons. First, washing the mushrooms in water instead of wiping them clean. Second, overcrowding the baking dish, which causes them to steam. Always wipe mushrooms clean and give them space in the pan to ensure they roast properly.
2. Can I use different types of mushrooms for this recipe?
Absolutely! While Cremini mushrooms are recommended for their flavor and texture, this recipe also works well with white button mushrooms. For a more substantial, meal-sized version, you can use large Portobello mushroom caps. You’ll need to increase the baking time for Portobellos.
3. Can I make this recipe vegan or dairy-free?
Yes, you can adapt it. Use a high-quality vegan butter substitute in place of regular butter. For the cheese, use a store-bought vegan Parmesan alternative or make your own by blending raw cashews, nutritional yeast, garlic powder, and salt in a food processor until it resembles a fine crumble.
4. What’s the best way to store and reheat leftovers?
Store any leftover mushrooms in an airtight container in the refrigerator for up to 3 days. To reheat, avoid the microwave as it can make the topping soggy. The best method is to place them on a baking sheet in an oven or toaster oven preheated to 350°F (175°C) for 5-10 minutes, or until warmed through and the topping has re-crisped.
5. Can I freeze these baked mushrooms?
It’s possible, but the texture may change slightly upon thawing. For best results, freeze them after baking and cooling completely. Arrange them in a single layer on a baking sheet and freeze until solid. Then, transfer them to a freezer-safe bag or container. Reheat directly from frozen in a 375°F (190°C) oven for 15-20 minutes.
6. I don’t have Panko breadcrumbs. What can I use instead?
If you don’t have Panko, you can use regular dried breadcrumbs. The topping won’t be quite as light and crispy, but it will still be delicious. Alternatively, you can crush saltine crackers or buttery crackers like Ritz to a coarse crumb for a different but equally tasty topping.
7. My garlic burned during the broiling step. How can I prevent this?
The broiling step is very fast and intense. To prevent the garlic in the topping from burning, make sure it is well-incorporated into the butter and breadcrumb mixture, rather than having large pieces sitting on top. Also, place your oven rack in the middle position, not the top one, to give it a little more distance from the intense heat of the broiler. And most importantly, watch it like a hawk!
8. Is it necessary to pre-bake the mushrooms before adding the topping?
While you could technically stuff them raw and bake them all at once, the two-step process yields far superior results. The initial baking period allows the mushrooms to release some of their moisture and become tender before the topping is fully cooked. This prevents the topping from burning before the mushroom is cooked through and helps avoid a watery final product.

Baked Parmesan Garlic Mushrooms
Ingredients
Crafting the perfect Baked Parmesan Garlic Mushrooms starts with selecting high-quality ingredients. Each component plays a crucial role in building the layers of flavor and texture that make this dish so special.
- 24 oz (1.5 lbs) Cremini Mushrooms: Often called “baby bellas,” these are the ideal choice. They have a firmer texture and a deeper, earthier flavor than white button mushrooms, allowing them to stand up well to baking without becoming watery. Ensure they are whole and firm.
- 1/2 cup Unsalted Butter: The foundation of our garlic-parmesan topping. Using unsalted butter allows you to control the final saltiness of the dish, which is important as Parmesan cheese is already quite salty. Let it melt to a liquid state for easy mixing.
- 6–8 Cloves Fresh Garlic: This is not a time for powdered garlic. Freshly minced garlic cloves provide an aromatic, pungent kick that is central to the recipe’s flavor profile. Feel free to adjust the quantity based on your love for garlic.
- 1 cup Grated Parmesan Cheese: For the best results, buy a block of authentic Parmigiano-Reggiano and grate it yourself. Pre-shredded cheeses often contain anti-caking agents that prevent them from melting as smoothly and lack the nutty, complex flavor of a freshly grated block.
- 1/2 cup Panko Breadcrumbs: These Japanese-style breadcrumbs are the secret to an extra-crispy topping. They are lighter and flakier than traditional breadcrumbs, so they absorb less oil and brown beautifully in the oven.
- 1/4 cup Fresh Parsley: Finely chopped fresh parsley adds a burst of freshness and color that cuts through the richness of the butter and cheese. A small amount will be mixed into the topping, with more reserved for garnishing.
- 2 tablespoons Olive Oil: A light drizzle of olive oil helps the mushrooms cook evenly and prevents them from drying out in the oven’s heat before the topping is added.
- 1 teaspoon Salt: Or to taste. Essential for bringing out the flavors of all the other ingredients.
- 1/2 teaspoon Black Pepper: Freshly ground black pepper provides a subtle warmth and spice that complements the earthy mushrooms.
Instructions
Follow these detailed instructions carefully to ensure your mushrooms are juicy, your topping is crispy, and your final dish is nothing short of spectacular. The process is broken down into simple, manageable steps.
First things first, preheat your oven to 400°F (200°C). A hot oven is crucial for roasting the mushrooms effectively and achieving that beautiful golden-brown color.
Next, prepare your mushrooms. It’s a common misconception that mushrooms should be soaked in water. Mushrooms are like little sponges and will absorb water, leading to a soggy, diluted final product. Instead, clean the mushrooms by gently wiping them with a damp paper towel to remove any dirt. Once clean, carefully snap off the stems. You can do this by gently wiggling the stem back and forth until it pops out. Set the stems aside—we’ll use them later! Arrange the mushroom caps, cavity-side up, in a single layer in a large oven-safe skillet or a 9×13 inch baking dish. Drizzle them with the 2 tablespoons of olive oil and sprinkle lightly with salt and pepper.
While the oven is preheating, let’s create the star of the show: the filling. Finely chop the mushroom stems you set aside earlier. The stems have a wonderful flavor and add bulk and texture to the filling, ensuring nothing goes to waste.
In a medium bowl, combine the melted unsalted butter and the finely minced fresh garlic. Whisk them together until the garlic is fragrant and evenly distributed. Now, add the chopped mushroom stems, the Panko breadcrumbs, 3/4 cup of the grated Parmesan cheese (reserving the other 1/4 cup for topping), and half of your chopped fresh parsley. Season this mixture with the remaining salt and pepper. Stir everything together until you have a thick, paste-like mixture. This is your flavor-packed filling.
Using a small spoon or your clean fingers, generously fill the cavity of each mushroom cap with the Parmesan garlic mixture. Don’t be shy here; mound the filling on top. The goal is to have a substantial, crusty layer after baking. As the mushrooms cook, they will release some moisture and shrink slightly, so a generous amount of filling is key.
Place the filled mushrooms in the preheated oven. Bake for 15-20 minutes. You’re looking for two signs of perfection: the mushrooms should be tender and have released some of their natural juices, and the Panko-Parmesan topping should be starting to turn a light golden color.
After the initial bake, carefully remove the skillet or baking dish from the oven. Sprinkle the remaining 1/4 cup of grated Parmesan cheese over the top of the mushrooms. This final layer of cheese will melt and create an extra-crispy, savory crust.
Return the dish to the oven and switch the setting to BROIL on high. This step is critical for getting that irresistible crunchy top, but it happens very quickly, so do not walk away! Broil for 1-3 minutes, watching closely, until the cheese is bubbling and the topping is a deep golden brown.
Once they are perfectly browned, carefully remove them from the oven. Let them rest for a few minutes, as they will be incredibly hot. Just before serving, garnish generously with the remaining fresh chopped parsley. This adds a final touch of freshness and vibrant color.
Nutrition
- Serving Size: one normal portion
- Calories: 300


