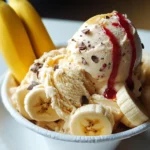
Ingredients
This recipe is wonderfully simple, requiring just a handful of ingredients, most of which you probably already have on hand. The beauty of this banana ice cream lies in its minimalist approach, letting the natural flavors shine. Here’s what you’ll need to create this frozen wonder:
- Ripe Bananas: The star of the show! You’ll need 3-4 large, ripe bananas per serving (adjust based on your desired quantity). The riper the banana, the sweeter and creamier your ice cream will be. Look for bananas with plenty of brown spots – these are at their peak ripeness and will provide the best flavor and texture. Avoid using green or underripe bananas, as they won’t blend as smoothly and will lack the natural sweetness needed for that ice cream-like taste.
- Optional: Vanilla Extract: A splash of vanilla extract (about 1 teaspoon) enhances the overall flavor profile, adding a warm, comforting note that complements the banana beautifully. While optional, it’s highly recommended for an extra layer of deliciousness. Pure vanilla extract is preferred for the best flavor.
- Optional: Cinnamon: For a touch of warmth and spice, a pinch of ground cinnamon (about ¼ teaspoon) works wonders. Cinnamon pairs exceptionally well with bananas, creating a cozy and inviting flavor. Ceylon cinnamon, known for its delicate flavor, is a great choice, but any good quality ground cinnamon will do.
- Optional: Peanut Butter: If you’re a peanut butter lover, adding a tablespoon or two of creamy peanut butter can transform your banana ice cream into a decadent treat. The salty, nutty notes of peanut butter create a fantastic contrast to the sweetness of the banana. Choose a natural peanut butter without added sugars or oils for a healthier option.
- Optional: Chocolate Chips or Cacao Nibs: For a bit of indulgence and texture, consider adding a handful of mini chocolate chips or cacao nibs. Dark chocolate chips or cacao nibs offer a slightly bitter counterpoint to the sweetness, while milk chocolate chips will amplify the sweetness. Cacao nibs provide a more intense chocolate flavor and a satisfying crunch.
- Optional: Berries (Fresh or Frozen): Adding a handful of fresh or frozen berries like strawberries, blueberries, or raspberries introduces a burst of fruity freshness and vibrant color. Berries not only add flavor but also boost the nutritional value of your banana ice cream. Frozen berries can also help to thicken the ice cream further.
- Optional: Milk or Plant-Based Milk (Only if Necessary): In most cases, you won’t need any liquid. However, if your blender or food processor is struggling to blend the frozen bananas, you can add a tablespoon or two of milk or plant-based milk (almond milk, oat milk, etc.) to help it along. Add liquid sparingly, as too much can make your ice cream less thick and creamy.
Instructions
Creating this banana ice cream is surprisingly straightforward and requires minimal effort. Follow these simple steps to transform frozen bananas into a creamy, dreamy dessert:
- Peel and Slice the Bananas: Start by peeling your ripe bananas. Slice them into roughly ½-inch thick coins. Slicing before freezing helps them freeze more evenly and makes blending easier later on. Don’t worry about perfect slices; just aim for relatively uniform pieces.
- Freeze the Banana Slices: The key to achieving the perfect ice cream texture is to freeze the banana slices properly. Spread the banana slices in a single layer on a baking sheet lined with parchment paper or a silicone mat. This prevents them from sticking together and freezing into a solid block. Place the baking sheet in the freezer and freeze for at least 2 hours, or ideally overnight. The bananas should be completely frozen solid before you proceed to the next step. Freezing them overnight ensures they are rock solid and ready to be transformed into ice cream.
- Blend the Frozen Bananas: Once the banana slices are frozen solid, transfer them to a high-speed blender or a food processor. If using a blender, you might need to stop and scrape down the sides a few times during the blending process to ensure everything gets evenly blended. A food processor often works slightly better as its wider base can handle the frozen bananas more effectively.
- Blend Until Smooth and Creamy: Now, the magic begins! Start blending the frozen banana slices. Initially, they will crumble and look like, well, frozen bananas. Continue blending. Be patient, this is crucial! As you keep blending, the bananas will start to break down further, then clump together, and eventually, they will transform into a smooth, creamy, soft-serve ice cream consistency. This process can take a few minutes, so don’t be discouraged if it doesn’t happen instantly. Keep blending until you reach that perfect, smooth and creamy texture, similar to soft-serve ice cream.
- Add Optional Ingredients (If Desired): Once you’ve achieved the creamy banana ice cream base, this is the time to add any of your chosen optional ingredients. If you’re adding vanilla extract, cinnamon, or peanut butter, add them now and blend for a few more seconds until they are fully incorporated. For chocolate chips, cacao nibs, or berries, you can either blend them in for a more uniform flavor and color, or gently fold them in by hand after blending for pockets of texture and flavor. Folding them in will give you chunks of chocolate or berries throughout your ice cream.
- Serve Immediately or Freeze for Later (Optional): Banana ice cream is at its absolute best when served immediately after blending, as it will have a perfect soft-serve consistency. If you prefer a firmer, more scoopable ice cream, you can transfer it to a freezer-safe container and freeze for another 1-2 hours. Freezing for longer will make it harder, more like traditional ice cream. If you do freeze it for longer periods, you might need to let it thaw for a few minutes at room temperature before scooping to soften it slightly.
- Enjoy Your Delicious and Healthy Banana Ice Cream Treat! Serve your banana ice cream immediately in bowls or cones. Get creative with toppings (see “How to Serve” section below) and enjoy the delightful and healthy treat you’ve just created!
Tips for Perfect Banana Ice Cream Texture:
- Ripeness is Key: Use very ripe bananas for the best sweetness and creamy texture.
- Freeze Solid: Ensure the banana slices are completely frozen solid before blending.
- Patience is a Virtue: Don’t rush the blending process. It takes time for the frozen bananas to transform into ice cream.
- Don’t Over-Blend if Adding Mix-ins: If you are adding mix-ins like chocolate chips or berries and want them to remain chunky, fold them in after blending the base, instead of blending them in completely.
- Adjust Consistency with Liquid (Sparingly): Only add a tablespoon or two of liquid (milk or plant-based milk) if your blender is struggling, and add it very sparingly to avoid making the ice cream too liquidy.
Nutrition
- Serving Size: one normal portion
- Calories: 120
- Fat: 1 gram