
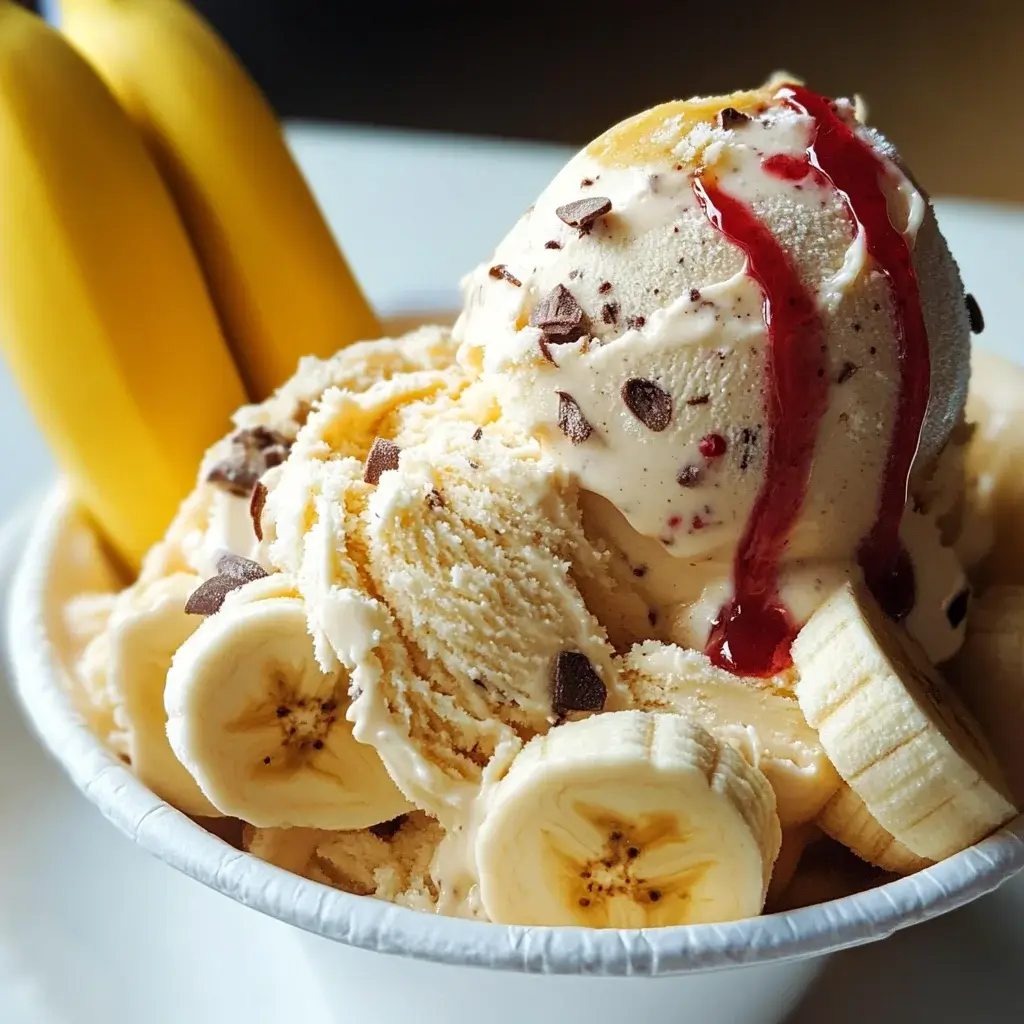
It’s funny how some of the simplest things can bring the greatest joy. Recently, in a quest for healthier dessert options that wouldn’t compromise on taste (especially with the kids!), I stumbled upon the magic of banana ice cream. Honestly, I was skeptical at first. Ice cream made from just bananas? Could it actually be good? Well, let me tell you, it wasn’t just good – it was incredible! My family, notoriously picky when it comes to healthy alternatives, devoured it. The smooth, creamy texture and naturally sweet flavor were a hit with everyone, from the little ones to the adults. It’s become our go-to treat, and I’m excited to share this ridiculously easy and delicious recipe with you, hoping it brings as much delight to your home as it has to mine. Prepare to be amazed by the sheer simplicity and pure deliciousness of this banana ice cream treat!
Ingredients for Your Delightful Banana Ice Cream Treat
This recipe is wonderfully simple, requiring just a handful of ingredients, most of which you probably already have on hand. The beauty of this banana ice cream lies in its minimalist approach, letting the natural flavors shine. Here’s what you’ll need to create this frozen wonder:
- Ripe Bananas: The star of the show! You’ll need 3-4 large, ripe bananas per serving (adjust based on your desired quantity). The riper the banana, the sweeter and creamier your ice cream will be. Look for bananas with plenty of brown spots – these are at their peak ripeness and will provide the best flavor and texture. Avoid using green or underripe bananas, as they won’t blend as smoothly and will lack the natural sweetness needed for that ice cream-like taste.
- Optional: Vanilla Extract: A splash of vanilla extract (about 1 teaspoon) enhances the overall flavor profile, adding a warm, comforting note that complements the banana beautifully. While optional, it’s highly recommended for an extra layer of deliciousness. Pure vanilla extract is preferred for the best flavor.
- Optional: Cinnamon: For a touch of warmth and spice, a pinch of ground cinnamon (about ¼ teaspoon) works wonders. Cinnamon pairs exceptionally well with bananas, creating a cozy and inviting flavor. Ceylon cinnamon, known for its delicate flavor, is a great choice, but any good quality ground cinnamon will do.
- Optional: Peanut Butter: If you’re a peanut butter lover, adding a tablespoon or two of creamy peanut butter can transform your banana ice cream into a decadent treat. The salty, nutty notes of peanut butter create a fantastic contrast to the sweetness of the banana. Choose a natural peanut butter without added sugars or oils for a healthier option.
- Optional: Chocolate Chips or Cacao Nibs: For a bit of indulgence and texture, consider adding a handful of mini chocolate chips or cacao nibs. Dark chocolate chips or cacao nibs offer a slightly bitter counterpoint to the sweetness, while milk chocolate chips will amplify the sweetness. Cacao nibs provide a more intense chocolate flavor and a satisfying crunch.
- Optional: Berries (Fresh or Frozen): Adding a handful of fresh or frozen berries like strawberries, blueberries, or raspberries introduces a burst of fruity freshness and vibrant color. Berries not only add flavor but also boost the nutritional value of your banana ice cream. Frozen berries can also help to thicken the ice cream further.
- Optional: Milk or Plant-Based Milk (Only if Necessary): In most cases, you won’t need any liquid. However, if your blender or food processor is struggling to blend the frozen bananas, you can add a tablespoon or two of milk or plant-based milk (almond milk, oat milk, etc.) to help it along. Add liquid sparingly, as too much can make your ice cream less thick and creamy.
Instructions: Crafting Your Perfect Banana Ice Cream Treat
Creating this banana ice cream is surprisingly straightforward and requires minimal effort. Follow these simple steps to transform frozen bananas into a creamy, dreamy dessert:
- Peel and Slice the Bananas: Start by peeling your ripe bananas. Slice them into roughly ½-inch thick coins. Slicing before freezing helps them freeze more evenly and makes blending easier later on. Don’t worry about perfect slices; just aim for relatively uniform pieces.
- Freeze the Banana Slices: The key to achieving the perfect ice cream texture is to freeze the banana slices properly. Spread the banana slices in a single layer on a baking sheet lined with parchment paper or a silicone mat. This prevents them from sticking together and freezing into a solid block. Place the baking sheet in the freezer and freeze for at least 2 hours, or ideally overnight. The bananas should be completely frozen solid before you proceed to the next step. Freezing them overnight ensures they are rock solid and ready to be transformed into ice cream.
- Blend the Frozen Bananas: Once the banana slices are frozen solid, transfer them to a high-speed blender or a food processor. If using a blender, you might need to stop and scrape down the sides a few times during the blending process to ensure everything gets evenly blended. A food processor often works slightly better as its wider base can handle the frozen bananas more effectively.
- Blend Until Smooth and Creamy: Now, the magic begins! Start blending the frozen banana slices. Initially, they will crumble and look like, well, frozen bananas. Continue blending. Be patient, this is crucial! As you keep blending, the bananas will start to break down further, then clump together, and eventually, they will transform into a smooth, creamy, soft-serve ice cream consistency. This process can take a few minutes, so don’t be discouraged if it doesn’t happen instantly. Keep blending until you reach that perfect, smooth and creamy texture, similar to soft-serve ice cream.
- Add Optional Ingredients (If Desired): Once you’ve achieved the creamy banana ice cream base, this is the time to add any of your chosen optional ingredients. If you’re adding vanilla extract, cinnamon, or peanut butter, add them now and blend for a few more seconds until they are fully incorporated. For chocolate chips, cacao nibs, or berries, you can either blend them in for a more uniform flavor and color, or gently fold them in by hand after blending for pockets of texture and flavor. Folding them in will give you chunks of chocolate or berries throughout your ice cream.
- Serve Immediately or Freeze for Later (Optional): Banana ice cream is at its absolute best when served immediately after blending, as it will have a perfect soft-serve consistency. If you prefer a firmer, more scoopable ice cream, you can transfer it to a freezer-safe container and freeze for another 1-2 hours. Freezing for longer will make it harder, more like traditional ice cream. If you do freeze it for longer periods, you might need to let it thaw for a few minutes at room temperature before scooping to soften it slightly.
- Enjoy Your Delicious and Healthy Banana Ice Cream Treat! Serve your banana ice cream immediately in bowls or cones. Get creative with toppings (see “How to Serve” section below) and enjoy the delightful and healthy treat you’ve just created!
Tips for Perfect Banana Ice Cream Texture:
- Ripeness is Key: Use very ripe bananas for the best sweetness and creamy texture.
- Freeze Solid: Ensure the banana slices are completely frozen solid before blending.
- Patience is a Virtue: Don’t rush the blending process. It takes time for the frozen bananas to transform into ice cream.
- Don’t Over-Blend if Adding Mix-ins: If you are adding mix-ins like chocolate chips or berries and want them to remain chunky, fold them in after blending the base, instead of blending them in completely.
- Adjust Consistency with Liquid (Sparingly): Only add a tablespoon or two of liquid (milk or plant-based milk) if your blender is struggling, and add it very sparingly to avoid making the ice cream too liquidy.
Nutrition Facts: A Healthy and Guilt-Free Dessert
Banana ice cream is not only incredibly delicious but also surprisingly healthy! It’s a fantastic way to satisfy your sweet cravings without the added sugars, fats, and artificial ingredients often found in traditional ice cream. Here’s a general nutritional overview for a single serving (approximately ½ cup, made with 2 medium bananas and no added ingredients):
- Servings: 1
- Calories per Serving: Approximately 105-120 calories (depending on banana size)
- Fat: Less than 1 gram (primarily from natural banana fats)
- Saturated Fat: Negligible
Key Nutritional Benefits:
- Naturally Sweet: Banana ice cream gets its sweetness solely from the natural sugars in bananas, eliminating the need for added refined sugars.
- High in Fiber: Bananas are a good source of dietary fiber, which aids digestion and promotes feelings of fullness.
- Potassium-Rich: Bananas are well-known for their potassium content, an essential electrolyte that supports heart health and muscle function.
- Vitamins and Minerals: Bananas contain various vitamins and minerals, including vitamin B6, vitamin C, and manganese.
- Dairy-Free and Vegan: This recipe is naturally dairy-free and vegan, making it a perfect option for those with dietary restrictions or preferences.
- Lower in Calories and Fat: Compared to traditional ice cream, banana ice cream is significantly lower in calories and fat, especially saturated fat.
Note: Nutritional values can vary slightly based on the size and ripeness of the bananas and any optional ingredients added. Adding ingredients like peanut butter, chocolate chips, or nuts will increase the calorie, fat, and sugar content accordingly.
Preparation Time: Quick, Easy, and Convenient
The beauty of banana ice cream lies not only in its taste and health benefits but also in its incredibly short preparation time. Here’s a breakdown of the time involved:
- Active Preparation Time: Approximately 5-10 minutes. This includes peeling and slicing the bananas.
- Freezing Time: Minimum 2 hours, ideally overnight. While this is the longest part of the process, it’s passive time – you don’t need to actively do anything during this period. Planning ahead and freezing the bananas in advance is key.
- Blending Time: Approximately 2-5 minutes. The actual blending time will depend on the power of your blender or food processor and the consistency you desire.
- Total Time (excluding freezing): Approximately 10-15 minutes from start to finish (after bananas are frozen).
Overall, banana ice cream is a remarkably quick and easy dessert to prepare, especially considering the delicious and healthy outcome. The majority of the time is spent waiting for the bananas to freeze, which can be done ahead of time. When you’re ready for a treat, you can whip up a batch of banana ice cream in just minutes!
How to Serve Your Banana Ice Cream Treat: Endless Possibilities
Banana ice cream is delicious on its own, but the serving possibilities are truly endless! Get creative and elevate your banana ice cream experience with these delightful serving suggestions:
- Classic Bowl or Cone: The simplest and most classic way to enjoy banana ice cream is in a bowl or waffle cone, just like traditional ice cream.
- Topped with Fresh Fruit: Enhance the natural fruitiness by topping your banana ice cream with fresh berries (strawberries, blueberries, raspberries), sliced peaches, mango, or kiwi.
- Sprinkled with Nuts and Seeds: Add a satisfying crunch and healthy fats by sprinkling chopped nuts (almonds, walnuts, pecans, peanuts) or seeds (chia seeds, flax seeds, sunflower seeds) on top.
- Drizzled with Chocolate Sauce or Caramel: For a touch of decadence, drizzle your banana ice cream with homemade or store-bought chocolate sauce, caramel sauce, or even a date caramel for a healthier option.
- As a Base for Smoothies: Blend banana ice cream with milk, plant-based milk, or juice to create a thicker, creamier, and naturally sweetened smoothie.
- Layered in Parfaits: Create beautiful and layered parfaits by alternating scoops of banana ice cream with granola, yogurt (dairy or plant-based), fresh fruit, and a drizzle of honey or maple syrup.
- Paired with Granola: Serve a scoop of banana ice cream alongside a bowl of your favorite granola for a delightful breakfast or brunch treat.
- Accompanied by Cookies or Brownies: For a more indulgent dessert, serve banana ice cream with homemade or store-bought cookies (like oatmeal cookies or chocolate chip cookies) or warm brownies.
- With a Sprinkle of Spices: Enhance the flavor profile by sprinkling a dash of cinnamon, nutmeg, or cardamom on top.
- Make it a Sundae: Go all out and create a banana ice cream sundae with layers of toppings like whipped cream (dairy or coconut), chocolate syrup, nuts, cherries, and sprinkles!
The key is to experiment and find your favorite combinations. Banana ice cream is a versatile base that pairs well with a wide range of flavors and textures, so have fun and get creative with your servings!
Additional Tips for Perfect Banana Ice Cream: Pro-Level Results
Want to take your banana ice cream game to the next level? Here are some additional tips and tricks to ensure you achieve perfect results every time:
- Use Very Ripe Bananas – Seriously! This cannot be stressed enough. The riper the bananas, the sweeter, creamier, and more flavorful your ice cream will be. Overripe bananas with brown spots are ideal. They are naturally sweeter and softer, which translates to a better ice cream texture and taste.
- Freeze Banana Slices in a Single Layer: Avoid clumping by freezing the banana slices in a single layer on a baking sheet. This prevents them from sticking together and ensures they freeze individually, making blending much easier and resulting in a smoother texture.
- Use a Powerful Blender or Food Processor: While you can make banana ice cream with a less powerful blender, a high-speed blender or a food processor will yield the best results in terms of texture and speed. A powerful machine will be able to handle the frozen bananas more efficiently and create a smoother, creamier ice cream.
- Don’t Add Too Much Liquid (Unless Necessary): Resist the urge to add liquid unless your blender is truly struggling. Adding too much milk or plant-based milk will make your ice cream less thick and more like a smoothie. Start with no liquid and only add a tablespoon or two if absolutely needed to help the blending process.
- Experiment with Flavors and Extracts: Don’t be afraid to get creative with flavors! Experiment with different extracts like almond extract, peppermint extract, or even coffee extract. You can also add spices like ginger, cloves, or cardamom for unique flavor profiles.
- Store Leftovers Properly (If You Have Any!): While banana ice cream is best served fresh, you can store leftovers in a freezer-safe container. However, it will become quite hard when frozen solid. To soften it up for serving later, let it thaw at room temperature for about 10-15 minutes before scooping.
- Thaw Slightly if Too Hard After Freezing: If you have frozen your banana ice cream for a longer period and it becomes too hard to scoop, simply let it thaw at room temperature for a few minutes to soften slightly before serving. Microwaving is not recommended as it can melt it unevenly.
- Get Creative with Toppings and Mix-ins: Have fun with toppings and mix-ins! Think beyond the basics and try adding toasted coconut flakes, chopped dates, chopped nuts, granola, different types of chocolate chips, fruit compotes, or even a drizzle of nut butter. The possibilities are endless!
Frequently Asked Questions (FAQ) About Banana Ice Cream
Still have questions about banana ice cream? Here are some frequently asked questions to help you master this simple and delicious treat:
Q1: What exactly is banana ice cream?
A: Banana ice cream, often referred to as “nice cream,” is a healthy and dairy-free alternative to traditional ice cream made primarily from frozen bananas. When blended, frozen bananas transform into a creamy, smooth, and ice cream-like texture without the need for added cream, sugar, or dairy.
Q2: Is banana ice cream actually healthy?
A: Yes, banana ice cream is a healthy dessert option! It’s naturally sweetened by the bananas, high in fiber and potassium, and lower in calories and fat compared to traditional ice cream. It’s also dairy-free and vegan, making it suitable for various dietary needs. It’s a great way to satisfy sweet cravings in a healthier way.
Q3: Can I make banana ice cream without a food processor or high-speed blender?
A: While a high-speed blender or food processor is recommended for the smoothest texture, you can still make banana ice cream with a regular blender. You might need to stop and scrape down the sides more frequently and add a tiny amount of liquid (milk or plant-based milk) to help it blend. The texture might be slightly less smooth, but it will still be delicious.
Q4: How long does banana ice cream last in the freezer?
A: Banana ice cream is best enjoyed fresh. However, you can store leftovers in a freezer-safe container for up to a week. Keep in mind that it will become very hard when frozen solid. You’ll need to let it thaw for 10-15 minutes at room temperature before serving to soften it up. The texture might slightly change after freezing and thawing, becoming a bit icier.
Q5: Can I add other fruits to banana ice cream?
A: Absolutely! Adding other fruits like berries (strawberries, blueberries, raspberries), mango, or peaches is a fantastic way to customize your banana ice cream. You can blend them in with the frozen bananas or fold them in after blending for chunks of fruit. Frozen fruits will help thicken the ice cream even further.
Q6: Can I use unripe or slightly green bananas?
A: It’s best to use ripe or overripe bananas for banana ice cream. Unripe or green bananas will not be as sweet and won’t blend into as creamy a texture. Ripe bananas have a higher sugar content and a softer texture, which are essential for achieving that ice cream-like consistency and sweetness.
Q7: How do I prevent my banana ice cream from becoming icy after freezing?
A: Banana ice cream is best served fresh for the creamiest texture. However, if you do freeze it for later, try to consume it within a few days. Freezing for extended periods can lead to ice crystal formation. Adding a small amount of fat, like a tablespoon of nut butter, can help improve the texture and reduce iciness when freezing. Also, thawing slightly before serving helps.
Q8: What are some good flavor combinations to try with banana ice cream?
A: The flavor possibilities are endless! Some popular and delicious flavor combinations include:
- Chocolate Peanut Butter: Add peanut butter and cocoa powder or chocolate chips.
- Cinnamon Spice: Add cinnamon, nutmeg, and a pinch of ginger.
- Berry Swirl: Swirl in berry puree or fold in chopped berries.
- Coffee Caramel: Add coffee extract and caramel sauce or date caramel.
- Tropical Delight: Add coconut extract and pineapple or mango chunks.
- Mint Chocolate Chip: Add peppermint extract and mini chocolate chips.
Banana Ice Cream Treat Recipe
Ingredients
This recipe is wonderfully simple, requiring just a handful of ingredients, most of which you probably already have on hand. The beauty of this banana ice cream lies in its minimalist approach, letting the natural flavors shine. Here’s what you’ll need to create this frozen wonder:
- Ripe Bananas: The star of the show! You’ll need 3-4 large, ripe bananas per serving (adjust based on your desired quantity). The riper the banana, the sweeter and creamier your ice cream will be. Look for bananas with plenty of brown spots – these are at their peak ripeness and will provide the best flavor and texture. Avoid using green or underripe bananas, as they won’t blend as smoothly and will lack the natural sweetness needed for that ice cream-like taste.
- Optional: Vanilla Extract: A splash of vanilla extract (about 1 teaspoon) enhances the overall flavor profile, adding a warm, comforting note that complements the banana beautifully. While optional, it’s highly recommended for an extra layer of deliciousness. Pure vanilla extract is preferred for the best flavor.
- Optional: Cinnamon: For a touch of warmth and spice, a pinch of ground cinnamon (about ¼ teaspoon) works wonders. Cinnamon pairs exceptionally well with bananas, creating a cozy and inviting flavor. Ceylon cinnamon, known for its delicate flavor, is a great choice, but any good quality ground cinnamon will do.
- Optional: Peanut Butter: If you’re a peanut butter lover, adding a tablespoon or two of creamy peanut butter can transform your banana ice cream into a decadent treat. The salty, nutty notes of peanut butter create a fantastic contrast to the sweetness of the banana. Choose a natural peanut butter without added sugars or oils for a healthier option.
- Optional: Chocolate Chips or Cacao Nibs: For a bit of indulgence and texture, consider adding a handful of mini chocolate chips or cacao nibs. Dark chocolate chips or cacao nibs offer a slightly bitter counterpoint to the sweetness, while milk chocolate chips will amplify the sweetness. Cacao nibs provide a more intense chocolate flavor and a satisfying crunch.
- Optional: Berries (Fresh or Frozen): Adding a handful of fresh or frozen berries like strawberries, blueberries, or raspberries introduces a burst of fruity freshness and vibrant color. Berries not only add flavor but also boost the nutritional value of your banana ice cream. Frozen berries can also help to thicken the ice cream further.
- Optional: Milk or Plant-Based Milk (Only if Necessary): In most cases, you won’t need any liquid. However, if your blender or food processor is struggling to blend the frozen bananas, you can add a tablespoon or two of milk or plant-based milk (almond milk, oat milk, etc.) to help it along. Add liquid sparingly, as too much can make your ice cream less thick and creamy.
Instructions
Creating this banana ice cream is surprisingly straightforward and requires minimal effort. Follow these simple steps to transform frozen bananas into a creamy, dreamy dessert:
- Peel and Slice the Bananas: Start by peeling your ripe bananas. Slice them into roughly ½-inch thick coins. Slicing before freezing helps them freeze more evenly and makes blending easier later on. Don’t worry about perfect slices; just aim for relatively uniform pieces.
- Freeze the Banana Slices: The key to achieving the perfect ice cream texture is to freeze the banana slices properly. Spread the banana slices in a single layer on a baking sheet lined with parchment paper or a silicone mat. This prevents them from sticking together and freezing into a solid block. Place the baking sheet in the freezer and freeze for at least 2 hours, or ideally overnight. The bananas should be completely frozen solid before you proceed to the next step. Freezing them overnight ensures they are rock solid and ready to be transformed into ice cream.
- Blend the Frozen Bananas: Once the banana slices are frozen solid, transfer them to a high-speed blender or a food processor. If using a blender, you might need to stop and scrape down the sides a few times during the blending process to ensure everything gets evenly blended. A food processor often works slightly better as its wider base can handle the frozen bananas more effectively.
- Blend Until Smooth and Creamy: Now, the magic begins! Start blending the frozen banana slices. Initially, they will crumble and look like, well, frozen bananas. Continue blending. Be patient, this is crucial! As you keep blending, the bananas will start to break down further, then clump together, and eventually, they will transform into a smooth, creamy, soft-serve ice cream consistency. This process can take a few minutes, so don’t be discouraged if it doesn’t happen instantly. Keep blending until you reach that perfect, smooth and creamy texture, similar to soft-serve ice cream.
- Add Optional Ingredients (If Desired): Once you’ve achieved the creamy banana ice cream base, this is the time to add any of your chosen optional ingredients. If you’re adding vanilla extract, cinnamon, or peanut butter, add them now and blend for a few more seconds until they are fully incorporated. For chocolate chips, cacao nibs, or berries, you can either blend them in for a more uniform flavor and color, or gently fold them in by hand after blending for pockets of texture and flavor. Folding them in will give you chunks of chocolate or berries throughout your ice cream.
- Serve Immediately or Freeze for Later (Optional): Banana ice cream is at its absolute best when served immediately after blending, as it will have a perfect soft-serve consistency. If you prefer a firmer, more scoopable ice cream, you can transfer it to a freezer-safe container and freeze for another 1-2 hours. Freezing for longer will make it harder, more like traditional ice cream. If you do freeze it for longer periods, you might need to let it thaw for a few minutes at room temperature before scooping to soften it slightly.
- Enjoy Your Delicious and Healthy Banana Ice Cream Treat! Serve your banana ice cream immediately in bowls or cones. Get creative with toppings (see “How to Serve” section below) and enjoy the delightful and healthy treat you’ve just created!
Tips for Perfect Banana Ice Cream Texture:
- Ripeness is Key: Use very ripe bananas for the best sweetness and creamy texture.
- Freeze Solid: Ensure the banana slices are completely frozen solid before blending.
- Patience is a Virtue: Don’t rush the blending process. It takes time for the frozen bananas to transform into ice cream.
- Don’t Over-Blend if Adding Mix-ins: If you are adding mix-ins like chocolate chips or berries and want them to remain chunky, fold them in after blending the base, instead of blending them in completely.
- Adjust Consistency with Liquid (Sparingly): Only add a tablespoon or two of liquid (milk or plant-based milk) if your blender is struggling, and add it very sparingly to avoid making the ice cream too liquidy.
Nutrition
- Serving Size: one normal portion
- Calories: 120
- Fat: 1 gram