")

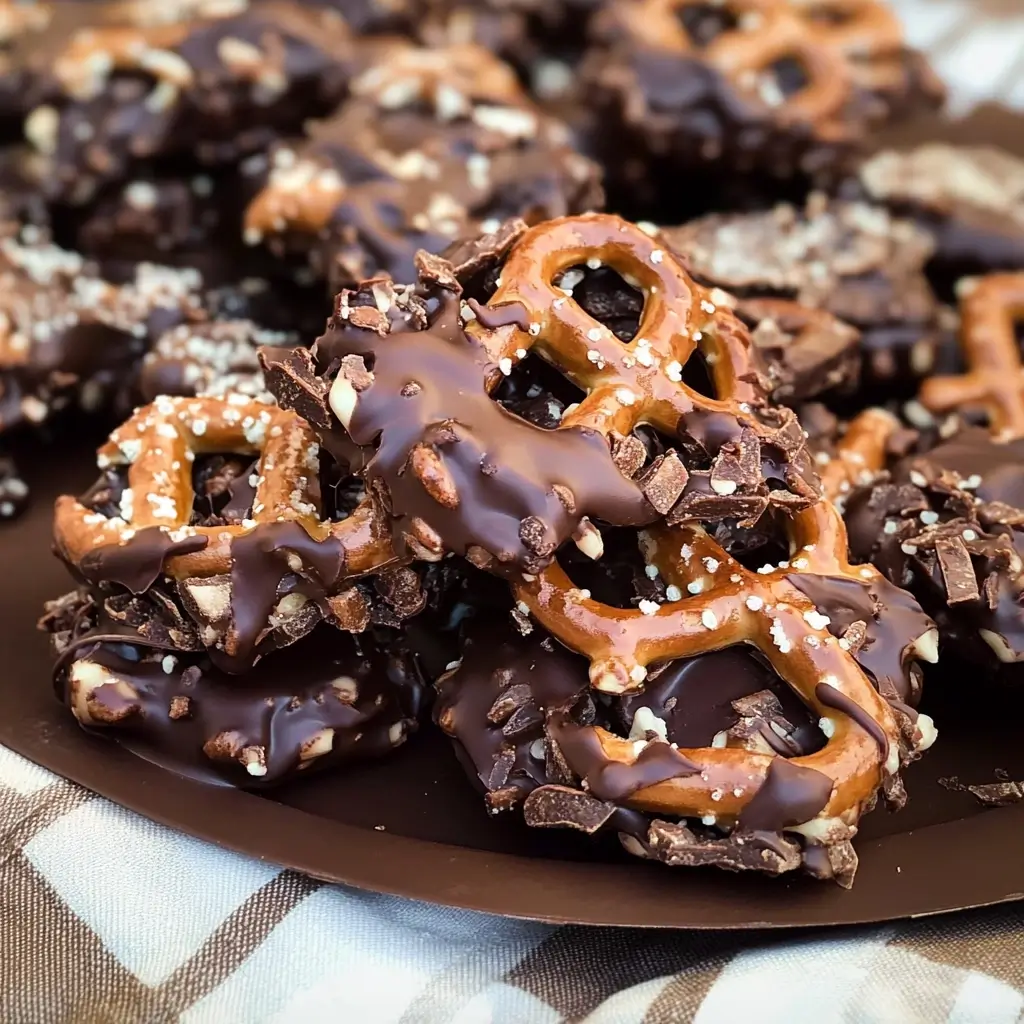

Our house has a few non-negotiable truths: socks will always go missing, someone will always forget to take out the trash, and if there’s a sweet and salty snack in the vicinity, it will disappear at an alarming rate. That’s precisely what happened the first time I whipped up a batch of these Chocolate Pretzel Clusters. I’d seen similar treats at bakeries and holiday parties, always looking so inviting, and I figured, “How hard can they be?” The answer, my friends, is “delightfully easy!” I remember my youngest hovering around the kitchen, eyes wide with anticipation as the smell of melting chocolate filled the air. My teenager, usually glued to a screen, actually emerged to investigate. The moment these clusters were set and ready, it was a free-for-all. The satisfying crunch of the pretzels, the smooth, decadent chocolate, that perfect marriage of sweet and salty – it was an instant hit. These Chocolate Pretzel Clusters have since become a staple for movie nights, a go-to for potlucks (they’re always the first to vanish!), and a much-requested homemade gift during the holidays. They’re simple enough for a weeknight indulgence but special enough to share with guests. The beauty of this recipe lies in its simplicity and the utterly addictive results. Trust me, once you try them, you’ll understand why they’ve earned a permanent spot in our family’s recipe rotation.
Ingredients
To create these irresistibly crunchy and decadent Chocolate Pretzel Clusters, you’ll need a few simple yet crucial components. Each ingredient plays a vital role in achieving that perfect balance of flavor and texture that makes these treats so addictive.
- 10 ounces (approx. 280g) Good Quality Semi-Sweet Chocolate Chips or Chopped Chocolate Bar: This is the star of the show. Using good quality chocolate makes a significant difference in the final taste and melt-in-your-mouth texture. Semi-sweet provides a wonderful balance, not too bitter and not overly sweet, complementing the salty pretzels perfectly. You can also use dark chocolate (60-70% cacao) for a more intense flavor or milk chocolate if you prefer a sweeter cluster.
- 1 tablespoon Coconut Oil or Vegetable Shortening (optional, but recommended): This ingredient is a little secret weapon for achieving a smoother, glossier chocolate coating that sets beautifully. Coconut oil adds a very subtle hint of flavor, while vegetable shortening is neutral. It helps the chocolate melt more evenly and gives the clusters a professional-looking sheen.
- 4 cups (approx. 200-220g) Small Pretzel Twists or Mini Pretzel Rods, roughly broken: The salty, crunchy backbone of our clusters! Small pretzel twists or mini rods work best. You’ll want to break them into smaller, bite-sized pieces – about 1/2 to 1 inch long. This ensures they mix well with the chocolate and create nicely proportioned clusters. The slight variation in pretzel piece size adds to the rustic charm.
- 1/2 cup Chopped Nuts (e.g., pecans, walnuts, or almonds, optional): For an extra layer of crunch and nutty flavor, consider adding chopped nuts. Toasted nuts will offer an even deeper, more complex taste. This is entirely optional, so feel free to omit if you have nut allergies or simply prefer the classic chocolate-pretzel combination.
- 1/2 cup Toffee Bits (optional): These add a delightful buttery, caramelized crunch and an extra dimension of sweetness. If you’re a fan of toffee, this addition takes the clusters to another level of indulgence.
- Sprinkles or Sea Salt Flakes for Garnish (optional): A final flourish! Festive sprinkles can make these clusters perfect for holidays or celebrations. A light sprinkle of flaky sea salt on top before the chocolate sets enhances the sweet-salty contrast beautifully, appealing to a more gourmet palate.
Instructions
Creating these delectable Chocolate Pretzel Clusters is a straightforward process, requiring minimal baking skills but delivering maximum flavor. Follow these steps carefully for perfect clusters every time.
- Prepare Your Workspace and Pretzels:
- Line one or two large baking sheets with parchment paper or wax paper. This is crucial for preventing the clusters from sticking and makes cleanup a breeze. Ensure you have enough flat space in your refrigerator or a cool room for the baking sheets later.
- If using whole pretzel twists or rods, place them in a large, sturdy zip-top bag. Gently crush them with a rolling pin, the bottom of a heavy mug, or your hands. You’re aiming for pieces roughly 1/2 to 1 inch in size. Avoid crushing them into dust; you want recognizable pretzel bits for texture. If using pre-broken pretzel pieces, you can skip this step. Place the broken pretzel pieces into a large mixing bowl.
- If you’re using optional additions like chopped nuts or toffee bits, add them to the bowl with the pretzel pieces now. This ensures they are evenly distributed when mixed with the chocolate. Gently toss them together.
- Melt the Chocolate:
- Double Boiler Method (Recommended for best results): Fill a small saucepan with about an inch of water and bring it to a gentle simmer over medium-low heat. Place the semi-sweet chocolate chips (or chopped chocolate) and the optional coconut oil or vegetable shortening into a heatproof bowl that fits snugly over the saucepan without touching the water. Stir frequently with a rubber spatula until the chocolate is about 75% melted. Remove from heat; the residual heat will melt the remaining chocolate as you continue to stir. Stir until completely smooth and glossy. This gentle melting method prevents the chocolate from scorching.
- Microwave Method: Place the chocolate chips (or chopped chocolate) and optional coconut oil or shortening in a microwave-safe bowl. Microwave on 50% power (medium) for 30-second intervals, stirring well after each interval. Be very careful not to overheat the chocolate, as it can seize and become grainy. Continue until the chocolate is almost fully melted, then remove and stir until completely smooth.
- Combine Chocolate and Pretzels:
- Pour the melted chocolate mixture over the pretzel pieces (and any nuts or toffee bits) in the large mixing bowl.
- Using a rubber spatula or a large spoon, gently fold and stir the mixture until all the pretzel pieces are thoroughly coated with chocolate. Work relatively quickly, as the chocolate will begin to set, but be gentle enough not to break the pretzels further into crumbs. Ensure every nook and cranny of the pretzel pieces gets a good coating.
- Form the Clusters:
- Using two spoons or a small cookie scoop (about 1 to 1.5 tablespoons in size), drop spoonfuls of the chocolate-pretzel mixture onto the prepared parchment-lined baking sheets.
- Arrange the clusters about an inch apart to prevent them from merging as they set. Don’t worry about making them perfectly uniform; their rustic, irregular shapes are part of their charm. You can make them as small or as large as you like, though bite-sized clusters are generally popular.
- Add Optional Toppings (If Using):
- If you’re using sprinkles or flaky sea salt for garnish, sprinkle them over the clusters immediately after spooning them onto the baking sheets, while the chocolate is still wet. This will ensure the toppings adhere properly.
- Chill and Set:
- Place the baking sheets with the clusters into the refrigerator for at least 30 minutes, or until the chocolate is completely firm and set. If your kitchen is very cool, you might be able to let them set at room temperature, but this will take longer (1-2 hours). Chilling speeds up the process and ensures a good snap.
- Once firm, the Chocolate Pretzel Clusters can be gently peeled off the parchment paper.
- Storage:
- Store the finished clusters in an airtight container at room temperature for up to one week, or in the refrigerator for up to two weeks (though they are best enjoyed sooner for optimal crunch). If storing in the refrigerator, let them sit at room temperature for a few minutes before serving, as the chocolate can be quite hard when chilled. If layering them in a container, you might want to place a sheet of parchment paper between layers to prevent sticking, especially in warmer environments.
Enjoy your homemade sweet and salty delights!
Nutrition Facts
Understanding the nutritional aspect of these Chocolate Pretzel Clusters can help you enjoy them as part of a balanced lifestyle. Please note that these values are estimates and can vary based on the specific brands of ingredients used, the exact size of the clusters, and any optional additions.
- Servings: This recipe typically yields approximately 24-30 clusters, depending on the size you make them.
- Calories Per Serving (per cluster): Approximately 100-150 calories. This can fluctuate based on the type of chocolate (milk chocolate will be higher in calories than dark), the amount of chocolate per cluster, and whether nuts or toffee bits are included.
Here are a few key nutrition facts with brief descriptions:
- Carbohydrates (approx. 10-15g per cluster): The primary source of carbohydrates comes from the pretzels (flour and starches) and the sugar content in the chocolate. Carbohydrates are the body’s main source of energy. The pretzels contribute complex carbohydrates, while the chocolate adds simpler sugars.
- Fat (approx. 6-10g per cluster): A significant portion of the fat content comes from the cocoa butter in the chocolate and any added coconut oil or shortening. If nuts are included, they will also contribute healthy unsaturated fats. Fats are essential for nutrient absorption and providing concentrated energy. Semi-sweet or dark chocolate generally contains more cocoa butter compared to milk chocolate.
- Sodium (approx. 50-100mg per cluster): Pretzels are inherently salty, contributing the majority of the sodium in this treat. Sodium is an essential mineral that helps maintain fluid balance and nerve function, but it’s often consumed in excess, so moderation is key. The optional sprinkle of sea salt will slightly increase this amount.
- Sugar (approx. 7-12g per cluster): Most of the sugar comes from the chocolate itself. The amount can vary widely depending on whether you use milk, semi-sweet, or dark chocolate (dark chocolate generally has less sugar). Toffee bits, if added, will also contribute to the sugar content.
- Protein (approx. 1-2g per cluster): While not a significant source of protein, small amounts are contributed by the flour in the pretzels and, to a lesser extent, the chocolate and nuts (if used). Protein is crucial for building and repairing tissues in the body.
Enjoy these Chocolate Pretzel Clusters as a delightful treat. Being mindful of portion sizes allows you to savor their deliciousness without overindulging. They are, after all, a confection meant for pleasure!
Preparation Time
Crafting these delightful Chocolate Pretzel Clusters is a relatively quick and enjoyable process, perfect for when you need a speedy sweet fix or a last-minute treat for guests. Here’s a breakdown of the time involved:
- Active Preparation Time: Approximately 15-20 minutes.
- This includes gathering and measuring your ingredients, which might take about 5 minutes.
- If you need to break your pretzels, this will add another 2-3 minutes.
- Melting the chocolate carefully, whether using a double boiler or microwave, typically takes about 5-7 minutes, including stirring.
- Mixing the melted chocolate with the pretzels and any other add-ins, and then spooning the clusters onto baking sheets, will take another 5-8 minutes. Your speed and efficiency here can vary slightly.
- Chilling/Setting Time: Approximately 30-60 minutes (in the refrigerator).
- Once the clusters are formed, they need time for the chocolate to solidify completely. In a standard refrigerator, this usually takes about 30 minutes. If you make larger clusters, or if your refrigerator isn’t very cold, it might take closer to an hour.
- If you opt to let them set at room temperature (only recommended in a cool, dry environment), this time can extend to 1-2 hours or even longer, depending on the ambient temperature.
- Total Time: Approximately 45 minutes to 1 hour and 20 minutes.
- From start to finish, including the minimum chilling time, you can have these Chocolate Pretzel Clusters ready to enjoy in under an hour if you’re efficient and use the refrigerator for setting. If you include a longer chilling time or are more leisurely in your preparation, it might stretch a bit longer.
The beauty of this recipe is that much of the “time” involved is passive chilling time, freeing you up to do other things while your delicious treats are firming up. It’s a fantastic low-effort, high-reward recipe!
How to Serve
Chocolate Pretzel Clusters are incredibly versatile and can be served in a multitude of ways, suiting various occasions and preferences. Their delightful combination of sweet, salty, and crunchy makes them a crowd-pleaser. Here are some creative and enjoyable ways to serve them:
- On a Dessert Platter:
- Arrange the clusters artfully on a platter alongside other small desserts like mini cookies, brownie bites, or fresh fruit. This creates an inviting spread for parties, gatherings, or family dessert time.
- Consider a tiered dessert stand for a more elegant presentation, especially for special occasions like birthdays or holiday celebrations.
- As Party Favors or Gifts:
- Package a few clusters in small cellophane bags tied with a festive ribbon. These make charming and delicious party favors for weddings, baby showers, or birthday parties.
- Fill small decorative boxes or mason jars with the clusters for thoughtful homemade gifts during the holidays, as thank-you gestures, or for teacher appreciation. Add a personalized tag for an extra special touch.
- For Movie Nights or Game Nights:
- Serve a generous bowl of Chocolate Pretzel Clusters as the perfect snack to munch on while watching a movie or enjoying a game night with family or friends. They are easy to eat by hand and less messy than some other snacks.
- Offer individual small bowls or ramekins for each person to prevent communal grabbing and ensure everyone gets their fair share.
- With Coffee or Tea:
- A couple of Chocolate Pretzel Clusters make a wonderful accompaniment to a morning coffee or afternoon tea. The bitterness of the coffee or the warmth of the tea beautifully complements the sweet and salty flavors of the clusters.
- Serve them on a small saucer next to the cup for a café-style treat at home.
- As an Ice Cream Topping:
- Roughly chop a few clusters and sprinkle them over a bowl of your favorite ice cream (vanilla, chocolate, or salted caramel would be particularly delicious!). This adds a fantastic crunchy texture and chocolatey-salty flavor.
- They can also be a great addition to a sundae bar, allowing guests to customize their own ice cream creations.
- Packed in Lunchboxes:
- Include one or two clusters in lunchboxes as a special treat for kids or adults. They provide a delightful sweet and salty pick-me-up during the day.
- Ensure they are packed in a way that they won’t get crushed, perhaps in a small, rigid container.
- Holiday Treat Trays:
- Chocolate Pretzel Clusters are a fantastic addition to any holiday cookie or treat tray. Their rustic appearance and irresistible flavor profile make them stand out.
- Garnish with holiday-themed sprinkles (red and green for Christmas, pastels for Easter, orange and black for Halloween) to make them even more festive.
- For Casual Snacking:
- Simply keep a container of them on hand for when a sweet and salty craving strikes. They are a satisfying and relatively quick snack to grab.
No matter how you choose to serve them, these Chocolate Pretzel Clusters are sure to be a hit. Their ease of preparation and universally loved flavor combination make them a go-to treat for any occasion, or no occasion at all!
Additional Tips
To help you perfect your Chocolate Pretzel Clusters and even customize them to your liking, here are eight additional tips. These suggestions cover everything from ingredient choices to storage, ensuring your clusters are sensational every single time.
- Choose Your Chocolate Wisely: The quality and type of chocolate you use will significantly impact the final flavor. For a classic, well-balanced taste, good quality semi-sweet chocolate chips or baking bars (around 50-60% cacao) are excellent. If you prefer a richer, more intense chocolate flavor, opt for dark chocolate (60-72% cacao). For a sweeter, creamier cluster, milk chocolate is a great choice, though it can be a bit softer at room temperature. You can even use white chocolate for a different aesthetic and flavor profile, or try a swirl of two types of chocolate for a marbled effect. Always use chocolate you enjoy eating on its own.
- Don’t Over-Crush the Pretzels: The goal is to have noticeable pretzel pieces that provide a substantial crunch, not pretzel dust. Aim for pieces that are roughly 1/2 to 1 inch in size. If the pieces are too small, the clusters will lack that satisfying textural contrast. If they’re too large, the clusters might be difficult to form and eat. A gentle crush in a zip-top bag with a rolling pin or the bottom of a glass usually does the trick.
- Toast Your Nuts (If Using): If you decide to add nuts like pecans, walnuts, or almonds, toasting them beforehand will greatly enhance their flavor. Spread the chopped nuts on a baking sheet and toast in a preheated oven at 350°F (175°C) for about 5-8 minutes, or until fragrant and lightly browned. Keep a close eye on them as nuts can burn quickly. Let them cool completely before adding them to the pretzel mixture.
- Temperature Control for Chocolate is Key: When melting chocolate, avoid extreme heat and any contact with water (unless it’s part of a recipe like ganache, which this isn’t). Overheating can cause chocolate to seize, becoming thick, lumpy, and unusable. Using a double boiler provides gentle, even heat. If microwaving, use short intervals at 50% power and stir frequently. If your chocolate does seize, sometimes stirring in a tiny bit more melted fat (like coconut oil or shortening, 1/2 teaspoon at a time) can help salvage it, but prevention is best.
- Experiment with Add-Ins: Beyond nuts and toffee bits, get creative! Consider adding things like:
- Mini M&M’s or other small chocolate candies for color and extra chocolatey goodness.
- Dried fruit like cranberries or chopped apricots for a chewy texture and tartness.
- Shredded coconut (toasted or untoasted) for a tropical flair.
- A pinch of cinnamon or a tiny dash of cayenne pepper in the melted chocolate for a warming spice or a hint of heat.
- Crushed potato chips for an extra salty, crunchy element.
- Proper Storage for Lasting Freshness: Store your Chocolate Pretzel Clusters in an airtight container to protect them from air and moisture, which can make the pretzels stale. At cool room temperature, they should last for about a week. If your home is warm, or for longer storage (up to two weeks), keep them in the refrigerator. If refrigerated, let them sit at room temperature for 10-15 minutes before serving for the best texture, as the chocolate can become quite hard when cold.
- Make Them Festive with Decorations: Tailor your clusters to any holiday or occasion with sprinkles. Use red and green for Christmas, pastel colors for Easter, orange and black for Halloween, or team colors for a game day party. A drizzle of a contrasting colored melted chocolate (e.g., white chocolate over dark chocolate clusters, or vice-versa) after they’ve partially set can also add a professional and appealing touch.
- Don’t Rush the Setting Process: While it’s tempting to dig in right away, allowing the clusters to set completely is crucial. If they aren’t fully firm, they can be messy and fall apart. Chilling in the refrigerator is the quickest way to achieve this. Be patient; the perfectly crisp, firm Chocolate Pretzel Clusters will be worth the wait! If you’re short on freezer space, a very cool room or even a brief stint in the freezer (10-15 minutes, but watch for condensation) can work, but the refrigerator is generally preferred for even setting.
By keeping these tips in mind, you’ll not only master the basic recipe but also have the confidence to experiment and create Chocolate Pretzel Clusters that are uniquely yours and consistently delicious.
FAQ Section
Here are answers to some frequently asked questions about making Chocolate Pretzel Clusters. These should help clarify any uncertainties and ensure your treat-making experience is smooth and successful.
- Q: Can I use white chocolate or milk chocolate instead of semi-sweet?
- A: Absolutely! You can easily substitute white chocolate or milk chocolate for semi-sweet chocolate in this recipe. Milk chocolate will result in a sweeter, creamier cluster, while white chocolate will offer a distinct vanilla-like sweetness and a different aesthetic. Keep in mind that milk and white chocolates can sometimes be a bit softer at room temperature and may melt more easily than semi-sweet or dark chocolate, so chilling them thoroughly and storing them in a cool place is even more important. The melting process is similar, but always be gentle to avoid scorching.
- Q: My chocolate seized while melting! What did I do wrong, and can I fix it?
- A: Chocolate typically seizes (becomes thick, grainy, and unworkable) due to one of two reasons: overheating or contact with a tiny amount of moisture (like a drop of water). To prevent this, melt chocolate slowly and gently, stirring frequently. If using a double boiler, ensure the bottom of the bowl doesn’t touch the simmering water. If it has already seized, you might be able to salvage it for this recipe by vigorously stirring in a very small amount (1/2 to 1 teaspoon at a time) of melted vegetable shortening, coconut oil, or a neutral-flavored vegetable oil. This sometimes helps to smooth it out, but it may not return to its original perfect texture.
- Q: How long will these Chocolate Pretzel Clusters stay fresh? And what’s the best way to store them?
- A: When stored properly in an airtight container, Chocolate Pretzel Clusters will stay fresh for about one week at cool room temperature. If your home is warm, or if you want them to last longer, you can store them in the refrigerator for up to two weeks. The pretzels might lose a tiny bit of their crispness over time, especially in humid conditions. If refrigerated, allow them to sit at room temperature for about 10-15 minutes before serving, as the chocolate will be quite hard.
- Q: Can I make these gluten-free?
- A: Yes, you can easily adapt this recipe to be gluten-free! Simply substitute the regular pretzels with your favorite brand of gluten-free pretzels. Ensure all other ingredients, particularly the chocolate and any add-ins like toffee bits, are also certified gluten-free, as some may contain hidden gluten. The process remains the same.
- Q: What’s the best type of pretzel to use?
- A: Small, thin pretzel twists or mini pretzel rods are generally preferred for this recipe. They provide a good chocolate-to-pretzel ratio and a satisfying crunch. Thicker pretzels can also be used, but you might need more chocolate to coat them adequately. Salted pretzels are standard, as the saltiness is key to the flavor profile. Avoid overly seasoned or flavored pretzels unless you’re intentionally going for a unique flavor combination.
- Q: Why are my clusters not setting properly, or why are they soft at room temperature?
- A: This could be due to a few factors. Firstly, ensure you’re giving them enough chilling time in the refrigerator – at least 30 minutes, or until completely firm. Secondly, if your kitchen is very warm or humid, the chocolate may struggle to set fully at room temperature or may soften quickly. Using chocolate with a higher cacao percentage (like dark or semi-sweet) tends to set firmer than milk or some white chocolates. Adding the optional tablespoon of coconut oil or shortening can help with a smoother melt and good set, but too much fat can also lead to softer results.
- Q: Can I add caramel to these clusters?
- A: Yes, adding caramel would be a delicious variation! You could drizzle melted caramel over the clusters after they’ve been formed and before the chocolate fully sets. Alternatively, you could mix in chewy caramel bits (like those used for baking) with the pretzels before adding the chocolate, or even place a small, soft caramel in the center of each cluster as you form it. If using liquid caramel sauce, ensure it’s a thick variety so it doesn’t make the clusters too sticky or prevent them from setting.
- Q: Can I freeze Chocolate Pretzel Clusters?
- A: Yes, you can freeze Chocolate Pretzel Clusters for longer storage, up to 2-3 months. To do so, first let them set completely. Then, place them in a single layer on a baking sheet and freeze until solid. Once frozen, transfer them to a freezer-safe airtight container or zip-top bag, placing parchment paper between layers to prevent sticking. Thaw them in the refrigerator overnight or at room temperature for a couple of hours before serving. Be aware that chocolate can sometimes develop a slight “bloom” (a whitish coating) after freezing and thawing due to temperature changes, but this doesn’t affect the taste, only the appearance. The pretzels might also lose some of their crispness.
Chocolate Pretzel Clusters
Ingredients
To create these irresistibly crunchy and decadent Chocolate Pretzel Clusters, you’ll need a few simple yet crucial components. Each ingredient plays a vital role in achieving that perfect balance of flavor and texture that makes these treats so addictive.
- 10 ounces (approx. 280g) Good Quality Semi-Sweet Chocolate Chips or Chopped Chocolate Bar: This is the star of the show. Using good quality chocolate makes a significant difference in the final taste and melt-in-your-mouth texture. Semi-sweet provides a wonderful balance, not too bitter and not overly sweet, complementing the salty pretzels perfectly. You can also use dark chocolate (60-70% cacao) for a more intense flavor or milk chocolate if you prefer a sweeter cluster.
- 1 tablespoon Coconut Oil or Vegetable Shortening (optional, but recommended): This ingredient is a little secret weapon for achieving a smoother, glossier chocolate coating that sets beautifully. Coconut oil adds a very subtle hint of flavor, while vegetable shortening is neutral. It helps the chocolate melt more evenly and gives the clusters a professional-looking sheen.
- 4 cups (approx. 200-220g) Small Pretzel Twists or Mini Pretzel Rods, roughly broken: The salty, crunchy backbone of our clusters! Small pretzel twists or mini rods work best. You’ll want to break them into smaller, bite-sized pieces – about 1/2 to 1 inch long. This ensures they mix well with the chocolate and create nicely proportioned clusters. The slight variation in pretzel piece size adds to the rustic charm.
- 1/2 cup Chopped Nuts (e.g., pecans, walnuts, or almonds, optional): For an extra layer of crunch and nutty flavor, consider adding chopped nuts. Toasted nuts will offer an even deeper, more complex taste. This is entirely optional, so feel free to omit if you have nut allergies or simply prefer the classic chocolate-pretzel combination.
- 1/2 cup Toffee Bits (optional): These add a delightful buttery, caramelized crunch and an extra dimension of sweetness. If you’re a fan of toffee, this addition takes the clusters to another level of indulgence.
- Sprinkles or Sea Salt Flakes for Garnish (optional): A final flourish! Festive sprinkles can make these clusters perfect for holidays or celebrations. A light sprinkle of flaky sea salt on top before the chocolate sets enhances the sweet-salty contrast beautifully, appealing to a more gourmet palate.
Instructions
Creating these delectable Chocolate Pretzel Clusters is a straightforward process, requiring minimal baking skills but delivering maximum flavor. Follow these steps carefully for perfect clusters every time.
- Prepare Your Workspace and Pretzels:
- Line one or two large baking sheets with parchment paper or wax paper. This is crucial for preventing the clusters from sticking and makes cleanup a breeze. Ensure you have enough flat space in your refrigerator or a cool room for the baking sheets later.
- If using whole pretzel twists or rods, place them in a large, sturdy zip-top bag. Gently crush them with a rolling pin, the bottom of a heavy mug, or your hands. You’re aiming for pieces roughly 1/2 to 1 inch in size. Avoid crushing them into dust; you want recognizable pretzel bits for texture. If using pre-broken pretzel pieces, you can skip this step. Place the broken pretzel pieces into a large mixing bowl.
- If you’re using optional additions like chopped nuts or toffee bits, add them to the bowl with the pretzel pieces now. This ensures they are evenly distributed when mixed with the chocolate. Gently toss them together.
- Melt the Chocolate:
- Double Boiler Method (Recommended for best results): Fill a small saucepan with about an inch of water and bring it to a gentle simmer over medium-low heat. Place the semi-sweet chocolate chips (or chopped chocolate) and the optional coconut oil or vegetable shortening into a heatproof bowl that fits snugly over the saucepan without touching the water. Stir frequently with a rubber spatula until the chocolate is about 75% melted. Remove from heat; the residual heat will melt the remaining chocolate as you continue to stir. Stir until completely smooth and glossy. This gentle melting method prevents the chocolate from scorching.
- Microwave Method: Place the chocolate chips (or chopped chocolate) and optional coconut oil or shortening in a microwave-safe bowl. Microwave on 50% power (medium) for 30-second intervals, stirring well after each interval. Be very careful not to overheat the chocolate, as it can seize and become grainy. Continue until the chocolate is almost fully melted, then remove and stir until completely smooth.
- Combine Chocolate and Pretzels:
- Pour the melted chocolate mixture over the pretzel pieces (and any nuts or toffee bits) in the large mixing bowl.
- Using a rubber spatula or a large spoon, gently fold and stir the mixture until all the pretzel pieces are thoroughly coated with chocolate. Work relatively quickly, as the chocolate will begin to set, but be gentle enough not to break the pretzels further into crumbs. Ensure every nook and cranny of the pretzel pieces gets a good coating.
- Form the Clusters:
- Using two spoons or a small cookie scoop (about 1 to 1.5 tablespoons in size), drop spoonfuls of the chocolate-pretzel mixture onto the prepared parchment-lined baking sheets.
- Arrange the clusters about an inch apart to prevent them from merging as they set. Don’t worry about making them perfectly uniform; their rustic, irregular shapes are part of their charm. You can make them as small or as large as you like, though bite-sized clusters are generally popular.
- Add Optional Toppings (If Using):
- If you’re using sprinkles or flaky sea salt for garnish, sprinkle them over the clusters immediately after spooning them onto the baking sheets, while the chocolate is still wet. This will ensure the toppings adhere properly.
- Chill and Set:
-
- Place the baking sheets with the clusters into the refrigerator for at least 30 minutes, or until the chocolate is completely firm and set. If your kitchen is very cool, you might be able to let them set at room temperature, but this will take longer (1-2 hours). Chilling speeds up the process and ensures a good snap.
- Once firm, the Chocolate Pretzel Clusters can be gently peeled off the parchment paper.
Kitchen remodeling -
- Storage:
- Store the finished clusters in an airtight container at room temperature for up to one week, or in the refrigerator for up to two weeks (though they are best enjoyed sooner for optimal crunch). If storing in the refrigerator, let them sit at room temperature for a few minutes before serving, as the chocolate can be quite hard when chilled. If layering them in a container, you might want to place a sheet of parchment paper between layers to prevent sticking, especially in warmer environments.
Enjoy your homemade sweet and salty delights!
Nutrition
- Serving Size: one normal portion
- Calories: 150
- Sugar: 12g
- Sodium: 100mg
- Fat: 10g
- Carbohydrates: 15g
- Protein: 2g


