")


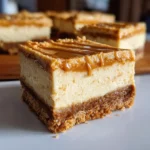
Of all the desserts that have graced my kitchen, few have disappeared with the same breathtaking speed as these Creamy Biscoff Cheesecake Bars. I first made them for a casual family get-together, thinking they’d be a nice, simple treat to have with coffee. I was wrong. They weren’t just “nice”; they were a phenomenon. I watched as eyes widened with the first bite, conversations paused, and a chorus of “What is this?” echoed around the room. My nephew, who usually only has eyes for chocolate, declared it the “best cookie cake thing ever.” The magic lies in the symphony of textures and flavors. The crust isn’t just a base; it’s a buttery, spiced foundation of crunchy Lotus Biscoff cookies. The filling is the star—impossibly smooth, velvety, and tangy, perfectly balancing the sweetness of the iconic cookie butter swirled within. And the topping? A generous layer of melted Biscoff spread, which hardens slightly in the fridge to create a soft, fudgy layer that melts in your mouth. These bars are more than a recipe; they’re a guaranteed showstopper, a secret weapon for potlucks, and the ultimate indulgence for a quiet afternoon. They have become a legendary treat in my house, and I’m so excited to share the recipe that will make them a legend in yours, too.
Ingredients
This recipe is broken down into three simple components: the crunchy crust, the velvety filling, and the luscious topping. Using high-quality, full-fat ingredients is key to achieving the perfect texture and flavor.
For the Buttery Biscoff Crust
- 250g (about 8.8 oz or 1 standard pack) Lotus Biscoff Cookies: These are the heart of the recipe. Their unique caramelized, slightly spicy flavor is irreplaceable and forms the perfect base.
- 100g (7 tablespoons) Unsalted Butter, melted: The butter acts as the glue that binds the cookie crumbs together, creating a firm, sliceable crust that doesn’t crumble apart.
For the Creamy Cheesecake Filling
- 680g (24 oz or three 8-oz blocks) Full-Fat Block Cream Cheese, softened to room temperature: This is non-negotiable for a rich, dense, and creamy cheesecake. Do not use whipped or low-fat cream cheese, as it will result in a runny filling. Bringing it to room temperature is crucial for a lump-free texture.
- 200g (1 cup) Powdered Sugar, sifted: Powdered sugar dissolves instantly into the cream cheese, ensuring a silky-smooth consistency without any graininess. Sifting prevents clumps.
- 250g (1 cup) Creamy Biscoff Spread (Cookie Butter): This is the star flavor. It gets mixed directly into the cheesecake batter to infuse every bite with that irresistible speculoos taste.
- 1 teaspoon Pure Vanilla Extract: Vanilla enhances the other flavors in the cheesecake, adding a layer of aromatic depth that complements the spiced cookie butter.
- 240ml (1 cup) Cold Heavy Whipping Cream: Whipped to stiff peaks, the heavy cream is folded into the filling to give it a light, airy, yet stable structure. The cold temperature helps it whip up faster and hold its shape.
For the Luscious Biscoff Topping
- 200g (¾ cup + 1 tablespoon) Creamy Biscoff Spread (Cookie Butter): This final layer provides an intense punch of Biscoff flavor and a beautiful, glossy finish.
- Optional: Extra Biscoff Cookies, crushed: For a decorative and crunchy garnish on top.
Instructions
Follow these step-by-step instructions carefully for flawless Biscoff cheesecake bars. The most important ingredient here is patience, especially during the chilling stages, which are essential for the bars to set properly.
Step 1: Prepare Your Baking Pan
First, prepare your 9×9 inch (23×23 cm) square baking pan. To ensure easy removal later, create a parchment paper “sling.” Cut two long strips of parchment paper. Lay one strip in the pan, pressing it down into the bottom and up the sides, leaving an overhang on two opposite ends. Lay the second strip perpendicular to the first, creating an overhang on the other two sides. This will allow you to lift the entire cheesecake out of the pan effortlessly once it’s set. Lightly grease the bottom of the pan before laying down the parchment to help it stick.
Step 2: Create the Biscoff Crust
Place the entire pack of Biscoff cookies into the bowl of a food processor. Pulse them until they are broken down into fine, consistent crumbs, resembling sand. If you don’t have a food processor, place the cookies in a large, sealed zip-top bag and crush them with a rolling pin or a heavy-bottomed pan. Ensure there are no large cookie chunks left. Transfer the fine crumbs to a medium-sized mixing bowl. Pour the melted unsalted butter over the crumbs. Using a fork or a spatula, mix until all the crumbs are evenly moistened. The final texture should be similar to wet sand.
Step 3: Press and Chill the Crust
Pour the buttered crumb mixture into your prepared 9×9 inch pan. Using the flat bottom of a measuring cup or a glass, press the crumbs down firmly and evenly across the entire bottom of the pan. Pay special attention to the corners and edges to create a solid, compact base. A firm crust is the foundation of a good cheesecake bar. Once pressed, place the pan in the freezer for at least 15-20 minutes while you prepare the filling. Chilling the crust helps the butter solidify, preventing the crust from becoming soggy when you add the filling.
Step 4: Begin the Cheesecake Filling
In a large mixing bowl, place the three blocks of softened, room-temperature cream cheese. It is absolutely vital that the cream cheese is soft, as cold cream cheese will result in a lumpy, unpleasant filling. Using an electric hand mixer or a stand mixer fitted with the paddle attachment, beat the cream cheese on medium speed for 2-3 minutes until it is completely smooth, creamy, and free of any lumps. Scrape down the sides and bottom of the bowl periodically to ensure everything is incorporated.
Step 5: Flavor the Filling
Once the cream cheese is perfectly smooth, add the sifted powdered sugar and the pure vanilla extract. Beat on low speed initially to prevent a sugar cloud, then increase to medium speed and mix until fully combined and smooth. Add the 1 cup of creamy Biscoff spread to the mixture. Continue to beat on medium speed for another 1-2 minutes until the Biscoff spread is fully incorporated and the filling is a uniform, pale caramel color. Scrape the bowl down one more time. Set this bowl aside.
Step 6: Whip the Heavy Cream
In a separate, clean, and chilled mixing bowl, pour in the cold heavy whipping cream. Using clean beaters, whip the cream on medium-high speed. It will go from bubbly to frothy, then to soft peaks. Continue beating until stiff peaks form. You’ll know you’ve reached stiff peaks when the cream holds its shape firmly and the peaks stand straight up when you lift the beaters out. Be careful not to over-whip, or it will turn into butter. Whipping the cream separately and then folding it in is the secret to a light-yet-rich no-bake cheesecake texture.
Step 7: Fold and Combine
Gently add about one-third of the whipped cream to the Biscoff and cream cheese mixture. Using a rubber spatula, carefully fold it in to lighten the base. “Folding” means using a gentle, sweeping motion from the bottom, up, and over the top. Once that is mostly combined, add the remaining whipped cream. Continue to fold gently until no white streaks remain. It’s important to fold, not stir or beat, at this stage. You want to keep all the air you just whipped into the cream, as this gives the bars their luscious, stable structure.
Step 8: Assemble the Cheesecake Bars
Retrieve the chilled crust from the freezer. Pour the prepared cheesecake filling over the crust. Using an offset spatula or the back of a spoon, spread the filling into an even, smooth layer, making sure it reaches all the corners.
Step 9: Add the Topping and Chill
Place the remaining ¾ cup of Biscoff spread into a microwave-safe bowl. Microwave in 15-second intervals, stirring in between, until it is melted, smooth, and pourable. This should only take about 30-45 seconds. Do not overheat it. Pour the melted Biscoff spread over the cheesecake filling. Gently tilt the pan or use your offset spatula to spread it evenly over the entire surface.
Step 10: The Final, Crucial Chill
Cover the pan loosely with plastic wrap or foil, being careful not to let it touch the surface. Place the cheesecake in the refrigerator to set for a minimum of 6-8 hours, but overnight is highly recommended. This chilling time is not optional; it is essential for the cheesecake to firm up completely so you can get clean, beautiful slices.
Step 11: Slice and Serve
Once the cheesecake is fully set, remove it from the refrigerator. Use the parchment paper overhangs to lift the entire block of cheesecake out of the pan and onto a cutting board. For perfectly clean slices, use a large, sharp knife. Dip the knife in hot water and wipe it dry between each cut. Cut the block into 16 small squares. If you like, you can garnish with extra crushed Biscoff cookies or a dollop of whipped cream before serving.
Nutrition Facts
The following nutritional information is an estimate and can vary based on the specific brands of ingredients used.
- Servings: 16 bars
- Calories per serving: Approximately 450 kcal
- Fat: High in fat, primarily from the cream cheese, heavy cream, and butter, which contributes to the rich, satisfying texture.
- Carbohydrates: The primary source of carbohydrates is the Biscoff cookies and powdered sugar, providing the dessert’s sweetness and energy.
- Protein: A moderate amount of protein is present, mainly from the cream cheese.
Preparation Time
This is an excellent make-ahead dessert, as most of the time is hands-off chilling.
- Active Preparation Time: 25-30 minutes
- Chilling Time: 6-8 hours, or preferably overnight
- Total Time: Approximately 6.5 – 8.5 hours
How to Serve
These Creamy Biscoff Cheesecake Bars are incredibly versatile and can be dressed up or down for any occasion. Here are some wonderful ways to serve them:
- For the Coffee Lover:
- Pair a bar with a hot cup of black coffee or a latte. The slightly bitter notes of the coffee cut through the richness of the cheesecake beautifully.
- Serve alongside an iced caramel macchiato for a truly decadent afternoon treat.
- For an Elegant Dessert Platter:
- Cut the bars into smaller, bite-sized squares (making 25 or 36 pieces instead of 16).
- Arrange them on a platter with fresh berries like raspberries or strawberries, whose tartness provides a lovely contrast.
- Add a small bowl of extra crushed Biscoff cookies for dipping or sprinkling.
- À La Mode Style:
- Serve a square slightly chilled (not frozen) with a small scoop of high-quality vanilla bean or coffee-flavored ice cream.
- Drizzle with a touch of salted caramel or dark chocolate sauce for an extra layer of flavor complexity.
- Simple and Classic:
- Serve them straight from the fridge as is. Their flavor is so rich and complex they need no accompaniment to shine.
- Add a simple dollop of freshly whipped cream on top of each square to balance the sweetness and add another creamy texture.
Additional Tips
Unlock the full potential of your cheesecake bars with these eight professional tips.
- Room Temperature is Not a Suggestion, It’s a Rule: The number one reason for lumpy cheesecake is cold cream cheese. Take it out of the fridge at least 2-3 hours before you begin. It should be very soft to the touch. If you’re short on time, you can submerge the foil-wrapped blocks in a bowl of warm (not hot) water for about 30 minutes.
- The Magic of a Hot Knife: For those picture-perfect, clean-cut squares you see in bakeries, the secret is a hot knife. Fill a tall glass with hot water. Dip your long, sharp knife into the water for a few seconds, then wipe it completely dry with a paper towel. Make one cut. Repeat the process—dip, wipe, cut—for every single slice. It melts the fat just enough to glide through without dragging.
- Don’t Scrimp on Chilling: It can be tempting to cut into the cheesecake after only a few hours. Resist! The 6-8 hour (or overnight) chill time is crucial for the fats in the cream cheese and heavy cream to solidify completely. This process, known as setting, is what transforms the soft filling into a firm, sliceable, and velvety bar.
- Get Creative with the Topping: While the melted Biscoff spread is classic, feel free to experiment. You can create a marble effect by drizzling melted Biscoff and melted white chocolate on top and then running a skewer through them. Or, for a different texture, skip the melted layer and top with Biscoff cookie crumbs and a dusting of cinnamon.
- Perfect Pressing for a Perfect Crust: To get an even, compact crust without getting your hands messy, use the bottom of a flat metal measuring cup. It allows you to apply firm, even pressure across the entire surface, ensuring the crust holds together perfectly when you slice it.
- Proper Storage is Key: Store leftover cheesecake bars in an airtight container in the refrigerator for up to 5 days. Keeping them covered prevents them from drying out or absorbing other fridge odors. The flavor and texture are often even better on the second day!
- Freezing for Future Cravings: These bars freeze exceptionally well. Place the sliced bars on a baking sheet and freeze for one hour until solid. Then, wrap each bar individually in plastic wrap and place them in a freezer-safe bag or container. They can be frozen for up to 3 months. To serve, simply thaw a bar in the refrigerator for a few hours.
- Whip Your Cream Cold: For the fluffiest, most stable whipped cream, make sure your heavy cream, the bowl, and the mixer’s beaters are all very cold. You can pop the bowl and beaters in the freezer for 10-15 minutes before you start. Cold cream whips up faster and creates a more stable structure that won’t deflate in your cheesecake filling.
FAQ Section
Here are answers to some of the most common questions about making these Creamy Biscoff Cheesecake Bars.
1. Why are my cheesecake bars not firm?
This is the most common issue with no-bake cheesecakes and it usually comes down to two things. First, not chilling it for long enough. It truly needs a minimum of 6 hours, and overnight is best, to fully set. Second, you may have used the wrong ingredients. Full-fat block cream cheese and heavy whipping cream (at least 35% milk fat) are essential for providing the structure. Low-fat or whipped products will not set properly.
2. Can I use a different size pan for this recipe?
Yes, but you’ll need to adjust your expectations. An 8×8 inch pan will work, but your bars will be thicker and may need a slightly longer chilling time. A 9×13 inch pan will result in much thinner bars, and they will set faster. You may also want to increase the crust ingredients by about 25% for a 9×13 pan to ensure full coverage.
3. Is “Biscoff spread” the same as “cookie butter”?
Yes. Lotus Biscoff Spread is the original brand name for what is generically known as cookie butter. Cookie butter is a spreadable paste with a consistency similar to peanut butter, but it’s made from crushed speculoos cookies (spiced shortcrust biscuits). You can use any brand of cookie butter in this recipe.
4. My crust was too crumbly. What did I do wrong?
A crumbly crust is usually caused by one of two things: not using enough melted butter to bind the crumbs, or not pressing the crust down firmly enough in the pan. Make sure your crumbs are well-coated with butter (they should look like wet sand) and use significant pressure with a flat-bottomed glass to create a tight, compact layer.
5. Can I make this recipe gluten-free?
Absolutely. The filling itself is naturally gluten-free. To adapt the recipe, you simply need to substitute the Lotus Biscoff cookies with your favorite gluten-free shortbread or digestive-style cookies for the crust. You can find gluten-free speculoos-style cookies from certain specialty brands, which would be the closest flavor match.
6. What is the best way to melt the Biscoff spread for the topping without burning it?
The microwave is the easiest method, but the key is to use low power and short intervals. Place the spread in a microwave-safe bowl and heat it in 15-second bursts, stirring well after each one. It’s better to under-heat it and let the residual heat melt the rest as you stir than to overheat it, which can make it seize up or taste scorched.
7. Can I make a baked version of this cheesecake?
While you could adapt it, this recipe is specifically designed and balanced for a no-bake application. A baked cheesecake requires eggs for structure and a different ratio of ingredients. It would be better to find a recipe specifically developed as a baked Biscoff cheesecake to ensure the best results.
8. Can I make these cheesecake bars ahead of time?
Yes, this is the perfect make-ahead dessert! You can make it up to two days in advance. Simply prepare the recipe as directed, cover, and store it in the refrigerator. The flavors will actually meld and deepen over time, making it taste even better on the second day. Just wait to slice and garnish until you’re ready to serve.
Creamy Biscoff Cheesecake Bars
Ingredients
This recipe is broken down into three simple components: the crunchy crust, the velvety filling, and the luscious topping. Using high-quality, full-fat ingredients is key to achieving the perfect texture and flavor.
For the Buttery Biscoff Crust
- 250g (about 8.8 oz or 1 standard pack) Lotus Biscoff Cookies: These are the heart of the recipe. Their unique caramelized, slightly spicy flavor is irreplaceable and forms the perfect base.
- 100g (7 tablespoons) Unsalted Butter, melted: The butter acts as the glue that binds the cookie crumbs together, creating a firm, sliceable crust that doesn’t crumble apart.
For the Creamy Cheesecake Filling
- 680g (24 oz or three 8-oz blocks) Full-Fat Block Cream Cheese, softened to room temperature: This is non-negotiable for a rich, dense, and creamy cheesecake. Do not use whipped or low-fat cream cheese, as it will result in a runny filling. Bringing it to room temperature is crucial for a lump-free texture.
- 200g (1 cup) Powdered Sugar, sifted: Powdered sugar dissolves instantly into the cream cheese, ensuring a silky-smooth consistency without any graininess. Sifting prevents clumps.
- 250g (1 cup) Creamy Biscoff Spread (Cookie Butter): This is the star flavor. It gets mixed directly into the cheesecake batter to infuse every bite with that irresistible speculoos taste.
- 1 teaspoon Pure Vanilla Extract: Vanilla enhances the other flavors in the cheesecake, adding a layer of aromatic depth that complements the spiced cookie butter.
- 240ml (1 cup) Cold Heavy Whipping Cream: Whipped to stiff peaks, the heavy cream is folded into the filling to give it a light, airy, yet stable structure. The cold temperature helps it whip up faster and hold its shape.
For the Luscious Biscoff Topping
- 200g (¾ cup + 1 tablespoon) Creamy Biscoff Spread (Cookie Butter): This final layer provides an intense punch of Biscoff flavor and a beautiful, glossy finish.
- Optional: Extra Biscoff Cookies, crushed: For a decorative and crunchy garnish on top.
Instructions
Follow these step-by-step instructions carefully for flawless Biscoff cheesecake bars. The most important ingredient here is patience, especially during the chilling stages, which are essential for the bars to set properly.
First, prepare your 9×9 inch (23×23 cm) square baking pan. To ensure easy removal later, create a parchment paper “sling.” Cut two long strips of parchment paper. Lay one strip in the pan, pressing it down into the bottom and up the sides, leaving an overhang on two opposite ends. Lay the second strip perpendicular to the first, creating an overhang on the other two sides. This will allow you to lift the entire cheesecake out of the pan effortlessly once it’s set. Lightly grease the bottom of the pan before laying down the parchment to help it stick.
Place the entire pack of Biscoff cookies into the bowl of a food processor. Pulse them until they are broken down into fine, consistent crumbs, resembling sand. If you don’t have a food processor, place the cookies in a large, sealed zip-top bag and crush them with a rolling pin or a heavy-bottomed pan. Ensure there are no large cookie chunks left. Transfer the fine crumbs to a medium-sized mixing bowl. Pour the melted unsalted butter over the crumbs. Using a fork or a spatula, mix until all the crumbs are evenly moistened. The final texture should be similar to wet sand.
Pour the buttered crumb mixture into your prepared 9×9 inch pan. Using the flat bottom of a measuring cup or a glass, press the crumbs down firmly and evenly across the entire bottom of the pan. Pay special attention to the corners and edges to create a solid, compact base. A firm crust is the foundation of a good cheesecake bar. Once pressed, place the pan in the freezer for at least 15-20 minutes while you prepare the filling. Chilling the crust helps the butter solidify, preventing the crust from becoming soggy when you add the filling.
In a large mixing bowl, place the three blocks of softened, room-temperature cream cheese. It is absolutely vital that the cream cheese is soft, as cold cream cheese will result in a lumpy, unpleasant filling. Using an electric hand mixer or a stand mixer fitted with the paddle attachment, beat the cream cheese on medium speed for 2-3 minutes until it is completely smooth, creamy, and free of any lumps. Scrape down the sides and bottom of the bowl periodically to ensure everything is incorporated.
Once the cream cheese is perfectly smooth, add the sifted powdered sugar and the pure vanilla extract. Beat on low speed initially to prevent a sugar cloud, then increase to medium speed and mix until fully combined and smooth. Add the 1 cup of creamy Biscoff spread to the mixture. Continue to beat on medium speed for another 1-2 minutes until the Biscoff spread is fully incorporated and the filling is a uniform, pale caramel color. Scrape the bowl down one more time. Set this bowl aside.
In a separate, clean, and chilled mixing bowl, pour in the cold heavy whipping cream. Using clean beaters, whip the cream on medium-high speed. It will go from bubbly to frothy, then to soft peaks. Continue beating until stiff peaks form. You’ll know you’ve reached stiff peaks when the cream holds its shape firmly and the peaks stand straight up when you lift the beaters out. Be careful not to over-whip, or it will turn into butter. Whipping the cream separately and then folding it in is the secret to a light-yet-rich no-bake cheesecake texture.
Gently add about one-third of the whipped cream to the Biscoff and cream cheese mixture. Using a rubber spatula, carefully fold it in to lighten the base. “Folding” means using a gentle, sweeping motion from the bottom, up, and over the top. Once that is mostly combined, add the remaining whipped cream. Continue to fold gently until no white streaks remain. It’s important to fold, not stir or beat, at this stage. You want to keep all the air you just whipped into the cream, as this gives the bars their luscious, stable structure.
Retrieve the chilled crust from the freezer. Pour the prepared cheesecake filling over the crust. Using an offset spatula or the back of a spoon, spread the filling into an even, smooth layer, making sure it reaches all the corners.
Place the remaining ¾ cup of Biscoff spread into a microwave-safe bowl. Microwave in 15-second intervals, stirring in between, until it is melted, smooth, and pourable. This should only take about 30-45 seconds. Do not overheat it. Pour the melted Biscoff spread over the cheesecake filling. Gently tilt the pan or use your offset spatula to spread it evenly over the entire surface.
Cover the pan loosely with plastic wrap or foil, being careful not to let it touch the surface. Place the cheesecake in the refrigerator to set for a minimum of 6-8 hours, but overnight is highly recommended. This chilling time is not optional; it is essential for the cheesecake to firm up completely so you can get clean, beautiful slices.
Once the cheesecake is fully set, remove it from the refrigerator. Use the parchment paper overhangs to lift the entire block of cheesecake out of the pan and onto a cutting board. For perfectly clean slices, use a large, sharp knife. Dip the knife in hot water and wipe it dry between each cut. Cut the block into 16 small squares. If you like, you can garnish with extra crushed Biscoff cookies or a dollop of whipped cream before serving.
Nutrition
- Serving Size: one normal portion
- Calories: 450