")

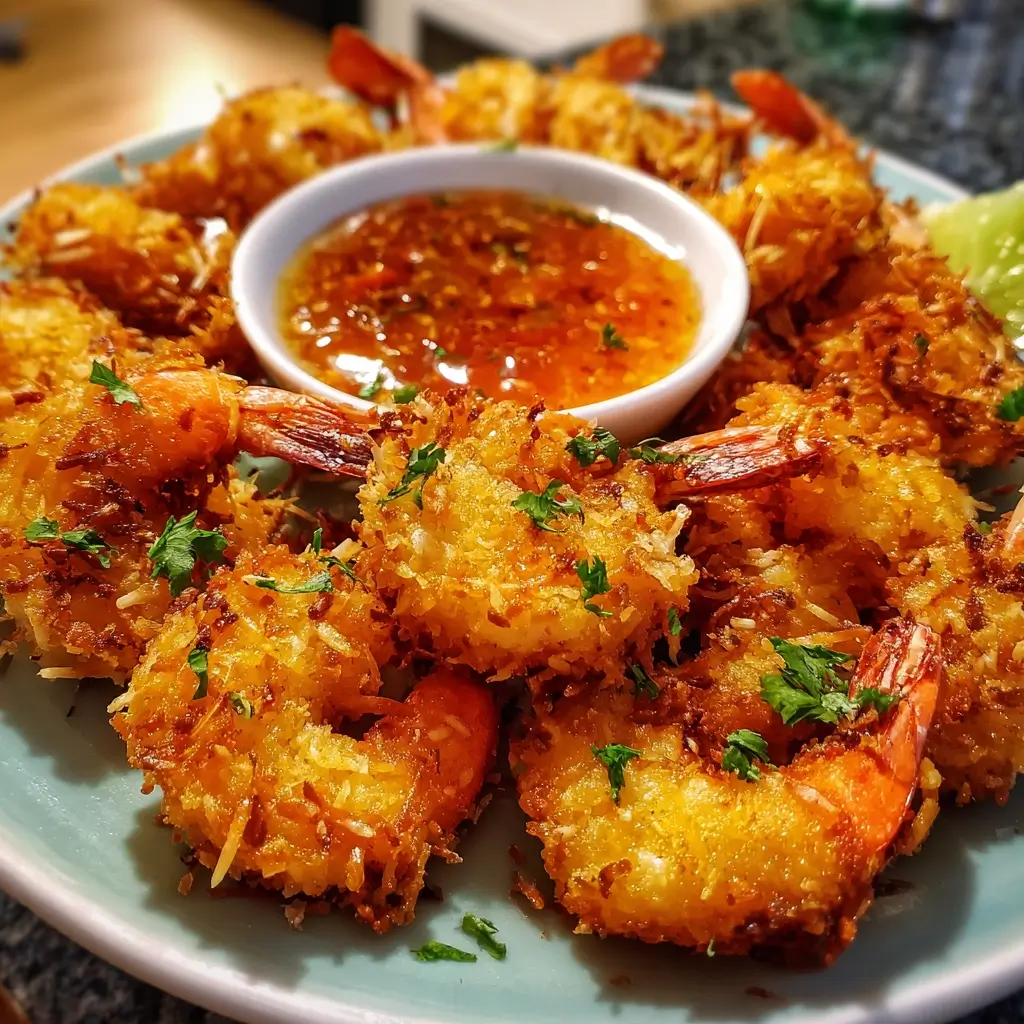

The moment the platter hit the table, a hush fell over our usual chaotic family gathering. All eyes were on the golden-brown, glistening morsels piled high. My nephew, usually the pickiest eater on the planet, was the first to grab one. The audible crunch as he bit into it was so satisfying it made everyone else reach for one immediately. That’s the magic of these Crispy Coconut Shrimp Bites. They aren’t just an appetizer; they’re an event. The perfect balance of sweet, flaky coconut and savory, seasoned panko breadcrumbs creates an irresistibly crispy crust that gives way to a tender, juicy shrimp inside. Paired with a simple sweet chili sauce, they transform from a delicious snack into a truly addictive experience. I’ve made these for game nights, holiday parties, and quiet weeknight dinners, and they are, without fail, the first thing to disappear. This recipe is my go-to for a guaranteed crowd-pleaser, and I’m so excited to share the simple secrets to making them perfectly crispy and flavorful every single time.
Ingredients for The Ultimate Crispy Coconut Shrimp Bites
A truly spectacular dish often starts with simple, high-quality ingredients. Each component in this recipe plays a crucial role in building layers of flavor and, most importantly, achieving that signature crunch.
- 1 lb Large Shrimp (about 20-25): The star of the show. Using large shrimp (size 21/25) ensures a juicy, meaty bite that stands up to the crispy coating. They should be peeled and deveined, with tails left on for a convenient handle.
- 1 cup All-Purpose Flour: This is the essential first layer of our breading station. It gives the egg wash something to cling to, ensuring the entire coating stays securely on the shrimp.
- 2 Large Eggs: Whisked to create an egg wash, this acts as the “glue” that binds the coconut and panko mixture to the flour-dusted shrimp.
- 1 cup Panko Breadcrumbs: The secret to an extra-light and crispy texture. Panko breadcrumbs are flakier and absorb less oil than traditional breadcrumbs, resulting in a superior crunch that doesn’t feel heavy or greasy.
- 1 cup Sweetened Shredded Coconut: This provides the signature sweet, tropical flavor. The sugar in the sweetened coconut also helps it caramelize slightly during cooking, contributing to the beautiful golden-brown color.
- 1 tsp Paprika: Adds a touch of smoky flavor and a warm, reddish hue to the breading mixture, creating a more complex and visually appealing crust.
- 1 tsp Garlic Powder: Provides a savory, aromatic undertone that perfectly balances the sweetness of the coconut.
- ½ tsp Salt: Essential for enhancing all the other flavors. Seasoning the breading mixture itself is key to a delicious final product.
- ½ tsp Black Pepper: Adds a mild, peppery bite that cuts through the richness.
- Vegetable or Canola Oil for Frying (about 3-4 cups): A neutral oil with a high smoke point is necessary for frying. You’ll need enough to allow the shrimp to be at least halfway submerged for even cooking.
Step-by-Step Instructions for Perfect Coconut Shrimp
Achieving restaurant-quality coconut shrimp at home is all about the process. Follow these steps carefully, focusing on the setup and technique, and you’ll be rewarded with perfectly crispy, golden bites. This recipe offers three cooking methods—classic deep-frying for the ultimate crisp, baking for a healthier option, and air frying for a quick and easy alternative.
Preparing the Shrimp and Breading Stations
- Pat the Shrimp Dry: This is the most critical first step. Use paper towels to thoroughly pat the peeled and deveined shrimp dry. A dry surface is essential for the flour to adhere properly, which is the foundation for a coating that won’t fall off during cooking.
- Set Up Your Breading Line: Organization is key to a smooth and mess-free breading process. You’ll need three shallow dishes or plates.
- Dish 1 (Flour): In the first dish, whisk together the all-purpose flour, paprika, garlic powder, salt, and black pepper. Spreading it out makes it easy to dredge the shrimp.
- Dish 2 (Egg): In the second dish, crack the two large eggs and whisk them thoroughly until the yolks and whites are completely combined and slightly frothy.
- Dish 3 (Coconut & Panko): In the final dish, combine the panko breadcrumbs and the sweetened shredded coconut. Use your fingers or a fork to mix them well, ensuring an even distribution.
The Breading Process: A Masterclass in Crunch
- The First Dredge (Flour): Working with one shrimp at a time, hold it by the tail and lightly dredge it in the seasoned flour mixture. Make sure to coat it completely on all sides, then gently shake off any excess. The shrimp should have a very thin, even dusting of flour.
- The Second Dip (Egg): Immediately transfer the flour-dusted shrimp to the egg wash. Submerge it completely, allowing any excess egg to drip back into the dish. The flour coating will now be wet, ready to grab onto the final layer.
- The Final Coat (Coconut & Panko): Move the egg-washed shrimp to the coconut and panko mixture. Press the shrimp firmly but gently into the mixture, ensuring it’s generously coated on all sides. This pressing action is vital for helping the coating adhere. Place the fully breaded shrimp on a clean baking sheet or large plate. Repeat with all remaining shrimp, arranging them in a single layer without touching.
Cooking Method 1: Classic Deep Frying (The Crispiest Result)
- Heat the Oil: In a heavy-bottomed pot or Dutch oven, pour in about 2-3 inches of vegetable or canola oil. Heat the oil over medium-high heat until it reaches 350°F (175°C). Use a cooking thermometer for accuracy; the correct oil temperature is crucial for crispy, not greasy, shrimp.
- Fry in Batches: Carefully place a few breaded shrimp into the hot oil, holding them by the tail and lowering them gently to avoid splashing. Do not overcrowd the pot, as this will lower the oil temperature and result in soggy shrimp. Fry in batches of 5-6 at a time.
- Cook to Golden Perfection: Fry for about 2-3 minutes total, turning once halfway through, until the coating is a deep golden brown and crispy, and the shrimp is opaque and cooked through.
- Drain and Rest: Use a slotted spoon or tongs to remove the shrimp from the oil and transfer them to a wire rack set over a baking sheet. This allows air to circulate, keeping the bottom crispy. Do not drain them on paper towels, as this can trap steam and make them soggy. Lightly season with a pinch of salt immediately after they come out of the oil.
Cooking Method 2: Healthier Baked Coconut Shrimp
- Preheat Oven: Preheat your oven to 400°F (200°C). Place a wire rack inside a baking sheet.
- Arrange and Spray: Arrange the breaded shrimp in a single layer on the wire rack. Lightly spray the tops of the shrimp with cooking spray or a neutral oil mister. This helps them brown and crisp up in the oven.
- Bake: Bake for 12-15 minutes, flipping the shrimp halfway through the cooking time. The shrimp are done when the coating is golden brown and the shrimp is pink and opaque.
Cooking Method 3: Quick and Easy Air Fryer Coconut Shrimp
- Preheat Air Fryer: Preheat your air fryer to 375°F (190°C).
- Arrange in Basket: Place the breaded shrimp in the air fryer basket in a single layer. Do not overcrowd the basket; cook in batches if necessary for the best results.
- Spray and Cook: Lightly spray the shrimp with cooking spray. Air fry for 8-10 minutes, flipping them halfway through, until they are golden, crispy, and cooked through.
Nutrition Facts
This recipe provides a delightful indulgence with surprising nutritional benefits, primarily from the shrimp itself.
- Servings: 4-6 appetizer servings
- Calories per serving (approx. 5 shrimp): 350-400 kcal (when fried)
- Protein: An excellent source of high-quality, lean protein, which is essential for muscle repair, immune function, and feeling full and satisfied.
- Healthy Fats: While frying adds fat, using a good quality oil and draining properly minimizes absorption. The coconut itself also contains medium-chain triglycerides (MCTs).
- Carbohydrates: The majority of carbohydrates come from the flour and panko breading, providing the energy and the classic crispy texture.
Preparation Time
This impressive appetizer comes together much faster than you might think, making it perfect for both planned parties and spontaneous cravings.
- Preparation: 20 minutes
- Cook Time: 10-15 minutes
- Total Time: 30-35 minutes
The key to efficiency is setting up your dredging station before you begin breading the shrimp. An organized workspace (a “mise en place”) makes the process seamless and enjoyable.
How to Serve Your Coconut Shrimp Bites
Presentation and pairings can elevate your homemade coconut shrimp from a simple snack to a show-stopping part of any meal. Here are some creative ways to serve them:
As a Stunning Appetizer
- Classic Platter: Arrange the shrimp in a circular pattern on a large platter with a bowl of your favorite dipping sauce in the center. Garnish with lime wedges and freshly chopped cilantro or parsley for a pop of color.
- On Skewers: For easier handling at parties, thread 2-3 cooked coconut shrimp onto small bamboo skewers.
- In Lettuce Cups: Place one or two shrimp inside a crisp butter lettuce or romaine cup for a fresh, low-carb serving option that adds a refreshing crunch.
The Perfect Dipping Sauces
A great sauce is non-negotiable. While a store-bought sweet chili sauce is a fantastic and easy choice, here are a few other ideas:
- Spicy Orange-Chili Marmalade: Mix ½ cup of orange marmalade with 1-2 tablespoons of sweet chili sauce and a squeeze of lime juice for a sweet and tangy kick.
- Creamy Piña Colada Dip: Combine ½ cup of plain Greek yogurt or sour cream, 2 tablespoons of cream of coconut, 1 tablespoon of crushed pineapple, and a pinch of salt for a creamy, tropical dip.
- Spicy Mango-Lime Salsa: Finely dice fresh mango, red onion, and jalapeño. Toss with a generous amount of fresh lime juice and chopped cilantro for a vibrant, fresh counterpoint to the fried shrimp.
As a Delicious Main Course
- Over Rice: Serve a generous portion of coconut shrimp over a bed of fluffy jasmine or coconut rice. Drizzle with extra dipping sauce and serve with a side of steamed or stir-fried vegetables like broccoli or bell peppers.
- In Tacos: Warm some small flour or corn tortillas and fill them with 2-3 coconut shrimp, a bit of crunchy slaw (cabbage and carrot), and a drizzle of a creamy, spicy sauce.
- On a Salad: Create a tropical-inspired salad with mixed greens, mango slices, avocado, and red onion. Top with warm coconut shrimp and a light vinaigrette for a satisfying and complete meal.
Additional Tips for Flawless Coconut Shrimp
These pro tips will help you troubleshoot common issues and ensure your coconut shrimp are perfect every single time.
- Don’t Skip Patting the Shrimp Dry: We mentioned it in the instructions, but it bears repeating. Moisture is the enemy of a crispy coating. Any water on the surface of the shrimp will create steam when it hits the hot oil, pushing the breading away from the shrimp. A thoroughly dry shrimp is the foundation of success.
- Use One Hand for Wet, One for Dry: To avoid breading your own fingers and creating a clumpy mess, designate one hand for the dry ingredients (flour, coconut mixture) and the other hand for the wet ingredient (egg). This simple trick keeps your station clean and your coating even.
- Maintain Your Oil Temperature: Use a thermometer! If the oil is too hot (above 375°F), the coconut will burn before the shrimp is cooked. If it’s too cool (below 325°F), the shrimp will absorb too much oil and become greasy and soggy. Keep it steady at 350°F for the best results.
- Choose the Right Shrimp Size: While any size shrimp will work, large (21/25 count per pound) or jumbo (16/20 count) shrimp are ideal. They provide a perfect ratio of juicy shrimp to crispy coating and are less likely to overcook in the time it takes to get the crust golden brown.
- Sweetened vs. Unsweetened Coconut: This recipe calls for sweetened coconut because the sugars help it caramelize and achieve that beautiful golden color. If you use unsweetened coconut, be aware that it may not brown as deeply and will have a less sweet flavor profile. You can mix both for a balanced result.
- Don’t Overcrowd Your Cooking Vessel: Whether you’re frying, baking, or air frying, give the shrimp space. Overcrowding lowers the temperature and causes the food to steam rather than crisp up. Always cook in batches for the best texture.
- Season Every Layer: Flavor is built in stages. The shrimp itself can be lightly seasoned before breading, the flour is seasoned, and a final pinch of salt after cooking brings everything together. This ensures every single bite is packed with flavor, not just the crust.
- Making Ahead and Freezing: You can bread the shrimp and freeze them for later. Arrange the breaded, uncooked shrimp in a single layer on a baking sheet and freeze until solid. Then, transfer them to a freezer-safe bag. You can cook them directly from frozen, just add a few extra minutes to the cooking time.
Frequently Asked Questions (FAQ)
Here are answers to some of the most common questions about making crispy coconut shrimp at home.
1. Why is my coconut shrimp coating falling off?
This is the most common issue and usually stems from one of two things. First, the shrimp was not patted dry enough before being floured. Moisture prevents the flour from sticking, which compromises the entire coating. Second, you may have skipped the flour dredge altogether. The flour acts as a primer, giving the egg wash something to grip. Without it, the slick surface of the shrimp won’t hold the heavy coconut and panko coating.
2. Can I make these gluten-free?
Absolutely! To make this recipe gluten-free, simply make two substitutions. Replace the all-purpose flour with a gluten-free all-purpose blend or even cornstarch. For the breadcrumbs, use gluten-free panko breadcrumbs, which are widely available in most supermarkets. The rest of the ingredients are naturally gluten-free.
3. What’s the best way to reheat coconut shrimp to keep it crispy?
The microwave is the enemy of leftover fried food. The best way to reheat coconut shrimp and revive its crispiness is in an oven or air fryer. Preheat your oven or air fryer to 350°F (175°C). Place the shrimp in a single layer on a baking sheet or in the air fryer basket and heat for 5-7 minutes, or until warmed through and crispy again.
4. Can I use pre-cooked shrimp for this recipe?
It is strongly recommended to use raw shrimp. The cooking time for this recipe is designed to perfectly cook the raw shrimp while the coating becomes golden and crispy. If you use pre-cooked shrimp, you risk overcooking them by the time the breading is done, resulting in tough, rubbery shrimp.
5. How do I know when the shrimp are perfectly cooked?
Shrimp cook very quickly. You can tell they’re done by their appearance. Raw shrimp is translucent and greyish. Cooked shrimp turns opaque and pinkish-white. When you see the shrimp curl into a “C” shape and the flesh is no longer translucent, they are perfectly cooked. An overcooked shrimp will curl into a tight “O” shape.
6. My coconut is burning before the shrimp is cooked. What should I do?
This is a classic sign that your oil is too hot. The sugar in the sweetened coconut makes it brown very quickly. Lower your heat immediately and use a thermometer to ensure your oil is stable at 350°F (175°C). If you’re consistently having this problem, you can try using a mix of half sweetened and half unsweetened coconut to reduce the sugar content.
7. What is the best oil for frying coconut shrimp?
The best oils for frying are neutral in flavor and have a high smoke point (the temperature at which the oil starts to break down and smoke). Excellent choices include canola oil, vegetable oil, peanut oil, or grapeseed oil. Avoid oils with low smoke points like extra virgin olive oil, as they will burn and impart a bitter flavor.
8. Can I prepare the breading mixture in advance?
Yes, you can. To save time, you can pre-mix your seasoned flour in one container and your panko-coconut mixture in another. Store them in airtight containers at room temperature for up to a week. This makes the assembly process much faster when you’re ready to cook. Just give them a quick whisk before using to make sure nothing has settled.
Crispy Coconut Shrimp Bites
Ingredients
A truly spectacular dish often starts with simple, high-quality ingredients. Each component in this recipe plays a crucial role in building layers of flavor and, most importantly, achieving that signature crunch.
- 1 lb Large Shrimp (about 20-25): The star of the show. Using large shrimp (size 21/25) ensures a juicy, meaty bite that stands up to the crispy coating. They should be peeled and deveined, with tails left on for a convenient handle.
- 1 cup All-Purpose Flour: This is the essential first layer of our breading station. It gives the egg wash something to cling to, ensuring the entire coating stays securely on the shrimp.
- 2 Large Eggs: Whisked to create an egg wash, this acts as the “glue” that binds the coconut and panko mixture to the flour-dusted shrimp.
- 1 cup Panko Breadcrumbs: The secret to an extra-light and crispy texture. Panko breadcrumbs are flakier and absorb less oil than traditional breadcrumbs, resulting in a superior crunch that doesn’t feel heavy or greasy.
- 1 cup Sweetened Shredded Coconut: This provides the signature sweet, tropical flavor. The sugar in the sweetened coconut also helps it caramelize slightly during cooking, contributing to the beautiful golden-brown color.
- 1 tsp Paprika: Adds a touch of smoky flavor and a warm, reddish hue to the breading mixture, creating a more complex and visually appealing crust.
- 1 tsp Garlic Powder: Provides a savory, aromatic undertone that perfectly balances the sweetness of the coconut.
- ½ tsp Salt: Essential for enhancing all the other flavors. Seasoning the breading mixture itself is key to a delicious final product.
- ½ tsp Black Pepper: Adds a mild, peppery bite that cuts through the richness.
- Vegetable or Canola Oil for Frying (about 3-4 cups): A neutral oil with a high smoke point is necessary for frying. You’ll need enough to allow the shrimp to be at least halfway submerged for even cooking.
Instructions
Achieving restaurant-quality coconut shrimp at home is all about the process. Follow these steps carefully, focusing on the setup and technique, and you’ll be rewarded with perfectly crispy, golden bites. This recipe offers three cooking methods—classic deep-frying for the ultimate crisp, baking for a healthier option, and air frying for a quick and easy alternative.
Preparing the Shrimp and Breading Stations
- Pat the Shrimp Dry: This is the most critical first step. Use paper towels to thoroughly pat the peeled and deveined shrimp dry. A dry surface is essential for the flour to adhere properly, which is the foundation for a coating that won’t fall off during cooking.
- Set Up Your Breading Line: Organization is key to a smooth and mess-free breading process. You’ll need three shallow dishes or plates.
- Dish 1 (Flour): In the first dish, whisk together the all-purpose flour, paprika, garlic powder, salt, and black pepper. Spreading it out makes it easy to dredge the shrimp.
- Dish 2 (Egg): In the second dish, crack the two large eggs and whisk them thoroughly until the yolks and whites are completely combined and slightly frothy.
- Dish 3 (Coconut & Panko): In the final dish, combine the panko breadcrumbs and the sweetened shredded coconut. Use your fingers or a fork to mix them well, ensuring an even distribution.
The Breading Process: A Masterclass in Crunch
- The First Dredge (Flour): Working with one shrimp at a time, hold it by the tail and lightly dredge it in the seasoned flour mixture. Make sure to coat it completely on all sides, then gently shake off any excess. The shrimp should have a very thin, even dusting of flour.
- The Second Dip (Egg): Immediately transfer the flour-dusted shrimp to the egg wash. Submerge it completely, allowing any excess egg to drip back into the dish. The flour coating will now be wet, ready to grab onto the final layer.
- The Final Coat (Coconut & Panko): Move the egg-washed shrimp to the coconut and panko mixture. Press the shrimp firmly but gently into the mixture, ensuring it’s generously coated on all sides. This pressing action is vital for helping the coating adhere. Place the fully breaded shrimp on a clean baking sheet or large plate. Repeat with all remaining shrimp, arranging them in a single layer without touching.
Cooking Method 1: Classic Deep Frying (The Crispiest Result)
- Heat the Oil: In a heavy-bottomed pot or Dutch oven, pour in about 2-3 inches of vegetable or canola oil. Heat the oil over medium-high heat until it reaches 350°F (175°C). Use a cooking thermometer for accuracy; the correct oil temperature is crucial for crispy, not greasy, shrimp.
- Fry in Batches: Carefully place a few breaded shrimp into the hot oil, holding them by the tail and lowering them gently to avoid splashing. Do not overcrowd the pot, as this will lower the oil temperature and result in soggy shrimp. Fry in batches of 5-6 at a time.
- Cook to Golden Perfection: Fry for about 2-3 minutes total, turning once halfway through, until the coating is a deep golden brown and crispy, and the shrimp is opaque and cooked through.
- Drain and Rest: Use a slotted spoon or tongs to remove the shrimp from the oil and transfer them to a wire rack set over a baking sheet. This allows air to circulate, keeping the bottom crispy. Do not drain them on paper towels, as this can trap steam and make them soggy. Lightly season with a pinch of salt immediately after they come out of the oil.
Cooking Method 2: Healthier Baked Coconut Shrimp
- Preheat Oven: Preheat your oven to 400°F (200°C). Place a wire rack inside a baking sheet.
- Arrange and Spray: Arrange the breaded shrimp in a single layer on the wire rack. Lightly spray the tops of the shrimp with cooking spray or a neutral oil mister. This helps them brown and crisp up in the oven.
- Bake: Bake for 12-15 minutes, flipping the shrimp halfway through the cooking time. The shrimp are done when the coating is golden brown and the shrimp is pink and opaque.
Cooking Method 3: Quick and Easy Air Fryer Coconut Shrimp
- Preheat Air Fryer: Preheat your air fryer to 375°F (190°C).
- Arrange in Basket: Place the breaded shrimp in the air fryer basket in a single layer. Do not overcrowd the basket; cook in batches if necessary for the best results.
- Spray and Cook: Lightly spray the shrimp with cooking spray. Air fry for 8-10 minutes, flipping them halfway through, until they are golden, crispy, and cooked through.
Nutrition
- Serving Size: one normal portion
- Calories: 400


