")


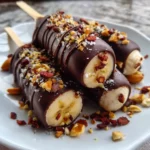
Of all the simple, nostalgic treats that transport me straight back to sun-drenched summer afternoons, none do it quite like a frozen banana. But not just any frozen banana. I’m talking about the ultimate upgrade: a perfectly ripe banana, frozen to chilly perfection, and enrobed in a crisp, decadent shell of rich chocolate. My first time making these Easy Chocolate Covered Banana Pops was a game-changer for our family’s snack routine. I was looking for a healthier alternative to ice cream that would still feel like a special treat for the kids. The moment of truth came when my youngest, a notoriously picky eater, took his first bite. His eyes widened, a chocolatey smile spread across his face, and he declared it “better than a popsicle!” That was it. I knew I had a winner. This recipe has since become our go-to for everything from after-school snacks to birthday party desserts. It’s unbelievably simple, endlessly customizable, and brings a little bit of magic to an ordinary day. It’s the kind of recipe that feels both wholesome and indulgent, proving that the best treats are often the ones made with the simplest ingredients and a little bit of love.
Ingredients
- Ripe Bananas: 4 large, ripe but still firm bananas. Using bananas that are sweet but can hold their shape is key to the perfect pop.
- Semi-Sweet Chocolate Chips: 2 cups (about 12 ounces). A quality semi-sweet chocolate provides a wonderful balance to the banana’s sweetness without being overly bitter.
- Coconut Oil: 2 tablespoons, refined or unrefined. This is the secret ingredient for creating a smooth, glossy chocolate shell that hardens perfectly.
- Popsicle Sticks: 8 sturdy wooden or reusable popsicle sticks. Sometimes called craft sticks, these are essential for turning the bananas into easy-to-handle pops.
- Optional Toppings: A variety of choices like chopped peanuts, rainbow sprinkles, shredded coconut, flaky sea salt, or crushed pretzels. This is where you can get creative!
Instructions
- Prepare the Bananas and Freezing Station: Begin by lining a large baking sheet or tray with parchment paper or wax paper. This is a crucial step to prevent the bananas from sticking after freezing. Peel the four bananas and cut each one in half crosswise, creating eight equal-sized pieces.
- Insert the Sticks: Gently and carefully insert a popsicle stick into the cut-end of each banana half. Push the stick in about halfway through the banana, ensuring it’s secure but doesn’t poke through the other side. The straighter you insert the stick, the more stable your banana pop will be.
- The First Freeze: Arrange the bananas on the prepared baking sheet, making sure they aren’t touching each other. Place the baking sheet in the freezer for at least 1 to 2 hours. This initial freeze is vital. Freezing the bananas solid ensures the warm, melted chocolate will harden almost instantly upon contact, creating a clean, crisp shell and preventing the bananas from becoming mushy.
- Melt the Chocolate: About 10 minutes before you plan to take the bananas out of the freezer, it’s time to melt the chocolate. You can do this in two ways:
- Microwave Method: Combine the chocolate chips and coconut oil in a microwave-safe bowl. Heat in 30-second intervals, stirring thoroughly after each interval, until the chocolate is almost completely melted. Remove and continue to stir until the residual heat melts the remaining chips and the mixture is perfectly smooth. Be careful not to overheat it, as this can cause the chocolate to seize and become grainy.
- Double Boiler Method: If you prefer, set up a double boiler. Fill a small saucepan with about an inch of water and bring it to a simmer. Place a heatproof bowl on top of the saucepan, ensuring the bottom of the bowl does not touch the water. Add the chocolate chips and coconut oil to the bowl and stir continuously until everything is melted and glossy.
- Prepare for Dipping: Once the chocolate is melted, pour it into a tall, narrow glass or jar. This makes dipping much easier and ensures you can get a full, even coating on each banana pop without making a huge mess. Have your desired toppings ready in shallow bowls or plates nearby.
- Dip the Bananas: Remove the frozen bananas from the freezer. Working one at a time, dip a frozen banana pop into the melted chocolate, turning it to coat all sides completely. You can use a spoon to help cover any missed spots. The cold banana will cause the chocolate to set very quickly, so you need to work efficiently.
- Add Toppings Immediately: As soon as the banana is coated in chocolate, immediately sprinkle on your toppings or roll the pop in your bowl of toppings. The chocolate shell hardens within a minute, so you must add the toppings before it sets completely for them to adhere properly.
- The Final Freeze: Place the finished chocolate-covered banana pop back onto the parchment-lined baking sheet. Repeat the process with the remaining bananas. Once all the pops are dipped and decorated, return the baking sheet to the freezer for at least another 30 minutes to an hour to ensure the chocolate is fully hardened and the banana is completely frozen.
Nutrition Facts
- Servings: 8 pops
- Calories Per Serving: Approximately 250-300 kcal (This can vary significantly based on the size of the banana and the amount and type of toppings used).
- Potassium: Bananas are a fantastic source of potassium, an essential mineral and electrolyte that helps regulate nerve signals, muscle contractions, and fluid balance in the body.
- Healthy Fats: The use of coconut oil and optional toppings like chopped nuts adds a dose of healthy unsaturated and medium-chain fats, which are beneficial for heart health and sustained energy.
- Fiber: With several grams of dietary fiber per serving from the banana, this treat can aid in digestion and help you feel fuller for longer, making it a more satisfying snack than empty-calorie sweets.
- Antioxidants: Choosing a high-quality dark or semi-sweet chocolate with a high cacao percentage means you’re getting a dose of flavonoids, powerful antioxidants that can help combat oxidative stress in the body.
- Natural Sugars: While there is sugar in the chocolate, a significant portion of the sweetness comes from the natural fructose in the banana, making it a more wholesome choice compared to treats made entirely with refined sugars.
Preparation Time
This recipe is incredibly quick in terms of active work, but requires patience for the freezing periods.
- Active Preparation Time: 15-20 minutes. This includes peeling and cutting the bananas, inserting the sticks, melting the chocolate, and dipping the pops.
- Freezing Time: Approximately 2.5 – 3 hours. This is the hands-off time where the freezer does all the work, first freezing the bananas and then setting the final product.
- Total Time: Around 3 hours. Despite the total time, the minimal active effort makes this an exceptionally easy recipe to fit into your day.
How to Serve
These chocolate covered banana pops are versatile and can be presented in numerous fun and appealing ways. Here are a few ideas for serving them:
- The Classic Summer Cool-Down:
- Serve them straight from the freezer on a hot day.
- Perfect for grabbing and enjoying in the backyard, by the pool, or as a post-dinner treat on the patio.
- Their simple, handheld nature makes them an ideal no-fuss, no-mess snack.
- A DIY Banana Pop Party Bar:
- This is a fantastic and interactive idea for kids’ birthday parties or family gatherings.
- Prepare the frozen, stick-inserted bananas ahead of time.
- Set up a “decorating station” with the tall glass of melted chocolate and several small bowls filled with a wide array of toppings.
- Topping Ideas for a Party Bar:
- Rainbow and chocolate sprinkles
- Mini M&Ms or chocolate chips
- Crushed Oreos or other cookies
- Toasted shredded coconut
- Finely chopped walnuts, pecans, or almonds
- Colorful popping candy
- Dehydrated mini marshmallows
- Let each guest dip their own banana pop and create their own masterpiece. It’s an activity and a dessert all in one!
- An Elegant and Light Dessert:
- For a more sophisticated presentation, you can elevate the banana pops.
- Use high-quality dark chocolate (70% cacao or higher).
- Focus on elegant toppings like flaky sea salt, finely chopped pistachios, or a delicate drizzle of melted white chocolate over the dark chocolate shell.
- Arrange them artfully on a chilled platter or slate board to serve after a dinner party or barbecue.
- As a Healthy “Ice Cream” Alternative:
- When you’re craving something creamy and sweet but want to stay on a healthier track, these are the perfect solution.
- Serve one as a satisfying single-serving dessert to curb sweet cravings.
- Focus on nutrient-dense toppings like chia seeds, hemp hearts, or chopped peanuts for an extra boost of protein and healthy fats.
Additional Tips
- Banana Ripeness is Paramount: The ideal banana is yellow with a few brown spots. This indicates it’s sweet and flavorful but still firm enough to handle being cut and put on a stick. Green-tipped bananas won’t be sweet enough, and overly brown, mushy bananas will fall apart.
- Don’t Skip the Coconut Oil: The coconut oil is not just for flavor; it’s a functional ingredient. It lowers the viscosity of the melted chocolate, making it thinner and easier to dip for a smooth, even coating. It also helps the chocolate shell become extra crisp and “crackly” when you bite into it.
- Master the Double Dip (for Chocolate Lovers): For an extra-thick and decadent chocolate shell, try a double-dipping technique. Dip the frozen banana once, let the chocolate set for a minute on the parchment paper in the freezer, and then dip it a second time. This creates an incredibly satisfying and crunchy shell.
- Work Quickly and In Batches: Your biggest enemy is time. The bananas will start to thaw, and the chocolate will begin to cool and thicken. Work with only 2-3 banana pops at a time, leaving the rest in the freezer until you are ready for them. This keeps everything at the optimal temperature.
- Choose the Right Sticks: While standard popsicle sticks work well, you can also find slightly wider and sturdier “craft sticks” at most craft stores. These provide a more stable base, especially if you are using very large bananas. For a fun twist, you can even use colorful reusable popsicle sticks.
- Proper Storage Prevents Freezer Burn: To store your banana pops for more than a day, wrap each one individually and tightly in plastic wrap or place them in a single layer in an airtight, freezer-safe container or zip-top bag. This prevents ice crystals from forming and protects them from freezer burn, keeping them fresh for up to two weeks.
- Get Creative with Your Chocolate: Don’t feel limited to semi-sweet chocolate. This recipe works wonderfully with dark chocolate for a richer, more intense flavor, milk chocolate for a sweeter, creamier taste, or even white chocolate. You can also create a beautiful marbled or drizzled effect by melting two types of chocolate and decorating with the second one.
- Preparation is Key: Before you even think about melting the chocolate, get everything else ready. Have your baking sheet lined, your bananas frozen, and all your toppings measured out and placed in shallow bowls. This “mise en place” approach ensures a smooth, stress-free dipping process once the chocolate is melted and ready to go.
Frequently Asked Questions (FAQ)
1. Can I use unripe or very overripe bananas for this recipe?
It’s best to avoid both extremes. Unripe, greenish bananas lack the sweetness and flavor needed to complement the chocolate and can have a starchy, unpleasant texture. Very overripe, mushy bananas are too soft; they will likely fall apart when you insert the stick or try to dip them. The perfect banana is bright yellow, perhaps with a few brown freckles, indicating peak sweetness and a firm texture.
2. Why is my melted chocolate so thick and clumpy?
This usually happens for one of two reasons. First, the chocolate may have been overheated. If chocolate gets too hot, especially in the microwave, it can “seize” and become a thick, grainy mess. Always heat it slowly and stir frequently. Second, any contact with water can cause chocolate to seize. Ensure your bowls, spoons, and the bananas themselves are completely dry. The addition of coconut oil is specifically designed to help thin the chocolate for a smoother consistency.
3. How do I properly store leftover chocolate covered banana pops?
For the best results, place the fully frozen pops in a single layer in a freezer-safe airtight container or a large zip-top freezer bag. If you need to stack them, place a layer of parchment paper between each layer to prevent sticking. Stored this way, they will stay fresh and delicious for up to 2 weeks. Wrapping them individually first provides extra protection against freezer burn.
4. Are these chocolate covered banana pops actually healthy?
Compared to many store-bought frozen novelties, they are a significantly healthier option. The base is a whole fruit—the banana—which provides fiber, potassium, and vitamins. When you use dark chocolate (70% cacao or higher), you get the benefit of antioxidants with less sugar. The health factor can be further enhanced by choosing nutrient-dense toppings like nuts and seeds over sugary sprinkles. They are a wonderful example of a “whole-food-based” treat.
5. Can I make this recipe vegan and/or gluten-free?
Absolutely! This recipe is naturally very allergy-friendly. To ensure it is 100% vegan, simply use a brand of chocolate chips that is certified dairy-free (many high-quality dark chocolate and semi-sweet varieties are). The recipe is also naturally gluten-free, but you should double-check that your toppings (like crushed cookies or pretzels) are certified gluten-free if you have a sensitivity or celiac disease.
6. What are the absolute best toppings for chocolate covered bananas?
The “best” topping is subjective, but classic pairings are popular for a reason! For a salty-sweet combination, crushed peanuts, pretzels, or a sprinkle of flaky sea salt are unbeatable. For a texture contrast, toasted coconut, crushed nuts (almonds, walnuts), or sprinkles add a great crunch. For a fun, kid-friendly option, mini M&Ms or crushed Oreos are always a huge hit. The beauty is in the customization!
7. My bananas keep falling off the popsicle sticks! How can I prevent this?
This is a common issue that can be solved with a few tricks. First, make sure you are pushing the stick in far enough—at least halfway through the banana piece—for stability. Second, freeze the bananas for the full recommended time before dipping. A rock-solid frozen banana is less likely to become soft and slip. Finally, use bananas that are firm, not overripe and mushy, as their structure will be much more sound.
8. How long do the banana pops really take to freeze solid?
The initial freeze of the plain bananas should be a minimum of 1-2 hours. After they are dipped in chocolate, they need at least another 30-60 minutes back in the freezer to ensure the chocolate shell is completely hard and the banana inside is fully re-frozen. For the best firm, ice-cream-like texture, a total freezing time of around 3 hours is ideal. If you’re in a rush, a colder freezer setting can speed this up slightly.
Easy Chocolate Covered Banana Pops
Ingredients
- Ripe Bananas: 4 large, ripe but still firm bananas. Using bananas that are sweet but can hold their shape is key to the perfect pop.
- Semi-Sweet Chocolate Chips: 2 cups (about 12 ounces). A quality semi-sweet chocolate provides a wonderful balance to the banana’s sweetness without being overly bitter.
- Coconut Oil: 2 tablespoons, refined or unrefined. This is the secret ingredient for creating a smooth, glossy chocolate shell that hardens perfectly.
- Popsicle Sticks: 8 sturdy wooden or reusable popsicle sticks. Sometimes called craft sticks, these are essential for turning the bananas into easy-to-handle pops.
- Optional Toppings: A variety of choices like chopped peanuts, rainbow sprinkles, shredded coconut, flaky sea salt, or crushed pretzels. This is where you can get creative!
Instructions
- Prepare the Bananas and Freezing Station: Begin by lining a large baking sheet or tray with parchment paper or wax paper. This is a crucial step to prevent the bananas from sticking after freezing. Peel the four bananas and cut each one in half crosswise, creating eight equal-sized pieces.
- Insert the Sticks: Gently and carefully insert a popsicle stick into the cut-end of each banana half. Push the stick in about halfway through the banana, ensuring it’s secure but doesn’t poke through the other side. The straighter you insert the stick, the more stable your banana pop will be.
- The First Freeze: Arrange the bananas on the prepared baking sheet, making sure they aren’t touching each other. Place the baking sheet in the freezer for at least 1 to 2 hours. This initial freeze is vital. Freezing the bananas solid ensures the warm, melted chocolate will harden almost instantly upon contact, creating a clean, crisp shell and preventing the bananas from becoming mushy.
- Melt the Chocolate: About 10 minutes before you plan to take the bananas out of the freezer, it’s time to melt the chocolate. You can do this in two ways:
- Microwave Method: Combine the chocolate chips and coconut oil in a microwave-safe bowl. Heat in 30-second intervals, stirring thoroughly after each interval, until the chocolate is almost completely melted. Remove and continue to stir until the residual heat melts the remaining chips and the mixture is perfectly smooth. Be careful not to overheat it, as this can cause the chocolate to seize and become grainy.
- Double Boiler Method: If you prefer, set up a double boiler. Fill a small saucepan with about an inch of water and bring it to a simmer. Place a heatproof bowl on top of the saucepan, ensuring the bottom of the bowl does not touch the water. Add the chocolate chips and coconut oil to the bowl and stir continuously until everything is melted and glossy.
- Prepare for Dipping: Once the chocolate is melted, pour it into a tall, narrow glass or jar. This makes dipping much easier and ensures you can get a full, even coating on each banana pop without making a huge mess. Have your desired toppings ready in shallow bowls or plates nearby.
- Dip the Bananas: Remove the frozen bananas from the freezer. Working one at a time, dip a frozen banana pop into the melted chocolate, turning it to coat all sides completely. You can use a spoon to help cover any missed spots. The cold banana will cause the chocolate to set very quickly, so you need to work efficiently.
- Add Toppings Immediately: As soon as the banana is coated in chocolate, immediately sprinkle on your toppings or roll the pop in your bowl of toppings. The chocolate shell hardens within a minute, so you must add the toppings before it sets completely for them to adhere properly.
- The Final Freeze: Place the finished chocolate-covered banana pop back onto the parchment-lined baking sheet. Repeat the process with the remaining bananas. Once all the pops are dipped and decorated, return the baking sheet to the freezer for at least another 30 minutes to an hour to ensure the chocolate is fully hardened and the banana is completely frozen.
Nutrition
- Serving Size: one normal portion
- Calories: 300


