Ingredients
Here are the simple, wholesome ingredients you’ll need to create these delightful dessert cups. Each component plays a crucial role in building the perfect balance of texture and flavor.
For the Shortcake Biscuits:
- 2 cups All-Purpose Flour: This forms the structural base of our tender, flaky biscuits.
- 1/4 cup Granulated Sugar: Adds a subtle sweetness to the biscuits, complementing the strawberries perfectly.
- 1 tablespoon Baking Powder: This is the leavening agent that gives the biscuits their light, airy lift.
- 1/2 teaspoon Salt: Enhances all the other flavors and balances the sweetness.
- 1/2 cup (1 stick) Cold, Unsalted Butter: The key to a flaky biscuit. It must be very cold and cut into small cubes to create steam pockets as it bakes.
- 3/4 cup Buttermilk or Heavy Cream: Provides moisture and richness, contributing to a tender crumb. Buttermilk will add a slight tang.
- 1 tablespoon Coarse Sugar (like Turbinado): For sprinkling on top before baking, creating a delightful crunchy, golden crust.
For the Strawberry Filling:
- 2 pounds Fresh Strawberries: The star of the show! Look for ripe, vibrant red berries for the best flavor. This is about 6–7 cups once hulled and sliced.
- 1/4 cup to 1/2 cup Granulated Sugar: Used to macerate the strawberries. The amount depends on the natural sweetness of your berries and your personal preference.
- 1 tablespoon Lemon Juice: A secret weapon that brightens the flavor of the strawberries and prevents the filling from being overly sweet.
For the Homemade Whipped Cream:
- 2 cups Cold Heavy Whipping Cream: The foundation of our light and airy topping. It must be very cold to whip up properly.
- 1/4 cup Powdered Sugar: Dissolves easily into the cream without creating a grainy texture, adding a delicate sweetness.
- 1 teaspoon Vanilla Extract: Adds a warm, aromatic depth of flavor that pairs beautifully with the fruit and biscuits.
Instructions
Follow these step-by-step instructions to assemble your perfect Strawberry Shortcake Cups. We’ll prepare each of the three main components separately before bringing them all together for the grand finale.
Step 1: Prepare the Strawberry Filling
This step is best done first to allow the strawberries time to macerate, which means they will soften and release their natural, delicious juices to create a beautiful syrup.
- Wash and Hull: Gently wash the strawberries under cool running water and pat them dry. Remove the green leafy tops (the hull) with a small paring knife or a strawberry huller.
- Slice the Berries: Slice the strawberries to your desired thickness. For cups, a mix of quartered smaller berries and sliced larger berries works well for texture. Place them in a large bowl.
- Macerate: Sprinkle the granulated sugar and lemon juice over the sliced strawberries. Gently stir to combine, being careful not to mash the berries.
- Rest: Cover the bowl and let it sit at room temperature for at least 30 minutes, or up to 2 hours. You will notice a lovely syrup forming at the bottom of the bowl as the sugar draws out the juices. If preparing further in advance, store it in the refrigerator.
Step 2: Make the Shortcake Biscuits
The key to tender, flaky shortcakes is working with cold ingredients and a light touch. Do not overwork the dough.
- Preheat and Prepare: Preheat your oven to 400°F (200°C). Line a large baking sheet with parchment paper.
- Combine Dry Ingredients: In a large mixing bowl, whisk together the all-purpose flour, 1/4 cup of granulated sugar, baking powder, and salt.
- Cut in the Butter: Add the cold, cubed butter to the flour mixture. Using a pastry blender, two knives, or your fingertips, cut the butter into the flour until the mixture resembles coarse crumbs with some pea-sized pieces of butter still visible. These butter pieces are essential for creating flaky layers.
- Add Liquid: Pour in the cold buttermilk or heavy cream. Use a fork or a rubber spatula to gently stir until a shaggy dough just comes together. Be careful not to overmix; a few dry spots are okay.
- Shape the Biscuits: Turn the dough out onto a lightly floured surface. Gently knead it just 3-4 times to bring it together into a cohesive ball. Pat the dough out to a thickness of about 3/4-inch.
- Cut the Biscuits: Use a 2.5 or 3-inch round biscuit cutter to cut out the biscuits. Press the cutter straight down without twisting to ensure a high rise. Gently re-form the scraps to cut out more biscuits. You should get about 8-10 biscuits.
- Bake: Place the biscuits on the prepared baking sheet, about an inch apart. For a final touch, you can brush the tops with a little extra buttermilk or cream and sprinkle with the coarse turbinado sugar.
- Bake to Perfection: Bake for 12-15 minutes, or until the tops are golden brown and a toothpick inserted into the center comes out clean. Let them cool on the baking sheet for a few minutes before transferring them to a wire rack to cool completely.
Step 3: Whip the Cream
For the best results, chill your mixing bowl and whisk (or beaters) in the freezer for 10-15 minutes before you start.
- Chill Your Equipment: A cold bowl and beaters will help the cream whip up faster and create a more stable, voluminous texture.
- Start Whipping: Pour the cold heavy whipping cream, powdered sugar, and vanilla extract into the chilled bowl.
- Mix: Using an electric hand mixer or a stand mixer with the whisk attachment, begin whipping on low speed and gradually increase to medium-high.
- Form Peaks: Continue whipping until soft peaks form. This is when the cream holds its shape slightly but the peak slumps over when you lift the beaters. For a sturdier cream that holds up better in the cups, continue whipping to medium or stiff peaks (the peak will stand straight up). Be careful not to over-whip, or you will start to make butter.
Step 4: Assemble the Strawberry Shortcake Cups
Now for the fun part! You can assemble these just before serving or set up a station for guests to build their own.
- Prepare the Biscuits: Once the biscuits are cool, crumble or cut them into bite-sized pieces. You’ll need about one biscuit per cup.
- Layer One: Place a layer of the crumbled biscuit pieces at the bottom of your serving cups or glasses.
- Layer Two: Spoon a generous amount of the juicy strawberry filling, including some of the syrup, over the biscuit layer.
- Layer Three: Top the strawberries with a large dollop or pipe a swirl of the fresh whipped cream.
- Repeat (Optional): If your cups are large enough, you can repeat the layers for a more dramatic effect: another layer of biscuit, more strawberries, and a final swirl of cream.
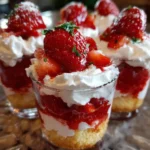
- Garnish and Serve: Garnish the top with a fresh strawberry slice and a mint sprig for a pop of color. Serve immediately and enjoy!
Nutrition
- Serving Size: one normal portion
- Calories: 550
- Fat: 25g
- Carbohydrates: 60g