")


There’s a certain magic that happens when the first truly warm day of the season arrives. For my family, it’s a signal to fire up the grill, pull the patio furniture out of storage, and end the day with a dessert that tastes like pure sunshine. Last weekend was one of those perfect days, and I decided to try something a little different with a classic favorite. Instead of one large, messy-to-serve cake, I opted for these Easy Strawberry Shortcake Cups. The reaction was nothing short of spectacular. My kids loved having their own personal dessert, meticulously layering the components themselves. My husband, who usually just takes a polite bite of dessert, went back for a second cup. The beauty of this recipe isn’t just in its delightful taste—the tender, buttery biscuit, the sweet, juicy strawberries, and the cloud of fresh whipped cream—it’s in its simplicity and charm. It transforms a humble dessert into an elegant, individual experience that feels special, yet it’s one of the easiest recipes in my arsenal. These cups have now become our official “welcome to summer” tradition.
Ingredients
Here are the simple, wholesome ingredients you’ll need to create these delightful dessert cups. Each component plays a crucial role in building the perfect balance of texture and flavor.
For the Shortcake Biscuits:
- 2 cups All-Purpose Flour: This forms the structural base of our tender, flaky biscuits.
- 1/4 cup Granulated Sugar: Adds a subtle sweetness to the biscuits, complementing the strawberries perfectly.
- 1 tablespoon Baking Powder: This is the leavening agent that gives the biscuits their light, airy lift.
- 1/2 teaspoon Salt: Enhances all the other flavors and balances the sweetness.
- 1/2 cup (1 stick) Cold, Unsalted Butter: The key to a flaky biscuit. It must be very cold and cut into small cubes to create steam pockets as it bakes.
- 3/4 cup Buttermilk or Heavy Cream: Provides moisture and richness, contributing to a tender crumb. Buttermilk will add a slight tang.
- 1 tablespoon Coarse Sugar (like Turbinado): For sprinkling on top before baking, creating a delightful crunchy, golden crust.
For the Strawberry Filling:
- 2 pounds Fresh Strawberries: The star of the show! Look for ripe, vibrant red berries for the best flavor. This is about 6-7 cups once hulled and sliced.
- 1/4 cup to 1/2 cup Granulated Sugar: Used to macerate the strawberries. The amount depends on the natural sweetness of your berries and your personal preference.
- 1 tablespoon Lemon Juice: A secret weapon that brightens the flavor of the strawberries and prevents the filling from being overly sweet.
For the Homemade Whipped Cream:
- 2 cups Cold Heavy Whipping Cream: The foundation of our light and airy topping. It must be very cold to whip up properly.
- 1/4 cup Powdered Sugar: Dissolves easily into the cream without creating a grainy texture, adding a delicate sweetness.
- 1 teaspoon Vanilla Extract: Adds a warm, aromatic depth of flavor that pairs beautifully with the fruit and biscuits.
Instructions
Follow these step-by-step instructions to assemble your perfect Strawberry Shortcake Cups. We’ll prepare each of the three main components separately before bringing them all together for the grand finale.
Step 1: Prepare the Strawberry Filling
This step is best done first to allow the strawberries time to macerate, which means they will soften and release their natural, delicious juices to create a beautiful syrup.
- Wash and Hull: Gently wash the strawberries under cool running water and pat them dry. Remove the green leafy tops (the hull) with a small paring knife or a strawberry huller.
- Slice the Berries: Slice the strawberries to your desired thickness. For cups, a mix of quartered smaller berries and sliced larger berries works well for texture. Place them in a large bowl.
- Macerate: Sprinkle the granulated sugar and lemon juice over the sliced strawberries. Gently stir to combine, being careful not to mash the berries.
- Rest: Cover the bowl and let it sit at room temperature for at least 30 minutes, or up to 2 hours. You will notice a lovely syrup forming at the bottom of the bowl as the sugar draws out the juices. If preparing further in advance, store it in the refrigerator.
Step 2: Make the Shortcake Biscuits
The key to tender, flaky shortcakes is working with cold ingredients and a light touch. Do not overwork the dough.
- Preheat and Prepare: Preheat your oven to 400°F (200°C). Line a large baking sheet with parchment paper.
- Combine Dry Ingredients: In a large mixing bowl, whisk together the all-purpose flour, 1/4 cup of granulated sugar, baking powder, and salt.
- Cut in the Butter: Add the cold, cubed butter to the flour mixture. Using a pastry blender, two knives, or your fingertips, cut the butter into the flour until the mixture resembles coarse crumbs with some pea-sized pieces of butter still visible. These butter pieces are essential for creating flaky layers.
- Add Liquid: Pour in the cold buttermilk or heavy cream. Use a fork or a rubber spatula to gently stir until a shaggy dough just comes together. Be careful not to overmix; a few dry spots are okay.
- Shape the Biscuits: Turn the dough out onto a lightly floured surface. Gently knead it just 3-4 times to bring it together into a cohesive ball. Pat the dough out to a thickness of about 3/4-inch.
- Cut the Biscuits: Use a 2.5 or 3-inch round biscuit cutter to cut out the biscuits. Press the cutter straight down without twisting to ensure a high rise. Gently re-form the scraps to cut out more biscuits. You should get about 8-10 biscuits.
- Bake: Place the biscuits on the prepared baking sheet, about an inch apart. For a final touch, you can brush the tops with a little extra buttermilk or cream and sprinkle with the coarse turbinado sugar.
- Bake to Perfection: Bake for 12-15 minutes, or until the tops are golden brown and a toothpick inserted into the center comes out clean. Let them cool on the baking sheet for a few minutes before transferring them to a wire rack to cool completely.
Step 3: Whip the Cream
For the best results, chill your mixing bowl and whisk (or beaters) in the freezer for 10-15 minutes before you start.
- Chill Your Equipment: A cold bowl and beaters will help the cream whip up faster and create a more stable, voluminous texture.
- Start Whipping: Pour the cold heavy whipping cream, powdered sugar, and vanilla extract into the chilled bowl.
- Mix: Using an electric hand mixer or a stand mixer with the whisk attachment, begin whipping on low speed and gradually increase to medium-high.
- Form Peaks: Continue whipping until soft peaks form. This is when the cream holds its shape slightly but the peak slumps over when you lift the beaters. For a sturdier cream that holds up better in the cups, continue whipping to medium or stiff peaks (the peak will stand straight up). Be careful not to over-whip, or you will start to make butter.
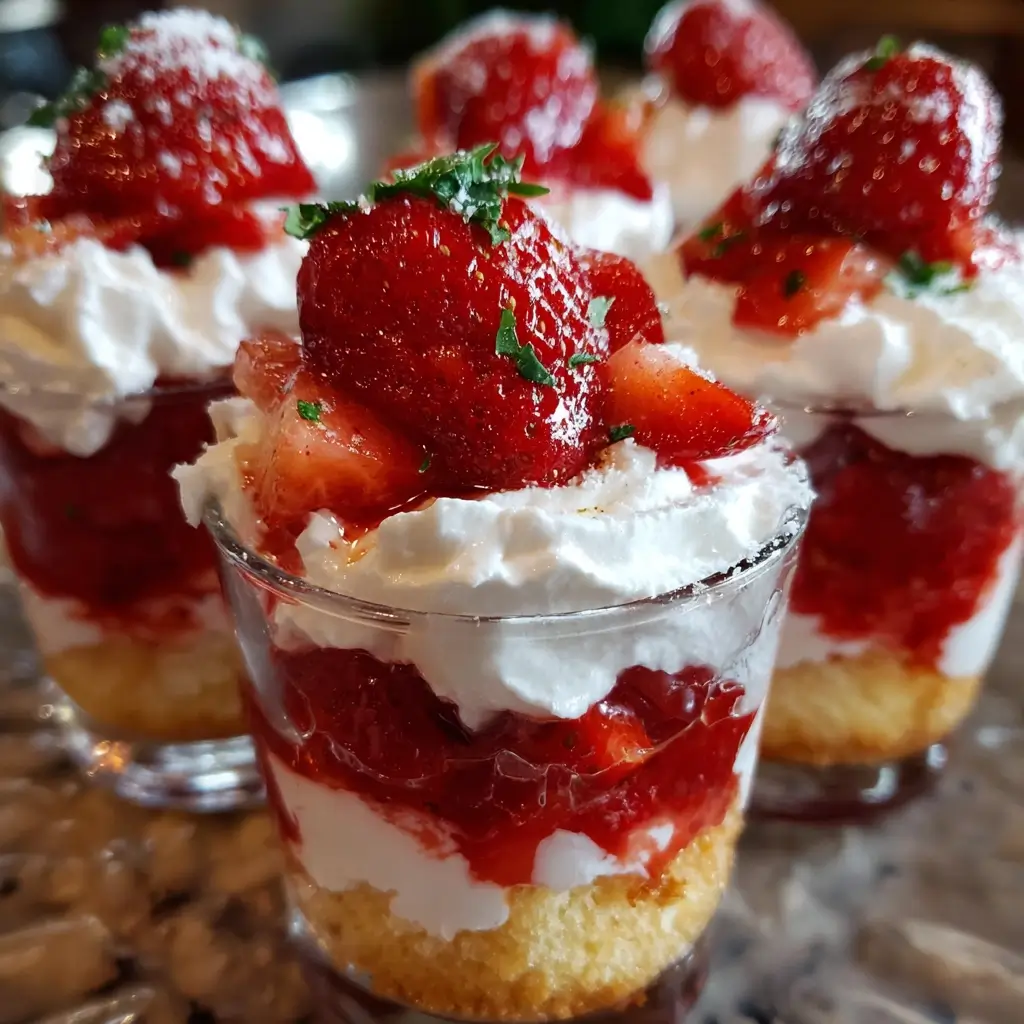
Step 4: Assemble the Strawberry Shortcake Cups
Now for the fun part! You can assemble these just before serving or set up a station for guests to build their own.
- Prepare the Biscuits: Once the biscuits are cool, crumble or cut them into bite-sized pieces. You’ll need about one biscuit per cup.
- Layer One: Place a layer of the crumbled biscuit pieces at the bottom of your serving cups or glasses.
- Layer Two: Spoon a generous amount of the juicy strawberry filling, including some of the syrup, over the biscuit layer.
- Layer Three: Top the strawberries with a large dollop or pipe a swirl of the fresh whipped cream.
- Repeat (Optional): If your cups are large enough, you can repeat the layers for a more dramatic effect: another layer of biscuit, more strawberries, and a final swirl of cream.
- Garnish and Serve: Garnish the top with a fresh strawberry slice and a mint sprig for a pop of color. Serve immediately and enjoy!
Nutrition Facts
Please note that these values are an approximation and can vary based on the specific ingredients used, the sweetness of your strawberries, and your final portion size.
- Servings: 8-10 individual cups
- Calories per Serving: Approximately 450-550 kcal
- Vitamin C: Very high. Strawberries are an excellent source of this powerful antioxidant, which supports the immune system.
- Carbohydrates: Approximately 60g. Primarily from the flour in the biscuits and the sugar used for sweetness.
- Fat: Approximately 25g. Mostly from the butter in the biscuits and the heavy whipping cream, providing richness and flavor.
Preparation Time
This recipe is designed to be straightforward and relatively quick, allowing you to enjoy a stunning dessert without spending all day in the kitchen.
- Prep Time: 25 minutes (for preparing strawberries, mixing biscuit dough, and whipping cream)
- Cook Time: 12-15 minutes (for baking the biscuits)
- Resting Time: 30 minutes (for macerating the strawberries)
- Total Time: Approximately 1 hour and 10 minutes from start to finish.
How to Serve
Serving these shortcakes in individual cups opens up a world of creative and elegant presentation possibilities. Here are some ideas to make your dessert service truly special:
- Create a DIY Shortcake Bar:
- This is a fantastic and interactive idea for parties, barbecues, or family gatherings.
- Set out the three main components in separate bowls: the crumbled shortcake biscuits, the bowl of macerated strawberries, and the bowl of whipped cream.
- Provide a stack of clear glass cups, mason jars, or even fancy cocktail glasses.
- Include a small “toppings bar” with extras like:
- Mini chocolate chips
- Toasted slivered almonds or pecans
- A drizzle of chocolate or caramel sauce
- A bowl of fresh blueberries or raspberries to mix in
- Sprinkles for the kids (and kids at heart!)
- Elegant and Pre-Assembled:
- For a more formal dinner party, assemble the cups just before serving to ensure the biscuits don’t get soggy.
- Use a piping bag with a star tip to create a beautiful, professional-looking swirl of whipped cream on top.
- Serve the cups on a decorative tray for an impressive presentation.
- Garnish Gracefully:
- A simple garnish can elevate the look of the dessert significantly.
- Fresh Mint Sprig: The vibrant green provides a beautiful color contrast against the red and white.
- Lemon or Orange Zest: A light dusting of citrus zest over the whipped cream adds a sophisticated look and a burst of fresh aroma.
- Whole Berry: Top each cup with a single, perfect whole strawberry, either plain or fanned out with a paring knife.
- Edible Flowers: For a truly show-stopping look, garnish with a few delicate, edible flowers like pansies or violas.
- Perfect Pairings:
- Consider what you’ll serve alongside your Strawberry Shortcake Cups.
- For adults: A glass of crisp sparkling wine like Prosecco or a sweet dessert wine cuts through the richness beautifully.
- For all ages: A glass of homemade lemonade or a light iced tea complements the fresh, summery flavors perfectly.
Additional Tips
Master this recipe and make it your own with these eight pro tips for guaranteed success and delicious variations.
- The Colder, The Better: This is the golden rule for both flaky biscuits and stable whipped cream. Keep your butter, buttermilk, and heavy cream in the refrigerator until the very last second you need them. Chilling your mixing bowl and beaters for the whipped cream is a non-negotiable step for achieving lofty, fluffy peaks.
- Don’t Overwork the Biscuit Dough: The biggest mistake in biscuit-making is overmixing. When you mix the dough, you develop gluten. A little gluten is good for structure, but too much will make your biscuits tough and dense instead of light and tender. Mix only until the dough just comes together. A shaggy, slightly messy dough is a good sign.
- Unlock Flavor by Macerating: Don’t skip the step of macerating the strawberries. This simple process of letting them sit in sugar does more than just sweeten them. It draws out the natural juices, creating a luscious, built-in syrup that soaks into the biscuits and makes every bite incredible. Adding lemon juice not only brightens the flavor but also helps break down the pectin in the fruit, contributing to a softer texture and more juice.
- Make-Ahead Magic: You can easily prepare all the components in advance to make assembly a breeze. The biscuits can be baked up to two days ahead and stored in an airtight container at room temperature. The strawberry filling can be made a day in advance and kept in the fridge. The whipped cream is best made fresh, but you can make it a few hours ahead and keep it chilled. Just give it a quick whisk to liven it up before serving.
- Experiment with the Base: While classic shortcake biscuits are divine, feel free to get creative! For a super-fast version, use store-bought angel food cake or pound cake, cut into cubes. Crumbled shortbread cookies or even golden vanilla wafers can also work as a delicious, crunchy base layer in a pinch.
- Control the Sweetness: This recipe is easily adaptable to your taste. The amount of sugar in the strawberry filling can be adjusted based on the ripeness and natural sweetness of your berries. Taste your berries first! If they are incredibly sweet, you might only need a couple of tablespoons of sugar. If they’re a bit tart, you might need the full half cup.
- Add a Flavor Boost: Elevate the components with simple additions. Add the zest of half a lemon or orange to the biscuit dough for a bright, citrusy note. Scrape the seeds from half a vanilla bean into your whipped cream instead of using extract for a more intense, gourmet vanilla flavor. A tiny pinch of cinnamon or cardamom in the biscuit’s dry ingredients can also add a warm, surprising spice.
- The Perfect Biscuit Cut: When using a round cutter for your biscuits, press it straight down and pull it straight up. Do not twist the cutter! Twisting the cutter seals the edges of the biscuit, which prevents them from rising to their full, flaky potential in the oven. A clean, straight cut allows the layers to separate and climb high.
Frequently Asked Questions (FAQ)
Here are answers to some of the most common questions about making Easy Strawberry Shortcake Cups.
1. Can I use frozen strawberries for this recipe?
Yes, you absolutely can, which makes this a great dessert to enjoy year-round! Thaw the frozen strawberries completely in a colander over a bowl to catch the juice. Use the thawed berries as you would fresh ones for the filling, and you can even add some of the reserved juice back in. You may need to adjust the sugar, as frozen berries can sometimes be more tart.
2. How can I make this recipe gluten-free?
To make gluten-free shortcakes, simply substitute the all-purpose flour with a high-quality, cup-for-cup gluten-free flour blend that contains xanthan gum. The texture might be slightly different—often a bit more crumbly—but it will still be delicious. The strawberry and whipped cream components are naturally gluten-free.
3. Is it okay to use store-bought whipped cream or whipped topping?
Of course! If you’re short on time or ingredients, a good quality canned whipped cream or a tub of frozen whipped topping (thawed) will work just fine. While homemade whipped cream offers a superior flavor and texture, the convenience of store-bought options can be a lifesaver.
4. How do I store leftovers?
It is highly recommended to store the components separately. Keep leftover biscuits in an airtight container at room temperature for up to 2 days. The strawberry filling and whipped cream should be stored in separate airtight containers in the refrigerator for up to 3 days. Assembled shortcake cups will get soggy quickly, so they are best enjoyed immediately.
5. Why did my biscuits turn out hard instead of soft and flaky?
Hard biscuits are usually the result of two things: overworking the dough or not using cold enough butter. When you overmix, you develop too much gluten, leading to a tough, bready texture. If your butter is too warm, it melts into the flour instead of staying in small pieces, so you lose the steam pockets that create flaky layers during baking. Always use very cold butter and mix the dough as little as possible.
6. Can I make this as one large traditional strawberry shortcake instead of individual cups?
Yes, this recipe works perfectly for a traditional presentation. Instead of crumbling the biscuits, simply split a whole biscuit in half horizontally. Place the bottom half on a plate, spoon over the strawberries and syrup, top with a generous dollop of whipped cream, and then place the top half of the biscuit on at a slight angle.
7. What’s the best way to prepare the biscuits for the cups?
You have two great options. For a more rustic, textured look, simply use your hands to break and crumble the cooled biscuits into bite-sized pieces. For a cleaner, more uniform look, you can use a serrated knife to carefully cut the biscuits into small, neat cubes. Both methods work wonderfully.
8. Is this a good recipe for kids to help with?
This is an excellent recipe for getting kids involved in the kitchen! They can help with washing and hulling the strawberries (with supervision), stirring the strawberry mixture, measuring dry ingredients for the biscuits, and, of course, the best part—assembling their own dessert cups. It’s a fun, hands-on experience with a delicious reward.

Easy Strawberry Shortcake Cups
Ingredients
Here are the simple, wholesome ingredients you’ll need to create these delightful dessert cups. Each component plays a crucial role in building the perfect balance of texture and flavor.
For the Shortcake Biscuits:
- 2 cups All-Purpose Flour: This forms the structural base of our tender, flaky biscuits.
- 1/4 cup Granulated Sugar: Adds a subtle sweetness to the biscuits, complementing the strawberries perfectly.
- 1 tablespoon Baking Powder: This is the leavening agent that gives the biscuits their light, airy lift.
- 1/2 teaspoon Salt: Enhances all the other flavors and balances the sweetness.
- 1/2 cup (1 stick) Cold, Unsalted Butter: The key to a flaky biscuit. It must be very cold and cut into small cubes to create steam pockets as it bakes.
- 3/4 cup Buttermilk or Heavy Cream: Provides moisture and richness, contributing to a tender crumb. Buttermilk will add a slight tang.
- 1 tablespoon Coarse Sugar (like Turbinado): For sprinkling on top before baking, creating a delightful crunchy, golden crust.
For the Strawberry Filling:
- 2 pounds Fresh Strawberries: The star of the show! Look for ripe, vibrant red berries for the best flavor. This is about 6–7 cups once hulled and sliced.
- 1/4 cup to 1/2 cup Granulated Sugar: Used to macerate the strawberries. The amount depends on the natural sweetness of your berries and your personal preference.
- 1 tablespoon Lemon Juice: A secret weapon that brightens the flavor of the strawberries and prevents the filling from being overly sweet.
For the Homemade Whipped Cream:
- 2 cups Cold Heavy Whipping Cream: The foundation of our light and airy topping. It must be very cold to whip up properly.
- 1/4 cup Powdered Sugar: Dissolves easily into the cream without creating a grainy texture, adding a delicate sweetness.
- 1 teaspoon Vanilla Extract: Adds a warm, aromatic depth of flavor that pairs beautifully with the fruit and biscuits.
Instructions
Follow these step-by-step instructions to assemble your perfect Strawberry Shortcake Cups. We’ll prepare each of the three main components separately before bringing them all together for the grand finale.
Step 1: Prepare the Strawberry Filling
This step is best done first to allow the strawberries time to macerate, which means they will soften and release their natural, delicious juices to create a beautiful syrup.
- Wash and Hull: Gently wash the strawberries under cool running water and pat them dry. Remove the green leafy tops (the hull) with a small paring knife or a strawberry huller.
- Slice the Berries: Slice the strawberries to your desired thickness. For cups, a mix of quartered smaller berries and sliced larger berries works well for texture. Place them in a large bowl.
- Macerate: Sprinkle the granulated sugar and lemon juice over the sliced strawberries. Gently stir to combine, being careful not to mash the berries.
- Rest: Cover the bowl and let it sit at room temperature for at least 30 minutes, or up to 2 hours. You will notice a lovely syrup forming at the bottom of the bowl as the sugar draws out the juices. If preparing further in advance, store it in the refrigerator.
Step 2: Make the Shortcake Biscuits
The key to tender, flaky shortcakes is working with cold ingredients and a light touch. Do not overwork the dough.
- Preheat and Prepare: Preheat your oven to 400°F (200°C). Line a large baking sheet with parchment paper.
- Combine Dry Ingredients: In a large mixing bowl, whisk together the all-purpose flour, 1/4 cup of granulated sugar, baking powder, and salt.
- Cut in the Butter: Add the cold, cubed butter to the flour mixture. Using a pastry blender, two knives, or your fingertips, cut the butter into the flour until the mixture resembles coarse crumbs with some pea-sized pieces of butter still visible. These butter pieces are essential for creating flaky layers.
- Add Liquid: Pour in the cold buttermilk or heavy cream. Use a fork or a rubber spatula to gently stir until a shaggy dough just comes together. Be careful not to overmix; a few dry spots are okay.
- Shape the Biscuits: Turn the dough out onto a lightly floured surface. Gently knead it just 3-4 times to bring it together into a cohesive ball. Pat the dough out to a thickness of about 3/4-inch.
- Cut the Biscuits: Use a 2.5 or 3-inch round biscuit cutter to cut out the biscuits. Press the cutter straight down without twisting to ensure a high rise. Gently re-form the scraps to cut out more biscuits. You should get about 8-10 biscuits.
- Bake: Place the biscuits on the prepared baking sheet, about an inch apart. For a final touch, you can brush the tops with a little extra buttermilk or cream and sprinkle with the coarse turbinado sugar.
- Bake to Perfection: Bake for 12-15 minutes, or until the tops are golden brown and a toothpick inserted into the center comes out clean. Let them cool on the baking sheet for a few minutes before transferring them to a wire rack to cool completely.
Step 3: Whip the Cream
For the best results, chill your mixing bowl and whisk (or beaters) in the freezer for 10-15 minutes before you start.
- Chill Your Equipment: A cold bowl and beaters will help the cream whip up faster and create a more stable, voluminous texture.
- Start Whipping: Pour the cold heavy whipping cream, powdered sugar, and vanilla extract into the chilled bowl.
- Mix: Using an electric hand mixer or a stand mixer with the whisk attachment, begin whipping on low speed and gradually increase to medium-high.
- Form Peaks: Continue whipping until soft peaks form. This is when the cream holds its shape slightly but the peak slumps over when you lift the beaters. For a sturdier cream that holds up better in the cups, continue whipping to medium or stiff peaks (the peak will stand straight up). Be careful not to over-whip, or you will start to make butter.
Step 4: Assemble the Strawberry Shortcake Cups
Now for the fun part! You can assemble these just before serving or set up a station for guests to build their own.
- Prepare the Biscuits: Once the biscuits are cool, crumble or cut them into bite-sized pieces. You’ll need about one biscuit per cup.
- Layer One: Place a layer of the crumbled biscuit pieces at the bottom of your serving cups or glasses.
- Layer Two: Spoon a generous amount of the juicy strawberry filling, including some of the syrup, over the biscuit layer.
- Layer Three: Top the strawberries with a large dollop or pipe a swirl of the fresh whipped cream.
- Repeat (Optional): If your cups are large enough, you can repeat the layers for a more dramatic effect: another layer of biscuit, more strawberries, and a final swirl of cream.
- Garnish and Serve: Garnish the top with a fresh strawberry slice and a mint sprig for a pop of color. Serve immediately and enjoy!
Nutrition
- Serving Size: one normal portion
- Calories: 550
- Fat: 25g
- Carbohydrates: 60g


