")


Of all the recipes that have become staples in our home, this one holds a special place in my heart, and in our freezer. I remember the first time I made these Frozen Yogurt Banana Pops. It was a sweltering July afternoon, the kind where the air feels thick and the kids are wilting from the heat. I needed a hero—a snack that was cold, delicious, and wouldn’t lead to a sugar-crash meltdown an hour later. Rummaging through the kitchen, I found some ripe bananas on the counter, a tub of Greek yogurt in the fridge, and a half-eaten bar of dark chocolate. An idea sparked. A few hours later, I presented my creations. The look on my family’s faces as they took their first bite—a satisfying crack of the chocolate shell, the creamy tang of the frozen yogurt, and the sweet, soft banana within—was pure magic. Since that day, these pops have become our go-to treat for everything from after-school snacks to celebratory desserts. They are deceptively simple, endlessly customizable, and genuinely feel like a guilt-free indulgence. This isn’t just a recipe; it’s a solution to the summer heat, a fun kitchen project, and a guaranteed smile-maker.
Why You’ll Absolutely Love This Frozen Yogurt Banana Pops Recipe
Before we dive into the nitty-gritty, let’s talk about why this recipe will quickly become a favorite in your household. It’s more than just a frozen treat; it’s a versatile and wholesome option that ticks all the right boxes.
- Incredibly Easy to Make: You don’t need any special culinary skills or fancy equipment. If you can peel a banana and dip it in yogurt, you can master this recipe. It’s a fantastic entry-level recipe for getting kids involved in the kitchen.
- Healthy and Wholesome: Packed with the natural goodness of bananas and the protein-rich benefits of Greek yogurt, these pops are a snack you can feel good about. They are a far healthier alternative to store-bought ice cream bars, which are often loaded with refined sugars and artificial ingredients.
- Endlessly Customizable: The recipe provided here is a classic, delicious foundation. But the real fun lies in the variations. You can switch up the yogurt, experiment with dozens of toppings, and create a unique flavor combination every single time.
- Budget-Friendly: This recipe primarily uses staple ingredients that are easy on the wallet. It’s an excellent way to use up those overripe bananas that are past their prime for fresh eating but are perfect for freezing.
- Perfect for All Ages: From toddlers who need a cooling teething treat (with supervision, of course) to adults who want a sophisticated, light dessert, these banana pops are a universal crowd-pleaser.
Essential Equipment for Perfect Pops
While this recipe is simple, having the right tools on hand will make the process smoother, cleaner, and more successful. Here’s what you’ll need to assemble your frozen masterpieces:
- Baking Sheet: A standard half-sheet or quarter-sheet pan is essential. This will be your assembly station and the platform for freezing the pops.
- Parchment Paper or Wax Paper: This is non-negotiable. Lining your baking sheet with parchment paper is the secret to preventing the pops from sticking. It ensures they release cleanly after freezing, preserving their beautiful coating.
- Popsicle Sticks: You can find these at most craft stores or in the baking aisle of your supermarket. Standard wooden craft sticks work perfectly.
- Tall, Narrow Glass or Jar: This is a pro-tip for easy dipping. Dipping the bananas into a bowl of yogurt can be messy and lead to uneven coverage. A tall glass allows you to submerge the banana pop in one clean motion for a perfect, even coat.
- Small Bowls: You’ll want a few small bowls for your toppings. This keeps them organized and makes the decorating process much more fun and less chaotic.
- Microwave-Safe Bowl or Double Boiler: For melting the optional chocolate drizzle. Using the right vessel ensures your chocolate melts smoothly without scorching.
Choosing the Best Ingredients for the Job
The beauty of a simple recipe is that the quality of each ingredient truly shines. Here’s a quick guide to selecting the best components for your frozen yogurt banana pops.
The Bananas: Ripeness is Key
The star of the show is, of course, the banana. For this recipe, you want to look for bananas that are perfectly ripe or even slightly overripe. Look for a vibrant yellow peel with a few brown spots or freckles. These bananas are at their peak sweetness, which means you don’t need to add any extra sugar to the recipe. Their texture is also softer, making them easier to bite into when frozen. Avoid green, underripe bananas as they will be starchy, less sweet, and have a firmer, almost chalky texture when frozen.
The Yogurt: Creamy and Tangy
The yogurt provides the creamy coating and a delightful tang that balances the banana’s sweetness.
- Greek Yogurt: This is my top recommendation. Its thick consistency clings to the banana beautifully, creating a substantial layer. It’s also higher in protein, making the pops more satisfying. Plain or vanilla-flavored Greek yogurt both work wonderfully.
- Regular Yogurt: If you don’t have Greek yogurt, regular plain or vanilla yogurt will work. It is thinner, so you might need to apply two coats (freezing for 30 minutes between each coat) to get a nice, thick layer.
- Dairy-Free/Vegan Options: To make this recipe vegan, simply substitute a plant-based yogurt. Thick coconut-based or almond-based yogurts are excellent choices as they have a good consistency for coating.
The Optional Chocolate Drizzle
A chocolate drizzle or coating takes these pops from a healthy snack to a decadent dessert.
- Dark Chocolate: A good quality dark chocolate (60-75% cacao) provides a rich, intense flavor that pairs beautifully with the sweet banana.
- Semi-Sweet Chocolate Chips: A classic and convenient choice that melts well and has a crowd-pleasing flavor.
- Milk or White Chocolate: For those with a sweeter tooth, these are great options. Be mindful that they will add more sugar to the final product.
Ingredients
- 4 large, ripe bananas: These will form the sweet and soft base of your pops.
- 8 popsicle sticks: To transform the bananas into easy-to-handle pops.
- 1 ½ cups plain or vanilla Greek yogurt: This provides a thick, creamy, protein-rich coating.
- 1 cup semi-sweet or dark chocolate chips (optional): For creating a delicious, crunchy chocolate shell or drizzle.
- 1 tablespoon coconut oil (optional): When mixed with the melted chocolate, it helps it harden faster and creates a smoother, glossier finish.
- ½ cup assorted toppings (optional): Such as chopped peanuts, almonds, sprinkles, shredded coconut, or crushed graham crackers.
Instructions
- Prepare the Bananas: Peel the four ripe bananas. Slice each banana in half crosswise, creating eight banana pieces of roughly equal size.
- Insert the Sticks: Gently but firmly push one popsicle stick into the cut-side of each banana half. Push it about halfway through the banana, ensuring it’s secure enough to hold the weight of the banana and its coatings.
- The First Freeze (Flash Freeze): Line a baking sheet with parchment paper. Place the bananas on the sticks onto the prepared baking sheet, making sure they are not touching each other. Place the sheet in the freezer for at least 30-45 minutes. This initial freeze is crucial; it firms up the bananas so they don’t get mushy during the dipping process and helps the yogurt adhere better.
- Prepare the Yogurt Dip: While the bananas are in their initial freeze, pour the Greek yogurt into a tall, narrow glass or jar. This will make it much easier to get a full, even coat on the bananas. If using toppings, place them in small, shallow bowls for easy access.
- Dip in Yogurt: Remove the partially frozen bananas from the freezer. One by one, dip a banana into the glass of yogurt, turning it to coat it completely. Lift it out and let any excess yogurt drip off for a moment.
- Add Toppings (If Using): Immediately after dipping in yogurt, while the yogurt is still wet, roll the pop in your desired toppings or sprinkle them on. The cold banana will cause the yogurt to start setting quickly, so you need to work fast.
- The Final Freeze: Carefully place the coated bananas back onto the parchment-lined baking sheet. Ensure they have space between them. Place the baking sheet back into the freezer and freeze for at least 3-4 hours, or until the yogurt is completely firm to the touch.
- Add Optional Chocolate Drizzle: Once the yogurt layer is frozen solid, you can add the chocolate. In a microwave-safe bowl, combine the chocolate chips and coconut oil. Microwave in 20-second intervals, stirring in between each, until the chocolate is smooth and fully melted. Be careful not to overheat it.
- Decorate with Chocolate: Remove the frozen pops from the freezer. You can either dip the top half of each pop into the melted chocolate or use a spoon to drizzle the chocolate over them in a decorative pattern. The cold surface of the pop will cause the chocolate to harden almost instantly.
- Serve or Store: The pops are ready to be enjoyed immediately after the chocolate has set. For later enjoyment, proceed to the storage instructions.
Nutrition Facts
- Servings: 8 pops
- Calories per serving: Approximately 160 kcal (will vary based on toppings and chocolate)
- Potassium: Bananas are famously rich in potassium, an essential mineral and electrolyte that helps regulate nerve signals, muscle contractions, and fluid balance.
- Protein: Using Greek yogurt provides a healthy dose of protein, which helps in building and repairing tissues and keeps you feeling full and satisfied for longer.
- Fiber: Bananas are a good source of dietary fiber, which is crucial for digestive health and helps to manage blood sugar levels.
- Healthy Fats: If you use toppings like chopped nuts or add coconut oil to your chocolate, you’re incorporating healthy monounsaturated and polyunsaturated fats, which are beneficial for heart health.
Preparation Time
This recipe is more about patience than active work.
- Active Preparation Time: 20-25 minutes. This includes peeling, slicing, inserting sticks, and the dipping/decorating process.
- Total Freezing Time: A minimum of 4-5 hours. This accounts for the initial flash freeze and the final, longer freeze to ensure the pops are completely solid.
How to Serve
These Frozen Yogurt Banana Pops are incredibly versatile. Here are a few creative and delicious ways to serve them:
- The Simple After-School Snack:
- Serve them straight from the freezer for a quick, cooling, and nutritious snack that kids will love.
- As a Light Dessert:
- Present them on a chilled platter after dinner as a light and refreshing alternative to heavy cakes or ice cream.
- For a Birthday Party:
- Set up a “DIY Banana Pop Bar.” Prepare the flash-frozen bananas on sticks and let kids dip them in yogurt and then choose their own toppings from a variety of bowls. It’s an interactive and fun party activity.
- On a Dessert Charcuterie Board:
- Arrange the finished pops on a large board alongside other treats like fresh berries, chocolate pretzels, small cookies, and bowls of caramel or chocolate sauce for extra dipping.
- A Post-Workout Refuel:
- The combination of carbohydrates from the banana and protein from the Greek yogurt makes this an excellent snack to help replenish energy and aid muscle recovery after exercise.
Customization and Delicious Variations
The true magic of this recipe is its adaptability. Think of the base recipe as a blank canvas for your culinary creativity.
Fruity and Flavorful Twists
- Strawberry Cheesecake: Before dipping, blend ¼ cup of fresh or frozen strawberries and 2 tablespoons of cream cheese into your yogurt. After dipping, roll the pop in crushed graham cracker crumbs.
- Tropical Mango Tango: Mix ¼ cup of mango puree into the yogurt for a tropical twist. Roll in toasted shredded coconut.
- Berry Blast: Gently fold a handful of finely chopped mixed berries (like raspberries and blueberries) into the yogurt before dipping for pops bursting with color and flavor.
Indulgent and Decadent Versions
- Peanut Butter Cup: Swirl 2-3 tablespoons of creamy peanut butter into the yogurt before dipping. After freezing, drizzle with melted chocolate and sprinkle with chopped peanuts.
- S’mores Sensation: Dip in yogurt, then roll in a mixture of crushed graham crackers and mini chocolate chips. For a true s’mores experience, you can lightly toast some mini marshmallows and press them onto the pop.
- Cookie Monster: Crush your favorite cookies (like Oreos or chocolate chip cookies) and mix them into the yogurt or use them as a crunchy coating.
Dietary-Specific Adaptations
- Vegan & Dairy-Free: This is an easy swap. Use a thick, plant-based yogurt like coconut or almond yogurt. Ensure your chocolate is certified dairy-free. Coconut oil is already vegan.
- Protein Power-Up: For an extra boost, mix half a scoop of your favorite plain or vanilla protein powder into the yogurt before dipping. Make sure it’s well combined to avoid a chalky texture.
- Lower Sugar Option: Use unsweetened plain Greek yogurt and a high-cacao (85% or higher) dark chocolate, which contains significantly less sugar. Rely on the natural sweetness of the ripe banana.
Additional Tips for Perfect Frozen Yogurt Banana Pops
- The Flash Freeze is Non-Negotiable: Do not skip the initial 30-45 minute freeze. A room-temperature banana will turn to mush when you try to dip it, and the yogurt will slide right off. A firm, cold banana is the key to a clean dip.
- Embrace the Tall Glass: It might seem like a minor detail, but dipping your banana in a tall, narrow glass instead of a wide bowl is a game-changer. It ensures an even, complete coating in one motion and saves you a lot of mess.
- Work Quickly and in Batches: Once you take the bananas out of the freezer, they will start to thaw. It’s best to work with only 2-3 bananas at a time, leaving the rest in the freezer until you are ready for them. This is especially important when adding toppings, as the yogurt sets fast.
- Parchment Paper is Your Best Friend: I’ll say it again: line your baking sheet. It prevents sticking and makes cleanup a breeze. Nothing is more frustrating than having your beautifully decorated pop get stuck and break.
- Don’t Fear the Ripe Banana: Those bananas with brown spots on your counter are not past their prime; they are perfect for this recipe. Their high sugar content means you get a naturally sweet pop without adding refined sugar.
- Prepare Toppings in Advance: Have all your toppings (chopped nuts, sprinkles, coconut) in shallow bowls and ready to go before you start dipping the bananas in yogurt. The window for applying toppings is short, so you need to be prepared.
- Chocolate Melting 101: To avoid seizing your chocolate (when it becomes a clumpy, grainy mess), melt it low and slow. Use a double boiler or microwave it in short 20-second bursts, stirring thoroughly each time. Make sure no water gets into the chocolate, as this is the primary cause of seizing.
- The Double Dip Technique: For an extra-thick and creamy yogurt layer, you can perform a double dip. Dip the banana in yogurt, place it back on the parchment-lined sheet, and freeze for another 30 minutes. Then, take it out and dip it a second time.
Frequently Asked Questions (FAQ)
1. My yogurt seems too thick/thin for dipping. How can I fix it?
If your Greek yogurt is too thick to dip smoothly, you can thin it out by stirring in a small amount of milk (or plant-based milk), one teaspoon at a time, until you reach a desirable consistency. If your regular yogurt is too thin, you can thicken it by straining it through a cheesecloth for an hour or by mixing in a tablespoon of cornstarch.
2. Can I make these frozen yogurt banana pops without popsicle sticks?
Yes, you can! Slice the bananas into thicker, 1-inch rounds instead of halves. Freeze them on a parchment-lined sheet, then use a fork to dip each round into the yogurt and toppings. Freeze until solid. These “banana bites” are perfect for snacking.
3. Are these frozen yogurt banana pops actually healthy?
Absolutely. Compared to traditional ice cream novelties, they are a fantastic healthy choice. They are made from whole foods—fruit and yogurt—and are packed with potassium, protein, and probiotics. The health factor depends slightly on your choice of toppings, but the base recipe is wonderfully nutritious.
4. How do I prevent the bananas from turning brown?
The freezing process and the yogurt coating largely prevent browning (oxidation). The initial flash freeze helps, and once the banana is sealed in yogurt, it’s protected from the air. You won’t notice any browning in the final product.
5. My chocolate seized up when I melted it! What went wrong and can I fix it?
Chocolate usually seizes for two reasons: it was overheated, or a small amount of water got into it. Always melt chocolate gently. If it has seized, you can sometimes save it for drizzling (though not for a hard shell) by vigorously stirring in a teaspoon of boiling water or neutral oil to smooth it out.
6. Can I use bananas that are already frozen to start the recipe?
It’s not recommended. Commercially frozen bananas are often frozen without being straightened, making it difficult to insert a popsicle stick. It’s best to start with fresh, ripe bananas so you can insert the stick first and then freeze them.
7. How do I store the finished banana pops properly?
Once they are completely frozen solid, wrap each pop individually in plastic wrap or a small piece of parchment paper. This prevents them from sticking together and protects them from freezer burn. Store the wrapped pops in a large, airtight freezer bag or container. They will keep well for up to 2-3 months.
8. Can I make these ahead of time for a party?
Yes, this is an excellent make-ahead recipe! You can prepare them completely—including the chocolate drizzle—up to a week in advance. Store them as directed above, and they’ll be ready to serve whenever you need them.

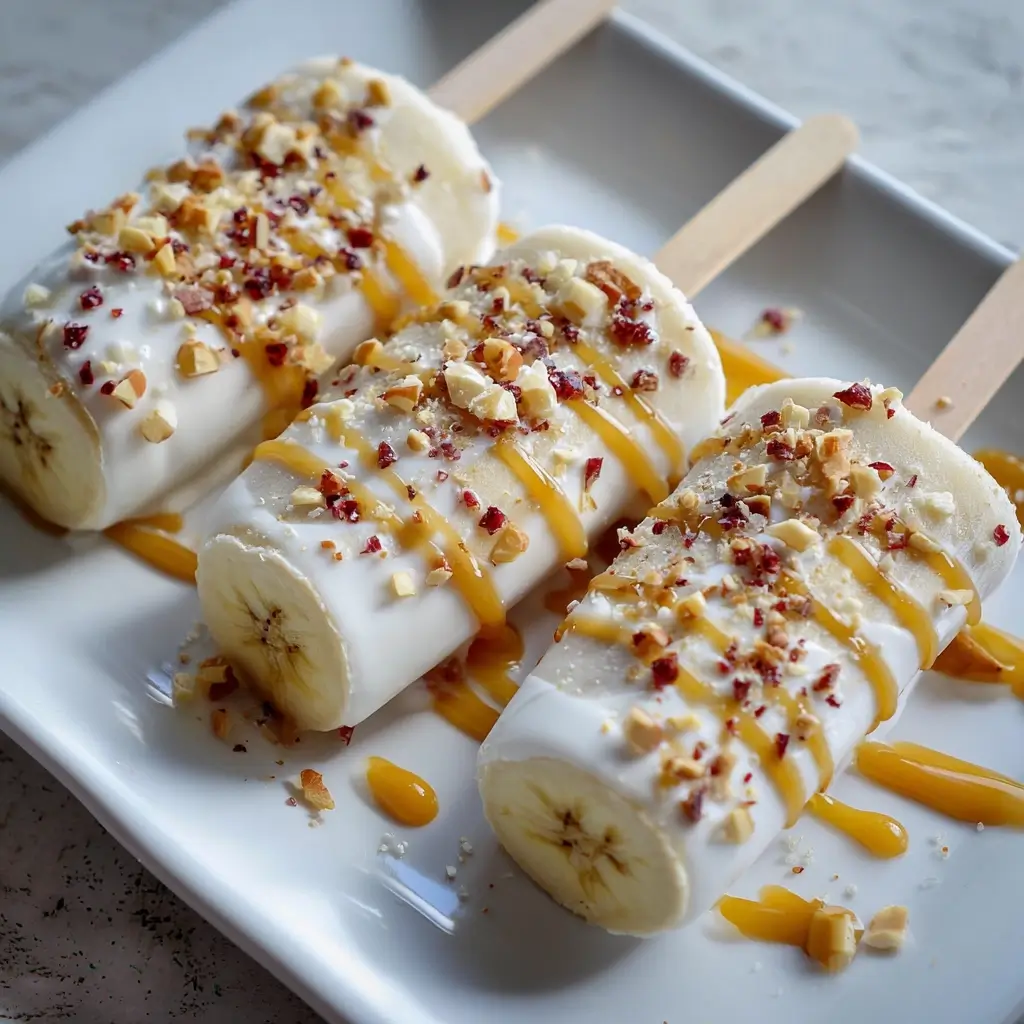
Frozen Yogurt Banana Pops
Ingredients
- 4 large, ripe bananas: These will form the sweet and soft base of your pops.
- 8 popsicle sticks: To transform the bananas into easy-to-handle pops.
- 1 ½ cups plain or vanilla Greek yogurt: This provides a thick, creamy, protein-rich coating.
- 1 cup semi-sweet or dark chocolate chips (optional): For creating a delicious, crunchy chocolate shell or drizzle.
- 1 tablespoon coconut oil (optional): When mixed with the melted chocolate, it helps it harden faster and creates a smoother, glossier finish.
- ½ cup assorted toppings (optional): Such as chopped peanuts, almonds, sprinkles, shredded coconut, or crushed graham crackers.
Instructions
- Prepare the Bananas: Peel the four ripe bananas. Slice each banana in half crosswise, creating eight banana pieces of roughly equal size.
- Insert the Sticks: Gently but firmly push one popsicle stick into the cut-side of each banana half. Push it about halfway through the banana, ensuring it’s secure enough to hold the weight of the banana and its coatings.
- The First Freeze (Flash Freeze): Line a baking sheet with parchment paper. Place the bananas on the sticks onto the prepared baking sheet, making sure they are not touching each other. Place the sheet in the freezer for at least 30-45 minutes. This initial freeze is crucial; it firms up the bananas so they don’t get mushy during the dipping process and helps the yogurt adhere better.
- Prepare the Yogurt Dip: While the bananas are in their initial freeze, pour the Greek yogurt into a tall, narrow glass or jar. This will make it much easier to get a full, even coat on the bananas. If using toppings, place them in small, shallow bowls for easy access.
- Dip in Yogurt: Remove the partially frozen bananas from the freezer. One by one, dip a banana into the glass of yogurt, turning it to coat it completely. Lift it out and let any excess yogurt drip off for a moment.
- Add Toppings (If Using): Immediately after dipping in yogurt, while the yogurt is still wet, roll the pop in your desired toppings or sprinkle them on. The cold banana will cause the yogurt to start setting quickly, so you need to work fast.
- The Final Freeze: Carefully place the coated bananas back onto the parchment-lined baking sheet. Ensure they have space between them. Place the baking sheet back into the freezer and freeze for at least 3-4 hours, or until the yogurt is completely firm to the touch.
- Add Optional Chocolate Drizzle: Once the yogurt layer is frozen solid, you can add the chocolate. In a microwave-safe bowl, combine the chocolate chips and coconut oil. Microwave in 20-second intervals, stirring in between each, until the chocolate is smooth and fully melted. Be careful not to overheat it.
- Decorate with Chocolate: Remove the frozen pops from the freezer. You can either dip the top half of each pop into the melted chocolate or use a spoon to drizzle the chocolate over them in a decorative pattern. The cold surface of the pop will cause the chocolate to harden almost instantly.
- Serve or Store: The pops are ready to be enjoyed immediately after the chocolate has set. For later enjoyment, proceed to the storage instructions.
Nutrition
- Serving Size: one normal portion
- Calories: 160