")


The morning rush is a universal truth for so many of us. Juggling school bags, finding lost shoes, and trying to get a nutritious breakfast on the table can feel like an Olympic sport. For the longest time, my go-to was toast or cereal, but I always felt a twinge of guilt, wishing I could offer something more exciting and wholesome. That’s when I stumbled upon the concept that would completely revolutionize our mornings: Frozen Yogurt Breakfast Bites. The first time I made them, I was skeptical. Would my kids, who are notoriously picky, actually eat frozen yogurt for breakfast? The answer was a resounding YES. They saw them as a treat, a sort of breakfast ice cream, and I saw them as a victory. Packed with protein from Greek yogurt, bursting with fresh fruit, and with a satisfying crunch from granola, these bites became our ultimate breakfast hack. They are incredibly simple to whip up on a Sunday afternoon, and having a stash in the freezer ready to go has been an absolute game-changer. It’s a quick, grab-and-go solution that I feel genuinely good about serving, and honestly, I enjoy them just as much as the kids do for a refreshing start to the day or a light afternoon snack.
Ingredients
- 3 cups Greek Yogurt (full-fat, plain): The star of the show. Using full-fat plain Greek yogurt is crucial for a creamy, less icy texture. It’s packed with protein and probiotics, forming the perfect healthy base for our bites.
- ¼ cup Maple Syrup: This provides a touch of natural sweetness to balance the tang of the yogurt. You can adjust the amount to your personal preference. Pure maple syrup also adds a wonderful, subtle flavor.
- 1 teaspoon Vanilla Extract: A small amount of pure vanilla extract enhances the other flavors and adds a warm, aromatic quality to the yogurt base, making it taste more like a deliberate dessert.
- 1 ½ cups Mixed Berries (fresh or frozen): A combination of blueberries, raspberries, and sliced strawberries adds vibrant color, natural sweetness, and a fantastic dose of antioxidants and fiber. If using frozen, there’s no need to thaw them first.
- ½ cup Granola (your favorite kind): This adds an essential textural contrast. The crunch of the granola against the smooth, frozen yogurt is incredibly satisfying. Choose a granola you love, whether it’s a simple oat and honey variety or one packed with nuts and seeds.
- 2 tablespoons Chia Seeds (optional): For an extra nutritional boost, chia seeds are a fantastic addition. They are rich in omega-3 fatty acids, fiber, and protein, and they blend seamlessly into the yogurt mixture without altering the flavor.
Instructions
- Prepare Your Pan: Begin by lining a 9×13 inch baking pan or a large baking sheet with parchment paper. This is a non-negotiable step! The parchment paper prevents the yogurt from sticking and makes it incredibly easy to lift the entire frozen slab out for cutting later. Ensure the paper goes up the sides of the pan slightly.
- Mix the Yogurt Base: In a large mixing bowl, combine the Greek yogurt, maple syrup, and vanilla extract. Use a spatula or a whisk to mix everything together until it’s completely smooth and uniform in consistency. Make sure there are no remaining streaks of syrup or vanilla. If you’re using the optional chia seeds, stir them in now.
- Incorporate the Fruit: Gently fold in one cup of your mixed berries into the yogurt mixture. Be gentle with your folding motion to avoid completely crushing the berries, especially if you’re using raspberries. You want to see whole or partially whole pieces of fruit distributed throughout the yogurt.
- Spread the Mixture: Pour the yogurt and berry mixture into your prepared parchment-lined pan. Use the back of your spatula to spread it out into an even layer. Aim for a thickness of about ½ to ¾ of an inch. If it’s too thin, the bites will be brittle; if it’s too thick, they will be difficult to bite into when fully frozen.
- Add the Toppings: Sprinkle the remaining ½ cup of mixed berries and the ½ cup of granola evenly over the top of the yogurt base. Gently press the toppings into the yogurt with your hands or the spatula. This helps them adhere to the base and prevents them from falling off after being frozen.
- Freeze Until Solid: Carefully place the pan in the freezer. Ensure it is sitting on a flat, level surface to prevent the mixture from shifting to one side. Let it freeze for a minimum of 3-4 hours, or until it is completely firm and solid to the touch. For best results, freezing overnight is ideal.
- Cut and Store: Once the yogurt slab is fully frozen, remove it from the freezer. Use the edges of the parchment paper to lift the entire slab out of the pan and place it on a cutting board. You can either use a large, sharp knife to cut it into uniform squares or rectangles, or you can simply break it apart with your hands for more rustic, bark-like pieces.
- Final Storage: Immediately transfer the cut frozen yogurt breakfast bites into a freezer-safe, airtight container or a large zip-top freezer bag. Place a small piece of parchment paper between layers to prevent them from sticking together. Store in the freezer for up to 2-3 months.
Nutrition Facts
- Servings: This recipe makes approximately 12-16 servings (bites).
- Calories per serving: Approximately 110-140 kcal, depending on the size of the bites and the specific granola used.
- High in Protein: Each bite is a good source of protein, primarily from the Greek yogurt. Protein is essential for building and repairing tissues, and it helps keep you feeling full and satisfied, reducing the urge to snack between meals.
- Rich in Probiotics: The use of Greek yogurt provides beneficial live and active cultures known as probiotics. These healthy bacteria support gut health, aid in digestion, and can help boost your immune system.
- Source of Antioxidants: The mixed berries are packed with powerful antioxidants, such as anthocyanins. Antioxidants help protect your cells from damage caused by free radicals, contributing to overall health and well-being.
- Good Source of Calcium: Yogurt is a natural source of calcium, a mineral that is vital for maintaining strong bones and teeth. It also plays a key role in muscle function and nerve signaling.
- Provides Healthy Fats and Fiber: Depending on your choice of granola and the addition of chia seeds, these bites can be a good source of heart-healthy fats and dietary fiber. Fiber is crucial for digestive regularity and helps to stabilize blood sugar levels.
Preparation Time
The beauty of this recipe lies in its minimal hands-on time. The active preparation time, which includes gathering ingredients, mixing the base, and spreading it in the pan, is only about 10-15 minutes. The majority of the time is passive, as the bites require at least 3-4 hours of freezing time to become completely solid and ready for cutting.
How to Serve
These Frozen Yogurt Breakfast Bites are wonderfully versatile. While they are perfect on their own, here are a few creative ways to serve and enjoy them:
- The Grab-and-Go Breakfast:
- This is the primary and most convenient way to enjoy them. Simply take one or two pieces directly from the freezer on a busy morning. They are a perfectly portioned, refreshing, and satisfying breakfast that you can eat on your way out the door.
- As a Healthy Dessert:
- Serve a bite on a small plate after dinner. It’s a fantastic, guilt-free alternative to ice cream that satisfies cravings for something cold, creamy, and sweet.
- Crumble as a Topping:
- Break up a bite and crumble it over a bowl of oatmeal or a smoothie bowl. It adds a delicious, cold, creamy element and an extra boost of protein and fruit.
- A Fun Kid’s Snack:
- Kids see these as a special treat. Serve them as an after-school snack to tide them over until dinner. Their colorful appearance and delicious taste make them a guaranteed hit.
- Post-Workout Refuel:
- The combination of protein from the yogurt and carbohydrates from the fruit and maple syrup makes these an excellent snack to help refuel your body after a workout.
- In a Lunchbox:
- Pack a bite in an insulated lunchbox with an ice pack. It will thaw slightly by lunchtime, resulting in a soft, chilled, mousse-like consistency that is still delicious and refreshing.
Additional Tips
- Choose Your Yogurt Wisely: The type of yogurt you use will have the biggest impact on the final texture. Full-fat (5% or higher) Greek yogurt is highly recommended. The higher fat content prevents the formation of large ice crystals, resulting in a much creamier, less icy bite. Avoid non-fat yogurts, as they tend to freeze rock-solid and become brittle.
- Sweetener Science: You have options beyond maple syrup. Honey works beautifully, but it has a slightly stronger flavor. Agave nectar is another great liquid sweetener. If you want to use a granular sweetener like coconut sugar, be sure to stir it into the yogurt until it has completely dissolved to avoid a gritty texture. For a sugar-free version, you can use a powdered or liquid monk fruit or stevia blend, but you may need to add a bit more yogurt or a dash of cream to maintain creaminess, as sugar also helps with texture.
- Get Creative with Toppings and Mix-Ins: Don’t feel limited to berries and granola. The possibilities are endless!
- Mix-ins: Try stirring in a tablespoon of peanut butter or almond butter into the yogurt base, a scoop of protein powder for an extra protein punch, or some shredded coconut.
- Toppings: Drizzle melted dark chocolate over the top before freezing, sprinkle on chopped nuts like almonds or pistachios, add a variety of seeds like pumpkin or sunflower seeds, or even scatter some mini chocolate chips for a more indulgent version.
- Pan and Thickness Matter: While a 9×13 pan is recommended, any pan or baking sheet with a rim will work. The key is to spread the yogurt to a consistent thickness of about ½ to ¾ of an inch. If you spread it too thin, it will be hard and icy. If it’s much thicker, it can be difficult to bite into straight from the freezer.
- Achieving the Perfect Cut: If you want clean, sharp-edged squares, the trick is to use a large, sharp knife that has been run under hot water and then wiped dry. The heat from the knife will slice through the frozen yogurt cleanly. Re-heat and wipe the knife between cuts for the best results. If you prefer a more rustic look, simply breaking the slab with your hands is faster and just as delicious.
- Avoid a Soggy Bottom: To ensure your granola topping stays crunchy, make sure it’s the very last thing you add. Sprinkling it on top and gently pressing it in, rather than mixing it into the yogurt base, helps it maintain its texture. Some extra-crunchy, cluster-style granolas hold up better than finer, muesli-style cereals.
- Long-Term Storage Solutions: For optimal freshness and to prevent freezer burn, proper storage is key. An airtight container is good, but a vacuum-sealed bag is even better if you have one. Placing parchment paper between the layers of bites is crucial to prevent them from freezing into one giant block. They can absorb other odors from the freezer, so ensure your container is sealed tightly.
- Making Them Dairy-Free or Vegan: This recipe is easily adaptable. Simply substitute the Greek yogurt with a thick, dairy-free alternative. A coconut-based or cashew-based yogurt will yield the creamiest results due to their higher fat content. Ensure you use a plain, unsweetened variety so you can control the sweetness, and verify that your chosen granola is also vegan.
FAQ Section
1. Can I use regular yogurt instead of Greek yogurt?
You can, but the results will be different. Regular yogurt has a much higher water content than Greek yogurt. When frozen, this extra water turns into ice crystals, making the bites much icier and less creamy. They will also be lower in protein. If you choose to use regular yogurt, it’s highly recommended to strain it through a cheesecloth for a few hours in the refrigerator to remove some of the excess whey and create a thicker, more Greek-style consistency.
2. How long do these Frozen Yogurt Breakfast Bites last in the freezer?
When stored correctly in an airtight, freezer-safe container or a heavy-duty freezer bag, these bites will maintain their best quality for up to 1 month. They are still safe to eat for up to 3 months, but after the first month, they may begin to develop some ice crystals or lose a bit of their flavor and creamy texture. For best results, eat them sooner rather than later.
3. Are these bites suitable for toddlers and young children?
Absolutely! These are a fantastic option for toddlers and kids. They are nutritious, easy for little hands to hold, and feel like a special treat. For very young children (under one year), you should omit honey as a sweetener. Maple syrup is a safe alternative. Also, be mindful of the toppings; you may want to chop nuts finely or use softer granolas to avoid any choking hazards.
4. My bites turned out rock-hard and icy. What did I do wrong?
The most common culprit for an icy texture is the yogurt you used. This usually happens when using low-fat or non-fat yogurt. The fat content is essential for a creamy frozen texture. Using a full-fat (at least 5% milkfat) Greek yogurt will make a significant difference. Another factor can be the amount of sweetener; sugar (including maple syrup) lowers the freezing point of the mixture, which also helps prevent it from freezing into a solid, icy block.
5. Can I make these without any added sweetener?
Yes, you can. If you prefer a more tart flavor, you can omit the maple syrup or honey entirely. The plain yogurt and fruit will provide some natural flavor. However, be aware that removing the sweetener will affect the texture. As sugar helps keep the bites softer, an unsweetened version will freeze harder and be more icy. Using very ripe, sweet fruit, like mashed bananas or sweet berries, can help add natural sweetness and improve the texture slightly.
6. What other fruits can I use in this recipe?
The sky is the limit when it comes to fruit combinations! Besides berries, here are some other fantastic options:
- Tropical: Diced mango, pineapple, and kiwi with a sprinkle of toasted coconut on top.
- Peaches and Cream: Diced fresh or canned peaches (drained well) with a swirl of vanilla.
- Banana Peanut Butter: Mashed banana mixed into the yogurt base with a swirl of peanut butter and topped with chocolate chips.
- Cherry Chocolate: Chopped dark cherries and mini dark chocolate chips.
- Just be sure to dice larger fruits into small, bite-sized pieces for even distribution.
7. How do I prevent all my fruit and toppings from sinking to the bottom?
There are two key techniques. First, use a thick yogurt base. Full-fat Greek yogurt is naturally thick and will suspend the mix-ins better than a thinner yogurt. Second, reserve some of your prettiest fruit and all of your granola for the topping. After you spread the yogurt base (with some fruit already mixed in), sprinkle the remaining fruit and granola over the surface and press them in gently. This ensures they stay visible and provide that great texture on top.
8. How can I make this recipe nut-free for school lunches or allergies?
Making this recipe nut-free is very simple. The base recipe is naturally nut-free. The only component you need to worry about is the granola. Be sure to purchase a certified nut-free granola, which is often made with oats, seeds, and dried fruit. Alternatively, you can make your own nut-free topping by toasting some rolled oats and pumpkin or sunflower seeds with a drizzle of maple syrup until golden and crunchy. You can also just skip the granola and use extra fruit and seeds as the topping.
Print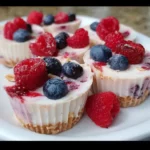
Frozen Yogurt Breakfast Bites
Ingredients
- 3 cups Greek Yogurt (full-fat, plain): The star of the show. Using full-fat plain Greek yogurt is crucial for a creamy, less icy texture. It’s packed with protein and probiotics, forming the perfect healthy base for our bites.
- ¼ cup Maple Syrup: This provides a touch of natural sweetness to balance the tang of the yogurt. You can adjust the amount to your personal preference. Pure maple syrup also adds a wonderful, subtle flavor.
- 1 teaspoon Vanilla Extract: A small amount of pure vanilla extract enhances the other flavors and adds a warm, aromatic quality to the yogurt base, making it taste more like a deliberate dessert.
- 1 ½ cups Mixed Berries (fresh or frozen): A combination of blueberries, raspberries, and sliced strawberries adds vibrant color, natural sweetness, and a fantastic dose of antioxidants and fiber. If using frozen, there’s no need to thaw them first.
- ½ cup Granola (your favorite kind): This adds an essential textural contrast. The crunch of the granola against the smooth, frozen yogurt is incredibly satisfying. Choose a granola you love, whether it’s a simple oat and honey variety or one packed with nuts and seeds.
- 2 tablespoons Chia Seeds (optional): For an extra nutritional boost, chia seeds are a fantastic addition. They are rich in omega-3 fatty acids, fiber, and protein, and they blend seamlessly into the yogurt mixture without altering the flavor.
Instructions
- Prepare Your Pan: Begin by lining a 9×13 inch baking pan or a large baking sheet with parchment paper. This is a non-negotiable step! The parchment paper prevents the yogurt from sticking and makes it incredibly easy to lift the entire frozen slab out for cutting later. Ensure the paper goes up the sides of the pan slightly.
- Mix the Yogurt Base: In a large mixing bowl, combine the Greek yogurt, maple syrup, and vanilla extract. Use a spatula or a whisk to mix everything together until it’s completely smooth and uniform in consistency. Make sure there are no remaining streaks of syrup or vanilla. If you’re using the optional chia seeds, stir them in now.
- Incorporate the Fruit: Gently fold in one cup of your mixed berries into the yogurt mixture. Be gentle with your folding motion to avoid completely crushing the berries, especially if you’re using raspberries. You want to see whole or partially whole pieces of fruit distributed throughout the yogurt.
- Spread the Mixture: Pour the yogurt and berry mixture into your prepared parchment-lined pan. Use the back of your spatula to spread it out into an even layer. Aim for a thickness of about ½ to ¾ of an inch. If it’s too thin, the bites will be brittle; if it’s too thick, they will be difficult to bite into when fully frozen.
- Add the Toppings: Sprinkle the remaining ½ cup of mixed berries and the ½ cup of granola evenly over the top of the yogurt base. Gently press the toppings into the yogurt with your hands or the spatula. This helps them adhere to the base and prevents them from falling off after being frozen.
- Freeze Until Solid: Carefully place the pan in the freezer. Ensure it is sitting on a flat, level surface to prevent the mixture from shifting to one side. Let it freeze for a minimum of 3-4 hours, or until it is completely firm and solid to the touch. For best results, freezing overnight is ideal.
- Cut and Store: Once the yogurt slab is fully frozen, remove it from the freezer. Use the edges of the parchment paper to lift the entire slab out of the pan and place it on a cutting board. You can either use a large, sharp knife to cut it into uniform squares or rectangles, or you can simply break it apart with your hands for more rustic, bark-like pieces.
- Final Storage: Immediately transfer the cut frozen yogurt breakfast bites into a freezer-safe, airtight container or a large zip-top freezer bag. Place a small piece of parchment paper between layers to prevent them from sticking together. Store in the freezer for up to 2-3 months.
Nutrition
- Serving Size: one normal portion
- Calories: 140


