")

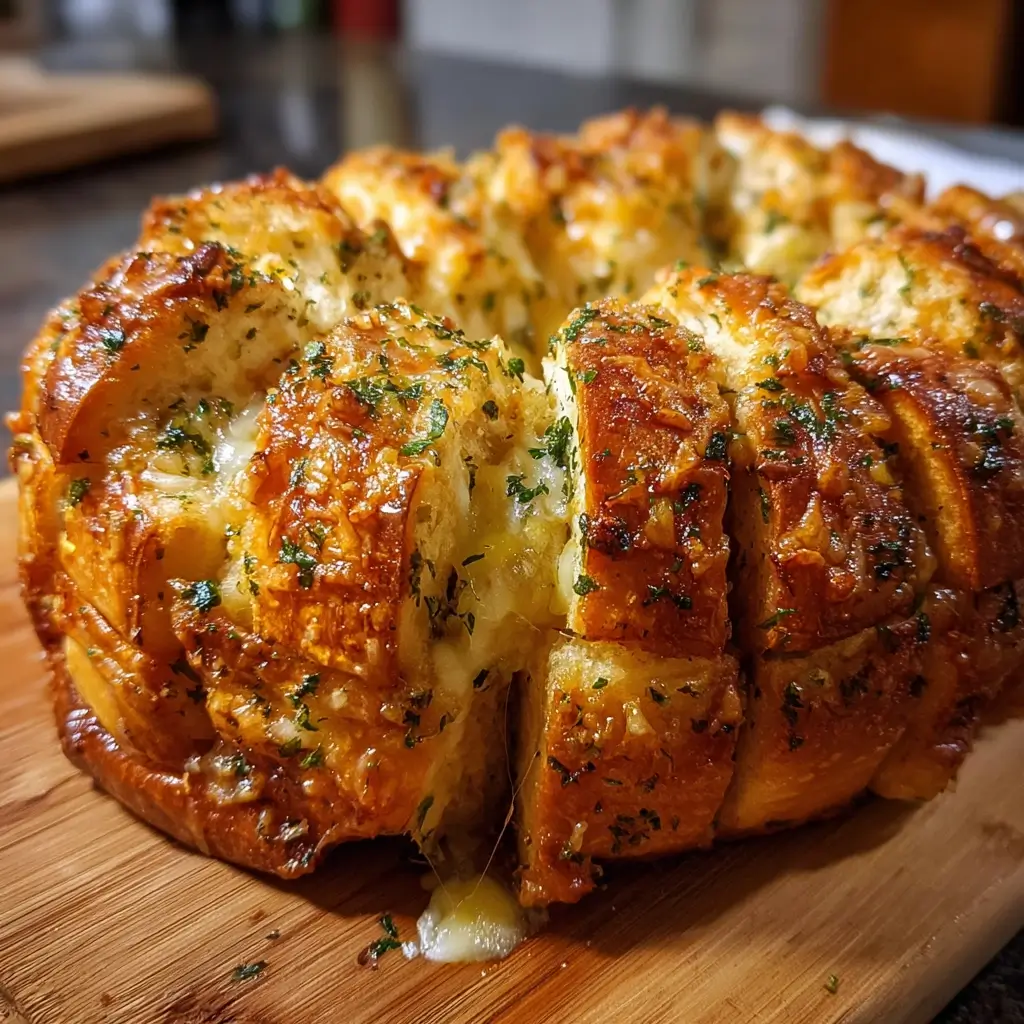

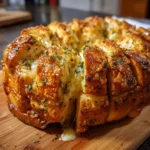
There are certain smells that instantly signal comfort, a sense of home, and the promise of something delicious. For my family, the undisputed champion of these aromas is the scent of garlic and butter toasting in the oven. I’ve made countless garlic bread recipes over the years, from simple toasted baguettes to elaborate stuffed loaves, but nothing has ever captivated my household quite like this Garlic Butter Pull-Apart Bread. The first time I made it was for a casual Sunday family dinner. I brought the golden, bubbly loaf to the table, and the conversation just stopped. Everyone’s eyes were on this glorious, cheesy creation. The real magic happened when the first person reached in to pull a piece away. The sound of the soft bread tearing, followed by an epic cheese pull, was met with audible gasps. It wasn’t just bread; it was an interactive experience. My kids, who are usually picky eaters, were clamoring for more. My husband declared it “the best appetizer ever invented.” It disappeared in under ten minutes, with everyone licking buttery, garlicky goodness from their fingertips. Since that day, it has become our go-to for everything from game nights and holiday gatherings to a comforting side dish for a weeknight pasta dinner. It’s more than a recipe; it’s a centerpiece, a conversation starter, and a guaranteed crowd-pleaser that never fails to make a meal feel special.
Ingredients
This recipe is divided into two main components: the soft, pillowy dough that forms the foundation, and the rich, aromatic garlic butter filling that infuses every single crevice with flavor. Using high-quality ingredients here will make a noticeable difference in the final product.
For the Bread Dough:
- 1 cup (240ml) Warm Milk: The milk should be lukewarm, around 110°F (43°C). Too hot and it will kill the yeast; too cold and it won’t activate it. Whole milk adds richness, but 2% works well too.
- 2 ¼ teaspoons (7g) Active Dry Yeast: This is one standard packet. The yeast is the leavening agent that will make our bread light and airy.
- 2 tablespoons (25g) Granulated Sugar: This provides a touch of sweetness to balance the savory flavors and, more importantly, acts as food for the yeast to help it activate.
- 4 cups (480g) Bread Flour: Bread flour has a higher protein content than all-purpose flour, which helps develop stronger gluten strands. This results in a chewier, more structured bread, perfect for pulling apart. You can use all-purpose flour, but the texture will be slightly softer.
- 1 teaspoon Salt: Salt is crucial for flavor, but it also helps control the yeast’s activity and strengthens the gluten structure.
- 1 large Egg: The egg should be at room temperature. It adds richness, color, and structure to the dough.
- ¼ cup (57g) Unsalted Butter: The butter should be melted and then cooled slightly. Unsalted butter allows you to control the total salt content of the recipe.
For the Garlic Butter Filling:
- ½ cup (113g) Unsalted Butter: This will be melted to create the base of our delicious coating.
- 5-6 cloves Garlic, Minced: This is the star of the show! Use fresh garlic for the best, most potent flavor. Adjust the amount based on your love for garlic.
- ½ cup Fresh Parsley, Finely Chopped: Fresh parsley adds a bright, herby flavor and a beautiful pop of green color that cuts through the richness of the butter and cheese.
- 1 teaspoon Salt: To season the filling.
- ½ teaspoon Black Pepper: For a subtle touch of warmth and spice.
- 2 cups (226g) Mozzarella Cheese, Shredded: Low-moisture, part-skim mozzarella is ideal as it melts beautifully and gives you that classic, irresistible cheese pull without releasing too much water.
- ½ cup (50g) Parmesan Cheese, Grated: Grated Parmesan adds a sharp, nutty, and salty flavor that complements the mozzarella and garlic perfectly.
Instructions
Follow these steps carefully to achieve a perfectly soft, cheesy, and flavorful pull-apart loaf. The process involves making a simple yeast dough, letting it rise, and then assembling the loaf with the glorious garlic butter filling before a final bake.
Step 1: Activate the Yeast
In a small bowl or the bowl of your stand mixer, combine the warm milk, granulated sugar, and active dry yeast. Give it a gentle stir and let it sit for about 5-10 minutes. You are looking for the mixture to become foamy and bubbly on top. This process, called “proofing,” confirms that your yeast is alive and active. If it doesn’t foam, your yeast may be old, and you should start over with a fresh packet.
Step 2: Mix the Dough
Once the yeast is proofed, add the bread flour, salt, room temperature egg, and melted butter to the bowl. If using a stand mixer, attach the dough hook and mix on low speed until a shaggy dough begins to form. Increase the speed to medium-low and continue to knead for about 7-9 minutes. The dough should become smooth, elastic, and pull away from the sides of the bowl. If mixing by hand, combine the ingredients in a large bowl with a wooden spoon until a shaggy dough forms. Turn the dough out onto a lightly floured surface.
Step 3: Knead the Dough by Hand (if not using a mixer)
Knead the dough by pressing it down and forward with the heel of your hand, then folding it over and giving it a quarter turn. Repeat this process for about 10-12 minutes. The dough is ready when it is smooth, elastic, and springs back when you gently poke it. You can also perform the “windowpane test”: stretch a small piece of dough between your fingers. If you can stretch it thin enough to see light through it without it tearing, the gluten is well-developed.
Step 4: First Rise
Lightly grease a large bowl with oil or cooking spray. Form your dough into a smooth ball and place it in the bowl, turning it over once to coat the top with oil. This prevents a dry crust from forming. Cover the bowl with plastic wrap or a clean kitchen towel. Place it in a warm, draft-free spot to rise for 1-1.5 hours, or until it has doubled in size.
Step 5: Prepare the Garlic Butter Filling
While the dough is rising, prepare the filling. In a medium-sized bowl, melt the ½ cup of unsalted butter. Add the minced garlic, chopped fresh parsley, salt, and black pepper. Stir well to combine. In a separate bowl, toss the shredded mozzarella and grated Parmesan cheese together.
Step 6: Assemble the Pull-Apart Bread
Grease a 9×5 inch loaf pan thoroughly with butter or cooking spray. Once the dough has doubled in size, gently punch it down to release the air. Transfer the dough to a lightly floured surface and roll it out into a large rectangle, about 12×20 inches and roughly ¼ inch thick.
Step 7: Create the Layers
Using a pastry brush, spread about half of the garlic butter mixture evenly over the entire surface of the rolled-out dough. Sprinkle the combined mozzarella and Parmesan cheeses evenly over the buttered dough.
Step 8: Cut and Stack
Using a sharp knife or a pizza cutter, cut the rectangle of dough vertically into six long strips of equal width (each strip will be about 2 inches wide). Carefully stack these six strips on top of one another, creating one tall stack of cheesy, garlicky layers.
Step 9: Fill the Loaf Pan
Once you have your stack, cut it crosswise into six equal pieces. This will give you six small stacks, each with six layers. Carefully place these small stacks into the prepared loaf pan, arranging them with the cut sides facing up, like a row of little books. It will look messy, but this is what creates the beautiful, pull-apart texture.
Step 10: Second Rise
Cover the loaf pan loosely with plastic wrap and let it rise again in a warm place for about 30-45 minutes, or until the dough has puffed up and is filling the pan nicely. Towards the end of this rising time, preheat your oven to 350°F (175°C).
Step 11: Bake to Golden Perfection
Once the dough has risen, drizzle the remaining garlic butter mixture over the top of the loaf, making sure to get it into all the nooks and crannies. Bake in the preheated oven for 30-35 minutes. The top should be a deep golden brown, and the cheese should be melted and bubbly. If you notice the top browning too quickly, you can loosely tent it with aluminum foil for the last 10 minutes of baking.
Step 12: Cool and Serve
Remove the bread from the oven and let it cool in the pan for about 5-10 minutes. This allows it to set up slightly, making it easier to handle. You can run a knife around the edges to loosen it if needed. Carefully transfer the loaf to a serving platter. Serve warm for the best, gooiest, pull-apart experience.
Nutrition Facts
This is an indulgent treat best enjoyed in moderation. The nutritional information is an estimate and can vary based on specific ingredients used.
- Servings: 10-12 servings
- Calories per serving: Approximately 350-400 kcal
- Fat: This dish is high in fat, primarily from the butter and cheese. This fat content contributes to the rich flavor and satisfying texture.
- Carbohydrates: The primary source of energy, coming mainly from the bread flour. The homemade dough provides complex carbohydrates for sustained energy.
- Protein: A good source of protein from the cheese, milk, and flour, which is essential for muscle repair and overall body function.
Preparation Time
Understanding the time commitment is key to planning. Much of this time is hands-off, allowing the yeast to do its work.
- Active Time: Approximately 30-40 minutes. This includes mixing and kneading the dough, preparing the filling, and assembling the loaf.
- Rising Time: Approximately 1.5 to 2.5 hours total. This is broken into two separate rises, which are essential for developing the bread’s flavor and light texture.
- Baking Time: 30-35 minutes.
- Total Time: Approximately 2.5 to 3.5 hours from start to finish.
How to Serve
This Garlic Butter Pull-Apart Bread is incredibly versatile. It can be the star of the show or a fantastic supporting actor in a larger meal. Here are some of our favorite ways to serve it:
- As a Party Appetizer:
- Place the entire loaf on a large wooden board or platter as a stunning centerpiece.
- Encourage guests to gather around and pull pieces off themselves – it’s a fantastic icebreaker!
- Serve alongside small bowls of dips for an elevated experience.
- With Delicious Dips:
- Classic Marinara Sauce: The acidity of a warm marinara sauce cuts through the richness of the cheese and butter beautifully.
- Creamy Ranch or Blue Cheese Dressing: A cool, creamy dip is the perfect contrast to the warm, savory bread.
- Spinach and Artichoke Dip: For an ultra-decadent pairing, serve it alongside a hot bowl of cheesy spinach and artichoke dip.
- As a Side Dish for Main Courses:
- Pasta Night: Use it to sop up every last bit of sauce from a hearty bolognese, a creamy alfredo, or a simple spaghetti aglio e olio.
- Soup and Chili: It’s the ultimate companion for a bowl of tomato soup, a robust beef chili, or a creamy potato soup.
- Steak or Roast Beef Dinner: Serve it in place of traditional dinner rolls for a more exciting and flavorful side.
- For Special Occasions:
- Game Day: It’s the perfect shareable snack for watching the big game with friends.
- Holiday Gatherings: It makes a wonderful addition to a Thanksgiving, Christmas, or Easter dinner spread.
- Cozy Family Movie Night: Pair it with a big salad for a simple yet incredibly satisfying dinner.
Additional Tips
Unlock the full potential of your pull-apart bread with these eight expert tips for customization and perfect results every time.
- Cheese Variations are Encouraged: Don’t be afraid to experiment with the cheese! A mix of sharp cheddar and mozzarella will give it a tangier flavor. For a bit of a kick, try adding some shredded pepper jack. A combination of provolone and mozzarella will be extra stringy and delicious.
- Experiment with Herbs: While fresh parsley is classic, other herbs can add new dimensions of flavor. Try adding a teaspoon of dried oregano and basil for an Italian feel, or a tablespoon of fresh chopped rosemary for a more earthy, aromatic profile.
- Make-Ahead Instructions: You can prepare the bread up to the point of the second rise. Assemble the loaf in the pan, cover it tightly with plastic wrap, and refrigerate for up to 24 hours. When you’re ready to bake, remove it from the fridge, let it sit at room temperature for about an hour to complete its second rise, and then bake as directed.
- Shortcut with Store-Bought Dough: If you’re short on time, you can use store-bought pizza dough or refrigerated biscuit dough. For pizza dough, roll it out and follow the assembly instructions. For biscuit dough, separate the biscuits, cut each one in half, toss them in the garlic butter, layer them with cheese in the pan, and bake.
- Incorporate Savory Mix-Ins: Elevate your bread by adding extra ingredients between the layers. Some fantastic options include finely diced cooked ham, crumbled cooked beef, chopped sun-dried tomatoes, sliced jalapeños for heat, or caramelized onions for a deep, sweet flavor.
- Ensure a Perfectly Golden Top: Ovens can have hot spots. If you notice the top of your bread is getting too dark before the center is cooked through, simply lay a piece of aluminum foil loosely over the top of the pan for the final 10-15 minutes of baking. This will deflect the direct heat and allow the inside to finish cooking.
- Don’t Rush the Rise: The rising steps are crucial for a light, airy bread. Be patient. The exact time will depend on the temperature of your kitchen. A good test for the first rise is the “poke test”: if you gently poke the dough and the indentation stays, it’s ready. If it springs back immediately, it needs more time.
- Storing and Reheating Leftovers: While this bread is best enjoyed fresh from the oven, leftovers are still delicious. Store any remaining bread in an airtight container or wrapped tightly in foil at room temperature for up to 2 days. To reheat, wrap the bread in foil and bake in a 350°F (175°C) oven for 10-15 minutes, or until warmed through and the cheese is re-melted.
FAQ Section
Here are answers to some of the most common questions about making homemade Garlic Butter Pull-Apart Bread.
1. Can I use all-purpose flour instead of bread flour?
Yes, you absolutely can. The result will be a slightly softer and less chewy bread because all-purpose flour has a lower protein content. The bread will still be incredibly delicious, so feel free to use what you have on hand.
2. My dough didn’t rise. What did I do wrong?
There are a few common culprits. The most likely is that your yeast was old or dead. Always check the expiration date. Another possibility is that your milk was too hot, which can kill the yeast. Lastly, ensure the dough is placed in a consistently warm, draft-free spot to rise.
3. Can I freeze this pull-apart bread?
Yes, this bread freezes well. You can freeze it either baked or unbaked. To freeze after baking, let the loaf cool completely, wrap it tightly in two layers of plastic wrap and then a layer of aluminum foil, and freeze for up to 3 months. Thaw at room temperature and reheat in a foil-wrapped in the oven. To freeze unbaked, assemble the loaf in a freezer-safe pan, wrap it tightly, and freeze. When ready to use, let it thaw in the refrigerator overnight, then let it sit at room temperature for 1-2 hours to rise before baking.
4. Why did my bread turn out dry?
Dry bread is often the result of adding too much flour to the dough. Be sure to measure your flour correctly by spooning it into the measuring cup and leveling it off with a knife, rather than scooping directly from the bag. Over-baking can also cause dryness, so keep an eye on it and remove it from the oven once it’s golden brown and cooked through.
5. Can I make this in a different type of pan?
Definitely! While a 9×5 loaf pan creates the classic shape, you can also bake this in a bundt pan for a beautiful wreath shape, a 9-inch round cake pan, or even a cast-iron skillet. You may need to adjust the baking time slightly depending on the pan you use.
6. Is it possible to make this recipe gluten-free?
Yes, you can adapt this recipe to be gluten-free. You will need to use a high-quality, 1-to-1 gluten-free baking flour blend that contains xanthan gum. Gluten-free doughs are often stickier and have a different texture, so follow the package instructions on your chosen flour blend for best results.
7. How can I make the garlic flavor stronger or more mellow?
For a stronger, spicier garlic flavor, use more raw minced garlic. For a sweeter, more mellow, and roasted garlic flavor, you can roast a whole head of garlic in the oven first, squeeze out the softened cloves, and mash them into the melted butter. This adds a wonderful depth of flavor.
8. What is the difference between pull-apart bread and monkey bread?
The terms are often used interchangeably, especially for savory versions. Traditionally, monkey bread is made by forming small balls of dough, dipping them in butter, and layering them in a bundt pan, often with sweet ingredients like cinnamon and sugar. Pull-apart bread is a more general term that can refer to any loaf designed to be pulled apart, like this one, which uses stacked layers of dough instead of individual balls.
Garlic Butter Pull-Apart Bread
Ingredients
This recipe is divided into two main components: the soft, pillowy dough that forms the foundation, and the rich, aromatic garlic butter filling that infuses every single crevice with flavor. Using high-quality ingredients here will make a noticeable difference in the final product.
For the Bread Dough:
- 1 cup (240ml) Warm Milk: The milk should be lukewarm, around 110°F (43°C). Too hot and it will kill the yeast; too cold and it won’t activate it. Whole milk adds richness, but 2% works well too.
- 2 ¼ teaspoons (7g) Active Dry Yeast: This is one standard packet. The yeast is the leavening agent that will make our bread light and airy.
- 2 tablespoons (25g) Granulated Sugar: This provides a touch of sweetness to balance the savory flavors and, more importantly, acts as food for the yeast to help it activate.
- 4 cups (480g) Bread Flour: Bread flour has a higher protein content than all-purpose flour, which helps develop stronger gluten strands. This results in a chewier, more structured bread, perfect for pulling apart. You can use all-purpose flour, but the texture will be slightly softer.
- 1 teaspoon Salt: Salt is crucial for flavor, but it also helps control the yeast’s activity and strengthens the gluten structure.
- 1 large Egg: The egg should be at room temperature. It adds richness, color, and structure to the dough.
- ¼ cup (57g) Unsalted Butter: The butter should be melted and then cooled slightly. Unsalted butter allows you to control the total salt content of the recipe.
For the Garlic Butter Filling:
- ½ cup (113g) Unsalted Butter: This will be melted to create the base of our delicious coating.
- 5–6 cloves Garlic, Minced: This is the star of the show! Use fresh garlic for the best, most potent flavor. Adjust the amount based on your love for garlic.
- ½ cup Fresh Parsley, Finely Chopped: Fresh parsley adds a bright, herby flavor and a beautiful pop of green color that cuts through the richness of the butter and cheese.
- 1 teaspoon Salt: To season the filling.
- ½ teaspoon Black Pepper: For a subtle touch of warmth and spice.
- 2 cups (226g) Mozzarella Cheese, Shredded: Low-moisture, part-skim mozzarella is ideal as it melts beautifully and gives you that classic, irresistible cheese pull without releasing too much water.
- ½ cup (50g) Parmesan Cheese, Grated: Grated Parmesan adds a sharp, nutty, and salty flavor that complements the mozzarella and garlic perfectly.
Instructions
Follow these steps carefully to achieve a perfectly soft, cheesy, and flavorful pull-apart loaf. The process involves making a simple yeast dough, letting it rise, and then assembling the loaf with the glorious garlic butter filling before a final bake.
Step 1: Activate the Yeast
In a small bowl or the bowl of your stand mixer, combine the warm milk, granulated sugar, and active dry yeast. Give it a gentle stir and let it sit for about 5-10 minutes. You are looking for the mixture to become foamy and bubbly on top. This process, called “proofing,” confirms that your yeast is alive and active. If it doesn’t foam, your yeast may be old, and you should start over with a fresh packet.
Step 2: Mix the Dough
Once the yeast is proofed, add the bread flour, salt, room temperature egg, and melted butter to the bowl. If using a stand mixer, attach the dough hook and mix on low speed until a shaggy dough begins to form. Increase the speed to medium-low and continue to knead for about 7-9 minutes. The dough should become smooth, elastic, and pull away from the sides of the bowl. If mixing by hand, combine the ingredients in a large bowl with a wooden spoon until a shaggy dough forms. Turn the dough out onto a lightly floured surface.
Step 3: Knead the Dough by Hand (if not using a mixer)
Knead the dough by pressing it down and forward with the heel of your hand, then folding it over and giving it a quarter turn. Repeat this process for about 10-12 minutes. The dough is ready when it is smooth, elastic, and springs back when you gently poke it. You can also perform the “windowpane test”: stretch a small piece of dough between your fingers. If you can stretch it thin enough to see light through it without it tearing, the gluten is well-developed.
Step 4: First Rise
Lightly grease a large bowl with oil or cooking spray. Form your dough into a smooth ball and place it in the bowl, turning it over once to coat the top with oil. This prevents a dry crust from forming. Cover the bowl with plastic wrap or a clean kitchen towel. Place it in a warm, draft-free spot to rise for 1-1.5 hours, or until it has doubled in size.
Step 5: Prepare the Garlic Butter Filling
While the dough is rising, prepare the filling. In a medium-sized bowl, melt the ½ cup of unsalted butter. Add the minced garlic, chopped fresh parsley, salt, and black pepper. Stir well to combine. In a separate bowl, toss the shredded mozzarella and grated Parmesan cheese together.
Step 6: Assemble the Pull-Apart Bread
Grease a 9×5 inch loaf pan thoroughly with butter or cooking spray. Once the dough has doubled in size, gently punch it down to release the air. Transfer the dough to a lightly floured surface and roll it out into a large rectangle, about 12×20 inches and roughly ¼ inch thick.
Step 7: Create the Layers
Using a pastry brush, spread about half of the garlic butter mixture evenly over the entire surface of the rolled-out dough. Sprinkle the combined mozzarella and Parmesan cheeses evenly over the buttered dough.
Step 8: Cut and Stack
Using a sharp knife or a pizza cutter, cut the rectangle of dough vertically into six long strips of equal width (each strip will be about 2 inches wide). Carefully stack these six strips on top of one another, creating one tall stack of cheesy, garlicky layers.
Step 9: Fill the Loaf Pan
Once you have your stack, cut it crosswise into six equal pieces. This will give you six small stacks, each with six layers. Carefully place these small stacks into the prepared loaf pan, arranging them with the cut sides facing up, like a row of little books. It will look messy, but this is what creates the beautiful, pull-apart texture.
Step 10: Second Rise
Cover the loaf pan loosely with plastic wrap and let it rise again in a warm place for about 30-45 minutes, or until the dough has puffed up and is filling the pan nicely. Towards the end of this rising time, preheat your oven to 350°F (175°C).
Step 11: Bake to Golden Perfection
Once the dough has risen, drizzle the remaining garlic butter mixture over the top of the loaf, making sure to get it into all the nooks and crannies. Bake in the preheated oven for 30-35 minutes. The top should be a deep golden brown, and the cheese should be melted and bubbly. If you notice the top browning too quickly, you can loosely tent it with aluminum foil for the last 10 minutes of baking.
Step 12: Cool and Serve
Remove the bread from the oven and let it cool in the pan for about 5-10 minutes. This allows it to set up slightly, making it easier to handle. You can run a knife around the edges to loosen it if needed. Carefully transfer the loaf to a serving platter. Serve warm for the best, gooiest, pull-apart experience.
Nutrition
- Serving Size: one normal portion
- Calories: 400