")


It’s a familiar story in our house: the chaotic rush of a weekday morning. Between getting everyone dressed, finding matching socks (a Herculean task in itself), and packing lunches, the idea of a wholesome, satisfying breakfast often feels like a distant dream. For the longest time, we were stuck in a rut of toast or sugary cereals that left us hungry an hour later. That all changed when I first whipped up these Greek Yogurt Berry Cups. I was skeptical, thinking they looked too simple to be truly satisfying. I was wrong. The moment my family tried them, their eyes lit up. The delightful contrast of the thick, tangy yogurt, the sweet burst of fresh berries, and the hearty crunch of granola was an instant sensation. My kids, who usually turn their noses up at anything overtly “healthy,” were asking for seconds. It has since become our go-to breakfast, a lifesaver for busy mornings, and even a frequent request for a light and refreshing dessert. It’s the kind of recipe that feels indulgent but is packed with goodness, a perfect harmony of flavor and texture that starts our day on the brightest possible note.
Ingredients
Here is the simple yet powerful lineup of ingredients you will need to create these vibrant and delicious Greek Yogurt Berry Cups. Each component plays a crucial role in building the perfect balance of flavor, texture, and nutrition.
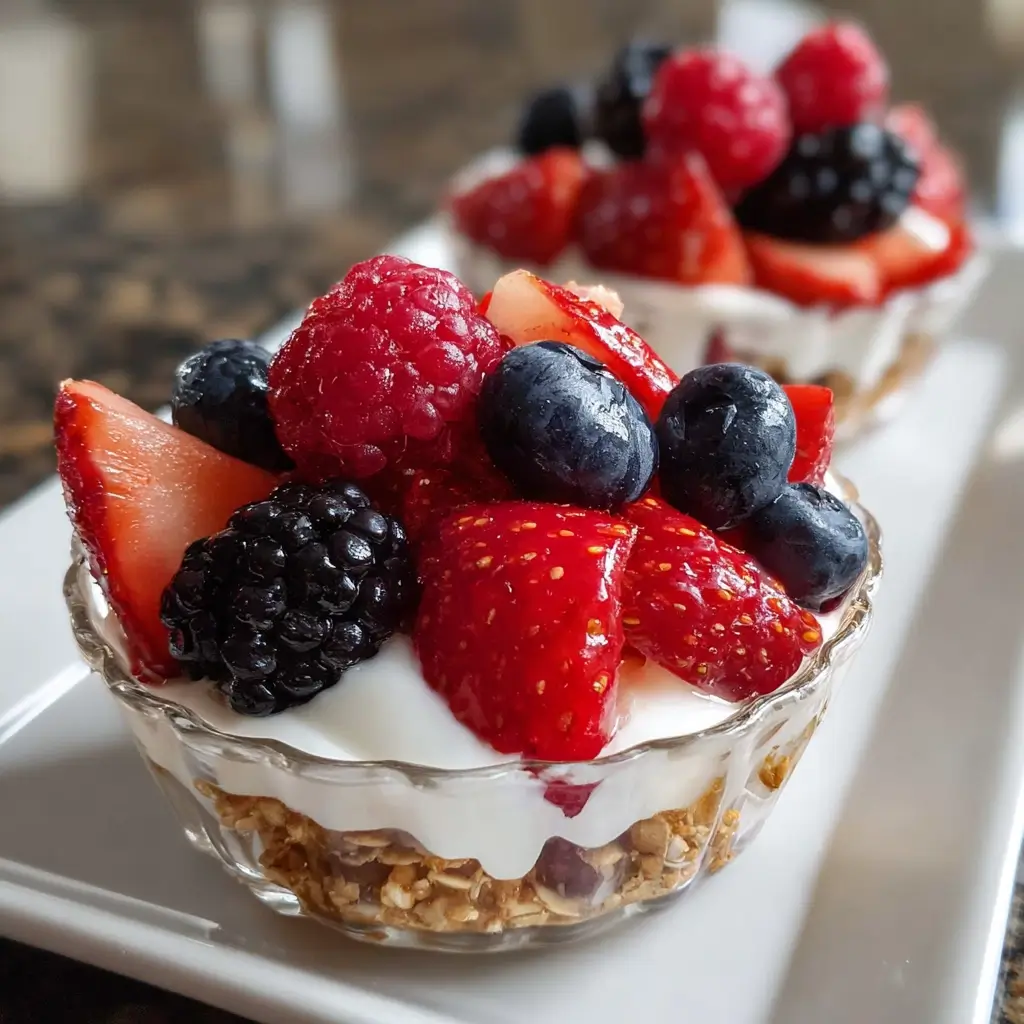
- Greek Yogurt (2 cups, plain, whole milk): The star of the show. Using plain, whole milk Greek yogurt provides a luxuriously thick and creamy base that’s rich in protein and probiotics. Its natural tanginess is the perfect canvas for the sweetness of the berries and honey.
- Mixed Fresh Berries (1 ½ cups): A colorful medley of nature’s candy. A combination of strawberries, blueberries, raspberries, and blackberries offers a spectrum of sweet and tart flavors, along with a powerful dose of antioxidants and fiber.
- Granola (1 cup): This is where the essential crunch comes from. Choose a high-quality granola that’s packed with whole rolled oats, nuts, and seeds for sustained energy. Look for one that is lower in added sugars to keep the recipe wholesome.
- Honey or Maple Syrup (2 tablespoons, or to taste): Your choice of natural sweetener. Honey offers a classic, floral sweetness, while maple syrup provides a warmer, richer flavor. You can adjust the amount based on your personal preference and the sweetness of your berries.
- Pure Vanilla Extract (1 teaspoon): A secret weapon for flavor enhancement. A small amount of pure vanilla extract elevates the yogurt base, adding a warm, aromatic depth that beautifully complements the fruit and honey.
- Lemon Zest (½ teaspoon, optional): For a bright, zesty kick. The zest from a fresh lemon can cut through the richness of the yogurt and make the berry flavors pop, adding an unexpected layer of freshness.
Instructions
Creating these Greek Yogurt Berry Cups is less about complex cooking and more about the art of assembly. Follow these detailed steps to build beautiful, delicious, and perfectly layered cups every time.
Step 1: Prepare the Yogurt Base
The foundation of your cups needs to be perfectly flavored and creamy. In a medium-sized mixing bowl, combine the 2 cups of plain Greek yogurt, 2 tablespoons of honey or maple syrup, and 1 teaspoon of pure vanilla extract. If you are using it, add the ½ teaspoon of lemon zest now. Using a spatula or a whisk, gently fold the ingredients together until they are just combined. The goal is to create a smooth, homogenous mixture without over-mixing, which can cause the yogurt to become too thin. Give it a small taste and adjust the sweetness if necessary. Some berries are tarter than others, so you may prefer a little extra honey.
Step 2: Prepare the Berries and Granola
Proper preparation of your fillings is key to achieving the best texture and flavor. Gently wash your mixed berries under cool running water and pat them completely dry with a paper towel. Moisture is the enemy of crunch, so ensuring your berries are dry will help keep the granola from becoming soggy too quickly. If you are using larger strawberries, slice them into bite-sized pieces for easier layering and eating. Set your 1 cup of granola in a separate bowl, ready for assembly.
Step 3: The Art of Layering
This is where the magic happens. You will need two medium-sized glasses, jars, or bowls for serving.
- The Foundation: Start by placing a layer of granola at the bottom of each glass, using about 2 tablespoons per glass. This creates a sturdy, crunchy base for your cup.
- First Yogurt Layer: Carefully spoon a generous layer of the prepared yogurt mixture over the granola. Use about ¼ of the total yogurt mixture for each glass. To create clean, distinct layers, you can use the back of the spoon to gently spread the yogurt to the edges of the glass.
- First Berry Layer: Sprinkle a colorful layer of your mixed berries over the yogurt. Be generous here, as this is a primary flavor component.
- Repeat the Layers: Continue the process. Add another thin layer of granola for an extra crunchy middle, followed by another layer of the yogurt mixture. Finally, top it all off with the remaining mixed berries.
Step 4: Garnish and Serve
The final touch makes all the difference. For a beautiful presentation, sprinkle a little extra granola over the top layer of berries. You can add a fresh mint sprig for a pop of color and a hint of fresh aroma. The cups can be served immediately to enjoy the maximum crunch from the granola, or they can be chilled in the refrigerator for about 15-20 minutes to allow the flavors to meld together slightly.
Nutrition Facts
- Servings: 2
- Calories per serving: Approximately 450 kcal
- Protein (Approx. 22g): The Greek yogurt provides a substantial amount of high-quality protein, which is essential for muscle repair, satiety, and keeping you feeling full and energized throughout the morning.
- Fiber (Approx. 8g): Sourced from the whole-grain granola and fresh berries, fiber is crucial for digestive health, helps regulate blood sugar levels, and contributes to the feeling of fullness.
- Vitamin C (High): Berries are packed with Vitamin C, a powerful antioxidant that supports a healthy immune system, promotes skin health, and helps protect your cells from damage.
- Calcium (Good Source): Greek yogurt is an excellent source of calcium, a vital mineral for maintaining strong bones and teeth, as well as proper nerve and muscle function.
- Probiotics (Rich Source): As a fermented food, the Greek yogurt in these cups contains beneficial live cultures (probiotics) that promote a healthy gut microbiome, which is linked to improved digestion and overall well-being.
Preparation Time
This recipe is celebrated for its speed and simplicity, making it a perfect solution for anyone short on time.
- Total Preparation Time: 10-15 Minutes
- Active Time: 10 minutes. This includes the time it takes to wash and prepare the berries, mix the yogurt base, and assemble the layers in your serving glasses.
- Chilling Time (Optional): 15-20 minutes. While not required, a short chill in the refrigerator can help the flavors meld together beautifully and provides a more refreshing experience, especially on a warm day.
How to Serve
These Greek Yogurt Berry Cups are incredibly versatile. Their appeal lies not just in their taste, but in how easily they can be adapted to fit any meal or occasion. Here are some fantastic ways to serve and enjoy them:
- As a Quick and Healthy Breakfast:
- Serve in a mason jar with a lid for a perfect grab-and-go breakfast on busy weekday mornings.
- Pair with a cup of coffee or tea for a balanced and leisurely start to your weekend.
- As a Re-energizing Afternoon Snack:
- Prepare them in smaller tumblers or ramekins for a perfectly portioned, protein-packed snack to beat the 3 PM slump.
- Enjoy it post-workout to help refuel your body with protein for muscle recovery and carbohydrates for energy.
- As a Light and Elegant Dessert:
- Serve in beautiful stemmed wine glasses or parfait glasses after dinner for a dessert that is both healthy and impressive.
- Garnish with a drizzle of melted dark chocolate or a dusting of cinnamon to elevate its dessert status.
- For Brunch or Gatherings:
- Set up a “Yogurt Cup Bar” for your next brunch. Lay out bowls of the yogurt base, various fruits, different types of granola, nuts, seeds, and sweeteners, and let guests build their own creations.
- Pre-assemble the cups in clear plastic cups for easy serving at parties, baby showers, or potlucks. They add a vibrant splash of color to any food table.
Additional Tips
Unlock the full potential of your Greek Yogurt Berry Cups with these eight expert tips, designed to enhance flavor, improve texture, and offer creative variations.
- The Frozen Yogurt Cup Variation: For a refreshing summer treat, assemble the cups in silicone muffin liners. Start with a pressed granola base, top with the yogurt mixture and berries, and freeze for at least 4 hours. They become healthy, frozen yogurt bites perfect for a hot day.
- Go Dairy-Free or Vegan: This recipe is easily adaptable. Swap the Greek yogurt for a thick, high-quality dairy-free alternative like coconut yogurt, almond milk yogurt, or soy yogurt. Ensure you use maple syrup instead of honey to keep it fully vegan.
- Create a Berry Compote: For a different texture and deeper flavor, gently heat the berries in a small saucepan over medium heat with a splash of lemon juice and a teaspoon of your chosen sweetener. Simmer for 5-7 minutes until they break down into a jam-like compote. Let it cool completely before layering.
- Boost the Nutrition: Supercharge your yogurt cups by adding a tablespoon of chia seeds or ground flax seeds to the yogurt mixture for extra fiber and omega-3s. You can also mix in a scoop of your favorite unflavored or vanilla protein powder for an extra protein punch.
- Play with Spices: Don’t be afraid to introduce warm spices into the yogurt base. A pinch of cinnamon, nutmeg, or cardamom can add a surprising and delicious complexity that pairs wonderfully with the berries and granola.
- Keep Granola Crunchy for Meal Prep: If you’re making these ahead of time, the best way to avoid soggy granola is to store the components separately. Keep the mixed yogurt in one airtight container, the berries in another, and the granola in a sealed bag. Assemble just before serving for maximum crunch.
- Toast Your Granola (and Nuts): If your granola seems a bit soft, or you simply want to enhance its flavor, spread it on a baking sheet and toast it in the oven at 350°F (175°C) for 5-7 minutes. The heat will bring out the nutty, roasted flavors and make it extra crispy.
- Experiment with Different Fruits: While berries are a classic choice, this recipe works beautifully with a variety of fruits. Try it with layers of diced mango and toasted coconut, sliced peaches and almonds, or chopped cherries and dark chocolate shavings.
FAQ Section
Here are answers to some of the most frequently asked questions about making the perfect Greek Yogurt Berry Cups.
1. Can I make these yogurt cups the night before for meal prep?
Yes, you can, but with a specific strategy to maintain the best texture. The biggest challenge with advance preparation is the granola becoming soggy from contact with the yogurt and berries. The ideal method is to prepare the components and store them separately in airtight containers in the refrigerator. The yogurt base will keep well, as will the washed and dried berries. Then, in the morning, it only takes a minute to layer them together in a jar or glass. If you absolutely must assemble them the night before, place a thick layer of granola at the bottom and try to create a barrier with whole berries before adding the yogurt to minimize contact.
2. How long will these Greek Yogurt Berry Cups last in the refrigerator?
If fully assembled, a Greek Yogurt Berry Cup is best consumed within 24 hours. After that, the granola will have lost its signature crunch, and the berries may start to release their juices, making the cup watery. If you store the components separately, the yogurt mixture will last for up to 4 days, and the fresh berries for 2-3 days, allowing you to assemble fresh cups throughout the week.
3. Are Greek Yogurt Berry Cups genuinely healthy?
Absolutely. This recipe is a powerhouse of balanced nutrition. The Greek yogurt delivers a high dose of protein and gut-healthy probiotics. The berries are loaded with antioxidants, vitamins, and fiber. The granola, especially a low-sugar, whole-grain variety, provides complex carbohydrates for sustained energy and more fiber. It’s a well-rounded meal that covers all your macronutrient bases and keeps you feeling full and satisfied without the crash associated with sugary breakfast options.
4. Can I use frozen berries instead of fresh ones for this recipe?
Yes, frozen berries are an excellent and budget-friendly alternative, especially when fresh berries are out of season. However, it’s important to thaw them properly first. Place the frozen berries in a colander in the sink or over a bowl and let them thaw completely. They will release a significant amount of juice. It is crucial to drain this juice off thoroughly and pat the berries dry before layering them. Using them while still frozen or undrained will result in a very watery and less appealing yogurt cup.
5. My granola always gets soggy. What is the best way to prevent this?
Soggy granola is a common issue, but it’s easily preventable. As mentioned, the best method is to assemble the cups right before you plan to eat them. If layering in advance, use strategic placement. A thick, dense granola will hold up better than a lighter, puffier one. Creating a solid, thick layer at the very bottom helps. You can also try placing a few whole berries, like blueberries, directly on top of the granola layer to act as a slight barrier before spooning on the yogurt.
6. What are the best dairy-free alternatives to Greek yogurt for this recipe?
There are many fantastic dairy-free yogurts available today that work well. For the thickest consistency, similar to Greek yogurt, look for coconut cream-based yogurts (often labeled as “coconutgurt”) or a thick, strained almond or soy-based yogurt. Always opt for the plain, unsweetened variety so you can control the sweetness and flavor yourself. These alternatives will provide a creamy base while making the recipe accessible to those with dairy sensitivities or vegan lifestyles.
7. How can I make this recipe lower in sugar?
This recipe is already relatively low in added sugar, but you can reduce it even further. First, use a plain, unsweetened Greek yogurt, as flavored varieties often contain a lot of hidden sugar. Second, choose a granola that has little to no added sugar. You can also reduce or omit the honey/maple syrup altogether and rely on the natural sweetness of the berries. For a touch of sweetness without sugar, you can mix in a small amount of a natural zero-calorie sweetener like stevia or monk fruit.
8. Is this recipe suitable for kids?
This recipe is incredibly kid-friendly and a fantastic way to get them to eat a nutritious breakfast. The sweet flavors and fun, colorful layers are very appealing to children. To make it even more engaging, you can turn it into a fun activity by setting up a “build-your-own” bar and letting them layer their own cups. This gives them a sense of ownership and makes them more excited to eat their healthy creation. For very young children, ensure the granola and any nuts are age-appropriate to avoid a choking hazard.
Print
Greek Yogurt Berry Cups
Ingredients
Here is the simple yet powerful lineup of ingredients you will need to create these vibrant and delicious Greek Yogurt Berry Cups. Each component plays a crucial role in building the perfect balance of flavor, texture, and nutrition.
- Greek Yogurt (2 cups, plain, whole milk): The star of the show. Using plain, whole milk Greek yogurt provides a luxuriously thick and creamy base that’s rich in protein and probiotics. Its natural tanginess is the perfect canvas for the sweetness of the berries and honey.
- Mixed Fresh Berries (1 ½ cups): A colorful medley of nature’s candy. A combination of strawberries, blueberries, raspberries, and blackberries offers a spectrum of sweet and tart flavors, along with a powerful dose of antioxidants and fiber.
- Granola (1 cup): This is where the essential crunch comes from. Choose a high-quality granola that’s packed with whole rolled oats, nuts, and seeds for sustained energy. Look for one that is lower in added sugars to keep the recipe wholesome.
- Honey or Maple Syrup (2 tablespoons, or to taste): Your choice of natural sweetener. Honey offers a classic, floral sweetness, while maple syrup provides a warmer, richer flavor. You can adjust the amount based on your personal preference and the sweetness of your berries.
- Pure Vanilla Extract (1 teaspoon): A secret weapon for flavor enhancement. A small amount of pure vanilla extract elevates the yogurt base, adding a warm, aromatic depth that beautifully complements the fruit and honey.
- Lemon Zest (½ teaspoon, optional): For a bright, zesty kick. The zest from a fresh lemon can cut through the richness of the yogurt and make the berry flavors pop, adding an unexpected layer of freshness.
Instructions
Creating these Greek Yogurt Berry Cups is less about complex cooking and more about the art of assembly. Follow these detailed steps to build beautiful, delicious, and perfectly layered cups every time.
Step 1: Prepare the Yogurt Base
The foundation of your cups needs to be perfectly flavored and creamy. In a medium-sized mixing bowl, combine the 2 cups of plain Greek yogurt, 2 tablespoons of honey or maple syrup, and 1 teaspoon of pure vanilla extract. If you are using it, add the ½ teaspoon of lemon zest now. Using a spatula or a whisk, gently fold the ingredients together until they are just combined. The goal is to create a smooth, homogenous mixture without over-mixing, which can cause the yogurt to become too thin. Give it a small taste and adjust the sweetness if necessary. Some berries are tarter than others, so you may prefer a little extra honey.
Step 2: Prepare the Berries and Granola
Proper preparation of your fillings is key to achieving the best texture and flavor. Gently wash your mixed berries under cool running water and pat them completely dry with a paper towel. Moisture is the enemy of crunch, so ensuring your berries are dry will help keep the granola from becoming soggy too quickly. If you are using larger strawberries, slice them into bite-sized pieces for easier layering and eating. Set your 1 cup of granola in a separate bowl, ready for assembly.
Step 3: The Art of Layering
This is where the magic happens. You will need two medium-sized glasses, jars, or bowls for serving.
- The Foundation: Start by placing a layer of granola at the bottom of each glass, using about 2 tablespoons per glass. This creates a sturdy, crunchy base for your cup.
- First Yogurt Layer: Carefully spoon a generous layer of the prepared yogurt mixture over the granola. Use about ¼ of the total yogurt mixture for each glass. To create clean, distinct layers, you can use the back of the spoon to gently spread the yogurt to the edges of the glass.
- First Berry Layer: Sprinkle a colorful layer of your mixed berries over the yogurt. Be generous here, as this is a primary flavor component.
- Repeat the Layers: Continue the process. Add another thin layer of granola for an extra crunchy middle, followed by another layer of the yogurt mixture. Finally, top it all off with the remaining mixed berries.
Step 4: Garnish and Serve
The final touch makes all the difference. For a beautiful presentation, sprinkle a little extra granola over the top layer of berries. You can add a fresh mint sprig for a pop of color and a hint of fresh aroma. The cups can be served immediately to enjoy the maximum crunch from the granola, or they can be chilled in the refrigerator for about 15-20 minutes to allow the flavors to meld together slightly.
Nutrition
- Serving Size: one normal portion
- Calories: 450
- Fiber: 8g
- Protein: 22g


