")


Of all the quick and healthy meals I’ve cycled through over the years, there’s one that my family and I return to time and time again: the Grilled Veggie and Hummus Wrap. It started as a “use up the leftover vegetables” experiment one sunny afternoon and quickly became a non-negotiable part of our weekly meal plan. There’s something magical about the combination of smoky, tender-crisp grilled vegetables, the creamy and savory spread of hummus, and the fresh, crisp bite of lettuce, all bundled together in a soft, warm tortilla. It’s the kind of lunch that feels both incredibly indulgent and wonderfully virtuous at the same time. The kids love it because they can help pick the veggies and watch them get beautiful char marks on the grill. My husband loves it because it’s hearty and satisfying without being heavy. And I love it because it’s versatile, unbelievably delicious, and comes together in under 30 minutes. It’s our go-to for busy weeknight dinners, packable lunches for work and school, and even as a casual, build-your-own-wrap option when friends come over. This recipe isn’t just about food; it’s about creating a moment of fresh, flavorful joy in the middle of a busy day.
Ingredients
- For the Grilled Vegetables:
- 1 large Red Bell Pepper: Sliced into thick, 1/2-inch strips. The sweetness of the red pepper intensifies beautifully on the grill.
- 1 large Yellow or Orange Bell Pepper: Also sliced into 1/2-inch strips. This adds a vibrant color and a slightly milder, fruitier flavor than the red pepper.
- 1 medium Zucchini: Sliced lengthwise into 1/4-inch thick planks. Zucchini becomes wonderfully tender and absorbs the smoky flavor of the grill.
- 1 medium Yellow Squash: Sliced lengthwise into 1/4-inch thick planks. Similar to zucchini, it provides a soft texture and a mild, buttery taste.
- 1 small Red Onion: Sliced into 1/2-inch thick rounds. Grilling tames the sharp bite of the onion, making it sweet and savory.
- 2 tablespoons Olive Oil: A good quality extra virgin olive oil helps the vegetables caramelize without sticking and adds a classic Mediterranean flavor.
- 1 teaspoon Dried Oregano: This herb provides a warm, peppery, and aromatic flavor that pairs perfectly with grilled vegetables.
- 1/2 teaspoon Garlic Powder: Offers a savory, aromatic depth without the risk of burning fresh garlic on the high heat of the grill.
- 1/2 teaspoon Salt: To taste, enhances all the other flavors.
- 1/4 teaspoon Black Pepper: Freshly ground for a pungent, spicy kick.
- For the Wraps:
- 4 large (10-inch) Flour or Whole Wheat Tortillas: Choose your favorite; whole wheat adds a nutty flavor and extra fiber.
- 1 cup Hummus: Use your favorite store-bought brand or homemade version. Classic, roasted red pepper, or roasted garlic hummus all work exceptionally well.
- 2 cups Fresh Spinach or Arugula: Washed and dried. Spinach is mild and tender, while arugula adds a peppery, spicy bite that contrasts nicely with the sweet veggies.
- (Optional) 1/4 cup Crumbled Feta Cheese: Adds a salty, briny tang that complements the other ingredients perfectly.
Instructions
- Prepare the Grill: Preheat your outdoor grill or indoor grill pan to medium-high heat (around 400°F or 200°C). A clean, well-oiled grate is essential to prevent the vegetables from sticking and to achieve those coveted grill marks. If using an outdoor grill, you can create two heat zones—one hotter for searing and one cooler for finishing the cooking if needed.
- Season the Vegetables: In a large mixing bowl, combine the sliced bell peppers, zucchini, yellow squash, and red onion. Drizzle the olive oil over the vegetables. Sprinkle with the dried oregano, garlic powder, salt, and black pepper. Use your hands or a large spoon to toss everything together, ensuring each piece of vegetable is lightly and evenly coated with oil and seasonings. This step is crucial for building the foundational flavor of the wrap.
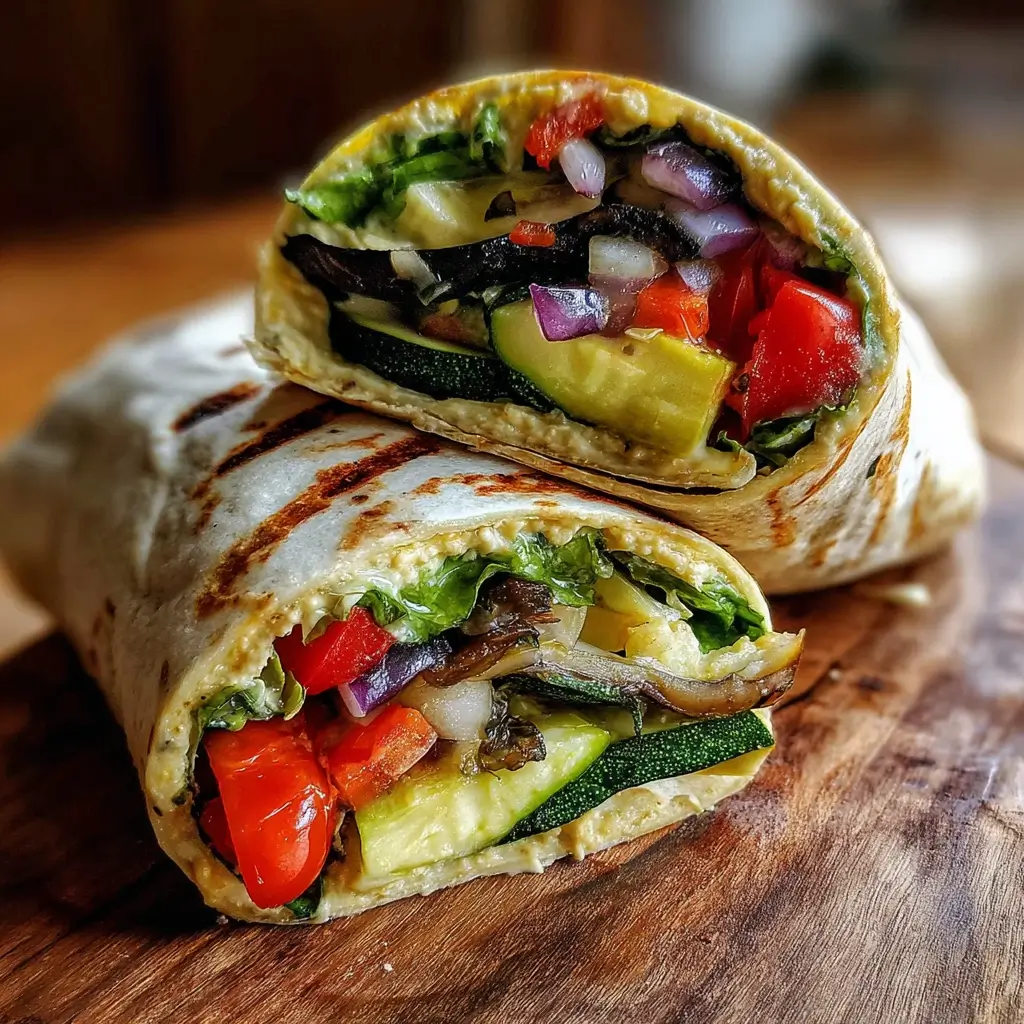
- Grill the Vegetables: Place the seasoned vegetables on the preheated grill in a single layer. It’s important not to overcrowd the grill, so you may need to do this in two batches. Grilling in a single layer ensures each piece gets direct contact with the heat, leading to proper charring and cooking rather than steaming. Grill for about 4-6 minutes per side. You are looking for them to be tender-crisp with distinct, dark grill marks. The natural sugars in the vegetables will caramelize, creating a delicious, smoky sweetness. Once cooked, remove the vegetables from the grill and set them aside on a platter. If desired, you can roughly chop the larger pieces into more bite-sized chunks to make rolling the wrap easier.
- Warm the Tortillas: This step is key to preventing your wraps from cracking or breaking when you roll them. You can warm the tortillas directly on the grill grates for about 15-20 seconds per side, just until they become soft and pliable. Alternatively, you can wrap them in a slightly damp paper towel and microwave them for 30 seconds, or heat them one by one in a dry skillet over medium heat.
- Assemble the Wraps: Now for the fun part! Lay a warm tortilla flat on a clean surface. Spread a generous layer of hummus (about 1/4 cup) evenly over the surface, leaving about a 1-inch border around the edges. The hummus acts as a delicious “glue” and a barrier to prevent the wrap from getting soggy.
- Layer the Fillings: On the bottom third of the tortilla (the side closest to you), create a horizontal line of your fillings. Start with a handful of fresh spinach or arugula. Top the greens with a generous portion of the grilled vegetables. If you are using feta cheese, sprinkle it over the vegetables now.
- Roll the Wrap Tightly: To roll the wrap like a burrito, first, fold the left and right sides of the tortilla inward over the filling. Then, take the edge of the tortilla closest to you and pull it up and over the filling, tucking it in tightly. Continue to roll away from you until you have a secure, compact wrap. The initial tight tuck is the secret to a wrap that holds together.
- Serve Immediately: Slice the wrap in half on a diagonal for a professional-looking presentation, and serve immediately while the vegetables are still warm and the tortilla is soft.
Nutrition Facts
- Servings: 4 wraps
- Calories per serving: Approximately 450-550 kcal
This wrap is a powerhouse of balanced nutrition, designed to fuel your body and delight your taste buds.
- Rich in Fiber: Thanks to the whole wheat tortillas, a plethora of vegetables, and chickpeas in the hummus, each wrap provides a significant portion of your daily fiber needs. Fiber is crucial for digestive health, helps maintain stable blood sugar levels, and contributes to a feeling of fullness, which can aid in weight management.
- Excellent Source of Plant-Based Protein: Hummus, made from chickpeas, provides a solid base of plant-based protein. When combined with the protein from a whole wheat tortilla, this wrap becomes a satisfying meal that helps in muscle repair and keeps you energized throughout the afternoon, staving off that dreaded 3 PM slump.
- Packed with Vitamins and Antioxidants: The colorful array of bell peppers, zucchini, and spinach makes this wrap a vibrant source of essential vitamins like Vitamin C, Vitamin A, and Vitamin K. These vitamins and the antioxidants they contain are vital for supporting a strong immune system, promoting healthy skin, and protecting your cells from damage.
- Contains Healthy Fats: The olive oil used for grilling the vegetables and the tahini (sesame paste) in the hummus are fantastic sources of monounsaturated and polyunsaturated fats. These “good” fats are essential for brain health, reducing inflammation, and supporting cardiovascular wellness.
- Complex Carbohydrates for Sustained Energy: The whole wheat tortillas and vegetables provide complex carbohydrates, which are digested more slowly than simple sugars. This results in a steady release of energy, preventing the sharp spikes and crashes in blood sugar that can leave you feeling tired and reaching for unhealthy snacks.
Preparation Time
- Total Time: 25-30 minutes
- Preparation: 10-15 minutes (washing and slicing vegetables, gathering ingredients)
- Cook Time: 15 minutes (grilling vegetables in batches and warming tortillas)
This recipe is the epitome of a quick and efficient meal. The majority of the time is spent on the simple, meditative task of slicing the vegetables. Once your ingredients are prepped, the grilling process is swift, and assembly takes only a minute per wrap, making it a perfect solution for time-crunched weeknights or a speedy lunch.
How to Serve
These Grilled Veggie and Hummus Wraps are incredibly versatile and can be served in various ways to suit any occasion. Here are some ideas to elevate your wrap experience:
- For a Quick and Healthy Lunch:
- Serve one whole wrap alongside a piece of fresh fruit like an apple or a pear.
- Pair it with a small cup of yogurt or a handful of almonds for extra protein and healthy fats.
- Enjoy it with a side of crunchy, raw veggie sticks like carrots and cucumbers for dipping in any leftover hummus.
- As a Light and Satisfying Dinner:
- Slice the wrap in half and serve it with a hearty side salad. A simple Greek salad with tomatoes, cucumbers, olives, and a light vinaigrette pairs wonderfully.
- Accompany the wrap with a warm bowl of soup, such as a creamy tomato basil soup or a lentil soup, for a comforting and complete meal.
- Serve with a side of sweet potato fries or a fluffy quinoa salad tossed with lemon and herbs.
- For Picnics or Packed Lunches:
- To prevent sogginess, pack the hummus and grilled vegetables in separate small containers. Assemble the wrap just before eating for the freshest taste and texture.
- If you must assemble it beforehand, wrap it tightly in parchment paper and then in plastic wrap or foil. This helps it hold its shape and keeps it fresh for several hours.
- Include a small bag of pita chips or vegetable chips for a satisfying crunch.
- As an Appetizer or Party Food:
- Slice the wraps into 1-inch thick pinwheels and arrange them on a platter. Secure each pinwheel with a toothpick for easy handling.
- Set up a “Build-Your-Own-Wrap Bar” with bowls of grilled vegetables, different types of hummus, various greens, cheeses, and other toppings, allowing guests to customize their own creations.
Additional Tips
- Meal Prep Like a Pro: This recipe is fantastic for meal prepping. Grill a large batch of vegetables at the beginning of the week and store them in an airtight container in the refrigerator for up to 4 days. You can then assemble a fresh wrap in under 5 minutes each day for a quick lunch or dinner.
- No Grill? No Problem! Roast Instead: If you don’t have an outdoor grill or an indoor grill pan, you can achieve a similar delicious result by roasting the vegetables. Toss them with the oil and seasonings as directed, then spread them in a single layer on a baking sheet. Roast in a preheated oven at 425°F (220°C) for 20-25 minutes, flipping halfway through, until they are tender and have some caramelized, browned edges.
- Get Creative with Your Hummus: While classic hummus is a perfect choice, don’t be afraid to experiment. Roasted red pepper hummus will amplify the sweet, smoky flavor of the peppers. Spicy hummus can add a fiery kick. Or, try a lemon-dill or cilantro-jalapeño hummus for a fresh twist. You can even make your own!
- The Secret to a Non-Soggy Wrap: The enemy of any good wrap is sogginess. To combat this, ensure your grilled vegetables have cooled slightly before assembling. The hummus layer acts as a great moisture barrier, but you can also add your layer of greens between the hummus and the veggies to provide extra protection for the tortilla.
- Boost the Protein: For an even heartier and more protein-packed meal, consider adding a scoop of cooked quinoa or a handful of chickpeas into the wrap along with the vegetables. If you are not strictly vegetarian, a few slices of grilled chicken or beef would also be a delicious addition.
- Vary Your Veggies: This wrap is a canvas for your creativity and what’s in season. Feel free to substitute or add other vegetables. Asparagus spears, sliced mushrooms (Portobello or cremini), eggplant planks, or even broccoli florets are all fantastic when grilled.
- Choose the Right Tortilla: The tortilla is more than just a vessel; it’s part of the flavor experience. Whole wheat tortillas add a nutty depth and extra fiber. Spinach or sun-dried tomato tortillas can add color and a subtle flavor. For a gluten-free option, look for certified gluten-free tortillas made from corn, rice, or almond flour.
- Don’t Forget a Sauce Drizzle: To take the flavor to the next level, consider a final drizzle of a complementary sauce before rolling. A swirl of balsamic glaze adds a tangy sweetness, a bit of tzatziki sauce provides a cool and creamy cucumber-dill flavor, or a dash of your favorite hot sauce can give it a spicy kick.
FAQ Section
1. Can I make these Grilled Veggie and Hummus Wraps ahead of time?
Yes, you can, but with a slight modification for the best results. The fully assembled wraps are best eaten fresh as the tortilla can become soggy over time. The ideal way to make them ahead is to prep the components separately. Store the grilled vegetables in one airtight container and the hummus in another. When you’re ready to eat, simply warm a tortilla, assemble your wrap, and enjoy. This method works perfectly for work or school lunches.
2. How do I store leftover wraps?
If you have leftover assembled wraps, wrap them tightly in plastic wrap or aluminum foil and store them in the refrigerator. They will be good for up to 24 hours. The texture of the tortilla might soften, but they will still be delicious. You can eat them cold or briefly heat them in a skillet or a panini press to crisp up the outside.
3. What can I use instead of hummus?
If you’re not a fan of hummus or want to try something different, there are several excellent alternatives. Baba ghanoush, a creamy dip made from roasted eggplant, offers a similar smoky flavor profile. Tzatziki, a Greek yogurt and cucumber sauce, provides a cool, tangy, and refreshing alternative. You could also use a simple mashed avocado with a squeeze of lime juice or a smear of your favorite cream cheese or bean dip.
4. How can I make this recipe gluten-free?
Making this wrap gluten-free is very simple. The filling ingredients (vegetables, hummus, seasonings) are all naturally gluten-free. The only substitution you need to make is the tortilla. Use your favorite brand of certified gluten-free wraps, which are commonly made from corn, brown rice flour, or almond flour. You can also skip the wrap altogether and serve the grilled vegetables and hummus over a bed of quinoa or in a “deconstructed” bowl.
5. Are these wraps healthy?
Absolutely. This recipe is a prime example of a balanced, nutrient-dense meal. It’s loaded with fiber, vitamins, and minerals from the vegetables, provides healthy fats from olive oil and hummus, and offers a good source of plant-based protein and complex carbohydrates for sustained energy. It’s a meal that is both incredibly satisfying and great for your body.
6. Can I add cheese to this wrap?
Yes, cheese is a fantastic addition! As mentioned in the recipe, crumbled feta cheese adds a wonderful salty and tangy flavor that perfectly complements the Mediterranean profile of the wrap. Other great options include goat cheese for a creamy tang, or provolone or mozzarella, which will melt beautifully if you decide to press the wrap in a panini press.
7. My wrap always falls apart when I roll it. What am I doing wrong?
There are a few common reasons for a wrap falling apart. First, make sure you are warming your tortilla before rolling; a cold, stiff tortilla is much more likely to crack. Second, don’t overfill it. It can be tempting to load it up, but a moderately filled wrap is easier to roll securely. Finally, focus on your rolling technique: fold in the sides first, then use your thumbs to pull the bottom edge up and tightly over the filling, tucking as you go to create a compact cylinder.
8. Can I use frozen vegetables for this recipe?
While fresh vegetables will give you the best texture and flavor, you can use frozen vegetables in a pinch. For the best results, thaw the vegetables completely and pat them very dry with a paper towel before tossing them with oil and seasonings. Frozen vegetables release more water, so they may not get as charred or crisp as fresh ones, and they will likely steam more than they grill, but they will still be flavorful. Roasting them in the oven is often a better method for frozen vegetables than grilling.

Grilled Veggie and Hummus Wrap
Ingredients
- For the Grilled Vegetables:
- 1 large Red Bell Pepper: Sliced into thick, 1/2-inch strips. The sweetness of the red pepper intensifies beautifully on the grill.
- 1 large Yellow or Orange Bell Pepper: Also sliced into 1/2-inch strips. This adds a vibrant color and a slightly milder, fruitier flavor than the red pepper.
- 1 medium Zucchini: Sliced lengthwise into 1/4-inch thick planks. Zucchini becomes wonderfully tender and absorbs the smoky flavor of the grill.
- 1 medium Yellow Squash: Sliced lengthwise into 1/4-inch thick planks. Similar to zucchini, it provides a soft texture and a mild, buttery taste.
- 1 small Red Onion: Sliced into 1/2-inch thick rounds. Grilling tames the sharp bite of the onion, making it sweet and savory.
- 2 tablespoons Olive Oil: A good quality extra virgin olive oil helps the vegetables caramelize without sticking and adds a classic Mediterranean flavor.
- 1 teaspoon Dried Oregano: This herb provides a warm, peppery, and aromatic flavor that pairs perfectly with grilled vegetables.
- 1/2 teaspoon Garlic Powder: Offers a savory, aromatic depth without the risk of burning fresh garlic on the high heat of the grill.
- 1/2 teaspoon Salt: To taste, enhances all the other flavors.
- 1/4 teaspoon Black Pepper: Freshly ground for a pungent, spicy kick.
- For the Wraps:
- 4 large (10-inch) Flour or Whole Wheat Tortillas: Choose your favorite; whole wheat adds a nutty flavor and extra fiber.
- 1 cup Hummus: Use your favorite store-bought brand or homemade version. Classic, roasted red pepper, or roasted garlic hummus all work exceptionally well.
- 2 cups Fresh Spinach or Arugula: Washed and dried. Spinach is mild and tender, while arugula adds a peppery, spicy bite that contrasts nicely with the sweet veggies.
- (Optional) 1/4 cup Crumbled Feta Cheese: Adds a salty, briny tang that complements the other ingredients perfectly.
Instructions
- Prepare the Grill: Preheat your outdoor grill or indoor grill pan to medium-high heat (around 400°F or 200°C). A clean, well-oiled grate is essential to prevent the vegetables from sticking and to achieve those coveted grill marks. If using an outdoor grill, you can create two heat zones—one hotter for searing and one cooler for finishing the cooking if needed.
- Season the Vegetables: In a large mixing bowl, combine the sliced bell peppers, zucchini, yellow squash, and red onion. Drizzle the olive oil over the vegetables. Sprinkle with the dried oregano, garlic powder, salt, and black pepper. Use your hands or a large spoon to toss everything together, ensuring each piece of vegetable is lightly and evenly coated with oil and seasonings. This step is crucial for building the foundational flavor of the wrap.
- Grill the Vegetables: Place the seasoned vegetables on the preheated grill in a single layer. It’s important not to overcrowd the grill, so you may need to do this in two batches. Grilling in a single layer ensures each piece gets direct contact with the heat, leading to proper charring and cooking rather than steaming. Grill for about 4-6 minutes per side. You are looking for them to be tender-crisp with distinct, dark grill marks. The natural sugars in the vegetables will caramelize, creating a delicious, smoky sweetness. Once cooked, remove the vegetables from the grill and set them aside on a platter. If desired, you can roughly chop the larger pieces into more bite-sized chunks to make rolling the wrap easier.
- Warm the Tortillas: This step is key to preventing your wraps from cracking or breaking when you roll them. You can warm the tortillas directly on the grill grates for about 15-20 seconds per side, just until they become soft and pliable. Alternatively, you can wrap them in a slightly damp paper towel and microwave them for 30 seconds, or heat them one by one in a dry skillet over medium heat.
- Assemble the Wraps: Now for the fun part! Lay a warm tortilla flat on a clean surface. Spread a generous layer of hummus (about 1/4 cup) evenly over the surface, leaving about a 1-inch border around the edges. The hummus acts as a delicious “glue” and a barrier to prevent the wrap from getting soggy.
- Layer the Fillings: On the bottom third of the tortilla (the side closest to you), create a horizontal line of your fillings. Start with a handful of fresh spinach or arugula. Top the greens with a generous portion of the grilled vegetables. If you are using feta cheese, sprinkle it over the vegetables now.
- Roll the Wrap Tightly: To roll the wrap like a burrito, first, fold the left and right sides of the tortilla inward over the filling. Then, take the edge of the tortilla closest to you and pull it up and over the filling, tucking it in tightly. Continue to roll away from you until you have a secure, compact wrap. The initial tight tuck is the secret to a wrap that holds together.
- Serve Immediately: Slice the wrap in half on a diagonal for a professional-looking presentation, and serve immediately while the vegetables are still warm and the tortilla is soft.
Nutrition
- Serving Size: one normal portion
- Calories: 550


