")

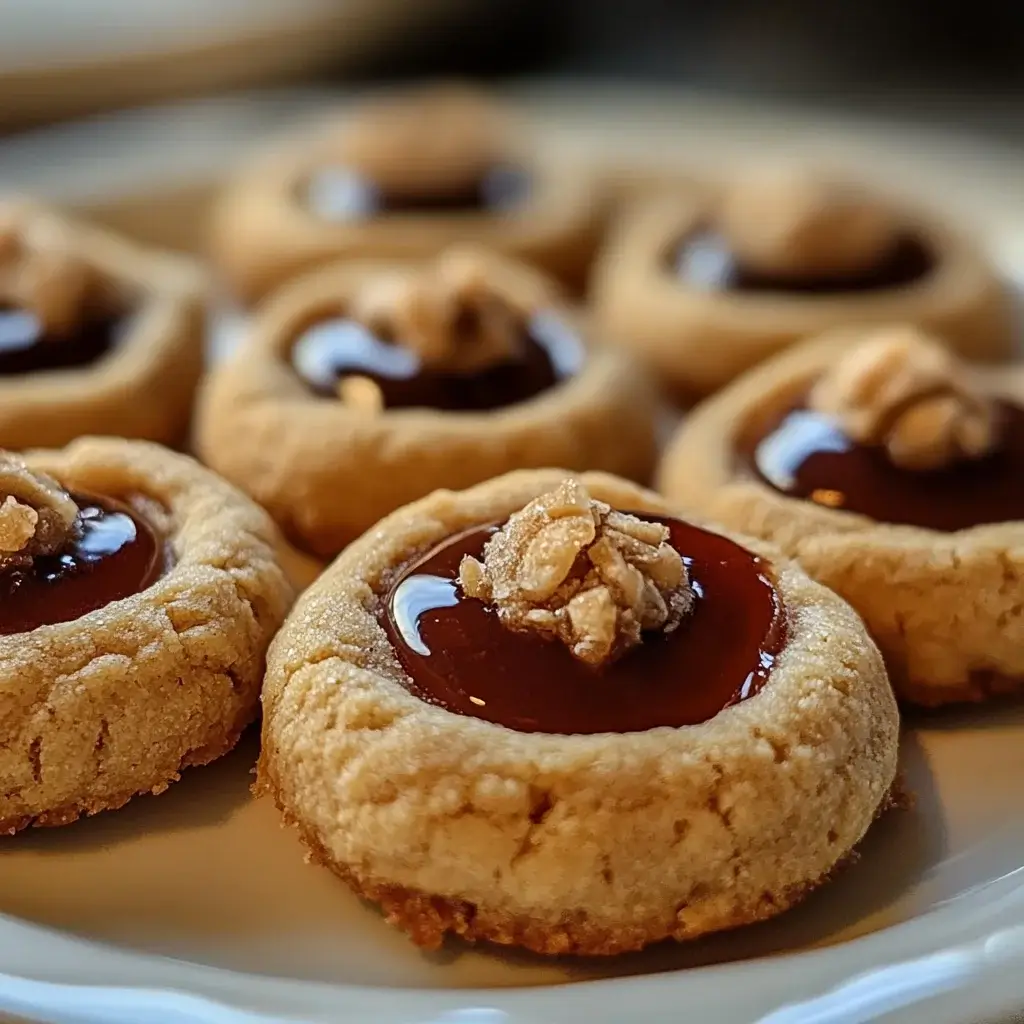

It’s funny how some recipes just become instant classics in your household. These Hazelnut Thumbprint Cookies? They are definitely one of those. From the moment the warm, nutty aroma started wafting from the oven, my family was hooked. The buttery, crumbly cookie base, the rich, toasted hazelnut flavor, and that perfect little dollop of jam in the center – it’s a combination that’s simply irresistible. We first made these during the holiday season, and they disappeared faster than I could say “second batch!” Since then, they’ve become a year-round favorite, perfect for afternoon tea, a sweet treat after dinner, or just because. If you’re looking for a cookie that’s both elegant and easy to make, with a flavor that’s sophisticated yet comforting, then look no further. These Hazelnut Thumbprint Cookies are about to become your new go-to recipe, guaranteed to bring smiles and requests for more!
Ingredients for Hazelnut Thumbprint Perfection
To create these delightful Hazelnut Thumbprint Cookies, you’ll need a selection of simple, high-quality ingredients. Each component plays a vital role in achieving the perfect texture and flavor profile. Here’s a breakdown of what you’ll need:
- Unsalted Butter: The foundation of our cookie, unsalted butter, allows you to control the saltiness of the final product. It provides richness, tenderness, and that melt-in-your-mouth texture we all crave. Make sure it’s softened to room temperature for easy creaming.
- Granulated Sugar: Granulated sugar not only sweetens the cookies but also contributes to their crisp edges and overall structure. It works in tandem with the butter to create a light and airy dough when creamed together.
- Egg Yolk: Using just the egg yolk adds richness, moisture, and a beautiful tender crumb to the cookies. It also helps bind the dough together without making it too tough.
- Vanilla Extract: A splash of pure vanilla extract enhances the overall flavor profile, adding warmth and depth that complements the nutty hazelnuts and sweet jam.
- All-Purpose Flour: The structural backbone of the cookie, all-purpose flour provides the necessary gluten development to hold the cookies together. Measure it accurately to avoid dry or tough cookies.
- Hazelnuts: The star of the show! You’ll need hazelnuts, preferably blanched and skinned, for the best flavor and texture. Toasting them beforehand is crucial to bring out their nutty aroma and prevent them from becoming soft in the cookies. Both ground hazelnuts for the dough and chopped hazelnuts for rolling are needed.
- Pinch of Salt: A small amount of salt is essential to balance the sweetness and enhance all the other flavors in the cookies, from the butter to the hazelnuts and jam.
- Jam or Preserves: For the thumbprint filling, choose your favorite jam or preserves. Raspberry, apricot, strawberry, or even fig jam work wonderfully. Opt for a good quality jam with a vibrant flavor and color.
Step-by-Step Instructions for Hazelnut Thumbprint Cookies
Creating these Hazelnut Thumbprint Cookies is a rewarding experience, and with these detailed instructions, you’ll be baking like a pro in no time. Follow each step carefully for cookie perfection:
Step 1: Toast the Hazelnuts (Flavor Booster!)
Preheat your oven to 350°F (175°C). Spread the whole hazelnuts in a single layer on a baking sheet. Toast them in the preheated oven for 8-10 minutes, or until they become fragrant and their skins start to crack. Keep a close eye on them as they can burn quickly. Once toasted, remove them from the oven and let them cool slightly.
Step 2: Skin and Grind (Nutty Flour!)
While the hazelnuts are still warm, rub them vigorously in a clean kitchen towel to remove as much of the skins as possible. Don’t worry if you can’t get all the skin off. Let the skinned hazelnuts cool completely. Once cooled, place about half of the toasted hazelnuts in a food processor and pulse until finely ground into hazelnut flour. Be careful not to over-process, or you’ll end up with hazelnut butter. Set aside the hazelnut flour. Roughly chop the remaining toasted hazelnuts for rolling the cookies later.
Step 3: Cream Butter and Sugar (Light and Airy!)
In a large mixing bowl, or the bowl of a stand mixer fitted with the paddle attachment, cream together the softened unsalted butter and granulated sugar until light and fluffy. This process should take about 2-3 minutes. Scraping down the sides of the bowl occasionally ensures everything is evenly incorporated. Creaming butter and sugar properly is crucial for creating cookies with a tender texture.
Step 4: Add Egg Yolk and Vanilla (Richness and Aroma!)
Add the egg yolk and vanilla extract to the creamed butter and sugar mixture. Beat until well combined, scraping down the bowl as needed to ensure everything is thoroughly mixed. The egg yolk will add richness and bind the dough, while the vanilla extract will enhance the overall flavor profile.
Step 5: Incorporate Dry Ingredients (Gentle Mixing!)
In a separate medium bowl, whisk together the all-purpose flour, ground hazelnut flour, and salt. Gradually add the dry ingredients to the wet ingredients, mixing on low speed until just combined. Be careful not to overmix the dough at this stage, as overmixing can lead to tough cookies. Mix until you just see the flour disappear into the wet ingredients.
Step 6: Chill the Dough (Firm and Easy to Handle!)
Cover the dough with plastic wrap and chill it in the refrigerator for at least 30 minutes, or up to 1 hour. Chilling the dough is essential because it firms up the butter, making the dough easier to handle and preventing the cookies from spreading too much during baking.
Step 7: Shape the Cookies (Thumbprint Time!)
Preheat your oven to 325°F (160°C). Line baking sheets with parchment paper. Take the chilled dough out of the refrigerator. Roll the dough into small balls, about 1 inch in diameter. One by one, roll each dough ball in the chopped toasted hazelnuts, gently pressing the nuts to adhere.
Step 8: Make the Thumbprints (Perfect Indentation!)
Place the hazelnut-coated dough balls on the prepared baking sheets, leaving some space between each cookie for spreading. Use your thumb (or the back of a small spoon or measuring spoon) to gently press an indentation in the center of each cookie. Be careful not to press all the way through the cookie.
Step 9: Fill with Jam (Sweet Center!)
Spoon a small amount of your chosen jam or preserves into the thumbprint indentation of each cookie. Don’t overfill, as the jam may bubble over during baking.
Step 10: Bake to Golden Perfection (Watch Carefully!)
Bake in the preheated oven for 12-15 minutes, or until the edges of the cookies are lightly golden brown and the jam is bubbly. Baking time may vary slightly depending on your oven, so keep a close eye on them towards the end of the baking time.
Step 11: Cool and Enjoy (Patience is Rewarded!)
Once baked, remove the baking sheets from the oven and let the cookies cool on the baking sheets for a few minutes before transferring them to a wire rack to cool completely. Cooling them slightly on the baking sheet helps them firm up before you move them. Once completely cooled, they are ready to be enjoyed!
Nutrition Facts for Hazelnut Thumbprint Cookies
These Hazelnut Thumbprint Cookies are a delightful treat, and knowing their approximate nutritional information can help you enjoy them as part of a balanced diet. Please note that these values are estimates and can vary slightly based on ingredient brands and specific measurements.
Serving Size: 1 Cookie
Servings Per Recipe: Approximately 24 cookies (depending on size)
Approximate Nutrition Facts Per Serving:
- Calories: 120 kcal
- Fat: 7g
Note: These values are estimates and may vary. Jam type and amount will affect sugar content.
Preparation Time Breakdown
Making Hazelnut Thumbprint Cookies is a relatively straightforward process, and knowing the time commitment helps with planning your baking session. Here’s a general overview of the preparation time:
- Prep Time: Approximately 30 minutes (This includes toasting and skinning hazelnuts, measuring ingredients, making the dough, and chilling time). While the active prep time is shorter, the chilling time is crucial for the dough’s consistency.
- Cook Time: 12-15 minutes per batch (Baking time will depend on your oven and cookie size. You may need to bake in batches).
- Total Time: Approximately 1 hour (Including prep, chill, and bake time, plus cooling time).
Overall, from start to finish, you can expect to spend about an hour creating these delicious Hazelnut Thumbprint Cookies. The hands-on time is relatively short, making them a great option for a satisfying baking project that doesn’t require all day in the kitchen.
How to Serve Hazelnut Thumbprint Cookies
Hazelnut Thumbprint Cookies are incredibly versatile and can be enjoyed in a variety of ways. Their delicate flavor and elegant appearance make them suitable for both casual and more formal occasions. Here are some delightful serving suggestions:
- With a Warm Beverage:
- Coffee: The nutty notes of the cookies pair beautifully with a cup of hot coffee, whether it’s a rich espresso, a smooth latte, or a simple black coffee.
- Tea: Serve alongside a pot of black tea, Earl Grey, or even a fragrant herbal tea for a comforting afternoon treat.
- Hot Chocolate: Indulge in the ultimate cozy combination by serving these cookies with a steaming mug of hot chocolate.
- As Part of a Dessert Platter:
- Cookie Assortment: Create a stunning cookie platter by including Hazelnut Thumbprint Cookies along with other festive cookies like gingerbread, shortbread, and chocolate chip cookies.
- Mixed Desserts: Incorporate them into a larger dessert spread featuring mini tarts, brownies, and fruit skewers for a diverse and appealing selection.
- For Special Occasions and Holidays:
- Holiday Cookie Exchange: Hazelnut Thumbprint Cookies are perfect for cookie exchanges. Their elegant presentation and delicious flavor will surely be a hit.
- Gift Giving: Package them beautifully in cellophane bags or decorative tins to give as homemade gifts to friends, family, or neighbors.
- Party Favors: Offer them as delightful party favors at birthdays, showers, or holiday gatherings.
- Simple and Elegant Dessert:
- After Dinner Treat: Serve a couple of Hazelnut Thumbprint Cookies as a light and satisfying dessert after a meal.
- With Ice Cream or Yogurt: Crumble them over vanilla ice cream or Greek yogurt for added texture and flavor.
- Enhance the Presentation:
- Dust with Powdered Sugar: Lightly dust the cooled cookies with powdered sugar for an extra touch of elegance, especially for holiday presentations.
- Arrange Artistically: Arrange the cookies on a pretty plate or platter, perhaps with a sprig of rosemary or a few fresh berries for visual appeal.
Additional Tips for Perfect Hazelnut Thumbprint Cookies
To ensure your Hazelnut Thumbprint Cookies turn out flawlessly every time, consider these helpful tips and tricks:
- Toast Hazelnuts Properly: Don’t skip toasting the hazelnuts! Toasting is crucial for bringing out their rich, nutty flavor. Watch them carefully in the oven to prevent burning. Slightly under-toasted is better than burnt.
- Use Room Temperature Butter: Softened butter is essential for creaming properly with sugar, resulting in a light and airy dough. If your butter is too cold, it won’t cream well, and if it’s melted, the cookies may spread too much.
- Don’t Overmix the Dough: Overmixing develops gluten, which can lead to tough cookies. Mix the dry ingredients into the wet ingredients until just combined. Stop mixing as soon as you no longer see streaks of flour.
- Chill the Dough Thoroughly: Chilling the dough is not optional! It firms up the butter, making the dough easier to handle and preventing excessive spreading during baking. At least 30 minutes, but even an hour is beneficial.
- Make Consistent Thumbprints: Try to make the thumbprints as consistent in size and depth as possible for even baking and a uniform look. Using the back of a small spoon or measuring spoon can help achieve this.
- Don’t Overfill the Thumbprints: Use a small amount of jam in each thumbprint. Overfilling can cause the jam to bubble over and make the cookies sticky or messy.
- Bake on Parchment Paper: Lining your baking sheets with parchment paper prevents sticking and makes for easy cleanup. It also helps the cookies bake more evenly and prevents the bottoms from burning.
- Cool Completely Before Storing: Allow the cookies to cool completely on a wire rack before storing them in an airtight container. Storing them while still warm can trap moisture and make them soft or sticky.
Frequently Asked Questions (FAQ) about Hazelnut Thumbprint Cookies
Baking questions are common, and we’ve compiled some of the most frequently asked questions about Hazelnut Thumbprint Cookies to help you bake with confidence:
Q1: Can I use pre-ground hazelnut flour instead of grinding my own?
A: Yes, you can use pre-ground hazelnut flour to save time. However, freshly ground hazelnut flour from toasted hazelnuts will have a more intense and flavorful nutty taste. If using pre-ground, ensure it is fresh for the best results.
Q2: What if I can’t find blanched hazelnuts? Can I use hazelnuts with skins?
A: Yes, you can use hazelnuts with skins. Toast them as instructed and then rub them vigorously in a kitchen towel to remove as much skin as possible. A little skin remaining is perfectly fine and won’t significantly affect the flavor or texture.
Q3: Can I substitute the jam filling with something else?
A: Absolutely! You can get creative with the filling. Consider using Nutella, caramel, lemon curd, chocolate ganache, or even a dollop of cream cheese frosting after baking. For a less sweet option, try a sprinkle of sea salt in the center before baking.
Q4: My cookie dough is too sticky. What should I do?
A: If your dough is too sticky, it likely needs more chilling time. Cover the dough and refrigerate it for another 30 minutes to an hour. This will firm up the butter and make the dough easier to handle. Avoid adding more flour unless absolutely necessary, as this can make the cookies dry.
Q5: How long do Hazelnut Thumbprint Cookies stay fresh?
A: Hazelnut Thumbprint Cookies will stay fresh when stored in an airtight container at room temperature for up to 5 days. For longer storage, you can freeze baked cookies for up to 2 months. Thaw them at room temperature before serving.
Q6: Can I make the dough ahead of time?
A: Yes, you can prepare the dough ahead of time. Wrap it tightly in plastic wrap and store it in the refrigerator for up to 2 days. Alternatively, you can freeze the dough for up to a month. Thaw it in the refrigerator overnight before rolling and baking.
Q7: My cookies spread too much during baking. What did I do wrong?
A: Several factors can cause cookies to spread too much. Ensure your butter was properly softened, not melted. Make sure you chilled the dough for the recommended time. Also, check your oven temperature to ensure it’s accurate. If your oven is too hot, cookies may spread before they set.
Q8: Can I double the recipe?
A: Yes, this recipe can easily be doubled or even tripled to make a larger batch. Simply double or triple all the ingredient quantities. You may need to bake in multiple batches depending on the size of your oven and baking sheets. Remember to maintain consistent baking times.
Print
Hazelnut Thumbprint Cookies
Ingredients
To create these delightful Hazelnut Thumbprint Cookies, you’ll need a selection of simple, high-quality ingredients. Each component plays a vital role in achieving the perfect texture and flavor profile. Here’s a breakdown of what you’ll need:
- Unsalted Butter: The foundation of our cookie, unsalted butter, allows you to control the saltiness of the final product. It provides richness, tenderness, and that melt-in-your-mouth texture we all crave. Make sure it’s softened to room temperature for easy creaming.
- Granulated Sugar: Granulated sugar not only sweetens the cookies but also contributes to their crisp edges and overall structure. It works in tandem with the butter to create a light and airy dough when creamed together.
- Egg Yolk: Using just the egg yolk adds richness, moisture, and a beautiful tender crumb to the cookies. It also helps bind the dough together without making it too tough.
- Vanilla Extract: A splash of pure vanilla extract enhances the overall flavor profile, adding warmth and depth that complements the nutty hazelnuts and sweet jam.
- All-Purpose Flour: The structural backbone of the cookie, all-purpose flour provides the necessary gluten development to hold the cookies together. Measure it accurately to avoid dry or tough cookies.
- Hazelnuts: The star of the show! You’ll need hazelnuts, preferably blanched and skinned, for the best flavor and texture. Toasting them beforehand is crucial to bring out their nutty aroma and prevent them from becoming soft in the cookies. Both ground hazelnuts for the dough and chopped hazelnuts for rolling are needed.
- Pinch of Salt: A small amount of salt is essential to balance the sweetness and enhance all the other flavors in the cookies, from the butter to the hazelnuts and jam.
- Jam or Preserves: For the thumbprint filling, choose your favorite jam or preserves. Raspberry, apricot, strawberry, or even fig jam work wonderfully. Opt for a good quality jam with a vibrant flavor and color.
Instructions
Creating these Hazelnut Thumbprint Cookies is a rewarding experience, and with these detailed instructions, you’ll be baking like a pro in no time. Follow each step carefully for cookie perfection:
Step 1: Toast the Hazelnuts (Flavor Booster!)
Preheat your oven to 350°F (175°C). Spread the whole hazelnuts in a single layer on a baking sheet. Toast them in the preheated oven for 8-10 minutes, or until they become fragrant and their skins start to crack. Keep a close eye on them as they can burn quickly. Once toasted, remove them from the oven and let them cool slightly.
Step 2: Skin and Grind (Nutty Flour!)
While the hazelnuts are still warm, rub them vigorously in a clean kitchen towel to remove as much of the skins as possible. Don’t worry if you can’t get all the skin off. Let the skinned hazelnuts cool completely. Once cooled, place about half of the toasted hazelnuts in a food processor and pulse until finely ground into hazelnut flour. Be careful not to over-process, or you’ll end up with hazelnut butter. Set aside the hazelnut flour. Roughly chop the remaining toasted hazelnuts for rolling the cookies later.
Step 3: Cream Butter and Sugar (Light and Airy!)
In a large mixing bowl, or the bowl of a stand mixer fitted with the paddle attachment, cream together the softened unsalted butter and granulated sugar until light and fluffy. This process should take about 2-3 minutes. Scraping down the sides of the bowl occasionally ensures everything is evenly incorporated. Creaming butter and sugar properly is crucial for creating cookies with a tender texture.
Step 4: Add Egg Yolk and Vanilla (Richness and Aroma!)
Add the egg yolk and vanilla extract to the creamed butter and sugar mixture. Beat until well combined, scraping down the bowl as needed to ensure everything is thoroughly mixed. The egg yolk will add richness and bind the dough, while the vanilla extract will enhance the overall flavor profile.
Step 5: Incorporate Dry Ingredients (Gentle Mixing!)
In a separate medium bowl, whisk together the all-purpose flour, ground hazelnut flour, and salt. Gradually add the dry ingredients to the wet ingredients, mixing on low speed until just combined. Be careful not to overmix the dough at this stage, as overmixing can lead to tough cookies. Mix until you just see the flour disappear into the wet ingredients.
Step 6: Chill the Dough (Firm and Easy to Handle!)
Cover the dough with plastic wrap and chill it in the refrigerator for at least 30 minutes, or up to 1 hour. Chilling the dough is essential because it firms up the butter, making the dough easier to handle and preventing the cookies from spreading too much during baking.
Step 7: Shape the Cookies (Thumbprint Time!)
Preheat your oven to 325°F (160°C). Line baking sheets with parchment paper. Take the chilled dough out of the refrigerator. Roll the dough into small balls, about 1 inch in diameter. One by one, roll each dough ball in the chopped toasted hazelnuts, gently pressing the nuts to adhere.
Step 8: Make the Thumbprints (Perfect Indentation!)
Place the hazelnut-coated dough balls on the prepared baking sheets, leaving some space between each cookie for spreading. Use your thumb (or the back of a small spoon or measuring spoon) to gently press an indentation in the center of each cookie. Be careful not to press all the way through the cookie.
Step 9: Fill with Jam (Sweet Center!)
Spoon a small amount of your chosen jam or preserves into the thumbprint indentation of each cookie. Don’t overfill, as the jam may bubble over during baking.
Step 10: Bake to Golden Perfection (Watch Carefully!)
Bake in the preheated oven for 12-15 minutes, or until the edges of the cookies are lightly golden brown and the jam is bubbly. Baking time may vary slightly depending on your oven, so keep a close eye on them towards the end of the baking time.
Step 11: Cool and Enjoy (Patience is Rewarded!)
Once baked, remove the baking sheets from the oven and let the cookies cool on the baking sheets for a few minutes before transferring them to a wire rack to cool completely. Cooling them slightly on the baking sheet helps them firm up before you move them. Once completely cooled, they are ready to be enjoyed!
Nutrition
- Serving Size: one normal portion
- Calories: 120
- Fat: 7g


