
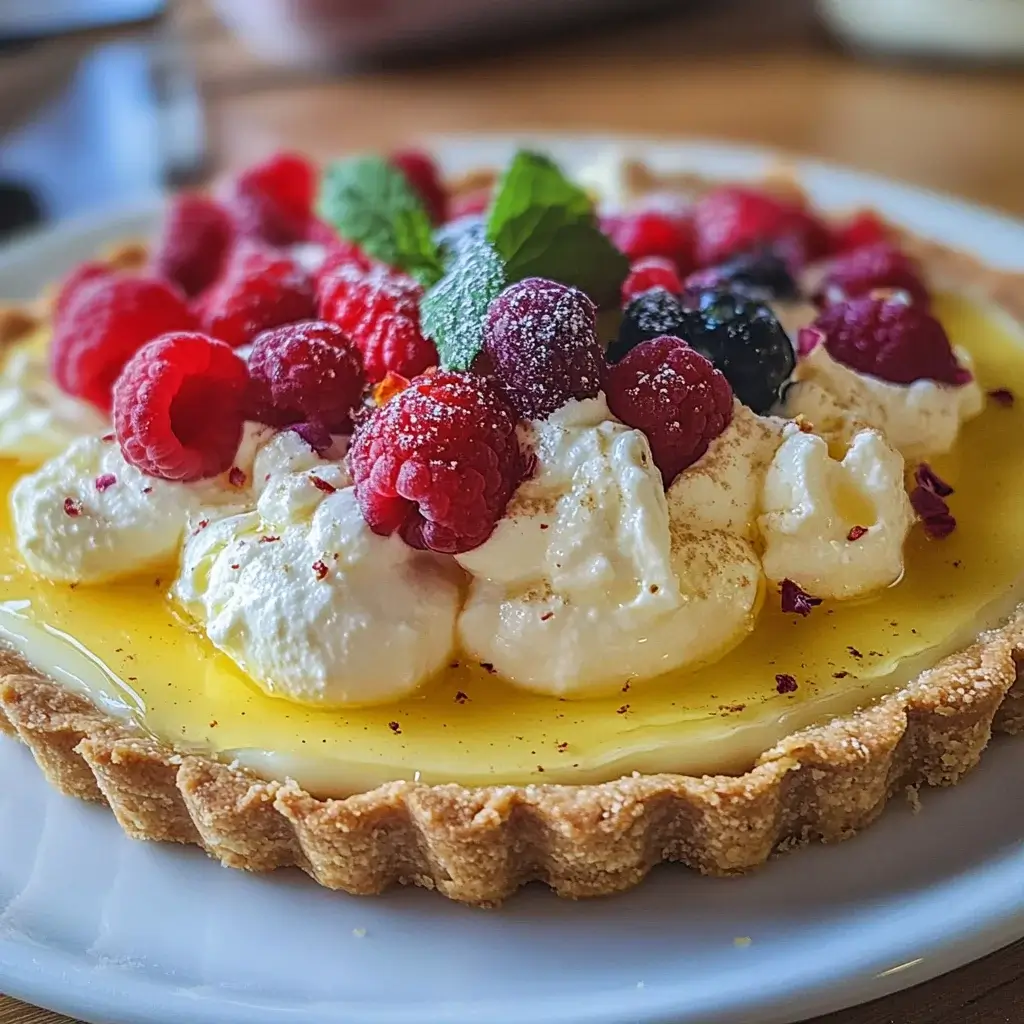
The first time I baked this Honey Ricotta Cream Tart, it was for a small family gathering. I’d stumbled upon the idea while daydreaming about desserts that were both elegant and comforting, something that wouldn’t be too heavy but would still feel indulgent. The combination of creamy ricotta and sweet, floral honey had always appealed to me, and encasing it in a buttery, crisp pastry shell seemed like the perfect way to showcase these simple yet sophisticated flavors. As the tart baked, a subtle, warm aroma of honey and baked cream began to fill the kitchen, drawing curious family members in one by one. The anticipation was palpable. When it finally emerged from the oven, golden-brown and beautiful, it was met with oohs and aahs. We let it cool, though the wait felt eternal, and then came the moment of truth. The first bite was pure bliss – the crisp, crumbly crust giving way to a cloud-like, subtly sweet ricotta filling, the honey singing through without overpowering the delicate cheese. My notoriously picky nephew, who usually shies away from anything “cheesy” in his desserts, asked for a second slice! My mother-in-law, a fantastic baker herself, declared it one of the best tarts she’d ever tasted. Since that day, this Honey Ricotta Cream Tart has become a staple for special occasions, a go-to when I want to impress without spending an entire day in the kitchen, and a beloved treat that never fails to bring smiles. It’s a testament to how a few quality ingredients, handled with care, can create something truly magical. This recipe, refined over several iterations, is my way of sharing that little piece of culinary joy with you. It’s more than just a dessert; it’s a celebration of simple pleasures, a sweet embrace in every bite, and a guaranteed showstopper that will have your guests asking for the recipe before they’ve even finished their first piece. Prepare to fall in love with its delicate charm and irresistible taste – I promise, this Honey Ricotta Cream Tart is an experience you’ll want to recreate time and time again.
Ingredients
Here’s what you’ll need to create this delightful Honey Ricotta Cream Tart, a symphony of textures and flavors that’s bound to become a new favorite. Each component plays a crucial role, from the sturdy yet tender base to the ethereally light and creamy filling.
For the Shortcrust Pastry:
- 1 ¾ cups (220g) All-Purpose Flour: The structural backbone of our tart shell, providing a tender yet sturdy base. Ensure it’s unbleached for the best flavor.
- ¼ cup (50g) Granulated Sugar: Adds a touch of sweetness to the crust, complementing the honeyed filling.
- ½ teaspoon Salt: Balances the sweetness and enhances the overall flavor profile of the pastry.
- ½ cup (113g) Unsalted Butter, chilled and cubed: Crucial for a flaky, tender crust. Keep it very cold until the moment it’s incorporated.
- 1 Large Egg Yolk: Adds richness, tenderness, and color to the pastry.
- 2-3 tablespoons Ice Water: Helps bind the dough together. Use just enough for the dough to come together; too much can make it tough.
For the Honey Ricotta Cream Filling:
- 2 cups (約 480g) Whole Milk Ricotta Cheese, drained: The star of the filling! Use good quality, fresh whole milk ricotta. Draining it well is key to prevent a soggy tart. You can do this by placing it in a cheesecloth-lined sieve over a bowl in the refrigerator for a few hours or overnight.
- ½ cup (120ml) Heavy Cream: Lends an incredible richness and smooth, velvety texture to the ricotta filling.
- ½ cup (170g) High-Quality Honey: Provides the primary sweetness and a distinct floral or amber flavor. Choose a honey you love the taste of – clover, orange blossom, or wildflower honey all work beautifully.
- 2 Large Egg Yolks: These contribute to the richness and custard-like consistency of the filling, helping it set beautifully.
- 1 teaspoon Lemon Zest (from about 1 medium lemon): Adds a bright, fresh counterpoint to the richness of the ricotta and the sweetness of the honey. It truly elevates the filling.
- 1 teaspoon Vanilla Extract: Enhances all the other flavors and adds a warm, comforting aroma.
- Pinch of Salt: A tiny amount to balance the sweetness and bring out the nuances of the other ingredients in the filling.
Optional for Garnish:
- Extra Honey, for drizzling: A final flourish of liquid gold before serving.
- Fresh Berries (raspberries, blueberries, strawberries): Their slight tartness and vibrant color provide a beautiful contrast.
- Toasted Sliced Almonds or Pistachios: For a delightful crunch and nutty flavor.
- A dusting of Powdered Sugar: For an elegant, classic finish.
Instructions
Follow these steps carefully to create your perfect Honey Ricotta Cream Tart. Baking is a science, but it’s also an art, so enjoy the process!
Part 1: Prepare the Shortcrust Pastry
- Combine Dry Ingredients: In a large mixing bowl, whisk together the all-purpose flour, granulated sugar, and salt. This ensures even distribution.
- Cut in the Butter: Add the chilled, cubed butter to the flour mixture. Using a pastry blender, your fingertips, or a food processor, cut the butter into the flour until the mixture resembles coarse crumbs with some pea-sized pieces of butter remaining. Working quickly helps keep the butter cold, which is essential for a flaky crust.
- Add Wet Ingredients: In a small bowl, lightly whisk the egg yolk with 2 tablespoons of ice water. Make a well in the center of the flour-butter mixture and pour in the egg yolk mixture.
- Form the Dough: Gently mix with a fork or your hands until the dough just starts to come together. If it seems too dry, add the remaining tablespoon of ice water, one teaspoon at a time, until it holds together without being sticky. Be careful not to overwork the dough, as this can make the crust tough.
- Chill the Dough: Turn the dough out onto a lightly floured surface and gently pat it into a 1-inch thick disc. Wrap it tightly in plastic wrap and refrigerate for at least 1 hour, or up to 2 days. This chilling period allows the gluten to relax, making the dough easier to roll out and preventing shrinkage during baking. It also ensures the butter is very cold.
Part 2: Blind Bake the Tart Shell
- Preheat Oven and Prepare Pan: Preheat your oven to 375°F (190°C). Have a 9-inch or 9.5-inch tart pan with a removable bottom ready. You don’t typically need to grease these pans if your pastry has enough butter.
- Roll Out the Dough: On a lightly floured surface, roll out the chilled dough disc into a circle about 12-13 inches in diameter and roughly ⅛-inch thick. Work from the center outwards, rotating the dough frequently to ensure an even circle and prevent sticking.
- Line the Tart Pan: Carefully transfer the rolled-out dough to your tart pan. An easy way to do this is to gently roll the dough around your rolling pin, then unroll it over the pan. Press the dough gently into the bottom and up the sides of the pan. Trim any excess dough from the edges using your rolling pin pressed across the rim or a sharp knife.
- Dock and Chill Again: Prick the bottom of the pastry all over with a fork. This allows steam to escape during baking, preventing the crust from puffing up. Place the pastry-lined tart pan in the freezer for 15-20 minutes, or in the refrigerator for at least 30 minutes, to firm up again. This further helps prevent shrinkage.
- Blind Bake: Line the chilled tart shell with parchment paper, ensuring it covers the bottom and sides. Fill it with pie weights, dried beans, or uncooked rice. This is called “blind baking” and ensures the crust bakes evenly and holds its shape.
- First Bake: Bake for 15-20 minutes. Then, carefully remove the parchment paper and weights. The crust should look set but still pale.
- Second Bake (Naked): Return the crust to the oven and bake for another 10-15 minutes, or until it’s lightly golden brown and looks dry. This step ensures the bottom of the crust is fully cooked and crisp.
- Cool Slightly: Remove the tart shell from the oven and let it cool on a wire rack for at least 15-20 minutes while you prepare the filling. Reduce the oven temperature to 350°F (175°C).
Part 3: Prepare the Honey Ricotta Cream Filling
- Drain Ricotta (if not done already): Ensure your ricotta is well-drained. Excess moisture can lead to a watery filling and a soggy crust. If you haven’t drained it yet, place it in a fine-mesh sieve lined with cheesecloth over a bowl and press gently to remove as much liquid as possible.
- Combine Filling Ingredients: In a large bowl, combine the drained ricotta cheese, heavy cream, honey, egg yolks, lemon zest, vanilla extract, and the pinch of salt.
- Mix Until Smooth: Using an electric mixer on low speed or a whisk, beat the ingredients together until they are just combined and the mixture is smooth and creamy. Be careful not to overmix, as this can incorporate too much air, which might cause the filling to crack during baking. A few small lumps of ricotta are perfectly fine and add to the texture.
Part 4: Assemble and Bake the Tart
- Pour Filling into Crust: Carefully pour the honey ricotta cream filling into the pre-baked and slightly cooled tart shell. Spread it evenly with a spatula.
- Bake the Tart: Place the tart on a baking sheet (to catch any potential drips and for easier handling) and bake in the preheated 350°F (175°C) oven for 30-40 minutes. The tart is done when the filling is mostly set but still has a slight wobble in the center. The edges should be lightly golden, and the filling might be slightly puffed.
- Cool Completely: Once baked, remove the tart from the oven and place it on a wire rack. Let it cool completely to room temperature, which can take 2-3 hours. As it cools, the filling will firm up further.
- Chill (Recommended): For the best texture and flavor, and for easier slicing, cover the cooled tart loosely with plastic wrap and refrigerate for at least 2-3 hours, or preferably overnight.
Part 5: Garnish and Serve
- Garnish: Just before serving, you can drizzle the top of the tart with a little extra honey. Add fresh berries, a sprinkle of toasted nuts, or a light dusting of powdered sugar if desired.
- Serve: Carefully remove the outer ring of the tart pan. Slice the Honey Ricotta Cream Tart into wedges using a sharp knife, wiping the blade clean between cuts for neat slices. Enjoy this exquisite dessert!
Nutrition Facts
This Honey Ricotta Cream Tart is an indulgent treat, best enjoyed in moderation as part of a balanced diet. The nutritional information provided below is an estimate and can vary based on specific ingredients used and portion sizes.
- Servings: This recipe typically yields 8-10 servings.
- Calories per serving (approximate for 1/8th of tart): 380-450 kcal. This is a rich dessert, with calories primarily from the butter in the crust and the fats in the ricotta and cream.
Key Nutrition Highlights (per serving estimate):
- Total Fat (approx. 25-30g): A significant portion comes from the butter, heavy cream, and whole milk ricotta. This includes saturated fats, so enjoy mindfully. Fats contribute to the rich flavor and satisfying texture.
- Carbohydrates (approx. 28-35g): Mainly from the flour in the crust and the natural sugars in honey, plus a small amount from the sugar in the crust.
- Protein (approx. 8-10g): Primarily from the ricotta cheese and eggs, making it a more protein-rich dessert compared to some others.
- Sugars (approx. 15-20g): A good portion of this is from the honey, which provides natural sugars, as well as the granulated sugar in the crust.
- Sodium (approx. 150-200mg): Contributed by the salt added to both the crust and the filling to enhance flavors.
It’s important to remember that these are approximations. For precise nutritional information, you may want to use an online calculator with your specific brand ingredients. This Honey Ricotta Cream Tart is a beautiful dessert designed for enjoyment; savor each bite!
Preparation Time
Crafting this beautiful Honey Ricotta Cream Tart involves several stages, but many of these include chilling or baking time where you can step away. Here’s a breakdown:
- Active Preparation Time: Approximately 45-60 minutes.
- Making the pastry dough: 15-20 minutes
- Rolling and fitting the pastry: 10-15 minutes
- Preparing the filling: 10-15 minutes
- Assembling and garnishing: 5-10 minutes
- Chilling Time (Crucial):
- Dough chilling: Minimum 1 hour (can be longer, up to 2 days)
- Lined tart shell chilling: 15-30 minutes
- Final tart chilling (post-baking): Minimum 2-3 hours (ideally overnight)
- Baking Time:
- Blind baking the crust: 25-35 minutes total
- Baking the filled tart: 30-40 minutes
- Cooling Time (Post-Baking): 2-3 hours at room temperature before chilling.
Total Time from Start to Serving (including minimum chilling): Approximately 5-6 hours, but much of this is passive time. If you chill the dough and the final tart overnight, the process will be spread over two days, making it very manageable.
This Honey Ricotta Cream Tart is a labor of love, but the steps are straightforward. Planning ahead, especially with the chilling times, will make the process smooth and enjoyable, leading to a truly rewarding and delicious result. Don’t rush the chilling, as it’s key to both the texture of the crust and the set of the filling.
How to Serve
This Honey Ricotta Cream Tart is wonderfully versatile and can be served in numerous ways to suit any occasion, from a casual afternoon tea to an elegant dinner party finale. Here are some ideas to inspire you:
- Simply Elegant:
- Serve chilled slices on their own. The beauty and flavor of the tart are often enough to impress without any accompaniments.
- A light drizzle of high-quality honey just before serving enhances the honey notes and adds a beautiful sheen. Choose a runny honey for the best effect.
- A delicate dusting of powdered sugar can add a touch of classic bakery elegance.
- With Fresh Fruit:
- Mixed Berries: A handful of fresh raspberries, blueberries, blackberries, or sliced strawberries alongside each slice. Their slight tartness beautifully cuts through the richness of the cream.
- Figs: Sliced fresh figs, when in season, make a sophisticated and delicious pairing, especially with a honey-forward dessert.
- Stone Fruit: Slices of ripe peaches or plums in the summer months can complement the creamy texture and sweet notes.
- Adding Texture and Crunch:
- Toasted Nuts: Sprinkle with toasted sliced almonds, chopped pistachios, or even candied pecans for a delightful textural contrast. Toasting brings out their flavor.
- Lemon or Orange Zest: A little extra finely grated zest over the top just before serving can brighten the flavors even more.
- Accompaniments:
- A Dollop of Cream: While the tart is already creamy, a small spoonful of lightly sweetened whipped cream or crème fraîche can add another layer of luxury.
- Fruit Coulis: A vibrant raspberry or mixed berry coulis drizzled around the plate adds color and a tangy counterpoint.
- Ice Cream: A small scoop of vanilla bean ice cream or a subtly flavored fruit sorbet (like lemon or raspberry) can be a wonderful partner, especially on a warm day.
- Beverage Pairings:
- Coffee or Tea: Perfect for an afternoon treat. A good quality black coffee, a latte, or a cup of Earl Grey or chamomile tea would be lovely.
- Dessert Wine: For a more sophisticated adult pairing, consider a sweet dessert wine like a Moscato d’Asti, a late-harvest Riesling, or even a light Vin Santo. The wine’s sweetness and acidity can complement the tart beautifully.
- Herbal Infusions: A mint or lemon balm infusion can be a refreshing non-alcoholic option.
- Presentation Tips:
- Always use a sharp, clean knife to slice the tart. Wiping the blade between cuts will ensure neat, professional-looking slices.
- Serve on attractive dessert plates.
- If garnishing with berries or nuts, arrange them artfully either on the tart before slicing or on individual plates.
- Consider the color contrast when choosing garnishes – vibrant berries look stunning against the pale cream filling.
This Honey Ricotta Cream Tart is best served chilled, as this allows the filling to set properly and the flavors to meld. Enjoy experimenting with these serving suggestions to find your favorite way to present this delectable dessert!
Additional Tips
To ensure your Honey Ricotta Cream Tart turns out perfectly every time and to encourage a bit of creative exploration, here are eight additional tips:
- Ricotta Quality and Draining is Paramount: Don’t skimp on the ricotta! Use fresh, high-quality whole milk ricotta for the best flavor and texture. The draining step is absolutely crucial. If your ricotta is too wet, the filling can become watery, leading to a soggy crust and a less stable set. For extra creamy results, you can even briefly process the drained ricotta in a food processor until perfectly smooth before mixing it with other filling ingredients, though some prefer the slightly rustic texture of simply whisked ricotta.
- Don’t Overwork the Pastry Dough: When making the shortcrust, mix the ingredients until they just come together. Overworking develops the gluten in the flour, which can result in a tough, shrink-prone crust rather than a tender, flaky one. Handle it gently and as little as possible.
- Mastering Blind Baking: Pay close attention to the blind baking process. An underbaked crust will be pale and can get soggy once the filling is added. A perfectly blind-baked crust will be golden and crisp, providing a wonderful textural contrast to the creamy filling. Removing the pie weights and parchment for the last part of blind baking helps the bottom of the crust to cook through and dry out.
- Flavor Variations for the Filling: While the classic honey-lemon-vanilla combination is divine, feel free to experiment.
- Citrus Zest: Try orange zest instead of, or in addition to, lemon zest. Lime zest could also offer an interesting twist.
- Spices: A tiny pinch of ground cardamom, nutmeg, or cinnamon could be added to the filling for a warmer, spiced note, especially nice in cooler months.
- Extracts: A drop of almond extract can add a lovely nuance, but use it sparingly as it’s quite potent.
- Infused Honey: Consider using honey that has been infused with flavors like lavender or rosemary for a unique aromatic profile.
- Preventing Cracks in the Filling: Overbaking is the most common culprit for a cracked cheesecake-like filling. Bake the tart until the edges are set but the center still has a slight jiggle. The filling will continue to cook and set as it cools. Also, avoid overmixing the filling, as incorporating too much air can contribute to cracking. A gentle bake in a moderate oven is key. If it does crack, don’t worry! It will still taste delicious, and a strategic garnish can easily hide it.
- Cooling and Chilling is Non-Negotiable: This tart needs ample time to cool gradually to room temperature before being transferred to the refrigerator to chill thoroughly. Rushing this process can affect the texture of the filling. Chilling not only allows the filling to set completely for clean slices but also melds the flavors beautifully. Ideally, chill it overnight.
- Choosing Your Honey: The type of honey you use will significantly impact the flavor profile of your tart.
- Mild Honeys: Clover, acacia, or orange blossom honey offer delicate, floral sweetness.
- Bolder Honeys: Wildflower, buckwheat (use sparingly as it’s very strong), or chestnut honey can provide more robust, complex, and sometimes darker notes.
Consider the flavor you want to achieve. A taste test of your honey is always a good idea!
- Making Ahead and Storage:
- Pastry Dough: The dough can be made up to 2 days in advance and kept well-wrapped in the refrigerator, or frozen for up to 3 months (thaw overnight in the fridge before use).
- Baked Tart Shell: The blind-baked tart shell can be made a day in advance. Cool it completely and store it in an airtight container at room temperature.
- Completed Tart: The finished Honey Ricotta Cream Tart is best made a day before you plan to serve it, allowing it to chill and flavors to develop. It will keep well in the refrigerator, covered, for up to 3-4 days. However, the crust may soften slightly over time.
By keeping these tips in mind, you’ll be well on your way to baking a Honey Ricotta Cream Tart that is not only delicious but also a joy to make.
FAQ Section
Here are answers to some frequently asked questions about making this Honey Ricotta Cream Tart, designed to help you achieve the best possible results.
Q1: Can I use low-fat ricotta cheese for this tart?
A1: While you technically can use low-fat ricotta, it’s highly recommended to use whole milk ricotta for this recipe. Whole milk ricotta provides a much richer flavor and a creamier, more luxurious texture, which is key to the appeal of this tart. Low-fat versions can sometimes be grainier or result in a less stable, more watery filling, even after draining. For the best outcome, stick with full-fat.
Q2: My tart crust shrunk significantly during blind baking. What went wrong?
A2: Crust shrinkage is a common issue and can be due to a few factors:
* Overworking the dough: This develops too much gluten. Handle the dough gently.
* Not enough chilling: The dough needs to be thoroughly chilled before rolling and, importantly, the lined tart pan needs to be chilled again (or frozen briefly) before it goes into the hot oven. This helps the fat stay solid longer, preventing the sides from slumping.
* Stretching the dough: When fitting the dough into the pan, avoid stretching it. Gently ease it into place. Stretched dough will try to shrink back to its original size.
* Oven too hot initially (less common for shrinking, more for burning): Ensure your oven temperature is accurate.
Q3: Can I make this Honey Ricotta Cream Tart gluten-free?
A3: Yes, you can adapt this tart to be gluten-free. The easiest way is to use a good quality gluten-free all-purpose flour blend (one that contains xanthan gum or allows you to add it) for the shortcrust pastry. The filling ingredients are naturally gluten-free. Be aware that gluten-free pastry can sometimes be more crumbly or delicate to handle, so extra care might be needed when rolling and transferring it. There are also many recipes for nut-based gluten-free crusts (e.g., almond flour crusts) that could work beautifully.
Q4: What’s the best way to drain the ricotta cheese effectively?
A4: The most effective way is to line a fine-mesh sieve with a double layer of cheesecloth (or a clean, lint-free kitchen towel or sturdy paper towels). Place the ricotta in the lined sieve, set the sieve over a bowl (to catch the whey), cover loosely, and refrigerate for at least 4 hours, or preferably overnight. For a quicker method, you can gently press down on the ricotta with the back of a spoon after an hour or so to help expel more liquid, but the overnight method is more hands-off and thorough. You’ll be surprised how much liquid comes out!
Q5: My ricotta filling is a bit grainy. How can I make it smoother?
A5: Graininess in ricotta filling can sometimes occur depending on the brand and type of ricotta. To achieve a smoother filling:
* Process the ricotta: After draining, you can process the ricotta in a food processor for a minute or two until it’s perfectly smooth and creamy before adding the other filling ingredients.
* Whisk thoroughly but gently: Ensure all ingredients are well combined, but avoid over-whisking which can incorporate too much air.
* Use high-quality ricotta: Some higher-end brands tend to have a smoother, less coarse texture naturally.
Q6: Can I freeze the Honey Ricotta Cream Tart?
A6: While the tart can be frozen, the texture of the ricotta filling might change slightly upon thawing, potentially becoming a bit more watery or grainy. The crust may also lose some of its crispness. If you choose to freeze it, cool the tart completely, then wrap it very well in plastic wrap, followed by a layer of aluminum foil, or place it in an airtight freezer container. Freeze for up to 1 month. Thaw overnight in the refrigerator. It’s generally best enjoyed fresh or within a few days of baking.
Q7: How do I know when the tart is perfectly baked? The center is still wobbly.
A7: The tart is done when the edges of the filling are set and lightly puffed, and the center still has a slight jiggle or wobble when you gently nudge the pan – think of a Jell-O or a very softly set custard. It should not be completely liquid, but it shouldn’t be rock solid either. The filling will continue to cook and firm up significantly as it cools and then chills. Overbaking will lead to a firmer, potentially drier texture and increase the risk of cracks. Trust the jiggle!
Q8: My honey is crystallized. Can I still use it?
A8: Absolutely! Crystallization is a natural process for pure honey and doesn’t mean it has gone bad. To re-liquefy crystallized honey, simply place the jar (with the lid loosened or removed if it’s plastic) in a bowl of warm (not boiling) water. Let it sit for 15-30 minutes, stirring occasionally, until the crystals dissolve and the honey becomes smooth and runny again. Avoid microwaving honey, as it can overheat easily and degrade its beneficial properties and delicate flavors. Once liquefied, it’s perfectly fine to use in the recipe.
Honey Ricotta Cream Tart
Ingredients
Here’s what you’ll need to create this delightful Honey Ricotta Cream Tart, a symphony of textures and flavors that’s bound to become a new favorite. Each component plays a crucial role, from the sturdy yet tender base to the ethereally light and creamy filling.
For the Shortcrust Pastry:
- 1 ¾ cups (220g) All-Purpose Flour: The structural backbone of our tart shell, providing a tender yet sturdy base. Ensure it’s unbleached for the best flavor.
- ¼ cup (50g) Granulated Sugar: Adds a touch of sweetness to the crust, complementing the honeyed filling.
- ½ teaspoon Salt: Balances the sweetness and enhances the overall flavor profile of the pastry.
- ½ cup (113g) Unsalted Butter, chilled and cubed: Crucial for a flaky, tender crust. Keep it very cold until the moment it’s incorporated.
- 1 Large Egg Yolk: Adds richness, tenderness, and color to the pastry.
- 2–3 tablespoons Ice Water: Helps bind the dough together. Use just enough for the dough to come together; too much can make it tough.
For the Honey Ricotta Cream Filling:
- 2 cups (約 480g) Whole Milk Ricotta Cheese, drained: The star of the filling! Use good quality, fresh whole milk ricotta. Draining it well is key to prevent a soggy tart. You can do this by placing it in a cheesecloth-lined sieve over a bowl in the refrigerator for a few hours or overnight.
- ½ cup (120ml) Heavy Cream: Lends an incredible richness and smooth, velvety texture to the ricotta filling.
- ½ cup (170g) High-Quality Honey: Provides the primary sweetness and a distinct floral or amber flavor. Choose a honey you love the taste of – clover, orange blossom, or wildflower honey all work beautifully.
- 2 Large Egg Yolks: These contribute to the richness and custard-like consistency of the filling, helping it set beautifully.
- 1 teaspoon Lemon Zest (from about 1 medium lemon): Adds a bright, fresh counterpoint to the richness of the ricotta and the sweetness of the honey. It truly elevates the filling.
- 1 teaspoon Vanilla Extract: Enhances all the other flavors and adds a warm, comforting aroma.
- Pinch of Salt: A tiny amount to balance the sweetness and bring out the nuances of the other ingredients in the filling.
Optional for Garnish:
- Extra Honey, for drizzling: A final flourish of liquid gold before serving.
- Fresh Berries (raspberries, blueberries, strawberries): Their slight tartness and vibrant color provide a beautiful contrast.
- Toasted Sliced Almonds or Pistachios: For a delightful crunch and nutty flavor.
- A dusting of Powdered Sugar: For an elegant, classic finish.
Instructions
Follow these steps carefully to create your perfect Honey Ricotta Cream Tart. Baking is a science, but it’s also an art, so enjoy the process!
Part 1: Prepare the Shortcrust Pastry
- Combine Dry Ingredients: In a large mixing bowl, whisk together the all-purpose flour, granulated sugar, and salt. This ensures even distribution.
- Cut in the Butter: Add the chilled, cubed butter to the flour mixture. Using a pastry blender, your fingertips, or a food processor, cut the butter into the flour until the mixture resembles coarse crumbs with some pea-sized pieces of butter remaining. Working quickly helps keep the butter cold, which is essential for a flaky crust.
- Add Wet Ingredients: In a small bowl, lightly whisk the egg yolk with 2 tablespoons of ice water. Make a well in the center of the flour-butter mixture and pour in the egg yolk mixture.
- Form the Dough: Gently mix with a fork or your hands until the dough just starts to come together. If it seems too dry, add the remaining tablespoon of ice water, one teaspoon at a time, until it holds together without being sticky. Be careful not to overwork the dough, as this can make the crust tough.
- Chill the Dough: Turn the dough out onto a lightly floured surface and gently pat it into a 1-inch thick disc. Wrap it tightly in plastic wrap and refrigerate for at least 1 hour, or up to 2 days. This chilling period allows the gluten to relax, making the dough easier to roll out and preventing shrinkage during baking. It also ensures the butter is very cold.
Part 2: Blind Bake the Tart Shell
- Preheat Oven and Prepare Pan: Preheat your oven to 375°F (190°C). Have a 9-inch or 9.5-inch tart pan with a removable bottom ready. You don’t typically need to grease these pans if your pastry has enough butter.
- Roll Out the Dough: On a lightly floured surface, roll out the chilled dough disc into a circle about 12-13 inches in diameter and roughly ⅛-inch thick. Work from the center outwards, rotating the dough frequently to ensure an even circle and prevent sticking.
- Line the Tart Pan: Carefully transfer the rolled-out dough to your tart pan. An easy way to do this is to gently roll the dough around your rolling pin, then unroll it over the pan. Press the dough gently into the bottom and up the sides of the pan. Trim any excess dough from the edges using your rolling pin pressed across the rim or a sharp knife.
- Dock and Chill Again: Prick the bottom of the pastry all over with a fork. This allows steam to escape during baking, preventing the crust from puffing up. Place the pastry-lined tart pan in the freezer for 15-20 minutes, or in the refrigerator for at least 30 minutes, to firm up again. This further helps prevent shrinkage.
- Blind Bake: Line the chilled tart shell with parchment paper, ensuring it covers the bottom and sides. Fill it with pie weights, dried beans, or uncooked rice. This is called “blind baking” and ensures the crust bakes evenly and holds its shape.
- First Bake: Bake for 15-20 minutes. Then, carefully remove the parchment paper and weights. The crust should look set but still pale.
- Second Bake (Naked): Return the crust to the oven and bake for another 10-15 minutes, or until it’s lightly golden brown and looks dry. This step ensures the bottom of the crust is fully cooked and crisp.
- Cool Slightly: Remove the tart shell from the oven and let it cool on a wire rack for at least 15-20 minutes while you prepare the filling. Reduce the oven temperature to 350°F (175°C).
Part 3: Prepare the Honey Ricotta Cream Filling
- Drain Ricotta (if not done already): Ensure your ricotta is well-drained. Excess moisture can lead to a watery filling and a soggy crust. If you haven’t drained it yet, place it in a fine-mesh sieve lined with cheesecloth over a bowl and press gently to remove as much liquid as possible.
- Combine Filling Ingredients: In a large bowl, combine the drained ricotta cheese, heavy cream, honey, egg yolks, lemon zest, vanilla extract, and the pinch of salt.
- Mix Until Smooth: Using an electric mixer on low speed or a whisk, beat the ingredients together until they are just combined and the mixture is smooth and creamy. Be careful not to overmix, as this can incorporate too much air, which might cause the filling to crack during baking. A few small lumps of ricotta are perfectly fine and add to the texture.
Part 4: Assemble and Bake the Tart
- Pour Filling into Crust: Carefully pour the honey ricotta cream filling into the pre-baked and slightly cooled tart shell. Spread it evenly with a spatula.
- Bake the Tart: Place the tart on a baking sheet (to catch any potential drips and for easier handling) and bake in the preheated 350°F (175°C) oven for 30-40 minutes. The tart is done when the filling is mostly set but still has a slight wobble in the center. The edges should be lightly golden, and the filling might be slightly puffed.
- Cool Completely: Once baked, remove the tart from the oven and place it on a wire rack. Let it cool completely to room temperature, which can take 2-3 hours. As it cools, the filling will firm up further.
- Chill (Recommended): For the best texture and flavor, and for easier slicing, cover the cooled tart loosely with plastic wrap and refrigerate for at least 2-3 hours, or preferably overnight.
Part 5: Garnish and Serve
- Garnish: Just before serving, you can drizzle the top of the tart with a little extra honey. Add fresh berries, a sprinkle of toasted nuts, or a light dusting of powdered sugar if desired.
- Serve: Carefully remove the outer ring of the tart pan. Slice the Honey Ricotta Cream Tart into wedges using a sharp knife, wiping the blade clean between cuts for neat slices. Enjoy this exquisite dessert!
Nutrition
- Serving Size: one normal portion
- Calories: 450
- Sugar: 20g
- Sodium: 200mg
- Fat: 30g
- Carbohydrates: 35g
- Protein: 10g