Ingredients
Scale
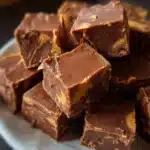
This recipe relies on the magic of a few high-quality, simple ingredients coming together to create something truly special. There’s no complex candy-making involved, just pure, straightforward deliciousness. Each component plays a crucial role in achieving that perfect, melt-in-your-mouth texture and rich flavor profile that defines this unforgettable fudge.
- 1 (14-ounce) can Sweetened Condensed Milk: This is the non-negotiable heart of the recipe. It provides the sugar, dairy, and structure that allows the fudge to set without cooking it for hours. It’s what makes the fudge incredibly smooth and creamy. Be absolutely sure you are using sweetened condensed milk, not evaporated milk, as they are not interchangeable and your fudge will not set properly with the latter. The thick, syrupy consistency is key.
- 2 cups (12 ounces) Semi-Sweet Chocolate Chips: The quality of your chocolate will directly impact the final flavor of your fudge. Using a good quality brand of semi-sweet chocolate chips will provide a deep, rich chocolate flavor that isn’t overly sweet, which is essential to balance the sweetness of the condensed milk and the saltiness of the peanut butter. You could also use a chopped semi-sweet chocolate bar for an even smoother melt.
- 1 cup Creamy Peanut Butter: This is where the other half of the iconic flavor duo comes in. For the smoothest, most consistent fudge, it’s best to use a standard commercial creamy peanut butter like Jif, Skippy, or a store-brand equivalent. These “no-stir” varieties contain emulsifiers that prevent the oil from separating, which ensures your fudge sets up perfectly smooth and not oily. While natural peanut butter is delicious, its tendency for oil separation can sometimes lead to a greasy or grainy final product in this specific recipe.
- 1 tablespoon Unsalted Butter: Just a small amount of butter adds an extra layer of richness and a beautiful, glossy sheen to the finished fudge. It also contributes to the soft, velvety texture, making each bite feel even more decadent. Using unsalted butter allows you to control the final salt level of the fudge.
- 1 teaspoon Vanilla Extract: Vanilla is a flavor enhancer. It won’t make your fudge taste like vanilla, but it will deepen and round out the chocolate and peanut butter flavors, making them taste more complex and pronounced. A pure vanilla extract will give you the best and most authentic flavor.
- ¼ teaspoon Salt: A tiny pinch of salt might seem counterintuitive in a sweet recipe, but it is absolutely essential. Salt is a flavor miracle worker; it tames the overall sweetness and makes the chocolate and peanut butter flavors pop. It creates a more dynamic and less one-note taste experience. If you only have salted butter, you can reduce or omit this extra salt.
Instructions
The beauty of this recipe lies in its sheer simplicity. These steps will guide you through the quick process of creating this decadent fudge using your microwave. The key is to work efficiently once the ingredients are melted, as the fudge will begin to set relatively quickly.
- Prepare Your Pan: Before you begin melting anything, prepare your baking pan. Take an 8×8 inch square baking pan and line it with parchment paper, leaving some overhang on at least two sides. This overhang will act as “handles,” allowing you to easily lift the entire block of fudge out of the pan for clean, easy cutting later. You can lightly grease the pan before adding the parchment to help it stick in place. Set the prepared pan aside.
- Combine and Melt: In a large, microwave-safe bowl, combine the semi-sweet chocolate chips, sweetened condensed milk, and the tablespoon of butter. It’s important to use a bowl that is large enough to allow for vigorous stirring without making a mess.
- Microwave in Intervals: Place the bowl in the microwave and heat on high power for 60 seconds. Remove the bowl—it will be hot, so use oven mitts—and stir the mixture well with a sturdy spatula. The chocolate chips will not be fully melted at this point, but stirring helps to distribute the heat evenly.
- Continue Melting and Stirring: Return the bowl to the microwave and continue to heat in 30-second intervals, stirring thoroughly after each interval. This interval method is crucial. It prevents the chocolate from overheating and “seizing,” which would result in a grainy, ruined texture. Continue this process until the chocolate is completely melted and the mixture is smooth and glossy. This should take a total of 2 to 3 minutes, depending on the power of your microwave.
- Incorporate Final Ingredients: Once the chocolate mixture is perfectly smooth, remove it from the microwave for the last time. Immediately add the cup of creamy peanut butter, the teaspoon of vanilla extract, and the ¼ teaspoon of salt.
- Stir to Perfection: Stir vigorously with your spatula until the peanut butter is completely melted and incorporated into the chocolate mixture. The fudge will become very thick, uniform in color, and have a beautiful sheen. You need to work fairly quickly at this stage as the fudge will begin to firm up as it cools.
- Transfer to Pan: Scrape the thick fudge mixture from the bowl into your prepared 8×8 inch pan. Use your spatula to spread it evenly into the corners, creating a smooth, level top.
- Chill Until Firm: Place the pan in the refrigerator. Let it chill for at least 2-3 hours, or until it is completely firm to the touch. The fudge needs this time to set properly so it can be cut into clean squares. For best results, you can let it chill for up to 4 hours or even overnight.
- Cut and Serve: Once the fudge is fully chilled and firm, grasp the parchment paper handles and lift the entire block of fudge out of the pan onto a cutting board. Use a large, sharp knife to cut the fudge into small squares. For extra clean cuts, you can run the knife under hot water and wipe it dry between each slice.
Nutrition
- Serving Size: one normal portion
- Calories: 120