")


It started on one of those impossibly hot, sticky summer afternoons when the air itself feels heavy and a cool breeze is just a distant memory. The kids were restless, craving a sweet treat, and frankly, so was I. The thought of turning on the oven was out of the question, and our usual ice cream supply had mysteriously vanished. A quick-thinking raid of the pantry and fridge revealed a promising trio: a couple of perfectly ripe, fragrant mangoes blushing a deep orange-gold, a can of creamy, full-fat coconut milk, and my trusty container of cornstarch. A lightbulb went off. Could I create a tropical escape in a bowl, something that required no heat, no fuss, and minimal effort? The answer was a resounding yes. Within fifteen minutes of active work and a patient couple of hours in the refrigerator, we were dipping our spoons into the most luscious, velvety, and intensely flavorful dessert I had ever whipped up on a whim. This Instant Coconut Mango Pudding was born out of necessity but has since become a legend in our household. It’s the dessert I bring to potlucks, the treat I make for unexpected guests, and the simple pleasure we turn to when we need a taste of sunshine. Its silky texture, the perfect marriage of sweet mango and rich coconut, is a testament to the idea that the most magnificent dishes are often the simplest. This recipe isn’t just a dessert; it’s a mini-vacation in a bowl, and I am so excited to share it with you.
Ingredients
This recipe relies on a few high-quality ingredients to achieve its signature creamy texture and vibrant tropical flavor. Each component plays a crucial role, so using the best you can find will elevate the final result from good to absolutely unforgettable.
- 3 cups Ripe Mango, peeled and cubed (about 2-3 large mangoes): This is the star of the show. Use mangoes that are intensely fragrant, yield slightly to gentle pressure, and have a deep, golden-orange flesh. Varieties like Alphonso, Ataulfo (Honey), or Kent are ideal for their low fiber content and intense sweetness, which means you’ll need less added sweetener.
- 1 can (13.5 oz / 400ml) Full-Fat Coconut Milk, chilled: Do not substitute with light coconut milk or coconut beverage from a carton. The high fat content is essential for creating the rich, creamy, and firm texture of the pudding. Chilling the can helps the pudding set faster.
- 1/4 cup Maple Syrup or Agave Nectar (adjust to taste): This provides a clean sweetness that complements the mango. The exact amount you need will depend entirely on the natural sweetness of your mangoes. Always taste the base mixture before adding the thickener to adjust the sweetness to your preference.
- 3 tablespoons Cornstarch (or Arrowroot Powder): This is the magic ingredient that makes the pudding “instant.” It acts as a thickener, transforming the liquid mixture into a silky, spoonable pudding without any cooking. Arrowroot powder is a great alternative and creates a slightly glossier finish.
- 1 tablespoon Fresh Lime Juice (or Lemon Juice): A small amount of acid is non-negotiable. It brightens the flavor of the mango, cuts through the richness of the coconut milk, and prevents the pudding from tasting flat or overly sweet.
- 1 teaspoon Pure Vanilla Extract: Vanilla adds a wonderful depth and warmth to the pudding, enhancing the tropical notes of the mango and coconut without overpowering them.
- 1/8 teaspoon Salt: A tiny pinch of salt doesn’t make the pudding salty; it enhances all the other flavors, making the mango taste fruitier and the overall dessert more balanced and delicious.
Instructions
Follow these simple, step-by-step instructions to create a perfectly smooth and decadent Instant Coconut Mango Pudding. The key to success lies in the blending technique and allowing adequate time for the pudding to chill and set.
- Prepare the Mangoes: Begin by washing and drying your mangoes. Carefully peel the skin away using a sharp paring knife or a vegetable peeler. Slice the mango flesh away from the large, flat pit in the center. Cut the flesh into rough 1-inch cubes. You should have approximately 3 cups of cubed mango. Place the mango cubes into the carafe of a high-speed blender.
- Create the Base Mixture: Pour the entire can of chilled, full-fat coconut milk into the blender with the mangoes. Add your chosen sweetener (starting with a little less if your mangoes are very sweet), the fresh lime juice, pure vanilla extract, and the pinch of salt.
- First Blend: Secure the lid on the blender. Start blending on a low speed, gradually increasing to high. Blend for 60-90 seconds, or until the mixture is completely smooth and homogenous. There should be no visible chunks of mango left. This step is crucial for achieving a silky, lump-free final texture. Once blended, pause and taste the mixture. If it needs more sweetness, add more maple syrup or agave now and give it a quick pulse to incorporate.
- Create the Thickener Slurry: In a small, separate bowl, place the 3 tablespoons of cornstarch. To prevent lumps, create a slurry by adding about 3-4 tablespoons of the mango-coconut mixture from the blender into the bowl with the cornstarch. Whisk vigorously with a fork or a small whisk until the cornstarch is completely dissolved and you have a smooth, thin paste. Do not add the dry cornstarch directly to the blender, as it can clump together and fail to thicken the pudding evenly.
- Final Blend: Pour the cornstarch slurry back into the blender with the rest of the mango mixture. Secure the lid and blend on medium-high speed for another 30 seconds. This final blend ensures the thickener is evenly distributed throughout the pudding base, which is essential for a uniform set. The mixture will still be liquid at this stage; the thickening magic happens during the chilling process.
- Portion and Chill: Immediately pour the pudding mixture into your desired serving vessels. You can use individual ramekins, small glass jars, dessert bowls, or a single larger serving dish. Pouring it right after blending is important, as it will begin to set as it sits.
- The Patient Wait: Cover the serving dishes with plastic wrap, pressing it gently onto the surface of the pudding to prevent a skin from forming. Place the puddings in the refrigerator to chill for at least 4 hours. For the best, firmest texture, chilling for 6 hours or even overnight is highly recommended. The longer it chills, the more the flavors will meld and the thicker the pudding will become. Once fully set, it’s ready to be garnished and served.
Nutrition Facts
This dessert offers a delicious taste of the tropics with some surprising nutritional benefits.
- Servings: This recipe makes approximately 4-6 servings.
- Calories per serving (approximate): 250-300 kcal, depending on the sweetness of the mangoes and amount of sweetener used.
- Rich in Vitamin C: Mangoes are an excellent source of Vitamin C, a powerful antioxidant that supports immune function and skin health.
- Source of Healthy Fats: The full-fat coconut milk provides medium-chain triglycerides (MCTs), a type of saturated fat that is more easily digested and used for energy by the body compared to other fats.
- Dietary Fiber: With a significant amount of mango in every serving, this pudding provides dietary fiber, which is important for digestive health and promoting a feeling of fullness.
- Naturally Dairy-Free and Gluten-Free: This recipe is inherently free from dairy and gluten, making it a wonderful and inclusive dessert option for those with allergies or dietary restrictions.
- Source of Manganese: Both mangoes and coconut are good sources of the essential mineral manganese, which plays a role in bone formation, metabolism, and antioxidant defenses.
Preparation Time
This recipe is prized for its speed and simplicity, with most of the time being completely hands-off.
- Active Preparation Time: 10-15 minutes. This includes washing, peeling, and chopping the mangoes, measuring the ingredients, and blending everything together.
- Inactive Chilling Time: 4-6 hours. This is the crucial time the pudding spends in the refrigerator to set and for the flavors to fully develop. While 4 hours is the minimum, allowing it to chill overnight yields the best texture.
How to Serve
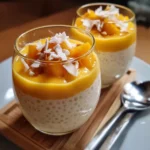
The beauty of this Instant Coconut Mango Pudding lies in its versatility. It can be served simply as is or dressed up with a variety of toppings and accompaniments to suit any occasion. Here are some delightful ways to serve it:
- The Minimalist Tropical Dream:
- Serve the pudding chilled, straight from the fridge, for a pure, unadulterated taste of mango and coconut.
- Garnish with a few small, perfectly diced cubes of fresh mango to provide a textural contrast and a burst of fresh flavor.
- Add a single, fresh mint leaf for a touch of color and a hint of cool aroma.
- For the Love of Crunch:
- Sprinkle generously with toasted shredded coconut. The toasting process deepens the coconut flavor and adds a delightful, crispy texture.
- Top with a spoonful of your favorite granola for a breakfast-for-dessert feel.
- Garnish with crushed nuts like pistachios (for color and a salty-sweet bite), almonds, or macadamia nuts.
- A sprinkle of toasted pumpkin seeds or chia seeds can also add a pleasant crunch and a nutritional boost.
- Decadent and Drizzled:
- Top with a dollop of thick coconut cream (the solid part skimmed from the top of a chilled can of coconut milk).
- Create a simple passion fruit coulis by simmering passion fruit pulp with a little sugar, then drizzle it over the top for a tangy counterpoint.
- A light drizzle of maple syrup or a swirl of date paste can add an extra layer of sweetness and visual appeal.
- Fresh and Zesty Finish:
- Finely grate some lime zest over the surface just before serving. The oils in the zest provide an intense, aromatic burst that beautifully complements the mango.
- Scatter a few fresh pomegranate arils on top for a jewel-like appearance and a juicy, tart pop of flavor.
- Layer the pudding in a clear glass with other fresh fruits like diced kiwi or pineapple to create a beautiful and delicious parfait.
Additional Tips
To ensure your pudding-making experience is a success every single time, keep these eight essential tips in mind.
- The Blender is Your Best Friend: For the smoothest, most luxurious texture, a high-speed blender (like a Vitamix or Blendtec) is highly recommended. It will pulverize the mango fibers and ensure the cornstarch is perfectly incorporated. If you don’t have one, just be prepared to blend for a longer period in a standard blender, and be sure to scrape down the sides a few times.
- Strain for Ultimate Silkiness: If you are using mangoes that are a bit fibrous or if you are an absolute perfectionist seeking a texture as smooth as silk, take one extra step. After the final blend, pour the mixture through a fine-mesh sieve into a bowl before portioning it out. This will catch any tiny, stubborn fibers or minuscule cornstarch clumps.
- Taste and Adjust Sweetness: Mangoes vary wildly in their natural sugar content. Always taste the mixture before you add the cornstarch slurry. This is your only chance to easily adjust the sweetness. If your mangoes are exceptionally sweet, you might need less sweetener than the recipe calls for, or even none at all.
- Don’t Skip the Chill Time: This is the most crucial tip. The cornstarch needs the cold and time to work its thickening magic. Cutting the chill time short will result in a runny, soupy dessert. Four hours is the absolute minimum, but for a truly firm, scoopable pudding, patience is rewarded. Aim for 6 hours or an overnight chill.
- Full-Fat Coconut Milk is Non-Negotiable: It’s worth repeating: you must use canned, full-fat coconut milk. The fat content is what gives the pudding its rich mouthfeel and helps it set firmly. Light coconut milk or the coconut milk beverage sold in cartons will result in a thin, watery pudding.
- Get Creative with Flavors: This recipe is a fantastic base for experimentation. Add a pinch of ground cardamom for a warm, fragrant spice. A teaspoon of freshly grated ginger can add a zesty kick. You could even blend in half of a passion fruit for an extra-tart, tropical twist.
- Perfect for Making Ahead: This is an ideal dessert for entertaining because it must be made ahead of time. You can prepare the pudding up to 2-3 days in advance. Just keep it well-covered in the refrigerator and add any crunchy or fresh garnishes right before serving to maintain their texture and freshness.
- Turn Them into Popsicles: Have leftovers or want a different kind of frozen treat? Pour the blended pudding mixture into popsicle molds instead of ramekins. Freeze for at least 6 hours, and you’ll have creamy, delicious mango-coconut popsicles, a perfect treat for a hot day.
FAQ
Here are answers to some of the most frequently asked questions about making this Instant Coconut Mango Pudding.
1. Can I use frozen mangoes instead of fresh ones?
Absolutely! Frozen mango is a fantastic and convenient option, especially when fresh mangoes are not in season. Simply use the same weight or volume called for in the recipe. The best part is you don’t even need to thaw them first; you can add them to the blender frozen. This will actually help the pudding chill and set even faster.
2. My pudding didn’t get thick. What did I do wrong?
There are a few common culprits if your pudding is runny. First, you may not have used enough cornstarch, or your cornstarch might be old and less effective. Second, you might have used low-fat or light coconut milk, which lacks the fat content to create a firm set. Third, and most likely, the pudding simply didn’t chill for long enough. Give it at least another 2-4 hours in the coldest part of your fridge.
3. Is this recipe vegan and gluten-free?
Yes, it is! This recipe is naturally vegan as it uses no animal products (no dairy, no eggs, no gelatin). It is also naturally gluten-free, as cornstarch is a gluten-free thickener. This makes it an excellent dessert choice for individuals with various dietary needs and preferences.
4. How long will this pudding last in the refrigerator?
When stored properly in an airtight container or covered tightly with plastic wrap, the Instant Coconut Mango Pudding will stay fresh and delicious for up to 4 days in the refrigerator. After a couple of days, a little liquid might separate, but you can simply stir it gently before serving.
5. I don’t have a blender. Can I still make this recipe?
While a blender is highly recommended for the smoothest texture, you can try making it with a food processor. It may take longer to get the mango completely smooth, and the final texture might be slightly less silky. If you have neither, it would be very difficult to achieve a pudding-like consistency, as you need to mechanically break down the mango fibers and emulsify the ingredients.
6. Can I use a different type of milk, like almond or oat milk?
You can, but it will dramatically change the final result. The richness and creaminess of this pudding come directly from the high fat content of canned coconut milk. Using almond, oat, or other plant-based milks will create a much thinner, less decadent dessert that may not set as firmly. If you must substitute, choose the creamiest, highest-fat version you can find, but be prepared for a different outcome.
7. Can I reduce the amount of sweetener or make it sugar-free?
Yes, you can. The amount of sweetener is completely adaptable. If your mangoes are very ripe and sweet, you may be able to omit the added sweetener entirely. You can also use a sugar-free alternative like monk fruit or stevia to taste. Just be sure to add it incrementally, as their sweetness levels are different from maple syrup.
8. Why is it important to make a cornstarch “slurry” first?
Creating a slurry—mixing the cornstarch with a small amount of liquid before adding it to the main batch—is a crucial technique to prevent lumps. If you were to dump the dry cornstarch powder directly into the large volume of liquid in the blender, it would instantly form stubborn clumps that are nearly impossible to blend out, resulting in a gritty, lumpy pudding. The slurry ensures the starch is fully hydrated and can be distributed evenly.
Instant Coconut Mango Pudding
Ingredients
This recipe relies on a few high-quality ingredients to achieve its signature creamy texture and vibrant tropical flavor. Each component plays a crucial role, so using the best you can find will elevate the final result from good to absolutely unforgettable.
- 3 cups Ripe Mango, peeled and cubed (about 2-3 large mangoes): This is the star of the show. Use mangoes that are intensely fragrant, yield slightly to gentle pressure, and have a deep, golden-orange flesh. Varieties like Alphonso, Ataulfo (Honey), or Kent are ideal for their low fiber content and intense sweetness, which means you’ll need less added sweetener.
- 1 can (13.5 oz / 400ml) Full-Fat Coconut Milk, chilled: Do not substitute with light coconut milk or coconut beverage from a carton. The high fat content is essential for creating the rich, creamy, and firm texture of the pudding. Chilling the can helps the pudding set faster.
- 1/4 cup Maple Syrup or Agave Nectar (adjust to taste): This provides a clean sweetness that complements the mango. The exact amount you need will depend entirely on the natural sweetness of your mangoes. Always taste the base mixture before adding the thickener to adjust the sweetness to your preference.
- 3 tablespoons Cornstarch (or Arrowroot Powder): This is the magic ingredient that makes the pudding “instant.” It acts as a thickener, transforming the liquid mixture into a silky, spoonable pudding without any cooking. Arrowroot powder is a great alternative and creates a slightly glossier finish.
- 1 tablespoon Fresh Lime Juice (or Lemon Juice): A small amount of acid is non-negotiable. It brightens the flavor of the mango, cuts through the richness of the coconut milk, and prevents the pudding from tasting flat or overly sweet.
- 1 teaspoon Pure Vanilla Extract: Vanilla adds a wonderful depth and warmth to the pudding, enhancing the tropical notes of the mango and coconut without overpowering them.
- 1/8 teaspoon Salt: A tiny pinch of salt doesn’t make the pudding salty; it enhances all the other flavors, making the mango taste fruitier and the overall dessert more balanced and delicious.
Instructions
Follow these simple, step-by-step instructions to create a perfectly smooth and decadent Instant Coconut Mango Pudding. The key to success lies in the blending technique and allowing adequate time for the pudding to chill and set.
- Prepare the Mangoes: Begin by washing and drying your mangoes. Carefully peel the skin away using a sharp paring knife or a vegetable peeler. Slice the mango flesh away from the large, flat pit in the center. Cut the flesh into rough 1-inch cubes. You should have approximately 3 cups of cubed mango. Place the mango cubes into the carafe of a high-speed blender.
- Create the Base Mixture: Pour the entire can of chilled, full-fat coconut milk into the blender with the mangoes. Add your chosen sweetener (starting with a little less if your mangoes are very sweet), the fresh lime juice, pure vanilla extract, and the pinch of salt.
- First Blend: Secure the lid on the blender. Start blending on a low speed, gradually increasing to high. Blend for 60-90 seconds, or until the mixture is completely smooth and homogenous. There should be no visible chunks of mango left. This step is crucial for achieving a silky, lump-free final texture. Once blended, pause and taste the mixture. If it needs more sweetness, add more maple syrup or agave now and give it a quick pulse to incorporate.
- Create the Thickener Slurry: In a small, separate bowl, place the 3 tablespoons of cornstarch. To prevent lumps, create a slurry by adding about 3-4 tablespoons of the mango-coconut mixture from the blender into the bowl with the cornstarch. Whisk vigorously with a fork or a small whisk until the cornstarch is completely dissolved and you have a smooth, thin paste. Do not add the dry cornstarch directly to the blender, as it can clump together and fail to thicken the pudding evenly.
- Final Blend: Pour the cornstarch slurry back into the blender with the rest of the mango mixture. Secure the lid and blend on medium-high speed for another 30 seconds. This final blend ensures the thickener is evenly distributed throughout the pudding base, which is essential for a uniform set. The mixture will still be liquid at this stage; the thickening magic happens during the chilling process.
- Portion and Chill: Immediately pour the pudding mixture into your desired serving vessels. You can use individual ramekins, small glass jars, dessert bowls, or a single larger serving dish. Pouring it right after blending is important, as it will begin to set as it sits.
- The Patient Wait: Cover the serving dishes with plastic wrap, pressing it gently onto the surface of the pudding to prevent a skin from forming. Place the puddings in the refrigerator to chill for at least 4 hours. For the best, firmest texture, chilling for 6 hours or even overnight is highly recommended. The longer it chills, the more the flavors will meld and the thicker the pudding will become. Once fully set, it’s ready to be garnished and served.
Nutrition
- Serving Size: one normal portion
- Calories: 300


