")

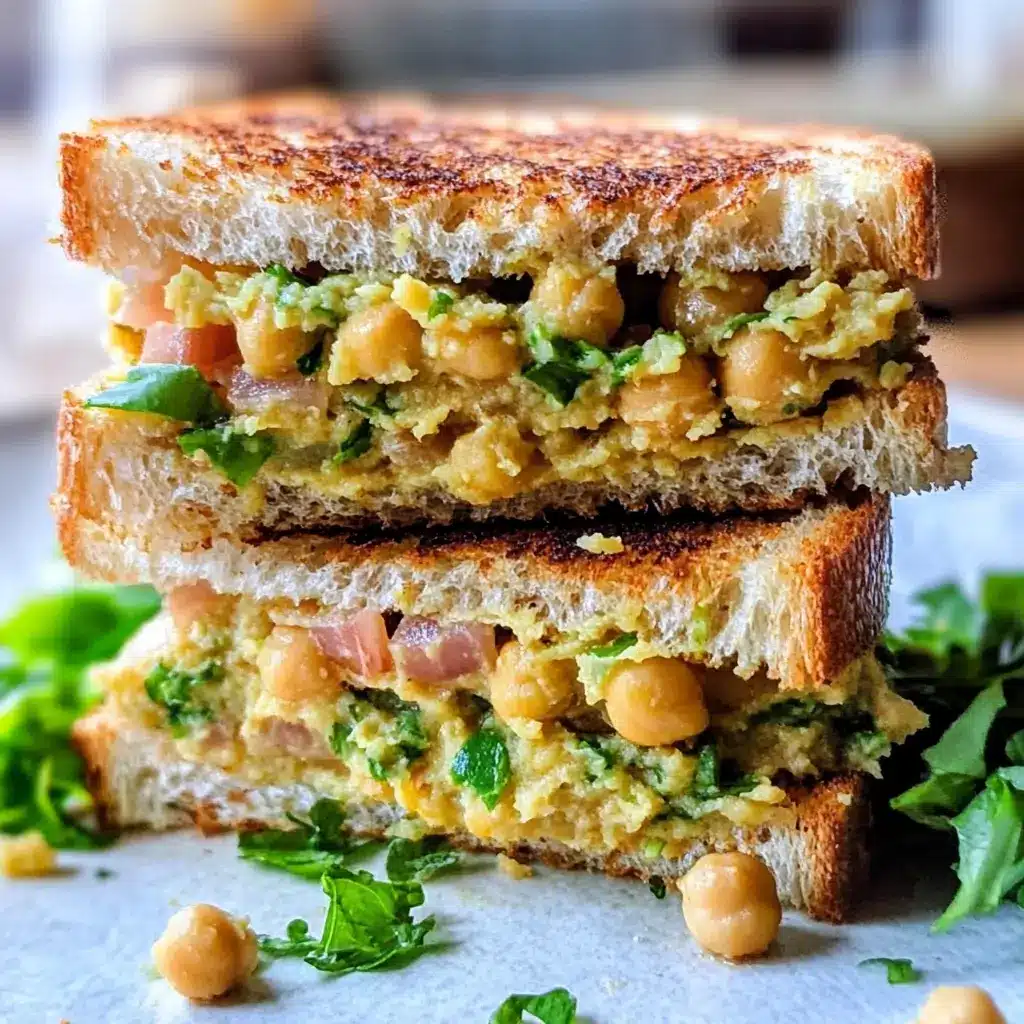

Of all the recipes that have become staples in our household, this Mashed Chickpea Sandwich is perhaps the most surprising champion. When I first transitioned our family towards more plant-based meals, I was met with some… skepticism, especially from my husband, a man who loves his classic deli sandwiches. I knew I needed a knockout recipe to win him over, something that was hearty, flavorful, and didn’t feel like a “compromise.” This sandwich was my secret weapon. The first time I served it for a weekend lunch, I didn’t even call it a “vegan tuna salad” or a “chickpea sandwich.” I just called it “our new favorite sandwich filling.” The verdict? An overwhelming success. The kids devoured it, loving the creamy texture and familiar crunch of the celery, and my husband genuinely couldn’t believe it was made from chickpeas. He admitted it hit all the same satisfying notes as a traditional tuna or chicken salad, but felt lighter and fresher. Now, it’s our go-to for quick lunches, picnics, and easy weeknight dinners. It’s the recipe that proved plant-based eating could be incredibly delicious, satisfying, and unbelievably simple. It’s more than just a recipe; it’s a testament to how simple, wholesome ingredients can be transformed into something truly spectacular.
The Ultimate Mashed Chickpea Sandwich: Ingredients You’ll Need
Crafting the perfect mashed chickpea sandwich is all about balancing textures and flavors. Each ingredient plays a crucial role in creating a final product that is creamy, crunchy, savory, and bright. Here is the foundational list of what you’ll need to create this lunchtime masterpiece.
- Canned Chickpeas (Garbanzo Beans) (1 x 15-ounce can): The star of the show. Canned chickpeas are the perfect base, offering a firm yet mashable texture and a mild, nutty flavor that absorbs all the other seasonings beautifully. Ensure they are rinsed and drained well.
- Vegan Mayonnaise (1/2 cup): This is the key to achieving that classic, luscious creaminess. A good quality vegan mayo provides richness and binds all the ingredients together into a cohesive, delicious spread.
- Celery (1 large stalk): Finely diced celery is non-negotiable for that signature crunch. It adds a fresh, slightly savory, and watery crispness that cuts through the richness of the mayonnaise.
- Red Onion (1/4 cup): Finely minced red onion brings a sharp, zesty bite that balances the creaminess. Its pungent flavor adds a layer of complexity that elevates the entire sandwich.
- Dill Pickles or Relish (2 tablespoons): This ingredient adds a briny, acidic kick. Finely chopped dill pickles or a sweet pickle relish introduces a tangy element that makes the flavors pop.
- Fresh Lemon Juice (1 tablespoon): A squeeze of fresh lemon juice is essential for brightness. Its acidity lifts all the other flavors, prevents the sandwich from feeling too heavy, and adds a zesty finish.
- Dijon Mustard (1 teaspoon): Dijon mustard provides a deep, tangy, and slightly spicy background note. It adds a sophisticated flavor that complements the chickpeas and mayonnaise perfectly.
- Fresh Dill (1 tablespoon, optional but recommended): Freshly chopped dill brings a unique, herbaceous, and slightly anise-like flavor that is the classic pairing for creamy salads. If you can’t find fresh, you can use 1 teaspoon of dried dill.
- Salt and Black Pepper (to taste): The essential final touch. Seasoning generously with salt and freshly ground black pepper brings all the individual components together and makes the flavors sing.
- Bread of Choice (8 slices): The vessel for your delicious creation. Hearty whole wheat, rustic sourdough, soft brioche, or gluten-free bread all work wonderfully.
- Toppings (Lettuce, Tomato, Sprouts): Fresh toppings add texture, moisture, and extra nutrients. Crisp lettuce, juicy tomato slices, and fresh sprouts are classic and delicious additions.
Step-by-Step Instructions for the Perfect Chickpea Mash
Follow these simple steps to create a chickpea salad filling that is perfectly textured and bursting with flavor. The key is in the mashing technique and the order of operations to ensure every bite is a perfect blend of creamy and crunchy.
- Prepare the Chickpeas: Open your can of chickpeas and pour them into a fine-mesh sieve or colander. Rinse them thoroughly under cold running water. This step is crucial as it removes the excess sodium and the viscous liquid (aquafaba) from the can, resulting in a cleaner, purer chickpea flavor. After rinsing, shake the colander well to drain as much water as possible. For an even better texture, you can gently pat them dry with a clean kitchen towel or paper towels.
- Create the Perfect Mash: Transfer the drained and dried chickpeas to a medium-sized mixing bowl. Now, it’s time to mash. You can use a potato masher for quick work or the back of a large fork for more control. The goal is not to create a completely smooth purée like hummus. You want to leave some texture. Mash until about three-quarters of the chickpeas are broken down, leaving some partial and even a few whole chickpeas intact. This variety in texture is what makes the sandwich so satisfying to eat.
- Incorporate the Creamy Base: To the mashed chickpeas, add the vegan mayonnaise, fresh lemon juice, and Dijon mustard. Use a spatula or spoon to mix these wet ingredients into the chickpeas until everything is evenly coated. This step creates the creamy, tangy dressing that will form the base of your salad.
- Add the Crunch and Flavor: Now, add the finely diced celery, minced red onion, chopped dill pickles (or relish), and freshly chopped dill (if using). Gently fold these ingredients into the chickpea mixture. Be careful not to overmix at this stage; you want to maintain the distinct textures of the crunchy vegetables within the creamy base.
- Season to Perfection: This is the most important final step. Add a generous pinch of salt and a few grinds of fresh black pepper. Mix it in, and then taste it. The flavor will develop as it sits, but it’s crucial to get the initial seasoning right. Does it need more salt to bring out the flavors? A little more lemon juice for brightness? An extra dash of pepper for a kick? Adjust the seasonings until it tastes absolutely delicious to you.
- Chill for Optimal Flavor (Optional but Recommended): For the best possible taste, cover the bowl and place the mashed chickpea mixture in the refrigerator for at least 30 minutes. This chilling period allows all the individual flavors to meld and deepen, resulting in a much more cohesive and flavorful sandwich filling.
- Assemble Your Sandwich: When you’re ready to serve, toast your bread slices if desired (toasting adds a wonderful crunch and prevents the bread from getting soggy). Spoon a generous amount of the mashed chickpea salad onto four of the bread slices. Top with your favorite additions like crisp lettuce leaves, juicy tomato slices, or fresh alfalfa sprouts. Place the remaining four slices of bread on top, slice the sandwiches in half, and serve immediately.
A Glimpse into the Nutrition Facts
This Mashed Chickpea Sandwich isn’t just delicious; it’s a powerhouse of nutrition, making it a truly smart choice for a satisfying meal.
- Servings: This recipe makes enough filling for 4 hearty sandwiches.
- Calories: Approximately 380-450 calories per sandwich (will vary based on bread and mayonnaise choice).
- Plant-Based Protein (Approx. 12g per serving): Chickpeas are an excellent source of plant-based protein, which is essential for muscle repair, energy, and keeping you feeling full and satisfied long after your meal.
- Dietary Fiber (Approx. 10g per serving): The combination of chickpeas, vegetables, and whole-grain bread (if used) provides a significant amount of dietary fiber. Fiber is crucial for digestive health, helps regulate blood sugar levels, and contributes to feelings of fullness.
- Healthy Fats (Varies by Mayo): By using a vegan mayonnaise made with avocado oil or another heart-healthy oil, you are incorporating beneficial unsaturated fats, which are important for brain health and overall well-being.
- Complex Carbohydrates: The chickpeas and whole-grain bread provide complex carbohydrates, which are the body’s primary source of fuel. They release energy slowly and steadily, preventing the energy spikes and crashes associated with simple sugars.
- Vitamins and Minerals: This sandwich is packed with micronutrients from its various components, including iron and folate from the chickpeas and vitamins A and K from the fresh vegetables.
Quick and Easy: Preparation Time
One of the greatest virtues of this Mashed Chickpea Sandwich recipe is its speed and simplicity. It’s the perfect solution for busy weekdays, last-minute lunch plans, or when you need a nutritious meal without spending hours in the kitchen.
- Active Preparation Time: 10-15 minutes
- Chilling Time (Optional): 30 minutes
- Total Time: 15 minutes (or 45 minutes with chilling)
The active time involves rinsing the chickpeas, chopping the vegetables, and mixing everything together. The optional chilling time is highly recommended to allow the flavors to meld, but if you’re in a hurry, the sandwich is still incredibly delicious when served immediately.
How to Serve Your Delicious Mashed Chickpea Sandwich
While a classic sandwich is the most common way to enjoy this delicious mash, its versatility is one of its best features. Here are several fantastic ways to serve your chickpea salad, catering to different dietary needs and occasions.
- The Classic Sandwich:
- Bread: Layer the chickpea mash between two slices of your favorite bread. Toasted sourdough, hearty whole wheat, soft rye, or a light brioche bun are all excellent choices.
- Toppings: Add classic toppings like crisp iceberg or romaine lettuce, thick slices of ripe tomato, and a few rings of red onion for extra bite.
- As a Healthy Wrap or Pita:
- Spoon the chickpea salad into a whole wheat tortilla or a soft pita pocket.
- Add in other fillings like shredded carrots, baby spinach, or sliced avocado for a nutrient-packed, portable lunch.
- Low-Carb Lettuce Wraps:
- For a gluten-free and low-carb option, use large, crisp lettuce leaves as a boat for the filling.
- Butter lettuce, romaine hearts, or iceberg cups work best for this. It’s a refreshing, light, and crunchy way to enjoy the salad.
- As a Deconstructed Salad Bowl:
- Serve a large scoop of the mashed chickpea salad on a bed of mixed greens, arugula, or baby spinach.
- Drizzle with a little extra lemon juice or a light vinaigrette and top with cucumber, bell peppers, and sunflower seeds for a complete and satisfying salad meal.
- An Elegant Appetizer:
- Spoon small amounts of the chickpea mash onto sturdy crackers, cucumber slices, or toasted baguette rounds (crostini).
- Garnish with a sprig of fresh dill or a sprinkle of paprika for a beautiful and delicious appetizer perfect for parties or gatherings.
- The “Tuna” Melt Experience:
- Assemble the sandwich as usual, but add a slice of vegan cheese on top of the chickpea mash.
- Grill the sandwich in a lightly oiled pan until the bread is golden brown and toasted, and the cheese is perfectly melted.
Pro-Level Success: 8 Additional Tips for the Best Chickpea Sandwich
Take your mashed chickpea sandwich from great to absolutely unforgettable with these eight professional tips and tricks.
- Toast Your Bread, Always: This might seem like a small step, but it makes a world of difference. Toasting the bread creates a firm, crunchy barrier that prevents the creamy filling from making it soggy, especially if you’re not eating it immediately. It adds an extra layer of texture and a delicious, nutty flavor.
- Don’t Over-Mash the Chickpeas: The magic of this sandwich is in its texture. Resist the urge to mash the chickpeas into a smooth paste. Aim for a “chunky-smashed” consistency, leaving some beans partially or even fully intact. This textural variation makes each bite more interesting and satisfying.
- The Secret Ingredient: A Pinch of Nori: For those who miss the subtle “taste of the sea” from a traditional tuna salad, here’s a brilliant vegan hack. Finely crumble or snip a small piece of a toasted nori (seaweed) sheet into the mixture. It imparts a subtle umami and briny flavor that is remarkably reminiscent of the ocean.
- Let It Chill and Marinate: While you can eat it right away, the flavor of the chickpea salad improves exponentially after it has had time to rest. Chilling the mixture for at least 30 minutes (and up to a few hours) allows the onion, dill, lemon, and mustard to meld together and infuse the chickpeas deeply.
- Customize Your Crunch: Celery is a classic, but don’t be afraid to experiment with other crunchy elements. Try adding finely chopped water chestnuts for a watery crunch, toasted sunflower seeds or pepitas for a nutty bite, or even chopped walnuts for richness and texture.
- Embrace the Power of Acid: Lemon juice is fantastic, but other acids can bring different dimensions of flavor. A splash of apple cider vinegar can add a fruity tang, while a bit of the brine from the pickle jar can enhance the salty, sour notes. Always taste and adjust your acid level—it’s what makes the flavors bright and lively.
- Spice It Up Your Way: The base recipe is a classic canvas. Feel free to paint it with other spices. A pinch of smoked paprika can add a smoky depth, a dash of curry powder can transport it to another continent, and a little bit of cayenne pepper or a squirt of sriracha can add a welcome kick of heat.
- Perfect for Meal Prep: This recipe is a meal-prepper’s dream. Make a double batch of the chickpea mash at the beginning of the week and store it in an airtight container in the fridge. It will stay fresh for 4-5 days. This way, you have a ready-to-go filling for quick sandwiches, salads, or wraps all week long, saving you time and ensuring you always have a healthy option on hand.
Your Mashed Chickpea Sandwich Questions Answered: FAQ
Here are answers to some of the most frequently asked questions about making the perfect mashed chickpea sandwich.
1. How long does the mashed chickpea salad last in the refrigerator?
The prepared chickpea salad mixture will stay fresh and delicious for up to 5 days when stored in an airtight container in the refrigerator. In fact, the flavor often gets even better on the second day as the ingredients have more time to meld. Be sure to give it a good stir before serving, as some liquid may separate slightly.
2. Can I make this mashed chickpea sandwich without mayonnaise?
Absolutely! If you’re not a fan of mayonnaise or are looking for an oil-free option, there are several excellent substitutes. You can use an equal amount of mashed avocado for a rich, creamy texture. Another great option is to use plain, unsweetened vegan yogurt or tahini (sesame paste) thinned with a little water and lemon juice. Each substitute will give the salad a slightly different flavor profile, but all are delicious.
3. Is this recipe gluten-free?
The chickpea salad filling itself is naturally gluten-free. To make the entire meal gluten-free, simply serve it on your favorite brand of certified gluten-free bread, in lettuce wraps, over a bed of greens, or with gluten-free crackers.
4. Can I use dried chickpeas instead of canned ones?
Yes, you can definitely use dried chickpeas. You will need to cook them first. To get the equivalent of one 15-ounce can, start with about 1/2 to 3/4 cup of dried chickpeas. Soak them overnight, then drain and cook them in fresh water until they are tender but not mushy. Using freshly cooked chickpeas can result in an even better flavor and texture.
5. Why is my chickpea salad watery?
A watery consistency is usually caused by one of two things. First, the chickpeas were not drained or dried well enough before mashing. Be sure to rinse, drain, and even pat them dry. Second, you may have used vegetables with high water content (like some pickles or relish) without draining them. If your mix seems a bit loose, you can stir in a tablespoon of nutritional yeast or some oat flour to help absorb the excess moisture and add a cheesy, nutty flavor.
6. What are some other ingredients I can add to my chickpea salad?
This recipe is incredibly versatile! Feel free to customize it to your liking. Some wonderful additions include:
- Vegetables: Grated carrots, finely chopped bell peppers, or corn.
- Herbs: Fresh parsley, chives, or tarragon.
- Fruit: Chopped apples or grapes for a sweet and crunchy element, similar to a Waldorf salad.
- Spices: A dash of celery salt, garlic powder, or onion powder to boost the savory flavors.
7. Is a mashed chickpea sandwich actually healthy?
Yes, it is an exceptionally healthy meal choice. Chickpeas are packed with plant-based protein and dietary fiber, which promote satiety and digestive health. Unlike traditional tuna salad, it’s free of cholesterol and mercury. When paired with whole-grain bread and fresh vegetables, it becomes a well-rounded meal full of complex carbs, vitamins, and minerals.
8. Can I freeze the mashed chickpea filling?
It is generally not recommended to freeze the completed chickpea salad, especially if it’s made with mayonnaise. Mayonnaise-based salads tend to separate and become watery and oily upon thawing, ruining the texture. The celery and onion will also lose their crunch. For best results, it’s best to make the filling fresh and store it in the refrigerator.
Mashed Chickpea Sandwich
Ingredients
Crafting the perfect mashed chickpea sandwich is all about balancing textures and flavors. Each ingredient plays a crucial role in creating a final product that is creamy, crunchy, savory, and bright. Here is the foundational list of what you’ll need to create this lunchtime masterpiece.
- Canned Chickpeas (Garbanzo Beans) (1 x 15-ounce can): The star of the show. Canned chickpeas are the perfect base, offering a firm yet mashable texture and a mild, nutty flavor that absorbs all the other seasonings beautifully. Ensure they are rinsed and drained well.
- Vegan Mayonnaise (1/2 cup): This is the key to achieving that classic, luscious creaminess. A good quality vegan mayo provides richness and binds all the ingredients together into a cohesive, delicious spread.
- Celery (1 large stalk): Finely diced celery is non-negotiable for that signature crunch. It adds a fresh, slightly savory, and watery crispness that cuts through the richness of the mayonnaise.
- Red Onion (1/4 cup): Finely minced red onion brings a sharp, zesty bite that balances the creaminess. Its pungent flavor adds a layer of complexity that elevates the entire sandwich.
- Dill Pickles or Relish (2 tablespoons): This ingredient adds a briny, acidic kick. Finely chopped dill pickles or a sweet pickle relish introduces a tangy element that makes the flavors pop.
- Fresh Lemon Juice (1 tablespoon): A squeeze of fresh lemon juice is essential for brightness. Its acidity lifts all the other flavors, prevents the sandwich from feeling too heavy, and adds a zesty finish.
- Dijon Mustard (1 teaspoon): Dijon mustard provides a deep, tangy, and slightly spicy background note. It adds a sophisticated flavor that complements the chickpeas and mayonnaise perfectly.
- Fresh Dill (1 tablespoon, optional but recommended): Freshly chopped dill brings a unique, herbaceous, and slightly anise-like flavor that is the classic pairing for creamy salads. If you can’t find fresh, you can use 1 teaspoon of dried dill.
- Salt and Black Pepper (to taste): The essential final touch. Seasoning generously with salt and freshly ground black pepper brings all the individual components together and makes the flavors sing.
- Bread of Choice (8 slices): The vessel for your delicious creation. Hearty whole wheat, rustic sourdough, soft brioche, or gluten-free bread all work wonderfully.
- Toppings (Lettuce, Tomato, Sprouts): Fresh toppings add texture, moisture, and extra nutrients. Crisp lettuce, juicy tomato slices, and fresh sprouts are classic and delicious additions.
Instructions
Follow these simple steps to create a chickpea salad filling that is perfectly textured and bursting with flavor. The key is in the mashing technique and the order of operations to ensure every bite is a perfect blend of creamy and crunchy.
- Prepare the Chickpeas: Open your can of chickpeas and pour them into a fine-mesh sieve or colander. Rinse them thoroughly under cold running water. This step is crucial as it removes the excess sodium and the viscous liquid (aquafaba) from the can, resulting in a cleaner, purer chickpea flavor. After rinsing, shake the colander well to drain as much water as possible. For an even better texture, you can gently pat them dry with a clean kitchen towel or paper towels.
- Create the Perfect Mash: Transfer the drained and dried chickpeas to a medium-sized mixing bowl. Now, it’s time to mash. You can use a potato masher for quick work or the back of a large fork for more control. The goal is not to create a completely smooth purée like hummus. You want to leave some texture. Mash until about three-quarters of the chickpeas are broken down, leaving some partial and even a few whole chickpeas intact. This variety in texture is what makes the sandwich so satisfying to eat.
- Incorporate the Creamy Base: To the mashed chickpeas, add the vegan mayonnaise, fresh lemon juice, and Dijon mustard. Use a spatula or spoon to mix these wet ingredients into the chickpeas until everything is evenly coated. This step creates the creamy, tangy dressing that will form the base of your salad.
- Add the Crunch and Flavor: Now, add the finely diced celery, minced red onion, chopped dill pickles (or relish), and freshly chopped dill (if using). Gently fold these ingredients into the chickpea mixture. Be careful not to overmix at this stage; you want to maintain the distinct textures of the crunchy vegetables within the creamy base.
- Season to Perfection: This is the most important final step. Add a generous pinch of salt and a few grinds of fresh black pepper. Mix it in, and then taste it. The flavor will develop as it sits, but it’s crucial to get the initial seasoning right. Does it need more salt to bring out the flavors? A little more lemon juice for brightness? An extra dash of pepper for a kick? Adjust the seasonings until it tastes absolutely delicious to you.
- Chill for Optimal Flavor (Optional but Recommended): For the best possible taste, cover the bowl and place the mashed chickpea mixture in the refrigerator for at least 30 minutes. This chilling period allows all the individual flavors to meld and deepen, resulting in a much more cohesive and flavorful sandwich filling.
- Assemble Your Sandwich: When you’re ready to serve, toast your bread slices if desired (toasting adds a wonderful crunch and prevents the bread from getting soggy). Spoon a generous amount of the mashed chickpea salad onto four of the bread slices. Top with your favorite additions like crisp lettuce leaves, juicy tomato slices, or fresh alfalfa sprouts. Place the remaining four slices of bread on top, slice the sandwiches in half, and serve immediately.
Nutrition
- Serving Size: one normal portion
- Calories: 450
- Fiber: 10g
- Protein: 12g


