")

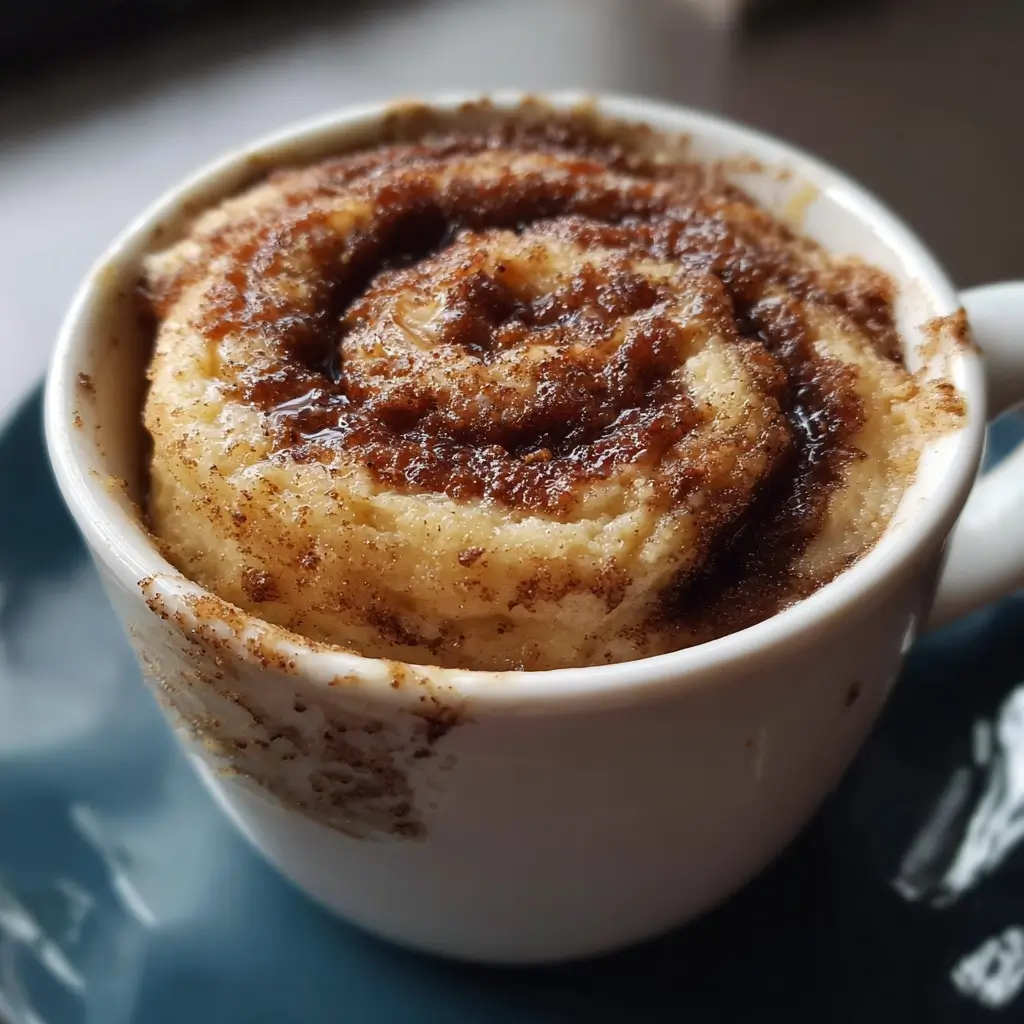

Of all the culinary inventions of the modern era, the mug cake stands as a true hero for the impatient and the indulgent. But this isn’t just any mug cake. This is the one that changed the game for my family. I remember the first time I made it; a frantic search for a quick, comforting dessert on a rainy Sunday led me down a rabbit hole of recipes. Most were too complicated or required ingredients I didn’t have. Then, I stumbled upon the concept of a microwave cinnamon roll. Skeptical but desperate, I gave it a try. The aroma that filled the kitchen in under two minutes was staggering—sweet, spicy, and buttery, just like a real cinnamon roll fresh from the oven. My daughter, drawn by the scent, peered into the microwave, her eyes wide with anticipation. When I pulled out the steaming mug, drizzled it with a quick vanilla glaze, and handed her a spoon, her reaction was pure, unadulterated joy. It has since become our go-to emergency treat, our celebration dessert for small victories, and our comforting companion on lazy afternoons. It’s more than a recipe; it’s a 5-minute ritual that brings instant happiness.
This recipe for a Microwave Cinnamon Roll in a Mug is the culmination of much trial and error. It’s perfectly portioned, incredibly fast, and delivers that authentic, gooey cinnamon roll experience without the hours of kneading, proofing, and baking. It’s a warm, sweet hug in a mug, and I’m so excited to share the definitive guide to making it perfectly, every single time. Whether you’re a college student in a dorm, a busy parent needing a moment of peace, or simply a dessert lover who believes that good things shouldn’t always have to take a long time, this recipe is for you.
The Ultimate Microwave Cinnamon Roll Mug Cake: Your 5-Minute Ticket to Bliss
Welcome to the most detailed guide you’ll ever need for creating the perfect single-serving cinnamon roll. We’ll break down every component, every step, and every secret to ensure your mug cake is fluffy, flavorful, and absolutely foolproof. Forget the long wait and the messy cleanup of traditional baking. Your new favorite dessert is just a few simple stirs and a short microwave trip away. Prepare to be amazed at how something so simple can taste so incredibly decadent.
Ingredients for Your Single-Serving Cinnamon Roll Dream
The beauty of this recipe lies in its simplicity and reliance on common pantry staples. Each ingredient plays a crucial role in recreating the classic cinnamon roll texture and flavor profile in a fraction of the time. Here’s what you’ll need and why it’s important.
For the Mug Cake Batter:
- 1/4 cup All-Purpose Flour: This is the structural foundation of your mug cake. All-purpose flour provides the perfect balance of protein to create a soft, tender crumb without becoming tough or chewy. Be sure to measure correctly by spooning the flour into your measuring cup and leveling it off with a knife, as scooping directly can compact the flour and lead to a dry cake.
- 2 tablespoons Granulated Sugar: This provides the primary sweetness for the cake batter itself. It dissolves easily and contributes to a soft, moist texture.
- 1/4 teaspoon Baking Powder: This is the magical leavening agent. When it comes into contact with the liquid ingredients and is activated by the heat of the microwave, it releases carbon dioxide gas, creating tiny air pockets that cause the cake to rise and become light and fluffy. Make sure your baking powder is fresh for the best lift!
- 3 tablespoons Milk: Milk adds moisture and richness, contributing to a tender crumb. Whole milk will yield the richest result, but 2%, skim, or even a plant-based alternative like almond or oat milk will work wonderfully.
- 1 tablespoon Melted Butter or Neutral Oil: Fat is flavor! It’s also essential for tenderness. Melted unsalted butter adds a rich, classic bakery flavor. However, a neutral oil like canola, vegetable, or melted coconut oil works just as well and can sometimes result in an even moister cake.
- 1/4 teaspoon Vanilla Extract: A small amount of vanilla enhances all the other flavors in the cake, adding a layer of aromatic warmth that complements the cinnamon beautifully.
For the Cinnamon Swirl Filling:
- 1 tablespoon Brown Sugar (packed): Brown sugar is the star of the filling. Its molasses content provides a deeper, more caramel-like flavor than granulated sugar and also adds moisture, helping to create that signature gooey swirl.
- 1/2 teaspoon Ground Cinnamon: This is the heart and soul of the recipe. The quality of your cinnamon will make a noticeable difference. A fresh, potent ground cinnamon will provide that warm, spicy kick that defines a cinnamon roll.
- 1 tablespoon Melted Butter: This binds the cinnamon and brown sugar together, transforming the dry powder into a luscious, buttery paste that melts into the batter as it cooks, creating decadent pockets of flavor.
For the Simple Vanilla Glaze:
- 3 tablespoons Powdered Sugar: Also known as confectioners’ sugar, this ultra-fine sugar dissolves instantly, creating a smooth, lump-free glaze.
- 1-2 teaspoons Milk: This is the liquid that turns the powdered sugar into a pourable glaze. Start with one teaspoon and add more, a tiny drop at a time, until you reach your desired consistency—thicker for a frosting, thinner for a drizzle.
- A tiny splash of Vanilla Extract: A hint of vanilla in the glaze ties it all together, echoing the flavor in the cake and giving it that classic icing taste.
Step-by-Step Instructions: From Mug to Magic
Follow these detailed instructions carefully to ensure a perfect outcome. The key to a great mug cake is in the technique—gentle mixing and precise timing are everything.
Step 1: Choose and Prepare Your Mug
Select a standard-sized, microwave-safe mug (approximately 12-14 ounces). A wider, shallower mug is often better than a tall, narrow one, as it allows the heat to distribute more evenly and cook the cake through without leaving a raw center. To be safe, you can lightly grease the inside of the mug with butter or a non-stick spray, though it’s not strictly necessary.
Step 2: Mix the Dry Batter Ingredients
In your chosen mug, add the all-purpose flour, granulated sugar, and baking powder. Use a small whisk or a fork to mix these ingredients together thoroughly. This step is crucial! It ensures the baking powder is evenly distributed, which will give you a uniform rise and prevent any dense or bitter spots in your final cake.
Step 3: Add the Wet Batter Ingredients
Pour the milk, melted butter (or oil), and vanilla extract directly into the mug on top of the dry ingredients. Using the same fork or whisk, gently stir everything together until just combined. Scrape the bottom and sides of the mug to ensure there are no dry pockets of flour, but be very careful not to overmix. A few small lumps are perfectly fine. Overmixing develops the gluten in the flour, which will result in a tough, rubbery cake. The goal is a batter that is smooth but not overworked.
Step 4: Create the Cinnamon Swirl Filling
In a separate small bowl, combine the packed brown sugar, ground cinnamon, and one tablespoon of melted butter. Stir until it forms a thick, slightly grainy paste. This is the gooey heart of your cinnamon roll.
Step 5: Swirl the Filling into the Batter
Drop spoonfuls of the cinnamon filling onto the surface of the batter in the mug. Then, take a knife or a toothpick and gently swirl the filling into the batter two or three times. Don’t mix it in completely! You want to create distinct ribbons of cinnamon-sugar, not a uniformly cinnamon-flavored cake. This swirling action is what gives the dessert its “roll” character.
Step 6: Microwave to Perfection
Place the mug in the center of your microwave. Cook on high power. The cooking time will vary depending on your microwave’s wattage.
- For a 1000-1200W microwave: Start with 60-75 seconds.
- For a 700-900W microwave: Start with 90 seconds to 2 minutes.
The cake is done when the top looks set and is slightly springy to the touch. It’s better to undercook it slightly than to overcook it. You can always add 10-15 more seconds if it’s still gooey in the center. Overcooking is the number one cause of a dry, hard mug cake.
Step 7: Prepare the Glaze and Serve
While the cake is cooking or cooling for a moment, quickly whisk together the powdered sugar, one teaspoon of milk, and the splash of vanilla in a small bowl. If the glaze is too thick, add another tiny drop or two of milk until it’s a pourable consistency. Let the mug cake cool in the mug for at least one minute—it will be dangerously hot and will continue to set up as it rests. Drizzle the vanilla glaze generously over the top and enjoy immediately, straight from the mug with a spoon.
A Quick Look at Nutrition Facts
This is a single-serving indulgent treat. While it’s a dessert, it’s helpful to have a general idea of its nutritional content. Please note these are estimates and can vary based on the specific ingredients used (e.g., whole vs. skim milk, butter vs. oil).
- Servings: 1 Mug Cake
- Calories per serving: Approximately 450-550 kcal. This is a rich, satisfying dessert designed to fulfill a craving completely.
- Carbohydrates: This is the primary macronutrient, providing the quick energy and comfort that makes this dessert so satisfying. Most of the carbs come from the flour and sugars.
- Sugars: A significant portion of the carbohydrates are from the granulated, brown, and powdered sugars, giving the cake its signature sweet, dessert-like quality.
- Fat: The butter or oil contributes to the overall calorie count but is essential for the moist texture and rich flavor.
- Protein: A small amount of protein is present from the flour and milk, providing some substance to the cake.
Preparation Time: Faster Than a Coffee Run
One of the greatest appeals of this recipe is its incredible speed. You can go from craving to consumption in the time it takes to brew a cup of tea.
- Total Time: Approximately 5 minutes
- Preparation: 3 minutes. This includes gathering your ingredients from the pantry, measuring them out, and mixing everything together in the mug.
- Cook Time: 1-2 minutes. This is the active time in the microwave.
This truly is the ultimate instant gratification dessert. There is no preheating, no extensive cleanup, and no long waiting period.
How to Serve Your Microwave Cinnamon Roll Mug Cake
While this treat is divine on its own, a few simple additions can elevate it from a quick snack to a truly show-stopping dessert. Here are some ideas for serving and presentation.
Classic & Simple:
- The Glaze is Key: Don’t skip the simple vanilla glaze. It adds moisture and a sweet, creamy contrast to the warm, spicy cake.
- A Dusting of Cinnamon: For extra aroma and visual appeal, give the finished, glazed cake a final light dusting of ground cinnamon.
- Eat it Warm: This cake is at its absolute best when it’s fresh and warm from the microwave, allowing the glaze to melt slightly into the top.
Level Up Your Toppings:
- Add a Cream Cheese Frosting: For a more authentic cinnamon roll experience, mix 1 tablespoon of softened cream cheese with 2 tablespoons of powdered sugar and a splash of milk for a tangy, rich frosting instead of the simple glaze.
- A Scoop of Ice Cream: A small scoop of vanilla bean ice cream on top of the warm mug cake is pure decadence. The ice cream will melt into the cake, creating a delicious hot-and-cold sensation.
- A Dollop of Whipped Cream: A swirl of freshly whipped cream or even the canned variety adds a light, airy texture that complements the dense cake beautifully.
- Get Nutty: Sprinkle some toasted chopped pecans or walnuts on top for a delightful crunch and nutty flavor contrast.
- Chocolate Lover’s Twist: Drizzle with a bit of chocolate or caramel sauce, or sprinkle a few mini chocolate chips on top right after it comes out of the microwave so they get slightly melty.
Perfect Pairings:
- Coffee: The bitter notes of a strong black coffee, an espresso, or a creamy latte cut through the sweetness of the cake perfectly.
- Tea: A cup of black tea like Earl Grey or English Breakfast, or even a spiced chai tea, complements the cinnamon flavors wonderfully.
- A Glass of Cold Milk: The simple, classic combination of a warm baked good and a cold glass of milk is comforting and timeless.
Pro Tips for a Perfect Cinnamon Roll in a Mug Every Time
After making dozens of these mug cakes, I’ve learned a few tricks that guarantee success. Follow these eight tips to troubleshoot common issues and perfect your technique.
- Choose the Right Mug. As mentioned, a wider, bowl-like mug is superior. It promotes even cooking. If your mug is too small, the batter may overflow and make a mess in your microwave. A 12-ounce mug is the minimum size you should use.
- Measure Your Flour Correctly. This is the most common mistake in baking. Do not scoop the measuring cup directly into the flour bag. This compacts the flour, and you’ll end up using too much, resulting in a dry, dense cake. Instead, use a spoon to fluff up the flour, then spoon it into your measuring cup and level it off with the back of a knife.
- Don’t Overmix the Batter. Once you add the wet ingredients to the dry, stir only until they are just combined. A few lumps are okay! Overmixing develops gluten, which is great for chewy bread but terrible for a tender cake. It’s the number one reason for a rubbery mug cake.
- Know Your Microwave’s Wattage. Microwaves are not created equal. A 1200W microwave will cook this cake in about 75 seconds, while a 700W model might take close to 2 minutes. The first time you make this, err on the side of caution. Cook for the minimum recommended time and check it. You can always add 10-second intervals until it’s done.
- Don’t Skimp on the Swirl. The buttery, cinnamon-sugar filling is what makes this a “cinnamon roll.” Be generous with it, and don’t over-swirl. You want thick, distinct ribbons of gooey goodness running through the cake.
- Let It Rest for a Minute. The cake will be volcanically hot right out of the microwave. Letting it sit for 60-90 seconds allows the internal temperature to cool down slightly and, more importantly, allows the cake to finish “carry-over cooking” and set up properly.
- Customize Your Spices. While cinnamon is the star, don’t be afraid to experiment. Add a tiny pinch of nutmeg, allspice, or cardamom to the cinnamon-sugar filling to create a more complex, chai-like flavor profile.
- For a Richer Cake, Use an Egg Yolk. If you want a slightly richer, more custardy texture, you can add one egg yolk to the wet ingredients. If you do this, you may need to reduce the milk by about one tablespoon to maintain the right liquid balance.
Frequently Asked Questions (FAQ) about the Microwave Cinnamon Roll Mug Cake
Here are answers to some of the most common questions people have when making this quick and easy dessert.
1. Why did my mug cake turn out rubbery or tough?
The most likely culprit is overmixing. When you stir the flour and liquid together too vigorously or for too long, you develop gluten strands, which create a chewy, rubbery texture. Mix only until the ingredients are just combined. The second most common reason is overcooking. Even 15 extra seconds in a powerful microwave can take a cake from tender to tough.
2. Can I make this recipe vegan or dairy-free?
Absolutely! This recipe is very easy to adapt. Use a plant-based milk like almond, soy, or oat milk in place of dairy milk. For the fat, use a neutral oil like canola or melted coconut oil, or a dairy-free butter substitute. The recipe will work just as well.
3. My mug cake exploded and overflowed in the microwave. What happened?
This usually happens for one of two reasons: your mug was too small for the amount of batter, or your baking powder was extremely active. Always use a mug that is at least 12 ounces and only fill it about halfway with batter to give it plenty of room to rise.
4. Can I bake this in a regular oven instead of the microwave?
Yes, you can, but it defeats the purpose of a “microwave” mug cake. If you’d like to try, pour the batter into a greased ramekin and bake in a preheated oven at 350°F (175°C) for about 12-18 minutes, or until a toothpick inserted into the center comes out clean.
5. Can I prepare the batter ahead of time?
It’s not recommended. The baking powder is activated as soon as it comes into contact with the liquid ingredients. If you let the batter sit for too long before cooking, the leavening agent will lose its power, and your cake will turn out dense and flat. This recipe is so fast, it’s best made fresh.
6. How do I store leftovers?
This recipe is designed as a single serving and is truly at its best when eaten immediately. If you must save it, you can cover the mug with plastic wrap and store it at room temperature for up to a day, but it will lose its soft, fluffy texture and become much denser. You can try reheating it in the microwave for 10-15 seconds to soften it up.
7. Can I use a different type of flour, like whole wheat or gluten-free?
You can experiment, but it will change the texture. Whole wheat flour will result in a denser, heartier cake. A 1-to-1 gluten-free baking flour blend (that contains xanthan gum) should work well, though the texture may be slightly more delicate. You may need to adjust liquid amounts slightly when using alternative flours.
8. My cinnamon swirl just sank to the bottom. How can I prevent that?
This can happen if the filling is too heavy or the batter is too thin. Ensure your batter is a standard, thick-ish cake batter consistency. Also, instead of dropping all the filling in one big blob, try dropping smaller spoonfuls over the surface before swirling gently. This distributes the weight more evenly.
There you have it—everything you could possibly need to know to master the art of the microwave cinnamon roll mug cake. It’s a small, simple pleasure that proves you don’t need hours of work to create something truly delicious and comforting. Go ahead, grab a mug, and treat yourself. You deserve it.
Print
Microwave Cinnamon Roll Mug
Ingredients
The beauty of this recipe lies in its simplicity and reliance on common pantry staples. Each ingredient plays a crucial role in recreating the classic cinnamon roll texture and flavor profile in a fraction of the time. Here’s what you’ll need and why it’s important.
For the Mug Cake Batter:
- 1/4 cup All-Purpose Flour: This is the structural foundation of your mug cake. All-purpose flour provides the perfect balance of protein to create a soft, tender crumb without becoming tough or chewy. Be sure to measure correctly by spooning the flour into your measuring cup and leveling it off with a knife, as scooping directly can compact the flour and lead to a dry cake.
- 2 tablespoons Granulated Sugar: This provides the primary sweetness for the cake batter itself. It dissolves easily and contributes to a soft, moist texture.
- 1/4 teaspoon Baking Powder: This is the magical leavening agent. When it comes into contact with the liquid ingredients and is activated by the heat of the microwave, it releases carbon dioxide gas, creating tiny air pockets that cause the cake to rise and become light and fluffy. Make sure your baking powder is fresh for the best lift!
- 3 tablespoons Milk: Milk adds moisture and richness, contributing to a tender crumb. Whole milk will yield the richest result, but 2%, skim, or even a plant-based alternative like almond or oat milk will work wonderfully.
- 1 tablespoon Melted Butter or Neutral Oil: Fat is flavor! It’s also essential for tenderness. Melted unsalted butter adds a rich, classic bakery flavor. However, a neutral oil like canola, vegetable, or melted coconut oil works just as well and can sometimes result in an even moister cake.
- 1/4 teaspoon Vanilla Extract: A small amount of vanilla enhances all the other flavors in the cake, adding a layer of aromatic warmth that complements the cinnamon beautifully.
For the Cinnamon Swirl Filling:
- 1 tablespoon Brown Sugar (packed): Brown sugar is the star of the filling. Its molasses content provides a deeper, more caramel-like flavor than granulated sugar and also adds moisture, helping to create that signature gooey swirl.
- 1/2 teaspoon Ground Cinnamon: This is the heart and soul of the recipe. The quality of your cinnamon will make a noticeable difference. A fresh, potent ground cinnamon will provide that warm, spicy kick that defines a cinnamon roll.
- 1 tablespoon Melted Butter: This binds the cinnamon and brown sugar together, transforming the dry powder into a luscious, buttery paste that melts into the batter as it cooks, creating decadent pockets of flavor.
For the Simple Vanilla Glaze:
- 3 tablespoons Powdered Sugar: Also known as confectioners’ sugar, this ultra-fine sugar dissolves instantly, creating a smooth, lump-free glaze.
- 1–2 teaspoons Milk: This is the liquid that turns the powdered sugar into a pourable glaze. Start with one teaspoon and add more, a tiny drop at a time, until you reach your desired consistency—thicker for a frosting, thinner for a drizzle.
- A tiny splash of Vanilla Extract: A hint of vanilla in the glaze ties it all together, echoing the flavor in the cake and giving it that classic icing taste.
Instructions
Follow these detailed instructions carefully to ensure a perfect outcome. The key to a great mug cake is in the technique—gentle mixing and precise timing are everything.
Step 1: Choose and Prepare Your Mug
Select a standard-sized, microwave-safe mug (approximately 12-14 ounces). A wider, shallower mug is often better than a tall, narrow one, as it allows the heat to distribute more evenly and cook the cake through without leaving a raw center. To be safe, you can lightly grease the inside of the mug with butter or a non-stick spray, though it’s not strictly necessary.
Step 2: Mix the Dry Batter Ingredients
In your chosen mug, add the all-purpose flour, granulated sugar, and baking powder. Use a small whisk or a fork to mix these ingredients together thoroughly. This step is crucial! It ensures the baking powder is evenly distributed, which will give you a uniform rise and prevent any dense or bitter spots in your final cake.
Step 3: Add the Wet Batter Ingredients
Pour the milk, melted butter (or oil), and vanilla extract directly into the mug on top of the dry ingredients. Using the same fork or whisk, gently stir everything together until just combined. Scrape the bottom and sides of the mug to ensure there are no dry pockets of flour, but be very careful not to overmix. A few small lumps are perfectly fine. Overmixing develops the gluten in the flour, which will result in a tough, rubbery cake. The goal is a batter that is smooth but not overworked.
Step 4: Create the Cinnamon Swirl Filling
In a separate small bowl, combine the packed brown sugar, ground cinnamon, and one tablespoon of melted butter. Stir until it forms a thick, slightly grainy paste. This is the gooey heart of your cinnamon roll.
Step 5: Swirl the Filling into the Batter
Drop spoonfuls of the cinnamon filling onto the surface of the batter in the mug. Then, take a knife or a toothpick and gently swirl the filling into the batter two or three times. Don’t mix it in completely! You want to create distinct ribbons of cinnamon-sugar, not a uniformly cinnamon-flavored cake. This swirling action is what gives the dessert its “roll” character.
Step 6: Microwave to Perfection
Place the mug in the center of your microwave. Cook on high power. The cooking time will vary depending on your microwave’s wattage.
- For a 1000-1200W microwave: Start with 60-75 seconds.
- For a 700-900W microwave: Start with 90 seconds to 2 minutes.
The cake is done when the top looks set and is slightly springy to the touch. It’s better to undercook it slightly than to overcook it. You can always add 10-15 more seconds if it’s still gooey in the center. Overcooking is the number one cause of a dry, hard mug cake.
Step 7: Prepare the Glaze and Serve
While the cake is cooking or cooling for a moment, quickly whisk together the powdered sugar, one teaspoon of milk, and the splash of vanilla in a small bowl. If the glaze is too thick, add another tiny drop or two of milk until it’s a pourable consistency. Let the mug cake cool in the mug for at least one minute—it will be dangerously hot and will continue to set up as it rests. Drizzle the vanilla glaze generously over the top and enjoy immediately, straight from the mug with a spoon.
Nutrition
- Serving Size: one normal portion
- Calories: 550


