")

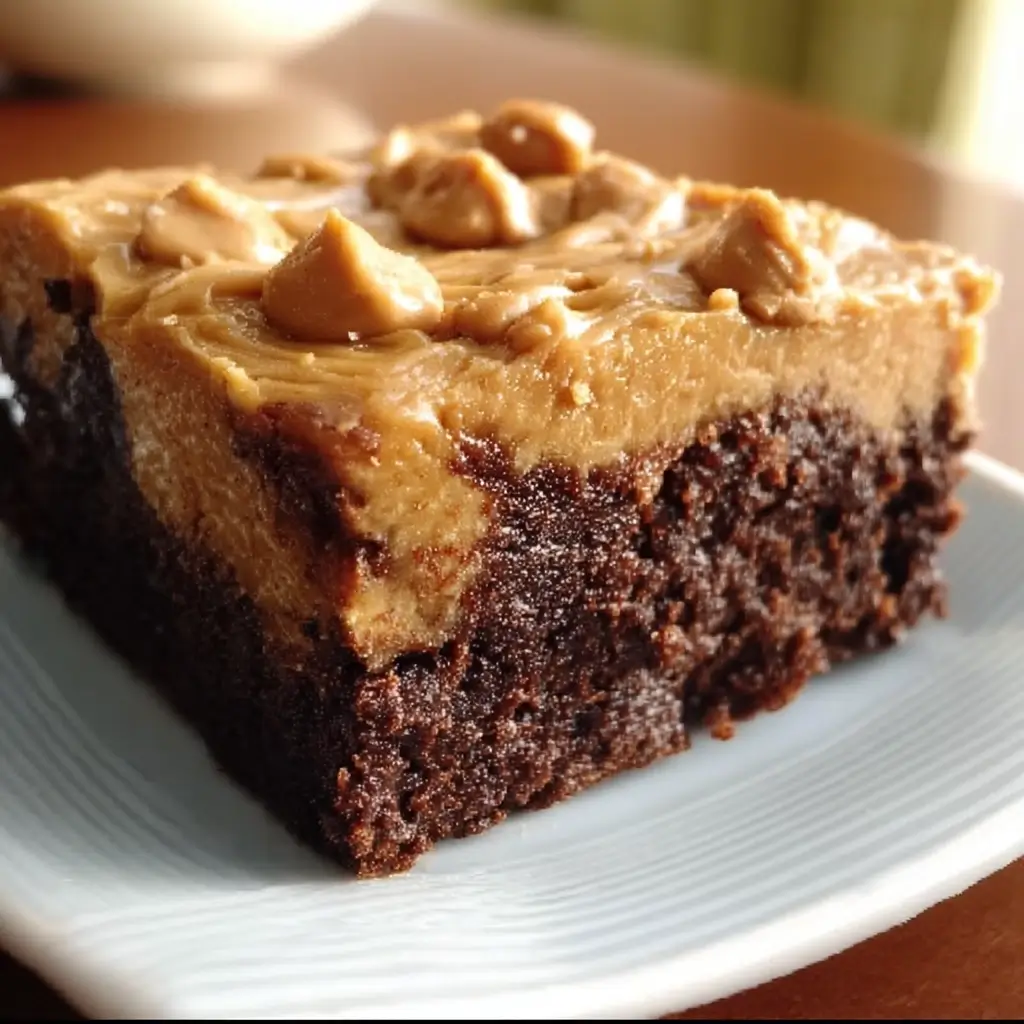

It was one of those evenings. The day had been long, the kids were finally asleep, and a deep, undeniable craving for something sweet, warm, and comforting washed over me. The idea of preheating the oven, dirtying a mixer, and waiting 40 minutes for a traditional pan of brownies felt like an insurmountable task. My pantry, however, held the promise of a near-instant solution. Flour, cocoa, sugar, and a jar of creamy peanut butter. A quick search, a bit of kitchen experimentation, and five minutes later, I was holding a warm mug filled with the most decadent, fudgy, and intensely satisfying treat I’d had in ages. This Microwave Peanut Butter Brownie wasn’t just good; it was a revelation. The rich, dark chocolate flavor melded perfectly with the salty, nutty ribbon of peanut butter swirled throughout. It was gooey in the center, slightly cakey on the edges, and utterly addictive. It has since become our family’s go-to emergency dessert, the treat my husband requests after a tough day, and the “special surprise” that can turn any ordinary weeknight into a small celebration. This isn’t just a recipe; it’s a secret weapon against cravings, a surefire way to produce a moment of pure, unadulterated bliss in under five minutes.
Ingredients
This recipe relies on common pantry staples, making it the perfect spur-of-the-moment dessert. Each ingredient plays a crucial role in achieving that perfect fudgy texture and rich flavor profile.
- All-Purpose Flour (4 tablespoons): This is the foundation of our brownie, providing the necessary structure and body without making it tough.
- Granulated Sugar (4 tablespoons): Delivers the classic sweetness that balances the bitterness of the cocoa and the saltiness of the peanut butter.
- Unsweetened Cocoa Powder (2 tablespoons): The heart of the chocolate flavor. Using unsweetened cocoa powder gives you control over the sweetness and provides a deep, rich, authentic chocolate taste.
- Pinch of Salt (1/8 teaspoon): A small but mighty ingredient. Salt enhances all the other flavors, making the chocolate more chocolatey and the peanut butter more pronounced.
- Milk (3 tablespoons): This provides the necessary moisture to bring the batter together. You can use any milk you have on hand—whole, skim, almond, soy, or oat milk all work beautifully.
- Vegetable Oil (2 tablespoons): The secret to a truly fudgy and moist microwave brownie. Oil ensures the brownie doesn’t dry out during the quick cooking process. Melted butter can also be used for a richer flavor.
- Vanilla Extract (1/4 teaspoon): A background player that elevates the overall taste, adding a layer of aromatic warmth that complements the chocolate and peanut butter.
- Creamy Peanut Butter (1 heaping tablespoon): The star of the show. Creamy peanut butter melts into the batter, creating luscious pockets and swirls of nutty goodness.
Instructions
Creating this single-serving masterpiece is incredibly simple. Follow these steps carefully for a perfect brownie every time. The key is to not overmix and, most importantly, not to overcook.
- Choose Your Mug: Select a standard-sized, microwave-safe mug (around 12-16 ounces). Using a mug that is too small will cause the batter to overflow, creating a mess in your microwave. A wider, shorter mug is often better than a tall, skinny one as it helps the brownie cook more evenly.
- Combine Dry Ingredients: In your chosen mug, add the all-purpose flour, granulated sugar, unsweetened cocoa powder, and the pinch of salt. Use a small whisk or a fork to mix these dry ingredients together thoroughly. This step is crucial to ensure there are no lumps of flour or cocoa in the final product.
- Add Wet Ingredients: Pour the milk, vegetable oil, and vanilla extract directly into the mug with the dry ingredients. Whisk everything together until the batter is just combined. Scrape the bottom and sides of the mug to make sure all the dry flour is incorporated. Be careful not to overmix; stop as soon as you no longer see dry streaks of flour. Overmixing can develop the gluten in the flour, resulting in a tough, rubbery brownie.
- Add the Peanut Butter: Drop the heaping tablespoon of creamy peanut butter right into the center of the batter. Use a fork or a toothpick to gently swirl the peanut butter into the brownie batter a few times. Don’t fully mix it in! The goal is to create distinct ribbons and pockets of melted peanut butter throughout the brownie for the best flavor and texture experience.
- Microwave to Perfection: Place the mug in the center of your microwave. Cook on high power. The cooking time is the most critical and variable step, as it depends entirely on the wattage of your microwave.
- For a 1000-1200W microwave: Start with 60 to 75 seconds.
- For a 700-900W microwave: Start with 90 seconds to 2 minutes.
The brownie is done when the top looks set and dry, but a toothpick inserted into the center still comes out with some moist, fudgy crumbs attached (not wet batter). It’s always better to undercook it slightly than to overcook it. An overcooked microwave brownie will be dry and tough.
- Rest and Cool: Carefully remove the mug from the microwave—it will be very hot! Let the brownie rest on the counter for at least 1-2 minutes. This is a non-negotiable step. The residual heat will continue to cook the center to fudgy perfection, and it allows the molten-hot brownie to cool down to an edible temperature.
- Enjoy: Grab a spoon and dive right in! Enjoy your warm, gooey, chocolate-peanut butter creation straight from the mug.
Nutrition Facts
This is an indulgent single-serving treat. The nutritional information is an estimate and can vary based on the specific ingredients used (e.g., type of milk, brand of peanut butter).
- Servings: 1 Brownie
- Calories Per Serving: Approximately 550-650 kcal
- Fat: This brownie is rich in fats from the oil and peanut butter, which is essential for its moist, fudgy texture. This fat content provides satiety and a decadent mouthfeel.
- Carbohydrates: The primary source of energy in this dessert, coming from the flour and sugar. They provide the structure and sweetness that make this brownie a satisfying treat.
- Protein: Contains a decent amount of protein, primarily from the peanut butter and milk. This adds to the brownie’s satisfying nature and provides building blocks for the body.
- Sugar: The granulated sugar provides the sweetness. While it’s a treat, it’s this sweetness that balances the rich cocoa and saltiness of the peanut butter, hitting all the right flavor notes for a classic dessert experience.
Preparation Time
This recipe is the definition of instant gratification. From craving to consumption, the entire process takes less time than a commercial break.
- Prep Time: 3 Minutes. This includes gathering your ingredients and mixing them together in the mug.
- Cook Time: 1-2 Minutes. This is the active microwave time, which can vary slightly depending on your microwave’s power.
- Total Time: Under 5 Minutes. It’s a truly quick and efficient way to satisfy a serious dessert craving without any fuss or prolonged waiting.
How to Serve
While this microwave peanut butter brownie is absolutely delicious on its own, a few simple additions can elevate it from a simple snack to a truly gourmet dessert experience. Here are some fantastic ways to serve it:
- The Classic A La Mode:
- Top the warm brownie with a generous scoop of vanilla bean ice cream. The contrast between the hot, fudgy brownie and the cold, creamy ice cream is a timeless and unbeatable combination.
- The Chocolate Lover’s Dream:
- Drizzle the top with warm chocolate fudge or caramel sauce.
- Sprinkle on a handful of mini chocolate chips or chocolate shavings while the brownie is still hot so they get slightly melty.
- The Ultimate Peanut Butter Indulgence:
- Warm up an extra teaspoon of peanut butter in the microwave for 15 seconds until it’s pourable.
- Drizzle the melted peanut butter over the top of the brownie.
- For some crunch, sprinkle on some chopped peanuts or peanut butter cups.
- Fruity and Fresh:
- The tartness of fresh berries cuts through the richness of the brownie beautifully.
- Top with fresh raspberries, sliced strawberries, or a few cherries. A dollop of whipped cream would complete this pairing perfectly.
- Salty and Sweet Sensation:
- Drizzle the brownie with a rich caramel sauce.
- Finish with a sprinkle of flaky sea salt. This enhances the chocolate and peanut butter flavors and adds a sophisticated, crunchy finish.
- The Campfire Experience:
- After microwaving, top the brownie with a few mini marshmallows.
- If you have a culinary torch, you can toast the marshmallows for a s’mores-like flavor. If not, the heat from the brownie will still make them soft and gooey.
Additional Tips
Unlock the full potential of your microwave brownie with these eight expert tips. Small adjustments can make a big difference in achieving your perfect texture and flavor.
- Don’t Overmix the Batter: When combining the wet and dry ingredients, mix only until they are just incorporated. A few small lumps are perfectly fine. Overmixing develops the gluten in the flour, which is great for bread but results in a chewy, tough, and rubbery brownie.
- Master Your Microwave’s Power: Microwaves vary significantly in wattage. The key to a perfect microwave brownie is to find the sweet spot for your specific machine. Start with the lower end of the recommended time, check for doneness, and then add 10-15 second intervals if needed. The first time you make it, take note of the perfect timing for future reference.
- The Mug Matters: The size and shape of your mug impact how the brownie cooks. A wider, bowl-like mug allows for more even cooking. If you only have a tall, narrow mug, you may need to add a few extra seconds to the cooking time to ensure the center gets cooked through. Always ensure it’s microwave-safe.
- Fudgy vs. Cakey – You Decide: The final texture is in your hands and depends on the cooking time. For a super gooey, molten, lava-cake-style center, cook it for the minimum recommended time. For a more fully cooked, cake-like brownie, cook it for the maximum recommended time.
- Experiment with Ingredient Swaps: This recipe is very forgiving. Feel free to experiment!
- Nut Butters: Swap peanut butter for almond butter, cashew butter, or even a seed butter like SunButter.
- Flour: For a slightly different texture, you can try whole wheat pastry flour. For a gluten-free version, a 1-to-1 gluten-free baking flour blend works well.
- Sweeteners: You can substitute brown sugar for a deeper, more molasses-like flavor, or use a sugar substitute like erythritol, though you may need to adjust the quantity based on the product’s sweetness level.
- Unleash the Add-Ins: Elevate your brownie by mixing in a tablespoon of your favorite treats along with the peanut butter. Mini chocolate chips, chopped walnuts or pecans, a crushed Oreo cookie, or even a few mini marshmallows can be folded into the batter before cooking for extra texture and flavor.
- Make It for Two (or Double for Yourself): This recipe can easily be doubled. Simply double all the ingredients and cook it in a larger, microwave-safe bowl or two separate mugs. If using one larger bowl, you will need to increase the cooking time—start with about 2 minutes and add 20-second increments until it’s done.
- The Crucial Cooling Period: It’s tempting to dive in the second the microwave dings, but patience is a virtue. Letting the brownie rest for 1-2 minutes is essential. This allows the center to finish “baking” from the residual heat and lets the structure set, transforming it from a soupy batter into a perfect, fudgy brownie.
Frequently Asked Questions (FAQ)
Here are answers to some of the most common questions about making the perfect Microwave Peanut Butter Brownie.
1. Why did my microwave brownie turn out dry and rubbery?
This is the most common issue and it’s almost always caused by one thing: overcooking. Microwaves cook from the inside out very quickly, and even an extra 15-20 seconds can turn a fudgy brownie into a tough, rubbery puck. The solution is to undercook it slightly. Cook it until the edges are set but the very center still looks a bit wet. It will continue to cook as it rests on the counter. Also, ensure you are using enough fat (oil or butter), as this is key to a moist texture.
2. Can I make this microwave brownie vegan?
Absolutely! This recipe is easily adaptable for a vegan diet. Simply use a plant-based milk such as almond, soy, or oat milk. The rest of the core ingredients (flour, sugar, cocoa powder, oil, peanut butter, salt, vanilla) are typically vegan, but it’s always a good idea to double-check your specific product labels, especially for sugar (to ensure it’s not processed with bone char).
3. Can I use a different kind of nut butter?
Yes, you can substitute the peanut butter with almost any other creamy nut or seed butter. Almond butter will give it a sophisticated, nutty flavor. Cashew butter will make it extra creamy and rich. For a nut-free version, creamy sunflower seed butter (SunButter) is an excellent alternative that pairs wonderfully with chocolate.
4. The recipe doesn’t call for an egg. Is that correct?
That’s correct! Many traditional brownie recipes use eggs as a binder and leavening agent. However, for a single-serving microwave recipe, an egg is often too much and can result in a spongy, overly cakey texture. The combination of flour, milk, and oil in this recipe provides all the structure and moisture needed, keeping it dense and fudgy.
5. What is the best kind of cocoa powder to use?
For the richest, most intense chocolate flavor, use a high-quality Dutch-process cocoa powder. It’s less acidic than natural cocoa powder, resulting in a darker color and a smoother, less bitter chocolate taste. However, standard unsweetened natural cocoa powder (like the kind most commonly found in grocery stores) will also work perfectly well and produce a delicious brownie.
6. How do I store leftovers? (If there are any!)
On the rare occasion that you have leftovers, you can cover the mug with plastic wrap or transfer the brownie to an airtight container. It can be stored at room temperature for up to a day or in the refrigerator for 2-3 days. To enjoy it again, you can eat it cold from the fridge (it will be very dense and fudgy) or reheat it in the microwave for 15-20 seconds to bring back its warm, gooey texture.
7. Can I prepare the batter in advance?
It’s not recommended. Because this recipe has no chemical leaveners (like baking powder or soda), the texture relies on the quick cooking process. If you let the batter sit for too long, the flour will fully absorb the liquid, which can lead to a denser, gummier final product. The recipe is so fast to mix together that it’s best to prepare it right before you plan to cook and eat it.
8. Why didn’t my brownie rise much? Is that normal?
Yes, that is completely normal for this type of recipe. This is a dense, fudgy brownie, not a light, airy cake. It doesn’t contain leavening agents like baking powder or soda, so you shouldn’t expect it to rise significantly in the mug. It will puff up slightly while cooking in the microwave and then settle back down as it cools. This lack of rise is what helps create that coveted gooey, compact, and ultra-rich brownie texture.
Microwave Peanut Butter Brownie
Ingredients
This recipe relies on common pantry staples, making it the perfect spur-of-the-moment dessert. Each ingredient plays a crucial role in achieving that perfect fudgy texture and rich flavor profile.
- All-Purpose Flour (4 tablespoons): This is the foundation of our brownie, providing the necessary structure and body without making it tough.
- Granulated Sugar (4 tablespoons): Delivers the classic sweetness that balances the bitterness of the cocoa and the saltiness of the peanut butter.
- Unsweetened Cocoa Powder (2 tablespoons): The heart of the chocolate flavor. Using unsweetened cocoa powder gives you control over the sweetness and provides a deep, rich, authentic chocolate taste.
- Pinch of Salt (1/8 teaspoon): A small but mighty ingredient. Salt enhances all the other flavors, making the chocolate more chocolatey and the peanut butter more pronounced.
- Milk (3 tablespoons): This provides the necessary moisture to bring the batter together. You can use any milk you have on hand—whole, skim, almond, soy, or oat milk all work beautifully.
- Vegetable Oil (2 tablespoons): The secret to a truly fudgy and moist microwave brownie. Oil ensures the brownie doesn’t dry out during the quick cooking process. Melted butter can also be used for a richer flavor.
- Vanilla Extract (1/4 teaspoon): A background player that elevates the overall taste, adding a layer of aromatic warmth that complements the chocolate and peanut butter.
- Creamy Peanut Butter (1 heaping tablespoon): The star of the show. Creamy peanut butter melts into the batter, creating luscious pockets and swirls of nutty goodness.
Instructions
Creating this single-serving masterpiece is incredibly simple. Follow these steps carefully for a perfect brownie every time. The key is to not overmix and, most importantly, not to overcook.
- Choose Your Mug: Select a standard-sized, microwave-safe mug (around 12-16 ounces). Using a mug that is too small will cause the batter to overflow, creating a mess in your microwave. A wider, shorter mug is often better than a tall, skinny one as it helps the brownie cook more evenly.
- Combine Dry Ingredients: In your chosen mug, add the all-purpose flour, granulated sugar, unsweetened cocoa powder, and the pinch of salt. Use a small whisk or a fork to mix these dry ingredients together thoroughly. This step is crucial to ensure there are no lumps of flour or cocoa in the final product.
- Add Wet Ingredients: Pour the milk, vegetable oil, and vanilla extract directly into the mug with the dry ingredients. Whisk everything together until the batter is just combined. Scrape the bottom and sides of the mug to make sure all the dry flour is incorporated. Be careful not to overmix; stop as soon as you no longer see dry streaks of flour. Overmixing can develop the gluten in the flour, resulting in a tough, rubbery brownie.
- Add the Peanut Butter: Drop the heaping tablespoon of creamy peanut butter right into the center of the batter. Use a fork or a toothpick to gently swirl the peanut butter into the brownie batter a few times. Don’t fully mix it in! The goal is to create distinct ribbons and pockets of melted peanut butter throughout the brownie for the best flavor and texture experience.
- Microwave to Perfection: Place the mug in the center of your microwave. Cook on high power. The cooking time is the most critical and variable step, as it depends entirely on the wattage of your microwave.
- For a 1000-1200W microwave: Start with 60 to 75 seconds.
- For a 700-900W microwave: Start with 90 seconds to 2 minutes.
The brownie is done when the top looks set and dry, but a toothpick inserted into the center still comes out with some moist, fudgy crumbs attached (not wet batter). It’s always better to undercook it slightly than to overcook it. An overcooked microwave brownie will be dry and tough.
- Rest and Cool: Carefully remove the mug from the microwave—it will be very hot! Let the brownie rest on the counter for at least 1-2 minutes. This is a non-negotiable step. The residual heat will continue to cook the center to fudgy perfection, and it allows the molten-hot brownie to cool down to an edible temperature.
- Enjoy: Grab a spoon and dive right in! Enjoy your warm, gooey, chocolate-peanut butter creation straight from the mug.
Nutrition
- Serving Size: one normal portion
- Calories: 650


