")

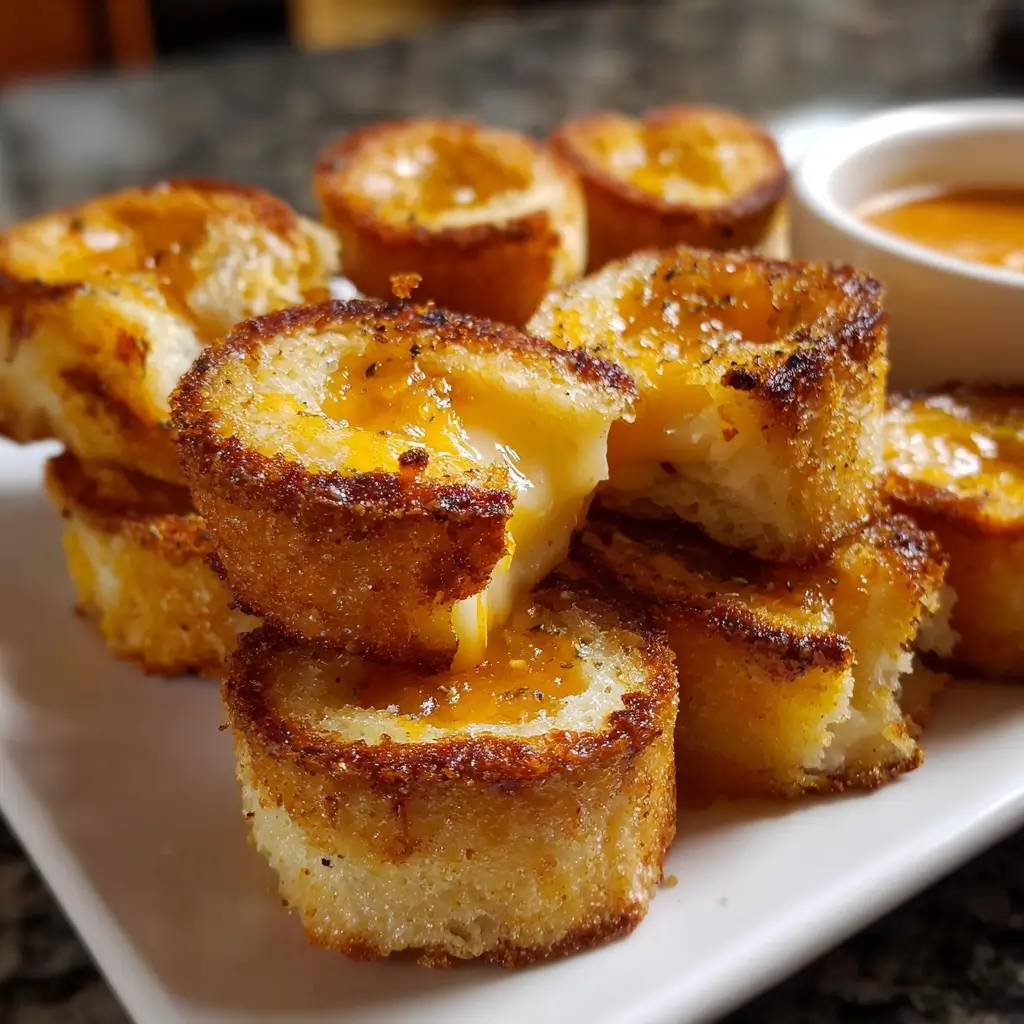

Of all the comfort foods that transport us back to simpler times, the grilled cheese sandwich holds a special place in my heart. It’s the quintessential meal for a rainy day, a quick and satisfying lunch, or a soothing remedy for a tough week. But what happens when you take that classic, beloved sandwich and transform it into a fun, shareable, and utterly irresistible appetizer? You get these Mini Grilled Cheese Dippers. The first time I made these for a family get-together, I knew I had stumbled upon something magical. The adults were instantly nostalgic, grabbing the tiny, golden-brown sandwiches with childlike glee, while the kids, who can sometimes be the toughest food critics, devoured them without a second thought. Watching my nephew, a notoriously picky eater, happily dunk a cheesy dipper into a small cup of tomato soup was a moment of pure culinary victory. These aren’t just scaled-down sandwiches; they are an experience. They are the perfect centerpiece for a party platter, a game-day snack that disappears in minutes, and the easiest way to make a simple lunch feel like a special occasion. This Mini Grilled Cheese Dippers recipe has become my go-to for its simplicity, its universal appeal, and the sheer joy it brings to everyone who tries it.
Ingredients for the Ultimate Mini Grilled Cheese Dippers
To create these perfectly crispy and cheesy dippers, you need a few simple but high-quality ingredients. The magic lies in the balance of sturdy bread, flavorful cheese, and the right fat for frying.
- 12 slices of Sturdy White or Sourdough Bread: The choice of bread is crucial. You need a loaf that is firm enough to hold its shape when sliced and dipped without becoming soggy. A good quality sandwich bread, brioche, or a mild sourdough works wonderfully.
- 12 slices of Sharp Cheddar Cheese: Sharp cheddar provides a robust, tangy flavor that stands up beautifully to the richness of the butter and pairs perfectly with tomato soup. You can also use a combination of cheeses.
- 4 slices of Provolone or Monterey Jack Cheese: Incorporating a meltier cheese like provolone or Monterey Jack ensures you get that iconic, gooey cheese pull that makes grilled cheese so satisfying.
- 1/2 cup (1 stick) of Unsalted Butter, softened: Use good quality, unsalted butter and make sure it’s softened to room temperature. This allows you to spread it evenly across the bread, guaranteeing a perfectly golden and crispy crust without burning.
- 1 quart of Creamy Tomato Soup, for serving: While optional, serving these dippers with a warm, creamy tomato soup elevates them from a snack to a complete, comforting experience.
Step-by-Step Instructions for Perfect Dippers
Follow these simple steps to achieve grilled cheese perfection. The key is to work in batches and not rush the grilling process.
- Prepare the Bread: Lay out all 12 slices of bread on a large cutting board or clean work surface. Using a butter knife or spatula, generously spread the softened butter on one side of each slice of bread. Make sure to cover the entire surface, right to the edges, as this is your key to a uniformly golden-brown finish.
- Assemble the Sandwiches: Flip over 6 of the buttered bread slices so the unbuttered side is facing up. On each of these slices, place two slices of sharp cheddar cheese, followed by a slice of provolone or Monterey Jack. The layering ensures a fantastic melt and flavor profile. If the cheese slices hang over the bread, feel free to fold or trim them to fit.
- Top the Sandwiches: Place the remaining 6 slices of bread on top of the cheese-layered slices, with the buttered side facing out. You should now have 6 full-sized grilled cheese sandwiches, ready for the skillet.
- Grill the Sandwiches: Heat a large non-stick skillet or griddle over medium-low heat. It’s crucial not to have the heat too high, as the bread will burn before the cheese has a chance to melt. Place 2 or 3 sandwiches in the skillet, being careful not to overcrowd it.
- Cook to Golden Perfection: Grill the sandwiches for 3-5 minutes on the first side, or until the bread is a deep golden brown and crispy. You can gently press down on the sandwich with a spatula to encourage even cooking and help the cheese melt.
- Flip and Finish: Carefully flip the sandwiches and cook for another 3-5 minutes on the other side, until it’s equally golden brown and the cheese is completely melted and gooey. You should see it oozing slightly from the sides.
- Rest and Slice: Remove the grilled cheese sandwiches from the skillet and place them on a cutting board. Let them rest for a minute or two. This allows the cheese to set slightly, which makes for cleaner cuts.
- Create the Dippers: Using a sharp serrated knife, carefully trim the crusts off all four sides of each sandwich (this is optional but creates a more tender dipper). Then, slice each sandwich vertically into 3 or 4 equal-sized “dippers” or “sticks.”
- Serve Immediately: Arrange the mini grilled cheese dippers on a platter alongside small bowls or cups of warm tomato soup for dipping. They are best served immediately while hot and crispy.
Nutritional Information
This information is an estimate and can vary based on the specific ingredients used.
- Servings: 6-8 (makes approximately 24 dippers)
- Calories per Serving: Approximately 450-550 kcal
- Fat: This recipe is a source of dietary fat, primarily from the butter and cheese, which contributes to its rich flavor and satisfying texture.
- Protein: The cheese provides a good amount of protein, which is essential for building and repairing tissues in the body.
- Carbohydrates: The bread is the primary source of carbohydrates, providing the energy needed to fuel your day.
Preparation and Cooking Time
This is a wonderfully quick and efficient recipe, perfect for a last-minute appetizer or a fast lunch.
- Preparation Time: 10 minutes
- Cooking Time: 15-20 minutes
- Total Time: Approximately 30 minutes from start to finish. The cooking time can vary slightly depending on the size of your skillet and how many batches you need to make.
How to Serve Your Mini Grilled Cheese Dippers
The presentation and pairing of your dippers can turn a simple snack into a memorable culinary event. Here are some creative and delicious ways to serve them.
The Ultimate Dipping Station
Set up a “dipper bar” for a party or family dinner to let everyone customize their experience.
- The Classic Companion: Creamy Tomato Soup
- Serve warm, creamy tomato soup in individual espresso cups, shot glasses, or small ramekins for easy, no-mess dipping.
- For a gourmet touch, use a roasted red pepper and tomato soup.
- Garnish the soup with a swirl of cream, fresh basil, or croutons.
- Other Savory Dips
- Marinara Sauce: A simple, warm marinara sauce offers a zesty, pizza-like flavor.
- Pesto: A vibrant basil pesto adds a fresh, herby dimension.
- Ranch Dressing: A cool and creamy ranch dip is a guaranteed hit, especially with kids.
- Garlic Aioli: A homemade or store-bought garlic aioli provides a rich, pungent kick.
- Sweet and Spicy Options
- Pepper Jelly: The combination of sweet and spicy from a red pepper jelly is a surprisingly delicious contrast to the savory cheese.
- Hot Honey: Drizzle a little hot honey over the dippers or serve it on the side for a sweet and fiery kick.
- Apple Butter: For a fall-themed twist, the sweet and spiced flavor of apple butter pairs wonderfully with sharp cheddar.
Presentation for Every Occasion
How you plate the dippers can match the mood of your gathering.
- For a Party: Arrange the dippers on a large wooden board or platter. You can stack them like Lincoln Logs or line them up neatly. Place the small cups of soup intermittently among the dippers for easy access. Garnish the platter with fresh parsley or chives for a pop of color.
- For a Cozy Family Meal: Serve a large, steaming bowl of tomato soup in the center of the table with a heaping plate of mini grilled cheese dippers on the side for everyone to share.
- For a Kid-Friendly Lunch: Use cookie cutters to cut the full-sized sandwiches into fun shapes (stars, hearts, dinosaurs) before slicing them into dippers. This makes lunchtime even more exciting.
Additional Tips for Next-Level Grilled Cheese Dippers
A few pro tricks can make the difference between a good grilled cheese and an unforgettable one.
- Bread Choice is Paramount: Don’t use flimsy, cheap bread. It will steam and become soggy under the weight of the cheese. A sturdy Pullman loaf, thick-cut brioche, or sourdough provides the structure needed to stand up to grilling and dipping.
- The Magic of Cheese Blending: Don’t be afraid to mix your cheeses! While sharp cheddar provides flavor, it can sometimes be greasy. Blending it with a super-melty, lower-fat cheese like Provolone, Monterey Jack, or low-moisture mozzarella gives you the best of both worlds: incredible flavor and that coveted, stringy cheese pull.
- Low and Slow is the Way to Go: The most common mistake in making grilled cheese is using heat that’s too high. This burns the bread before the cheese melts. A medium-low heat allows the bread to toast slowly to a perfect, even golden brown while giving the cheese ample time to become a molten, gooey river.
- Soften, Don’t Melt Your Butter: Spreading softened, room-temperature butter onto the bread is far superior to using melted butter. Melted butter soaks into the bread too quickly, which can make it greasy and prone to burning. Softened butter sits on the surface, essentially frying the bread in the pan for maximum crispiness.
- The Mayonnaise Secret: For an even deeper golden-brown color and a tangy flavor, try this trick: spread a very thin layer of mayonnaise on the outside of the bread instead of butter. The oil and egg in mayo have a higher smoke point, leading to a perfectly crisp, never-burnt crust. You can also mix softened butter and mayo together.
- Press, But Don’t Crush: Use a spatula to gently press down on the sandwich as it cooks. This ensures the entire surface of the bread makes contact with the skillet for even browning and helps the cheese melt together. However, don’t press so hard that you squeeze all the cheese out or flatten the bread completely.
- Batch Cooking for a Crowd: If you’re making a large quantity for a party, set your oven to its lowest temperature (around 200°F or 95°C). As you finish each batch of sandwiches on the skillet, place them on a baking sheet lined with a wire rack and keep them in the warm oven. The wire rack prevents the bottom from getting soggy. Slice them all into dippers just before serving.
- The Make-Ahead Strategy: You can assemble the sandwiches (bread, cheese, but no butter on the outside) up to a day in advance. Stack them, wrap them tightly in plastic wrap, and store them in the refrigerator. When you’re ready to cook, just unwrap, butter the outsides, and grill as directed. This is a huge time-saver for party prep.
Frequently Asked Questions (FAQ)
Here are answers to some of the most common questions about making the perfect Mini Grilled Cheese Dippers.
1. Can I make these gluten-free?
Absolutely! The recipe works wonderfully with a good quality gluten-free sandwich bread. Look for a brand that has sturdy, well-sized slices that won’t fall apart easily. The rest of the ingredients are naturally gluten-free, but always double-check your cheese and soup labels to be certain.
2. What is the absolute best cheese for a grilled cheese?
There’s no single “best” cheese—it’s all about what you’re looking for! For a classic, sharp flavor, you can’t beat sharp cheddar. For the ultimate cheese pull, Monterey Jack or provolone are champions. A great pro-tip is to use a blend: 2/3 sharp cheddar for flavor and 1/3 provolone for meltability. Gruyère also offers a nutty, sophisticated flavor that melts beautifully.
3. How do I prevent my grilled cheese from getting soggy?
Sogginess is the enemy! Prevent it by:
- Using sturdy bread.
- Using softened butter or mayo instead of melted butter.
- Cooking on medium-low heat to toast, not steam, the bread.
- Serving them immediately after cooking. If you have to wait, place them on a wire rack, not a flat plate, to allow air to circulate underneath.
4. Can I make these in an air fryer?
Yes, an air fryer is a fantastic way to make grilled cheese! Assemble the sandwiches as directed. Lightly spray the outside of the bread with cooking spray or spread a very thin layer of butter or mayo. Place them in the air fryer basket in a single layer and cook at 370°F (185°C) for 4-5 minutes. Flip the sandwich and cook for another 3-4 minutes, or until golden brown and the cheese is melted.
5. How do I store and reheat leftovers?
While best eaten fresh, you can store leftovers. Let the dippers cool completely, then store them in an airtight container in the refrigerator for up to 2 days. To reheat and bring back the crispiness, place them in a dry non-stick skillet over medium-low heat, in an air fryer, or in a toaster oven for a few minutes until warmed through and re-crisped. Avoid the microwave, as it will make them soft and chewy.
6. Can I add other ingredients to the sandwiches?
Of course! These dippers are a perfect canvas for creativity. Just remember to keep the additions very thin so the sandwich holds together. Great additions include:
- A very thin slice of ham or prosciutto.
- A smear of fig jam or apple butter.
- A few slices of cooked, crumbled beef.
- Caramelized onions or thinly sliced jalapeños.
7. Why isn’t my cheese melting properly?
This is almost always due to one of two things: the heat is too high, or you’re using the wrong kind of cheese. If the heat is too high, the bread will burn before the heat can penetrate to the center and melt the cheese. Turn the heat down to medium-low. Also, aged, hard cheeses or pre-shredded cheeses (which are often coated in anti-caking agents) don’t melt as well. Sliced cheese or cheese you grate yourself from a block will always melt better.
8. How do I get that perfect, even golden-brown crust?
The secret is threefold:
- Even Buttering: Use softened butter and a knife to spread it evenly all the way to the crusts.
- Medium-Low Heat: Patience is key. Low heat allows the entire surface to toast evenly.
- A Good Pan: A heavy-bottomed non-stick skillet or a well-seasoned cast-iron griddle will distribute heat more evenly, preventing hot spots that can burn the bread.
Mini Grilled Cheese Dippers Recipe
Ingredients
To create these perfectly crispy and cheesy dippers, you need a few simple but high-quality ingredients. The magic lies in the balance of sturdy bread, flavorful cheese, and the right fat for frying.
- 12 slices of Sturdy White or Sourdough Bread: The choice of bread is crucial. You need a loaf that is firm enough to hold its shape when sliced and dipped without becoming soggy. A good quality sandwich bread, brioche, or a mild sourdough works wonderfully.
- 12 slices of Sharp Cheddar Cheese: Sharp cheddar provides a robust, tangy flavor that stands up beautifully to the richness of the butter and pairs perfectly with tomato soup. You can also use a combination of cheeses.
- 4 slices of Provolone or Monterey Jack Cheese: Incorporating a meltier cheese like provolone or Monterey Jack ensures you get that iconic, gooey cheese pull that makes grilled cheese so satisfying.
- 1/2 cup (1 stick) of Unsalted Butter, softened: Use good quality, unsalted butter and make sure it’s softened to room temperature. This allows you to spread it evenly across the bread, guaranteeing a perfectly golden and crispy crust without burning.
- 1 quart of Creamy Tomato Soup, for serving: While optional, serving these dippers with a warm, creamy tomato soup elevates them from a snack to a complete, comforting experience.
Instructions
Follow these simple steps to achieve grilled cheese perfection. The key is to work in batches and not rush the grilling process.
- Prepare the Bread: Lay out all 12 slices of bread on a large cutting board or clean work surface. Using a butter knife or spatula, generously spread the softened butter on one side of each slice of bread. Make sure to cover the entire surface, right to the edges, as this is your key to a uniformly golden-brown finish.
- Assemble the Sandwiches: Flip over 6 of the buttered bread slices so the unbuttered side is facing up. On each of these slices, place two slices of sharp cheddar cheese, followed by a slice of provolone or Monterey Jack. The layering ensures a fantastic melt and flavor profile. If the cheese slices hang over the bread, feel free to fold or trim them to fit.
- Top the Sandwiches: Place the remaining 6 slices of bread on top of the cheese-layered slices, with the buttered side facing out. You should now have 6 full-sized grilled cheese sandwiches, ready for the skillet.
- Grill the Sandwiches: Heat a large non-stick skillet or griddle over medium-low heat. It’s crucial not to have the heat too high, as the bread will burn before the cheese has a chance to melt. Place 2 or 3 sandwiches in the skillet, being careful not to overcrowd it.
- Cook to Golden Perfection: Grill the sandwiches for 3-5 minutes on the first side, or until the bread is a deep golden brown and crispy. You can gently press down on the sandwich with a spatula to encourage even cooking and help the cheese melt.
- Flip and Finish: Carefully flip the sandwiches and cook for another 3-5 minutes on the other side, until it’s equally golden brown and the cheese is completely melted and gooey. You should see it oozing slightly from the sides.
- Rest and Slice: Remove the grilled cheese sandwiches from the skillet and place them on a cutting board. Let them rest for a minute or two. This allows the cheese to set slightly, which makes for cleaner cuts.
- Create the Dippers: Using a sharp serrated knife, carefully trim the crusts off all four sides of each sandwich (this is optional but creates a more tender dipper). Then, slice each sandwich vertically into 3 or 4 equal-sized “dippers” or “sticks.”
- Serve Immediately: Arrange the mini grilled cheese dippers on a platter alongside small bowls or cups of warm tomato soup for dipping. They are best served immediately while hot and crispy.
Nutrition
- Serving Size: one normal portion
- Calories: 550