")


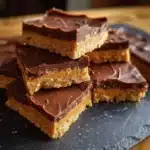
Of all the recipes in my collection, the ones that get the most mileage are the ones that deliver maximum “wow” for minimum effort. This is the undisputed champion of that category. I first made these No-Bake Chocolate Peanut Butter Bars on a frantic Tuesday afternoon. I had completely forgotten about a bake sale at my son’s school the next day, and the thought of preheating the oven and starting a complex baking project at 8 PM was daunting. I remembered a tattered recipe card a friend had given me years ago, promising a dessert that tasted just like a Reese’s cup but was “dangerously easy.” Skeptical but desperate, I gave it a shot. The result was nothing short of miraculous. The bars set up perfectly in the fridge overnight, and cutting into them revealed a dense, fudgy peanut butter layer topped with a glossy, snappy sheet of rich chocolate. They were the first thing to disappear from the bake sale table, and I came home with three separate requests for the recipe. Now, they are our go-to for everything: last-minute potluck contributions, a simple weeknight treat, or a comfort food craving that needs immediate satisfaction. The beauty is in their simplicity, a perfect harmony of salty peanut butter, sweet confectioner’s sugar, and decadent chocolate that tastes like it took hours, not minutes, to prepare.
Ingredients
Here is the simple list of ingredients you’ll need to create these incredibly decadent and easy dessert bars. The magic of this recipe lies in using common pantry staples to create something truly special.
- 1 cup (2 sticks or 226g) Unsalted Butter, melted: This is the foundation of the peanut butter layer, providing richness and helping the bars set firmly. Using unsalted butter allows you to control the final saltiness of the dish.
- 2 cups (240g) Graham Cracker Crumbs: This provides the structure and a subtle, honey-kissed flavor to the base. You can buy pre-crushed crumbs or make your own by pulsing about 15-16 full graham cracker sheets in a food processor.
- 2 cups (240g) Powdered Sugar (Confectioner’s Sugar): This ingredient dissolves completely, giving the peanut butter layer a smooth, fudgy, and melt-in-your-mouth texture without any grittiness.
- 1 cup (256g) Creamy Peanut Butter: The star of the show! A standard commercial creamy peanut butter (like Jif or Skippy) works best, as its stabilizers help the bars set properly.
- 1 ½ cups (255g) Semi-Sweet Chocolate Chips: These create the perfect chocolate topping, offering a rich chocolate flavor that beautifully balances the sweetness of the peanut butter base.
- 1 tablespoon (16g) Creamy Peanut Butter: A small amount is mixed into the melted chocolate. This is a secret trick that not only enhances the peanut butter flavor but also makes the chocolate layer slightly softer and much easier to cut without cracking.
Instructions
Follow these step-by-step instructions carefully to ensure your no-bake bars come out perfectly every time. The process is straightforward and requires no baking, just a bit of mixing and chilling.
Step 1: Prepare the Pan
Before you begin mixing, prepare your baking dish. Take a 9×13 inch baking pan and line it with parchment paper. The best way to do this is to leave a few inches of “overhang” on the two long sides. These parchment paper handles will make it incredibly easy to lift the entire chilled block of bars out of the pan for clean, perfect cutting. If you don’t have parchment paper, you can grease the pan thoroughly with butter or non-stick spray, but the lifting method is highly recommended for best results.
Step 2: Create the Peanut Butter Base Mixture
In a large mixing bowl, you’ll create the heart of this dessert. Pour in the 2 cups of graham cracker crumbs and the 2 cups of powdered sugar. Give them a quick whisk to combine and break up any lumps in the sugar. Now, pour in the 1 cup of melted unsalted butter and add the 1 cup of creamy peanut butter. Using a sturdy spatula or a wooden spoon, begin to mix everything together. At first, it might seem dry, but keep stirring. The butter and peanut butter will work their way into the dry ingredients, eventually forming a thick, slightly crumbly, but cohesive dough. Ensure there are no dry pockets of powdered sugar or graham cracker crumbs remaining.
Step 3: Press the Base into the Pan
Transfer the entire peanut butter mixture from the mixing bowl into your prepared 9×13 inch pan. Dump it into the center and then begin to press it outwards towards the edges. The goal is to create an even, flat, and densely packed layer. You can use the back of your spatula for this, but the best tool is the bottom of a flat-bottomed measuring cup or drinking glass. Press down firmly across the entire surface. This compaction is crucial; it ensures your base is solid and won’t crumble apart when you serve the bars. Make sure to get into the corners and create a level surface for the chocolate topping.
Step 4: Prepare the Chocolate Topping
Now it’s time for the glorious chocolate layer. In a medium-sized, microwave-safe bowl, combine the 1 ½ cups of semi-sweet chocolate chips and the final 1 tablespoon of creamy peanut butter. Place the bowl in the microwave and heat it on high in 30-second intervals. It is vital to stir well after each interval. Chocolate can hold its shape even when melted, so stirring is key to prevent it from scorching. Continue this process until the chocolate is about 90% melted, with just a few small lumps remaining. Remove it from the microwave and just keep stirring; the residual heat from the bowl and the melted chocolate will melt the remaining bits, leaving you with a perfectly smooth, glossy chocolate sauce. This gentle melting method prevents the chocolate from seizing or becoming grainy.
Step 5: Assemble and Spread the Topping
Immediately pour the warm, melted chocolate mixture over the prepared peanut butter base in the pan. Start by pouring it in the center and then, using an offset spatula or the back of a spoon, gently spread it into an even layer, all the way to the edges. The tablespoon of peanut butter you added will make the chocolate more pliable and easier to spread. Work relatively quickly before the chocolate begins to set. Tilt the pan slightly to help it level out into a beautiful, uniform topping.
Step 6: Chill for Firmness
This is the final and most important step: patience. Place the pan, uncovered, into the refrigerator. Let the bars chill for at least 2 hours. This time allows both the peanut butter base and the chocolate topping to firm up completely. If you’re in a hurry, you can place them in the freezer for about 45-60 minutes, but the refrigerator often yields a slightly better texture. The bars are ready when the chocolate is hard to the touch and the base is very firm.
Step 7: Cut and Serve
Once the bars are fully chilled, use the parchment paper handles to lift the entire block out of the pan and onto a cutting board. For the cleanest cuts, use a large, sharp knife. Run the knife under hot water for a few seconds, wipe it dry, and then make a cut. The heat from the knife will slice through the chocolate layer without cracking it. Repeat this process, wiping the knife clean between each cut, to create perfectly neat squares. You can cut them into any size you desire, from small, bite-sized treats to large, generous dessert portions.
Nutrition Facts
This is an indulgent treat, best enjoyed in moderation. The following nutritional information is an estimate based on a recipe yield of 24 servings.
- Servings: 24 bars
- Calories Per Serving: Approximately 280 kcal
- Fat: This dessert is rich in fats, primarily from the butter, peanut butter, and chocolate, which contribute to its decadent texture and satisfying quality.
- Carbohydrates: The primary source of carbohydrates comes from the powdered sugar and graham crackers, providing the sweetness and energy.
- Protein: Peanut butter provides a modest amount of protein, adding to the nutritional profile of these bars.
Preparation Time
This recipe is prized for its speed and simplicity. The total time is mostly hands-off chilling time, making it perfect for busy schedules.
- Active Preparation Time: 15-20 minutes. This includes gathering your ingredients, mixing the base, melting the chocolate, and assembling the bars in the pan.
- Chilling Time: A minimum of 2 hours in the refrigerator is required for the bars to set properly. For an even firmer bar that’s easier to cut, 3-4 hours is ideal.
How to Serve
These No-Bake Chocolate Peanut Butter Bars are wonderfully versatile. They can be dressed up or down for any occasion. Here are some fantastic ways to serve them:
- The Classic Square: Simply cut into squares and serve chilled, straight from the refrigerator. This is the perfect way to enjoy their pure, unadulterated flavor and firm, fudgy texture.
- With a Glass of Milk: The salty-sweet combination is a classic pairing with a cold glass of milk, making it a perfect after-school snack for kids or a nostalgic treat for adults.
- As a Potluck Superstar: Arrange the cut squares neatly on a platter. They travel well (as long as they are kept cool) and are always a massive crowd-pleaser at potlucks, barbecues, and family gatherings. They are one of the first desserts to disappear!
- A La Mode Dessert: For a more decadent dessert experience, serve a slightly larger bar on a plate and top it with a scoop of vanilla bean or chocolate ice cream. The contrast between the cold, creamy ice cream and the dense, rich bar is heavenly.
- Coffee Break Companion: A small square of this chocolate peanut butter bar is the perfect accompaniment to a hot cup of coffee or a latte. The bitterness of the coffee cuts through the richness of the bar beautifully.
- Garnished for a Party: To make them look extra fancy, you can add a simple garnish before the chocolate sets. A sprinkle of flaky sea salt, a drizzle of melted white chocolate, or a scattering of chopped peanuts or festive sprinkles can elevate their appearance for holidays or special events.
Additional Tips
Unlock the full potential of your No-Bake Chocolate Peanut Butter Bars with these eight expert tips. Small adjustments can make a big difference in texture, flavor, and presentation.
- Embrace the Salt: The balance of salty and sweet is what makes this recipe so addictive. After spreading the chocolate topping but before it sets, sprinkle a tiny amount of flaky sea salt (like Maldon) over the top. It not only looks beautiful but also enhances the chocolate and peanut butter flavors dramatically.
- Perfect Pan Prep is Key: Don’t skip the parchment paper step with the overhang. It is the single best trick for avoiding frustration. It guarantees that you can lift the bars out in one piece, preventing you from having to dig out the first piece and ensuring every single bar is perfectly square and presentable.
- Experiment with the Crust: While classic graham crackers are delicious, you can easily customize the base. Try using crushed Oreo cookies (no need to remove the filling), Biscoff cookies for a spiced flavor, or even crushed pretzels for an extra salty, crunchy kick. Adjust the amount of melted butter as needed depending on the dryness of your chosen base.
- Control the Thickness: The thickness of your bars is entirely up to you. For thicker, fudgier bars, use a smaller 8×8 or 9×9 inch pan. You will need to press the base down firmly and may need to chill it slightly longer. For a thinner, more snackable bar, the 9×13 inch pan is perfect.
- The Secret to Clean Cuts: The hot knife trick mentioned in the instructions is non-negotiable for a professional look. A cold, hard chocolate top will crack under pressure. A hot, dry knife melts its way through for a flawless slice every single time. Reheat and wipe the knife between cuts for the best results.
- Add Some Texture: If you enjoy a bit of crunch, consider adding 1 cup of Rice Krispies cereal to the peanut butter base mixture. It adds a delightful crispiness and lightens the texture of the dense base without altering the flavor profile significantly.
- Choose Your Chocolate Wisely: Semi-sweet chocolate provides the best balance. Milk chocolate will result in a much sweeter bar, while dark chocolate (60-70% cacao) will create a more intense, less sweet, and more sophisticated flavor. Feel free to use your favorite!
- Proper Storage is a Must: These bars must be stored in the refrigerator. Keep them in an airtight container, separated by layers of wax paper to prevent sticking. They will stay fresh and delicious for up to a week. They can also be frozen for longer-term storage (more on that in the FAQ).
FAQ
Here are answers to some of the most frequently asked questions about making No-Bake Chocolate Peanut Butter Bars.
1. Can I use natural peanut butter in this recipe?
While you can, it’s not highly recommended for best results. Natural peanut butter, where the oil separates, can cause the base to be greasy or too soft, failing to set up as firmly. Commercial, stabilized creamy peanut butter (like Jif, Skippy, or a store brand equivalent) contains emulsifiers that ensure the perfect dense, fudgy texture.
2. How can I make these bars gluten-free?
Absolutely! This recipe is very easy to adapt for a gluten-free diet. Simply substitute the regular graham crackers with your favorite brand of gluten-free graham crackers. All other ingredients in the recipe are typically gluten-free, but always double-check the labels on your chocolate chips and powdered sugar to be certain.
3. Why did my chocolate topping crack when I cut it?
This usually happens for two reasons. First, the chocolate was too cold and brittle. Second, the knife was not hot enough. To prevent this, let the bars sit at room temperature for about 10-15 minutes before cutting. More importantly, use the hot knife method: run a large, sharp knife under hot water, wipe it completely dry, and then make your cut. The warmth allows the knife to melt through the chocolate instead of breaking it.
4. How long will these bars last?
Stored properly in an airtight container in the refrigerator, these bars will stay fresh and delicious for up to one week. The texture will remain fudgy and the flavor will be just as good on day seven as it was on day one.
5. Can I freeze No-Bake Chocolate Peanut Butter Bars?
Yes, they freeze beautifully! First, chill the bars completely and cut them into squares. Place the squares on a baking sheet lined with wax paper and freeze them for one hour until solid. Then, transfer the frozen bars to a freezer-safe zip-top bag or airtight container, placing layers of wax paper between them. They can be frozen for up to 3 months. To serve, simply thaw them in the refrigerator for a few hours.
6. My peanut butter base seems too crumbly or too soft. What did I do wrong?
If the base is too crumbly, you may have packed your graham cracker crumbs or powdered sugar too tightly, resulting in a higher ratio of dry to wet ingredients. If it’s too soft or greasy, it’s likely because natural peanut butter was used, or you may have added a bit too much butter. The consistency you’re looking for before pressing it into the pan is a thick, cohesive dough, similar to wet sand.
7. Can I use a different kind of pan?
Yes, you can use a different sized pan, but it will affect the thickness of your bars. A 9×13 inch pan gives you classic, medium-thickness bars. An 8×8 or 9×9 inch pan will yield much thicker, more decadent bars. You can even use a round cake pan or a springform pan. Just remember to line it with parchment paper for easy removal.
8. Is it necessary to use powdered sugar? Can I use granulated sugar instead?
It is essential to use powdered sugar (also known as confectioner’s sugar or icing sugar). Granulated sugar will not dissolve into the peanut butter base, resulting in a gritty, unpleasant texture. Powdered sugar dissolves completely, which is what creates the smooth, melt-in-your-mouth, fudgy quality that makes these bars so irresistible. Sifting the powdered sugar before mixing can also help ensure an ultra-smooth final product.
No-Bake Chocolate Peanut Butter Bars
Ingredients
Here is the simple list of ingredients you’ll need to create these incredibly decadent and easy dessert bars. The magic of this recipe lies in using common pantry staples to create something truly special.
- 1 cup (2 sticks or 226g) Unsalted Butter, melted: This is the foundation of the peanut butter layer, providing richness and helping the bars set firmly. Using unsalted butter allows you to control the final saltiness of the dish.
- 2 cups (240g) Graham Cracker Crumbs: This provides the structure and a subtle, honey-kissed flavor to the base. You can buy pre-crushed crumbs or make your own by pulsing about 15-16 full graham cracker sheets in a food processor.
- 2 cups (240g) Powdered Sugar (Confectioner’s Sugar): This ingredient dissolves completely, giving the peanut butter layer a smooth, fudgy, and melt-in-your-mouth texture without any grittiness.
- 1 cup (256g) Creamy Peanut Butter: The star of the show! A standard commercial creamy peanut butter (like Jif or Skippy) works best, as its stabilizers help the bars set properly.
- 1 ½ cups (255g) Semi-Sweet Chocolate Chips: These create the perfect chocolate topping, offering a rich chocolate flavor that beautifully balances the sweetness of the peanut butter base.
- 1 tablespoon (16g) Creamy Peanut Butter: A small amount is mixed into the melted chocolate. This is a secret trick that not only enhances the peanut butter flavor but also makes the chocolate layer slightly softer and much easier to cut without cracking.
Instructions
Follow these step-by-step instructions carefully to ensure your no-bake bars come out perfectly every time. The process is straightforward and requires no baking, just a bit of mixing and chilling.
Step 1: Prepare the Pan
Before you begin mixing, prepare your baking dish. Take a 9×13 inch baking pan and line it with parchment paper. The best way to do this is to leave a few inches of “overhang” on the two long sides. These parchment paper handles will make it incredibly easy to lift the entire chilled block of bars out of the pan for clean, perfect cutting. If you don’t have parchment paper, you can grease the pan thoroughly with butter or non-stick spray, but the lifting method is highly recommended for best results.
Step 2: Create the Peanut Butter Base Mixture
In a large mixing bowl, you’ll create the heart of this dessert. Pour in the 2 cups of graham cracker crumbs and the 2 cups of powdered sugar. Give them a quick whisk to combine and break up any lumps in the sugar. Now, pour in the 1 cup of melted unsalted butter and add the 1 cup of creamy peanut butter. Using a sturdy spatula or a wooden spoon, begin to mix everything together. At first, it might seem dry, but keep stirring. The butter and peanut butter will work their way into the dry ingredients, eventually forming a thick, slightly crumbly, but cohesive dough. Ensure there are no dry pockets of powdered sugar or graham cracker crumbs remaining.
Step 3: Press the Base into the Pan
Transfer the entire peanut butter mixture from the mixing bowl into your prepared 9×13 inch pan. Dump it into the center and then begin to press it outwards towards the edges. The goal is to create an even, flat, and densely packed layer. You can use the back of your spatula for this, but the best tool is the bottom of a flat-bottomed measuring cup or drinking glass. Press down firmly across the entire surface. This compaction is crucial; it ensures your base is solid and won’t crumble apart when you serve the bars. Make sure to get into the corners and create a level surface for the chocolate topping.
Step 4: Prepare the Chocolate Topping
Now it’s time for the glorious chocolate layer. In a medium-sized, microwave-safe bowl, combine the 1 ½ cups of semi-sweet chocolate chips and the final 1 tablespoon of creamy peanut butter. Place the bowl in the microwave and heat it on high in 30-second intervals. It is vital to stir well after each interval. Chocolate can hold its shape even when melted, so stirring is key to prevent it from scorching. Continue this process until the chocolate is about 90% melted, with just a few small lumps remaining. Remove it from the microwave and just keep stirring; the residual heat from the bowl and the melted chocolate will melt the remaining bits, leaving you with a perfectly smooth, glossy chocolate sauce. This gentle melting method prevents the chocolate from seizing or becoming grainy.
Step 5: Assemble and Spread the Topping
Immediately pour the warm, melted chocolate mixture over the prepared peanut butter base in the pan. Start by pouring it in the center and then, using an offset spatula or the back of a spoon, gently spread it into an even layer, all the way to the edges. The tablespoon of peanut butter you added will make the chocolate more pliable and easier to spread. Work relatively quickly before the chocolate begins to set. Tilt the pan slightly to help it level out into a beautiful, uniform topping.
Step 6: Chill for Firmness
This is the final and most important step: patience. Place the pan, uncovered, into the refrigerator. Let the bars chill for at least 2 hours. This time allows both the peanut butter base and the chocolate topping to firm up completely. If you’re in a hurry, you can place them in the freezer for about 45-60 minutes, but the refrigerator often yields a slightly better texture. The bars are ready when the chocolate is hard to the touch and the base is very firm.
Step 7: Cut and Serve
Once the bars are fully chilled, use the parchment paper handles to lift the entire block out of the pan and onto a cutting board. For the cleanest cuts, use a large, sharp knife. Run the knife under hot water for a few seconds, wipe it dry, and then make a cut. The heat from the knife will slice through the chocolate layer without cracking it. Repeat this process, wiping the knife clean between each cut, to create perfectly neat squares. You can cut them into any size you desire, from small, bite-sized treats to large, generous dessert portions.
Nutrition
- Serving Size: one normal portion
- Calories: 280