")

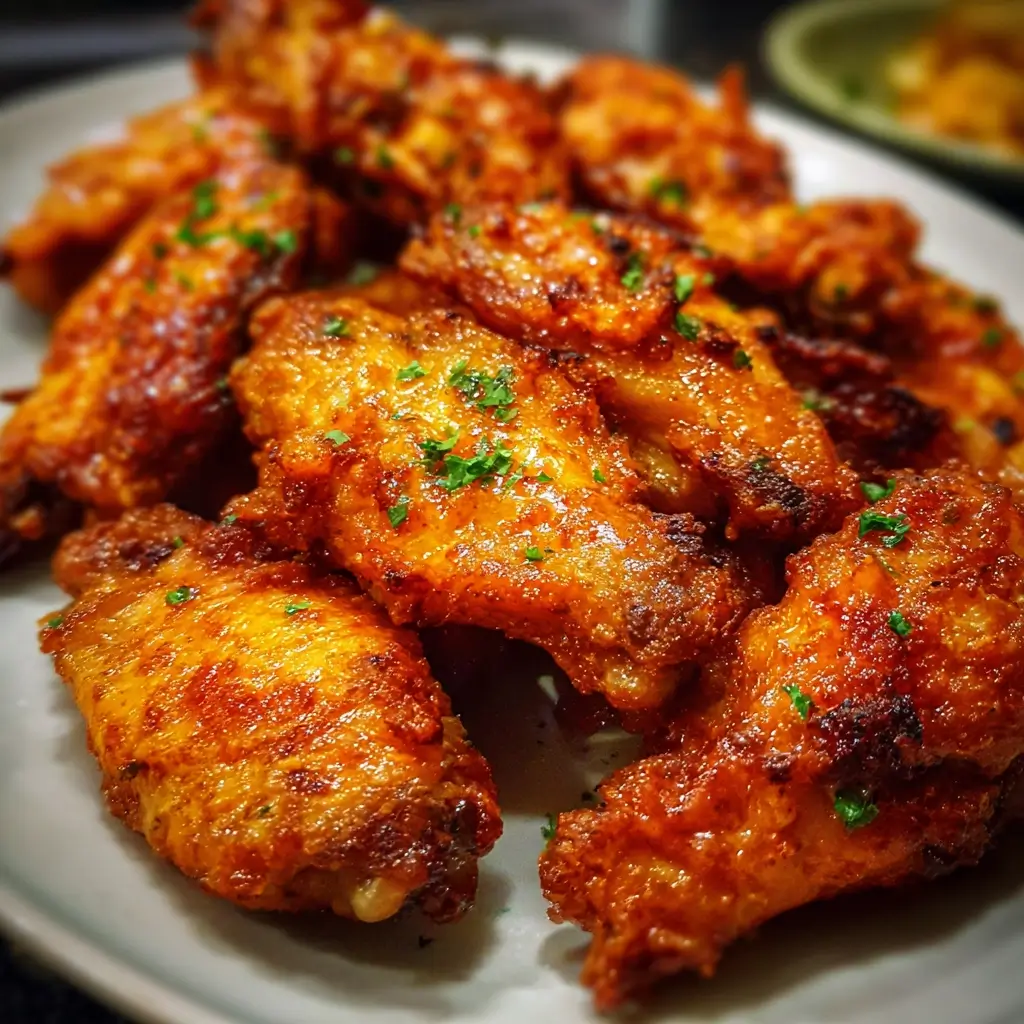

Of all the recipes in my culinary arsenal, the one that elicits the most oohs and aahs, the one that disappears from the platter in record time, is this one for oven-baked crispy chicken wings. For years, I chased the elusive dream of achieving that perfect, shatteringly crisp chicken skin without resorting to a deep fryer. My early attempts were often a disappointment—soggy, limp, and frankly, a bit sad. I tried high heat, low heat, marinating, and every trick I could find, but nothing replicated that restaurant-quality crunch. Then, I discovered the secret, a simple, almost magical ingredient that transforms everything: baking powder. The first time I tried this method, I was skeptical. But when I pulled that tray from the oven and heard the audible crackle as I moved the wings, I knew I had found the holy grail. My family, now seasoned veterans of my wing experiments, were floored. They’re now the non-negotiable star of our game day spreads, movie nights, and casual get-togethers, proving that you don’t need a vat of hot oil to create the most incredible, crowd-pleasing chicken wings imaginable.
Ingredients for the Ultimate Oven-Baked Crispy Chicken Wings
To embark on your journey to wing perfection, you’ll need a handful of simple, yet crucial, ingredients. Each component plays a vital role in building the layers of flavor and, most importantly, achieving that signature crispy texture.
- 4 lbs Chicken Wings: Also known as “party wings,” these should be split into drumettes and flats, with the tips discarded or saved for stock. This amount is perfect for a crowd or a hungry family.
- 1 tbsp Aluminum-Free Baking Powder: This is the non-negotiable secret weapon. It raises the pH of the chicken skin, helping to break down proteins and draw out moisture, which results in an incredibly crisp, bubbly, and golden-brown surface. Ensure it is aluminum-free to avoid any potential metallic aftertaste.
- 2 tsp Kosher Salt: The primary flavor enhancer. Kosher salt’s larger crystals provide a more even seasoning compared to fine table salt.
- 1 tsp Black Pepper: Freshly ground is always best for a pungent, spicy kick that complements the richness of the chicken.
- 1 tsp Smoked Paprika: This adds a beautiful, rich color and a subtle, smoky depth of flavor that mimics the taste of grilled or smoked wings.
- 1 tsp Garlic Powder: Provides a savory, aromatic foundation that is essential for a classic wing flavor profile.
- ½ tsp Onion Powder: Works in harmony with the garlic powder to add a deeper, more complex savory note to the seasoning blend.
Step-by-Step Instructions for Flawless Crispy Wings
Follow these instructions meticulously, as each step is designed to build towards the final, perfectly crispy result. The technique is just as important as the ingredients.
- Prepare Your Workstation: Preheat your oven to a low 250°F (120°C). Position an oven rack in the middle of the oven. Line a large, rimmed baking sheet with aluminum foil for easy cleanup. Place a wire oven-safe rack on top of the foil-lined baking sheet. This setup is critical; the wire rack allows hot air to circulate completely around each wing, cooking them evenly and preventing the bottoms from becoming soggy by letting the rendered fat drip away.
- The Crucial Drying Step: The number one enemy of crispy skin is moisture. Place the chicken wings on a tray lined with paper towels. Using more paper towels, pat each wing thoroughly dry. You want the skin to feel dry to the touch. The drier the skin, the crispier the final product will be. Do not skip this step!
- Create the Magic Dust: In a small bowl, combine the aluminum-free baking powder, kosher salt, black pepper, smoked paprika, garlic powder, and onion powder. Whisk them together until they are thoroughly mixed and there are no lumps from the baking powder. This ensures every wing gets an even distribution of seasoning and crisping agent.
- Coat the Wings Evenly: Place the completely dry chicken wings into a large bowl. Sprinkle the seasoning mixture over the wings, a little at a time, while tossing them with your hands or a pair of tongs. Continue to toss until every wing is lightly and evenly coated in the dry rub. You’re looking for a thin, dusty coating, not a thick, pasty one.
- Arrange for Success: Carefully place the seasoned wings onto the prepared wire rack in a single layer. Make sure there is space between each wing. Overcrowding the rack will cause the wings to steam rather than roast, which will prevent them from getting crispy. Use two baking sheets if necessary to give them adequate space.
- The Two-Temperature Bake: This two-stage cooking process is another key to success.
- First Bake (Low and Slow): Place the baking sheet into the preheated 250°F (120°C) oven. Bake for 30 minutes. This initial low-temperature bake gently renders out the fat from under the skin, which is essential for a truly crisp texture.
- Second Bake (High and Fast): After 30 minutes, without opening the oven door, increase the oven temperature to 425°F (220°C). Continue to bake for another 40-50 minutes, flipping the wings halfway through this second stage. The high heat will now aggressively crisp up the now-dehydrated skin. The wings are done when they are a deep golden brown, the skin is visibly crisp and bubbly, and they are cooked through.
- Rest Before Serving: Remove the wings from the oven and let them rest on the wire rack for 5-10 minutes. This allows the juices inside the meat to redistribute, ensuring a tender, juicy wing, and lets the skin set to its maximum crispiness. Serve them immediately as is, or toss them in your favorite sauce.
Nutrition Facts: A Healthier Take on a Classic
This oven-baked method offers a significantly healthier alternative to deep-frying without sacrificing flavor or texture. The nutritional information is an estimate and can vary based on the size of the wings.
- Servings: 6
- Calories Per Serving: Approximately 450 kcal
- Protein: A great source of protein, essential for muscle repair and growth, with roughly 35g per serving. Baking instead of frying preserves more of the chicken’s natural goodness.
- Fat: Contains about 32g of fat per serving. While not a low-fat food, baking on a wire rack allows a significant amount of excess fat to render and drip away, making it a lighter option than its fried counterpart.
- Sodium: The recipe contains a moderate amount of sodium for flavor, around 800mg per serving. This can be easily adjusted by reducing the amount of salt in the dry rub to meet your dietary needs.
Effortless Preparation Time
While the total time may seem long, the majority of it is hands-off, letting the oven do all the hard work.
- Preparation Time: 15 minutes. This includes drying the wings and mixing and applying the seasoning.
- Cook Time: 1 hour and 10-20 minutes. This is the total time the wings spend in the oven.
- Total Time: Approximately 1 hour and 35 minutes. Perfect for preparing while you relax or entertain guests.
How to Serve Your Crispy Baked Chicken Wings
The beauty of chicken wings lies in their versatility. They can be a casual snack, a party appetizer, or the star of a main meal. Here’s how to serve them for maximum enjoyment:
- The Classic Appetizer Platter:
- Arrange the hot, crispy wings on a large platter.
- Serve with classic celery and carrot sticks on the side for a cool, crunchy contrast.
- Provide small bowls of dipping sauces so guests can customize their experience. This method is ideal for preserving the crispiness of the wings.
- As a Satisfying Main Course:
- Serve a generous portion of wings alongside hearty side dishes.
- Excellent pairings include creamy coleslaw, seasoned french fries, a loaded baked potato, or a simple green salad with a vinaigrette dressing.
- Sauce Strategies: To Toss or To Dip?
- Dipping (Recommended for Maximum Crispiness): Serve the wings plain and hot from the oven with a variety of sauces on the side. This allows the incredible crispy texture you worked so hard for to remain intact until the very last bite.
- Tossing: If you prefer your wings fully coated, place the hot, rested wings in a large bowl. Pour your favorite sauce over them (like Buffalo or BBQ) and toss gently until they are evenly coated. Serve immediately, as the sauce will begin to soften the skin over time.
- Essential Dipping Sauces:
- Classic Blue Cheese Dressing
- Creamy Ranch Dressing
- Smoky Barbecue Sauce
- Spicy Buffalo Sauce
- Sweet and Tangy Honey Mustard
- Finishing Touches and Garnishes:
- A sprinkle of freshly chopped parsley or chives adds a touch of freshness and color.
- Toasted sesame seeds can add a nutty flavor and visual appeal, especially with Asian-inspired sauces.
Additional Tips for Wing Perfection
These extra pointers will help you troubleshoot common issues and elevate your wing game from great to legendary.
- Don’t Crowd the Pan: This is worth repeating. Giving each wing its own personal space on the wire rack is paramount. If they are too close together or touching, they will trap steam, which is the mortal enemy of crispiness. Use two baking sheets if your wings don’t fit in a single layer.
- Embrace the Dryness: You might think you’ve patted the wings dry enough, but go a step further. After patting them dry with paper towels, you can even let them sit, uncovered, on the wire rack in the refrigerator for an hour or two. This air-chilling process further dries out the skin, guaranteeing an even crispier result.
- Insist on Aluminum-Free Baking Powder: Regular baking powder can sometimes contain aluminum-based compounds that, when concentrated in a dry rub and cooked at high heat, can impart a faint but noticeable metallic or chemical taste to the food. Using a brand clearly labeled “aluminum-free” eliminates this risk entirely.
- Know Your Oven: Not all ovens are created equal. Some run hotter or cooler than what the dial says. An inexpensive oven thermometer can be a game-changer for all your baking and roasting. If you know your oven runs hot, you might want to slightly reduce the final cooking time to avoid burning.
- The Flip is Not Optional: Flipping the wings halfway through the high-heat portion of the bake is essential for achieving 360-degree crispiness. It ensures that the side that was facing down gets its chance to be directly exposed to the intense, circulating heat, crisping it up just as much as the top.
- Perfect Make-Ahead Strategy for Parties: You can perform the initial 30-minute bake at 250°F ahead of time. Once done, let the wings cool and then store them, covered, in the refrigerator. When your guests are arriving, pop them into a preheated 425°F oven for 20-25 minutes, or until heated through and super crispy. This frees you up to enjoy the party.
- Easy Air Fryer Conversion: If you have an air fryer, this recipe works beautifully. Prepare the wings exactly as described. Preheat your air fryer to 380°F (193°C). Place the wings in the air fryer basket in a single layer (work in batches if needed). Cook for about 25 minutes, flipping them halfway through, or until they are golden-brown and crispy.
- Experiment with Seasoning Blends: This base recipe is a perfect canvas for your creativity. Feel free to swap out the seasonings. Try a lemon pepper blend, a fiery Cajun or Creole seasoning, Old Bay for a taste of the coast, or a mix of chili powder and cumin for a Tex-Mex flavor profile.
Frequently Asked Questions (FAQ)
Here are answers to some of the most common questions about making perfect oven-baked wings.
1. Why does baking powder make chicken wings crispy?
Baking powder is a mixture of an alkali (like baking soda), an acid, and a starch. The alkali is the key component here. It raises the pH level of the chicken’s skin. This chemical reaction helps to break down the peptide bonds in the skin and also encourages the browning (Maillard) reaction to happen more quickly. Furthermore, the carbon dioxide released from the baking powder creates millions of microscopic bubbles on the surface, increasing the surface area and creating an ultra-crispy, bubbly texture once the fat has rendered out.
2. Can I use baking soda instead of baking powder?
No, you should not substitute baking soda for baking powder in this recipe. Baking soda is pure sodium bicarbonate, a very strong alkali. Without the acid to balance it, it will leave a very distinct and unpleasant soapy or chemical taste on your wings. Baking powder is formulated with a built-in acid to neutralize this, making it perfect for this application.
3. My wings didn’t get crispy. What did I do wrong?
There are a few common culprits. First, the wings were likely not dry enough before seasoning. Any residual moisture will create steam and prevent crisping. Second, you may have overcrowded the pan, which also leads to steaming. Third, you might have skipped the wire rack, causing the bottoms to sit in their own rendered fat and become soggy. Finally, ensure your oven temperature is accurate and that you followed the two-temperature baking method.
4. Can I make this recipe with frozen chicken wings?
You should never cook chicken wings directly from frozen for this recipe. They will release too much water during the cooking process, making it impossible for the skin to dry out and crisp up. You must thaw the wings completely first. The best way is to let them thaw overnight in the refrigerator. Once thawed, proceed with the recipe, making sure to pat them exceptionally dry.
5. How do I store and reheat leftover wings?
Store leftover wings in an airtight container in the refrigerator for up to 3-4 days. The skin will soften upon refrigeration. To bring back the crispiness, do not use a microwave, which will make them rubbery. The best way to reheat is in an oven or air fryer. Preheat to 375°F (190°C) and bake for 10-15 minutes, or until they are heated through and the skin has re-crisped.
6. Are these oven-baked wings gluten-free?
Yes, this recipe is naturally gluten-free. Chicken, spices, and salt are all gluten-free. The key is to ensure your baking powder is certified gluten-free, as some brands can have trace amounts of gluten from cornstarch or other anti-caking agents that may be cross-contaminated. Always check the label if you have a severe gluten allergy or celiac disease.
7. Can I use a different cut of chicken, like drumsticks?
Absolutely! This method works wonderfully for other skin-on chicken pieces like drumsticks or thighs. You will need to adjust the cooking time. For larger pieces like drumsticks, you may need to extend the initial low-temperature bake to 40-45 minutes and the high-temperature bake to a full hour, ensuring the internal temperature reaches a safe 165°F (74°C).
8. How do I make a simple, classic Buffalo sauce to toss them in?
A classic Buffalo sauce is incredibly easy to make while your wings are in their final baking stage. In a small saucepan over low heat, melt ½ cup (1 stick) of unsalted butter. Once melted, remove it from the heat and whisk in ⅔ cup of your favorite cayenne pepper hot sauce (like Frank’s RedHot) and a tablespoon of white vinegar. Whisk until smooth and emulsified. You can add a pinch of garlic powder or Worcestershire sauce for extra depth. Toss the hot, crispy wings in this sauce right before serving.

Oven-Baked Crispy Chicken Wings
Ingredients
To embark on your journey to wing perfection, you’ll need a handful of simple, yet crucial, ingredients. Each component plays a vital role in building the layers of flavor and, most importantly, achieving that signature crispy texture.
- 4 lbs Chicken Wings: Also known as “party wings,” these should be split into drumettes and flats, with the tips discarded or saved for stock. This amount is perfect for a crowd or a hungry family.
- 1 tbsp Aluminum-Free Baking Powder: This is the non-negotiable secret weapon. It raises the pH of the chicken skin, helping to break down proteins and draw out moisture, which results in an incredibly crisp, bubbly, and golden-brown surface. Ensure it is aluminum-free to avoid any potential metallic aftertaste.
- 2 tsp Kosher Salt: The primary flavor enhancer. Kosher salt’s larger crystals provide a more even seasoning compared to fine table salt.
- 1 tsp Black Pepper: Freshly ground is always best for a pungent, spicy kick that complements the richness of the chicken.
- 1 tsp Smoked Paprika: This adds a beautiful, rich color and a subtle, smoky depth of flavor that mimics the taste of grilled or smoked wings.
- 1 tsp Garlic Powder: Provides a savory, aromatic foundation that is essential for a classic wing flavor profile.
- ½ tsp Onion Powder: Works in harmony with the garlic powder to add a deeper, more complex savory note to the seasoning blend.
Instructions
Follow these instructions meticulously, as each step is designed to build towards the final, perfectly crispy result. The technique is just as important as the ingredients.
- Prepare Your Workstation: Preheat your oven to a low 250°F (120°C). Position an oven rack in the middle of the oven. Line a large, rimmed baking sheet with aluminum foil for easy cleanup. Place a wire oven-safe rack on top of the foil-lined baking sheet. This setup is critical; the wire rack allows hot air to circulate completely around each wing, cooking them evenly and preventing the bottoms from becoming soggy by letting the rendered fat drip away.
- The Crucial Drying Step: The number one enemy of crispy skin is moisture. Place the chicken wings on a tray lined with paper towels. Using more paper towels, pat each wing thoroughly dry. You want the skin to feel dry to the touch. The drier the skin, the crispier the final product will be. Do not skip this step!
- Create the Magic Dust: In a small bowl, combine the aluminum-free baking powder, kosher salt, black pepper, smoked paprika, garlic powder, and onion powder. Whisk them together until they are thoroughly mixed and there are no lumps from the baking powder. This ensures every wing gets an even distribution of seasoning and crisping agent.
- Coat the Wings Evenly: Place the completely dry chicken wings into a large bowl. Sprinkle the seasoning mixture over the wings, a little at a time, while tossing them with your hands or a pair of tongs. Continue to toss until every wing is lightly and evenly coated in the dry rub. You’re looking for a thin, dusty coating, not a thick, pasty one.
- Arrange for Success: Carefully place the seasoned wings onto the prepared wire rack in a single layer. Make sure there is space between each wing. Overcrowding the rack will cause the wings to steam rather than roast, which will prevent them from getting crispy. Use two baking sheets if necessary to give them adequate space.
- The Two-Temperature Bake: This two-stage cooking process is another key to success.
- First Bake (Low and Slow): Place the baking sheet into the preheated 250°F (120°C) oven. Bake for 30 minutes. This initial low-temperature bake gently renders out the fat from under the skin, which is essential for a truly crisp texture.
- Second Bake (High and Fast): After 30 minutes, without opening the oven door, increase the oven temperature to 425°F (220°C). Continue to bake for another 40-50 minutes, flipping the wings halfway through this second stage. The high heat will now aggressively crisp up the now-dehydrated skin. The wings are done when they are a deep golden brown, the skin is visibly crisp and bubbly, and they are cooked through.
- Rest Before Serving: Remove the wings from the oven and let them rest on the wire rack for 5-10 minutes. This allows the juices inside the meat to redistribute, ensuring a tender, juicy wing, and lets the skin set to its maximum crispiness. Serve them immediately as is, or toss them in your favorite sauce.
Nutrition
- Serving Size: one normal portion
- Calories: 450
- Fat: 32g
- Protein: 35g


