")


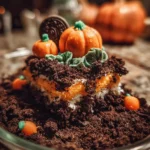
Of all the traditions our family cherishes when the leaves start to turn and a crisp chill fills the air, our annual Halloween party is by far the most anticipated. Every year, I try to outdo myself with a spooky, festive, and delicious centerpiece for the dessert table. A few years ago, I stumbled upon the idea of a dirt cake, but wanted to give it a seasonal, autumnal twist. That’s how this Pumpkin Patch Dirt Cake was born. The first time I brought it out, the kids’ eyes went wide with excitement. They couldn’t believe they were allowed to eat “dirt” and “worms,” and the sight of the cheerful little candy pumpkins nestled in the chocolatey soil was just magical. It’s not just for kids, though. The adults were just as captivated, sneaking spoonfuls and commenting on the surprisingly decadent and creamy layers hidden beneath the fun exterior. It’s a delightful combination of rich chocolate, tangy cream cheese, and light, airy pumpkin spice pudding. This no-bake dessert has since become a non-negotiable star of our fall celebrations, not just for its whimsical appearance, but because it’s genuinely one of the most delicious and crowd-pleasing treats I’ve ever made. It’s the perfect embodiment of fall fun: a little bit spooky, a whole lot sweet, and guaranteed to create wonderful memories.
Ingredients
- 1 (15.25 ounce) package Chocolate Sandwich Cookies (like Oreos): This forms the “dirt” for our pumpkin patch. You’ll be using the entire cookie, cream filling and all, to create a rich, crumbly, and authentic-looking soil.
- 8 ounces Cream Cheese, softened to room temperature: This is the foundation of our tangy, creamy cheesecake layer. Using full-fat, block-style cream cheese that has been thoroughly softened is crucial for a smooth, lump-free texture.
- ½ cup (1 stick) Unsalted Butter, softened to room temperature: Butter adds richness and a silky mouthfeel to the cream cheese layer, helping it set up properly.
- 1 cup Powdered Sugar: This sweetens the cream cheese layer and helps dissolve completely, ensuring a velvety texture without any grittiness.
- 2 (3.4 ounce) packages Instant Vanilla Pudding Mix: Do not use the “cook and serve” variety. Instant pudding is essential for the recipe to set up correctly without any cooking. This will be transformed into our pumpkin layer.
- 3 cups Cold Milk: Whole milk is recommended for the richest, creamiest pudding, but 2% will also work. The milk must be cold to help the instant pudding set up quickly and properly.
- 1 cup Pumpkin Purée: Use 100% pure pumpkin purée, not pumpkin pie filling, which is already sweetened and spiced. This gives our dessert its authentic, earthy pumpkin flavor.
- 1 teaspoon Pumpkin Pie Spice: This classic blend of cinnamon, nutmeg, ginger, and cloves infuses the pudding layer with the quintessential warm and cozy flavors of fall.
- 1 (12 ounce) container Frozen Whipped Topping (like Cool Whip), thawed: This lightens the dessert, giving the cream cheese and pumpkin layers a fluffy, mousse-like consistency. Be sure it is fully thawed in the refrigerator before using.
- Mellowcreme Pumpkins or other candy pumpkins: These are the star of our patch! These classic, soft, and chewy candies look just like miniature pumpkins and are essential for the final look.
- Gummy Worms (optional): For an extra touch of fun and “spookiness,” a few gummy worms peeking out of the dirt can add to the theme and delight the kids.
Instructions
- Prepare the “Dirt”: Place the entire package of chocolate sandwich cookies into the bowl of a food processor. Pulse in short bursts until they are broken down into fine crumbs that resemble potting soil. If you don’t have a food processor, you can place the cookies in a large, sealable plastic bag, remove as much air as possible, and crush them with a rolling pin or the bottom of a heavy pan. Set aside approximately 1 cup of the cookie crumbs for the topping later. Press the remaining crumbs firmly and evenly into the bottom of a 9×13-inch glass baking dish or a large trifle bowl. This will be the base layer of your cake.
- Create the Cream Cheese Layer: In a large mixing bowl, combine the thoroughly softened cream cheese and the softened unsalted butter. Using an electric hand mixer or a stand mixer with the paddle attachment, beat on medium speed for 2-3 minutes until the mixture is completely smooth, light, and fluffy. There should be no lumps. Scrape down the sides and bottom of the bowl with a rubber spatula. Add the powdered sugar and beat on low speed until just combined, then increase to medium speed and beat for another minute until it’s fully incorporated and silky smooth.
- Incorporate the Whipped Topping: Gently fold half (approximately 6 ounces) of the thawed whipped topping into the cream cheese mixture using a rubber spatula. Be careful not to overmix; fold just until no white streaks remain. This keeps the layer light and airy. Spread this cream cheese mixture carefully and evenly over the cookie crumb crust in the baking dish.
- Mix the Pumpkin Pudding Layer: In a separate large bowl, whisk together the two packages of instant vanilla pudding mix, the cold milk, the pumpkin purée, and the pumpkin pie spice. Whisk vigorously for about 2 minutes, until the mixture begins to thicken and is smooth. The pudding will become quite thick, which is exactly what you want.
- Finish the Pumpkin Layer: Gently fold the remaining half of the thawed whipped topping into the pumpkin pudding mixture. As before, fold carefully with a spatula until everything is uniformly combined and the color is a consistent, pale orange. This creates a light and fluffy pumpkin mousse.
- Assemble the Cake: Carefully spoon the pumpkin mousse layer over the cream cheese layer in the baking dish. Use an offset spatula or the back of a spoon to spread it out into a smooth, even layer, covering the cream cheese layer completely.
- Add the Top “Dirt” Layer: Take the 1 cup of reserved cookie crumbs and sprinkle them evenly over the top of the pumpkin layer. Make sure to cover the entire surface so that the dessert looks like a pan full of dark, rich soil.
- Chill for Firmness: Cover the dish with plastic wrap or a lid and refrigerate for at least 4 hours. Chilling is a critical step; it allows all the layers to set and firm up, and for the flavors to meld together beautifully. For the best results and a clean slice, chilling overnight is highly recommended.
- Decorate the Pumpkin Patch: Just before serving, it’s time to bring your pumpkin patch to life! Strategically place the Mellowcreme candy pumpkins all over the top of the “dirt.” You can arrange them in neat rows, cluster them in patches, or scatter them randomly. If using, poke a few gummy worms into the “dirt,” having them peek out halfway for a fun, surprising element.
Nutrition Facts
- Servings: 16 servings
- Calories per serving: Approximately 450 kcal
- Fat: This dessert is rich and decadent, with a significant portion of its calories coming from the butter, cream cheese, and whipped topping, providing a satisfying mouthfeel.
- Carbohydrates: The primary source of energy in this dish, coming from the sugars in the cookies, powdered sugar, and pudding mix.
- Sugar: A sweet treat perfect for a celebration, with sweetness derived from multiple components. Consider this a special occasion dessert.
- Protein: A modest amount of protein is present from the milk and cream cheese in the recipe.
- Sodium: Contains a moderate amount of sodium, primarily from the processed ingredients like the cookies and instant pudding mix.
Preparation time
The total preparation time for this Pumpkin Patch Dirt Cake is approximately 4 hours and 25 minutes. This breaks down into about 25 minutes of active preparation time—crushing cookies, mixing layers, and assembling—and a crucial minimum of 4 hours of passive chilling time in the refrigerator. The chilling period is essential for the dessert to set properly for easy slicing and serving.
How to Serve
Serving this Pumpkin Patch Dirt Cake is all about presentation and occasion. Here are a few creative and practical ways to serve this festive treat:
- Family-Style in a Glass Dish:
- Present the entire 9×13-inch glass baking dish directly on the dessert table. The clear glass allows guests to see the distinct, beautiful layers.
- Decorate the top as a single, large pumpkin patch. You can even use a piping bag with green frosting to draw little vines connecting the pumpkins for an extra “wow” factor.
- Serve with a large spoon or spatula for guests to scoop their own portions.
- Elegant Trifle Bowl Presentation:
- Assembling the cake in a large, clear trifle bowl creates a stunning vertical centerpiece.
- To do this, simply alternate the layers: a layer of cookie crumbs, the cream cheese layer, another layer of crumbs, the pumpkin layer, and a final topping of crumbs.
- This method beautifully showcases each component and turns the dessert into an elegant showstopper perfect for a more formal fall gathering.
- Individual Servings (Pumpkin Patch Dirt Cups):
- This is a fantastic option for kids’ parties, classroom treats, or for easier portion control and serving.
- Layer the components in small, clear plastic cups, mason jars, or glass dessert bowls.
- Top each individual cup with a sprinkle of “dirt” and place one or two candy pumpkins and a gummy worm on top.
- You can even write names on the cups or add a small “tombstone” cookie for a graveyard theme.
- Party Serving Suggestions:
- Place the dirt cake at the center of your Halloween or fall-themed dessert buffet.
- Serve alongside complementary fall beverages like warm apple cider, a pumpkin spice latte bar, or a simple pot of coffee.
- For a kids’ party, serve with a glass of cold milk.
Additional tips
- The Perfect “Dirt” Texture: When processing your chocolate sandwich cookies, be careful not to turn them into a fine powder. Pulse the food processor so you are left with some slightly larger crumbs mixed in with the fine ones. This variation in texture makes the “dirt” look more realistic and adds a better mouthfeel.
- Room Temperature is Non-Negotiable: The single most important tip for a smooth, creamy, non-lumpy cheesecake layer is to ensure your cream cheese and butter are truly at room temperature. They should be soft to the touch. This allows them to blend together seamlessly into a velvety-smooth base. If they are too cold, you will be left with small, unappetizing lumps.
- Chilling is Crucial: Do not try to rush the chilling time. The 4-hour minimum (or preferably, overnight) chill in the refrigerator is what allows the layers to meld and, more importantly, to set and firm up. If you slice into it too early, you’ll have a soupy mess instead of distinct, beautiful layers.
- Get Creative with the Patch: Don’t feel limited to just candy pumpkins and gummy worms! You can make your patch even more elaborate. Use green-tinted coconut flakes for “grass,” or pipe thin green frosting vines between the pumpkins. You could add candy corn around the border or even chocolate “rocks” for more texture.
- Make-Ahead Masterpiece: This dessert is perfect for making ahead of time, which is a lifesaver when planning for a party. You can fully assemble the cake (without the candy toppings) up to 2 days in advance. Keep it tightly covered in the refrigerator. Add the candy pumpkins and gummy worms just before serving to prevent the colors from bleeding and the candies from becoming too soft.
- Individual Serving Adaptation: When making individual dirt cups, use a piping bag to add the cream cheese and pumpkin layers. This allows for a much cleaner and more professional look inside the small cups or jars, preventing smears along the sides and creating perfect, distinct layers.
- Flavor Variations: Feel free to experiment! If you’re not a fan of vanilla pudding, you can use instant cheesecake or even chocolate pudding for a super-rich, triple-chocolate version. You could also try different sandwich cookies, like Golden Oreos, for a “sand” cake, though you’d lose the classic “dirt” look. A dash of cinnamon in the cream cheese layer can also add a nice warmth.
- Achieving a Gluten-Free Version: To make this recipe gluten-free, simply substitute the regular chocolate sandwich cookies with a gluten-free variety. Many brands now offer excellent gluten-free chocolate sandwich cookies that will work perfectly for the crust and topping. Ensure all other packaged ingredients (pudding mix, spices) are certified gluten-free as well.
FAQ section
1. Can I make this Pumpkin Patch Dirt Cake ahead of time?
Absolutely! This is one of the best features of this recipe. You can assemble the entire cake, minus the final candy decorations, up to 48 hours (2 days) in advance. Cover it tightly with plastic wrap and store it in the refrigerator. Adding the candy pumpkins and gummy worms just before you plan to serve it will ensure they stay vibrant and have the best texture.
2. My cream cheese layer is lumpy. What did I do wrong?
This is a very common issue and it almost always comes down to the temperature of your ingredients. If your cream cheese and/or butter were too cold when you started mixing, they won’t be able to incorporate smoothly with the sugar. To prevent this, make sure to let your block of cream cheese and stick of butter sit out on the counter for at least an hour before you begin, so they are truly softened to room temperature.
3. Do I have to use Oreo cookies? Can I use another type of cookie?
While classic Oreos (or any chocolate sandwich cookie) provide the most authentic “dirt” look and flavor, you can certainly substitute them. For a different flavor profile, you could use crushed Nilla Wafers, shortbread cookies, or even crushed Biscoff cookies. For a gluten-free version, use gluten-free chocolate sandwich cookies. The appearance will change, but the dessert will still be delicious.
4. Can I freeze Pumpkin Patch Dirt Cake?
Freezing this dessert is generally not recommended. The cream cheese and pudding layers contain a lot of dairy and water, and their texture can change upon thawing, often becoming watery or grainy. The cookie crumbs will also become very soft and soggy. It’s best enjoyed fresh, made within a couple of days of serving.
5. What are Mellowcreme pumpkins and where can I find them?
Mellowcreme pumpkins are a classic seasonal candy, most popular around Halloween. They have a unique, soft, and slightly chewy texture and a sweet, vanilla-like flavor, similar to candy corn. You can typically find them in the seasonal aisle of most grocery stores, drugstores, and big-box stores like Target or Walmart starting in late September.
6. Can I use homemade pudding instead of instant pudding mix?
While homemade vanilla pudding is delicious, it’s not recommended for this specific recipe. The consistency and setting properties of instant pudding are key to achieving the correct texture for the pumpkin mousse layer. Homemade pudding may not set up as firmly when mixed with the pumpkin and whipped topping, potentially leading to a runny layer.
7. How can I make the pumpkin flavor stronger?
If you are a true pumpkin fanatic and want to amplify the pumpkin taste, you can increase the amount of pumpkin pie spice to 1 ½ teaspoons. You could also add an additional ¼ cup of pumpkin purée, but be aware that this may slightly soften the final texture of the pumpkin layer.
8. Is this dessert very heavy? It seems like a lot of rich ingredients.
While the ingredients are indeed rich, the inclusion of a large amount of whipped topping (Cool Whip) in both the cream cheese and pumpkin layers makes the final dessert surprisingly light and fluffy. It has a mousse-like consistency rather than that of a dense, heavy cheesecake. It’s decadent and satisfying, but not overwhelmingly heavy per serving.
Pumpkin Patch Dirt Cake
Ingredients
- 1 (15.25 ounce) package Chocolate Sandwich Cookies (like Oreos): This forms the “dirt” for our pumpkin patch. You’ll be using the entire cookie, cream filling and all, to create a rich, crumbly, and authentic-looking soil.
- 8 ounces Cream Cheese, softened to room temperature: This is the foundation of our tangy, creamy cheesecake layer. Using full-fat, block-style cream cheese that has been thoroughly softened is crucial for a smooth, lump-free texture.
- ½ cup (1 stick) Unsalted Butter, softened to room temperature: Butter adds richness and a silky mouthfeel to the cream cheese layer, helping it set up properly.
- 1 cup Powdered Sugar: This sweetens the cream cheese layer and helps dissolve completely, ensuring a velvety texture without any grittiness.
- 2 (3.4 ounce) packages Instant Vanilla Pudding Mix: Do not use the “cook and serve” variety. Instant pudding is essential for the recipe to set up correctly without any cooking. This will be transformed into our pumpkin layer.
- 3 cups Cold Milk: Whole milk is recommended for the richest, creamiest pudding, but 2% will also work. The milk must be cold to help the instant pudding set up quickly and properly.
- 1 cup Pumpkin Purée: Use 100% pure pumpkin purée, not pumpkin pie filling, which is already sweetened and spiced. This gives our dessert its authentic, earthy pumpkin flavor.
- 1 teaspoon Pumpkin Pie Spice: This classic blend of cinnamon, nutmeg, ginger, and cloves infuses the pudding layer with the quintessential warm and cozy flavors of fall.
- 1 (12 ounce) container Frozen Whipped Topping (like Cool Whip), thawed: This lightens the dessert, giving the cream cheese and pumpkin layers a fluffy, mousse-like consistency. Be sure it is fully thawed in the refrigerator before using.
- Mellowcreme Pumpkins or other candy pumpkins: These are the star of our patch! These classic, soft, and chewy candies look just like miniature pumpkins and are essential for the final look.
- Gummy Worms (optional): For an extra touch of fun and “spookiness,” a few gummy worms peeking out of the dirt can add to the theme and delight the kids.
Instructions
- Prepare the “Dirt”: Place the entire package of chocolate sandwich cookies into the bowl of a food processor. Pulse in short bursts until they are broken down into fine crumbs that resemble potting soil. If you don’t have a food processor, you can place the cookies in a large, sealable plastic bag, remove as much air as possible, and crush them with a rolling pin or the bottom of a heavy pan. Set aside approximately 1 cup of the cookie crumbs for the topping later. Press the remaining crumbs firmly and evenly into the bottom of a 9×13-inch glass baking dish or a large trifle bowl. This will be the base layer of your cake.
- Create the Cream Cheese Layer: In a large mixing bowl, combine the thoroughly softened cream cheese and the softened unsalted butter. Using an electric hand mixer or a stand mixer with the paddle attachment, beat on medium speed for 2-3 minutes until the mixture is completely smooth, light, and fluffy. There should be no lumps. Scrape down the sides and bottom of the bowl with a rubber spatula. Add the powdered sugar and beat on low speed until just combined, then increase to medium speed and beat for another minute until it’s fully incorporated and silky smooth.
- Incorporate the Whipped Topping: Gently fold half (approximately 6 ounces) of the thawed whipped topping into the cream cheese mixture using a rubber spatula. Be careful not to overmix; fold just until no white streaks remain. This keeps the layer light and airy. Spread this cream cheese mixture carefully and evenly over the cookie crumb crust in the baking dish.
- Mix the Pumpkin Pudding Layer: In a separate large bowl, whisk together the two packages of instant vanilla pudding mix, the cold milk, the pumpkin purée, and the pumpkin pie spice. Whisk vigorously for about 2 minutes, until the mixture begins to thicken and is smooth. The pudding will become quite thick, which is exactly what you want.
- Finish the Pumpkin Layer: Gently fold the remaining half of the thawed whipped topping into the pumpkin pudding mixture. As before, fold carefully with a spatula until everything is uniformly combined and the color is a consistent, pale orange. This creates a light and fluffy pumpkin mousse.
- Assemble the Cake: Carefully spoon the pumpkin mousse layer over the cream cheese layer in the baking dish. Use an offset spatula or the back of a spoon to spread it out into a smooth, even layer, covering the cream cheese layer completely.
- Add the Top “Dirt” Layer: Take the 1 cup of reserved cookie crumbs and sprinkle them evenly over the top of the pumpkin layer. Make sure to cover the entire surface so that the dessert looks like a pan full of dark, rich soil.
- Chill for Firmness: Cover the dish with plastic wrap or a lid and refrigerate for at least 4 hours. Chilling is a critical step; it allows all the layers to set and firm up, and for the flavors to meld together beautifully. For the best results and a clean slice, chilling overnight is highly recommended.
- Decorate the Pumpkin Patch: Just before serving, it’s time to bring your pumpkin patch to life! Strategically place the Mellowcreme candy pumpkins all over the top of the “dirt.” You can arrange them in neat rows, cluster them in patches, or scatter them randomly. If using, poke a few gummy worms into the “dirt,” having them peek out halfway for a fun, surprising element.
Nutrition
- Serving Size: one normal portion
- Calories: 450


