")

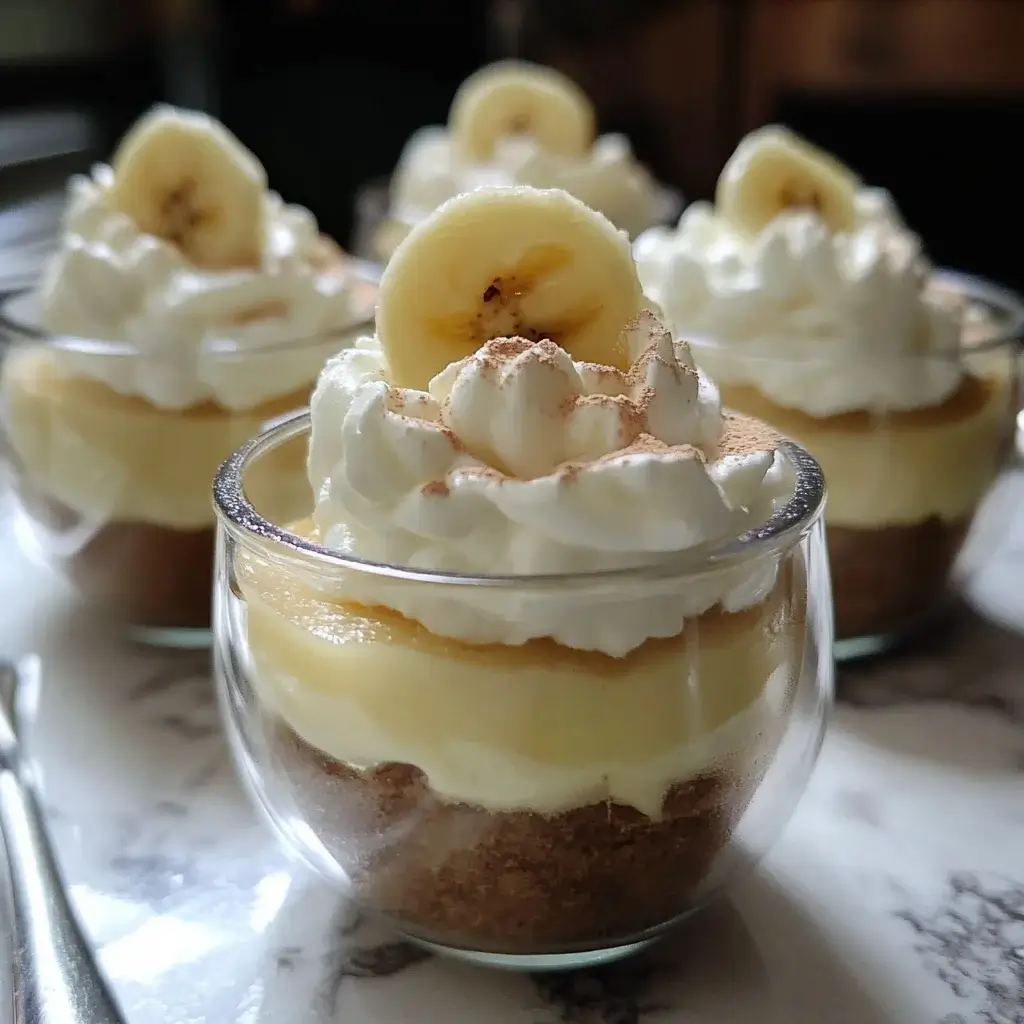

Oh, let me tell you, these Quick Banana Cream Cups have become an absolute lifesaver in my household! There are those evenings, you know the ones, where dinner is done, the kitchen is almost clean, and suddenly a collective craving for “something sweet” hits the family. My kids will start with the hopeful “Is there dessert?” glances, and my husband, a notorious sweet tooth, will echo their silent pleas. More often than not, I haven’t planned anything elaborate. That’s where this recipe swoops in like a culinary superhero. The first time I whipped these up, it was out of sheer desperation – I had ripe bananas, some vanilla wafers, and leftover whipped cream. What started as a hopeful experiment turned into an instant classic. The kids devoured them, their faces smeared with cream and happiness. My husband declared them “dangerously good” and immediately requested a repeat performance for the weekend. What I love most is the sheer simplicity combined with the utterly delightful taste. It’s creamy, it’s banana-y, it has that lovely crunch from the cookies, and it all comes together in minutes. It feels indulgent without any of the fuss of a baked pie, making it my go-to for a quick treat, an easy offering for potlucks, or even a light, satisfying dessert after a heavier meal. Honestly, these little cups of joy bring smiles all around, every single time.
Ingredients
- 2 cups (about 4-5 large) Ripe Bananas, mashed: Use well-ripened bananas with brown spots for maximum natural sweetness and a softer texture that mashes easily.
- 1 box (3.4 oz / 96g) Instant Vanilla Pudding Mix: The “instant” variety is key here for quick setting without cooking.
- 2 cups (480ml) Cold Milk: Whole milk is recommended for the richest flavor and creamiest texture, but 2% will also work.
- 1 teaspoon Vanilla Extract: A good quality pure vanilla extract enhances all the flavors.
- 8 oz (226g) Cream Cheese, softened: Allow it to come to room temperature for about 30-60 minutes for easy, lump-free blending.
- 1/2 cup (100g) Granulated Sugar (or to taste): Adjust based on the sweetness of your bananas and personal preference.
- 1 container (8 oz / 227g) Frozen Whipped Topping, thawed (like Cool Whip), or 2 cups homemade sweetened whipped cream: Thaw in the refrigerator for a few hours before use for best consistency.
- Approx. 30-40 Vanilla Wafers (like Nilla Wafers): These provide the classic crunchy base and layers.
- Optional Garnish: Extra banana slices, a sprinkle of cinnamon, chocolate shavings, or a drizzle of caramel sauce: For that extra touch of elegance and flavor.
Instructions
- Prepare the Pudding Base: In a medium-sized mixing bowl, whisk together the instant vanilla pudding mix and cold milk. Whisk vigorously for about 2 minutes, or until it begins to thicken. Set aside in the refrigerator to firm up further while you prepare the next components – about 5-10 minutes.
- Cream the Cheese and Sugar: In a separate large mixing bowl, using an electric hand mixer (or a stand mixer with the paddle attachment), beat the softened cream cheese until it’s smooth and creamy, with no lumps. This usually takes about 1-2 minutes on medium speed. Gradually add the granulated sugar and vanilla extract, continuing to beat until the mixture is light, fluffy, and well combined. Scrape down the sides of the bowl as needed to ensure everything is incorporated.
- Combine Pudding and Cream Cheese Mixture: Gently fold the thickened vanilla pudding (from step 1) into the cream cheese mixture. Use a spatula to mix until just combined and smooth. Be careful not to overmix, as this can cause the pudding to become too thin.
- Fold in Bananas and Whipped Topping: Gently fold the mashed ripe bananas into the pudding-cream cheese mixture. Then, carefully fold in the thawed whipped topping (or homemade whipped cream) until it’s evenly incorporated and the mixture is light and airy. Again, avoid overmixing.
- Assemble the Cups: You’ll need about 6-8 individual serving cups, small glasses, or ramekins.
- Place 1-2 whole vanilla wafers at the bottom of each cup. You can also crush some wafers for a different texture.
- Spoon a layer of the banana cream mixture over the wafers.
- Add a few thin slices of fresh banana (optional, but adds extra banana flavor and texture).
- Place another 1-2 vanilla wafers on top of the banana slices (or sprinkle crushed wafers).
- Spoon another layer of the banana cream mixture.
- Repeat layering if your cups are tall enough, ending with a layer of the banana cream mixture.
- Chill and Garnish: Cover the cups with plastic wrap and refrigerate for at least 30 minutes to an hour before serving. This allows the flavors to meld and the dessert to set properly. The wafers will also soften slightly, creating a wonderful cake-like texture.
- Serve: Just before serving, garnish as desired. A dollop of extra whipped topping, a fresh banana slice, a sprinkle of cinnamon, a few mini chocolate chips, or a drizzle of caramel sauce can make them look even more appealing.
Nutrition Facts
- Servings: 6-8 individual cups
- Calories per serving (approximate): 350-450 calories (This can vary greatly based on exact ingredients, portion size, and optional garnishes.)
- Description: A moderately indulgent dessert, perfect for satisfying a sweet craving.
- Fat (approximate): 18-25g
- Description: Primarily from cream cheese and whipped topping; contributes to the creamy texture and richness.
- Carbohydrates (approximate): 40-55g
- Description: Mainly from sugar, bananas, and vanilla wafers; provides energy and sweetness.
- Protein (approximate): 4-6g
- Description: Contributed by milk, cream cheese, and to a lesser extent, other ingredients.
- Sugar (approximate): 25-35g
- Description: Includes natural sugars from bananas and added sugars; responsible for the dessert’s sweetness.
(Note: These are estimates. For precise nutritional information, it’s best to use an online calculator with your specific brand ingredients and measurements.)
- Description: Includes natural sugars from bananas and added sugars; responsible for the dessert’s sweetness.
Preparation Time
- Active Preparation Time: Approximately 20-25 minutes. This includes mashing bananas, mixing ingredients, and assembling the cups.
- Chilling Time: Minimum 30 minutes to 1 hour (longer is even better, up to 4 hours).
- Total Time: Roughly 50 minutes to 1 hour 25 minutes (including minimum chilling).
- Description: This “Quick Banana Cream Cups” recipe lives up to its name by being exceptionally fast to put together. The majority of the time is hands-off chilling, making it perfect for a last-minute dessert or something you can prep with minimal effort before guests arrive or a craving strikes.
How to Serve
These Quick Banana Cream Cups are wonderfully versatile. Here are some delightful ways to serve them:
- Individual Portions for Easy Enjoyment:
- Serve in clear glass cups, small mason jars, or ramekins to showcase the beautiful layers.
- This makes serving a breeze, especially for parties or gatherings, as guests can just grab a cup.
- Garnish Creatively: Elevate the presentation with thoughtful garnishes.
- A dollop of fresh whipped cream or extra thawed whipped topping.
- A perfectly placed slice of fresh banana (toss in a little lemon juice to prevent browning if prepping ahead).
- A sprinkle of finely crushed vanilla wafers or graham cracker crumbs.
- A light dusting of cinnamon or nutmeg for warmth.
- Mini chocolate chips or chocolate shavings for a touch of decadence.
- A drizzle of caramel or chocolate sauce.
- A single maraschino cherry for a retro vibe.
- Occasion-Specific Serving:
- Weeknight Treat: Serve them straight from the fridge after dinner for a simple, satisfying dessert.
- Kids’ Parties: Use fun, colorful cups and let the kids add their own sprinkles.
- Potlucks & Barbecues: Prepare them in disposable cups for easy transport and cleanup. They are always a crowd-pleaser.
- Elegant Dinners: Serve in small, sophisticated glasses like martini glasses or small wine goblets, with a refined garnish.
- Temperature Matters:
- Always serve chilled. The cold temperature enhances the creaminess and refreshing quality of the dessert.
- Accompaniments (Optional):
- While delicious on their own, you could serve them alongside a cup of coffee or tea.
- For a banana split-inspired twist, a small scoop of vanilla ice cream on the side wouldn’t go amiss for an extra indulgent treat.
Additional Tips
- The Ripeness of Bananas is Key: For the best flavor and natural sweetness, use bananas that are well-ripened – yellow skin with plenty of brown spots. These bananas are softer, mash easier, and contribute a more intense banana taste. Avoid green or underripe bananas as they can be starchy and less flavorful.
- Soften Cream Cheese Properly: Ensure your cream cheese is truly softened to room temperature. Cold cream cheese will result in a lumpy mixture that’s difficult to smooth out. If you’re short on time, you can unwrap the cream cheese, cut it into small cubes, and let it sit on the counter for about 30 minutes, or microwave it on a very low power setting in 10-second intervals (be careful not to melt it).
- Don’t Overmix the Pudding or Whipped Topping: When combining the pudding with the cream cheese mixture, and especially when folding in the whipped topping, mix gently and only until just combined. Overmixing can deflate the whipped topping and cause the pudding to become watery, resulting in a less airy and more runny final product.
- Adjust Sweetness to Your Liking: Taste the banana cream mixture before assembling the cups. If your bananas weren’t super sweet, or if you prefer a sweeter dessert, you can add a little more granulated sugar or even a tablespoon or two of powdered sugar (which dissolves easily) to the cream cheese mixture.
- Chill for Optimal Flavor and Texture: While “quick” is in the name, allowing the cups to chill for at least 30 minutes (ideally 1-2 hours) makes a big difference. This time allows the flavors to meld together beautifully, the pudding to fully set, and the vanilla wafers to soften slightly, creating a more cohesive and delicious dessert.
- Prevent Browning Bananas (for Garnish): If you’re using fresh banana slices as a garnish and preparing them slightly ahead of time, toss the slices in a tiny bit of lemon juice or pineapple juice. The acidity helps prevent them from browning and looking unappetizing.
- Experiment with Cookie Layers: While vanilla wafers are classic, feel free to experiment. Crushed shortbread cookies, graham crackers, or even digestive biscuits can offer a different but equally delicious base and textural contrast. You can even try chocolate wafers for a banana-chocolate combination.
- Make it a Trifle: For a larger crowd or a different presentation, you can layer the ingredients in a large glass trifle bowl instead of individual cups. This creates a stunning centerpiece dessert. Simply scale up the layers as needed.
FAQ Section
Q1: Can I make these Quick Banana Cream Cups ahead of time?
A1: Yes, you can! These cups are actually great when made a few hours in advance. Assembling them and letting them chill in the refrigerator for 2-4 hours allows the flavors to meld wonderfully and the wafers to soften to a perfect cake-like consistency. However, for the best texture (especially of the bananas if used as visible layers), I wouldn’t recommend making them more than 24 hours ahead, as the bananas can start to brown excessively (even if treated) and the wafers might become too soggy. If making more than 4-6 hours ahead, consider adding any fresh banana slice garnishes just before serving.
Q2: How long do these banana cream cups last in the refrigerator?
A2: Stored properly covered in the refrigerator, these banana cream cups will last for up to 2-3 days. After that, the texture of the wafers may become overly soft, and the bananas may darken significantly. For optimal freshness and taste, they are best enjoyed within the first 48 hours.
Q3: Can I use real homemade whipped cream instead of frozen whipped topping?
A3: Absolutely! Homemade sweetened whipped cream is a fantastic substitution and will lend a richer, more natural flavor. You’ll need about 2 cups of heavy cream, whipped with about 1/4 to 1/2 cup of powdered sugar and a teaspoon of vanilla extract until stiff peaks form. Keep in mind that homemade whipped cream might not be as stabilized as commercial whipped topping, so the dessert might be a tad softer or may not hold its shape quite as long, but the taste is unparalleled.
Q4: My banana cream mixture seems a bit runny. What did I do wrong?
A4: There are a few potential reasons for a runny mixture. Firstly, ensure your instant pudding was fully whisked with cold milk and allowed to thicken properly before combining. Secondly, overmixing after adding the pudding or especially the whipped topping can deflate the mixture. Thirdly, using bananas that are too overripe and watery can contribute excess liquid. Ensure your cream cheese was softened but not melted. A good chill in the fridge usually helps firm it up considerably.
Q5: Can I freeze these banana cream cups?
A5: Freezing is generally not recommended for this dessert. The cream cheese and pudding mixture can separate or become grainy upon thawing, and the bananas will likely turn brown and mushy. The vanilla wafers will also become very soggy. It’s best enjoyed fresh and chilled from the refrigerator.
Q6: Are there any variations I can try with this recipe?
A6: Definitely! You could try:
* Chocolate Banana: Use chocolate pudding mix instead of vanilla, or add a layer of chocolate ganache or chocolate shavings.
* Peanut Butter Banana: Fold in 1/4 to 1/2 cup of creamy peanut butter into the cream cheese mixture.
* Different Cookies: As mentioned in the tips, try graham crackers, shortbread, or even Oreo cookies (with the filling removed or kept) for the layers.
* Spiced Banana: Add a pinch of cinnamon, nutmeg, or allspice to the cream mixture for a warmer flavor profile.
* Strawberry Banana: Layer with fresh sliced strawberries along with the bananas.
Q7: How can I prevent the banana slices within the layers or as garnish from browning?
A7: The best way to prevent browning is to lightly toss the fresh banana slices in a bit of acidic fruit juice, such as lemon juice, pineapple juice, or orange juice, right after slicing them. Use just a small amount so as not to overpower the banana flavor. This is especially important if you’re making the cups several hours before serving. For bananas mixed into the cream, the pudding mixture itself offers some protection.
Q8: I don’t have instant vanilla pudding. Can I use cook-and-serve pudding?
A8: While instant pudding is preferred for its “quick” nature, you can use cook-and-serve vanilla pudding. You’ll need to prepare it according to its package directions, then let it cool completely (press plastic wrap directly onto the surface to prevent a skin from forming) before incorporating it into the cream cheese mixture. This will add significant preparation and cooling time to the recipe, but the end result will still be delicious. Ensure it’s thoroughly chilled and set before using.
Quick Banana Cream Cups
Ingredients
- 2 cups (about 4–5 large) Ripe Bananas, mashed: Use well-ripened bananas with brown spots for maximum natural sweetness and a softer texture that mashes easily.
- 1 box (3.4 oz / 96g) Instant Vanilla Pudding Mix: The “instant” variety is key here for quick setting without cooking.
- 2 cups (480ml) Cold Milk: Whole milk is recommended for the richest flavor and creamiest texture, but 2% will also work.
- 1 teaspoon Vanilla Extract: A good quality pure vanilla extract enhances all the flavors.
- 8 oz (226g) Cream Cheese, softened: Allow it to come to room temperature for about 30–60 minutes for easy, lump-free blending.
- 1/2 cup (100g) Granulated Sugar (or to taste): Adjust based on the sweetness of your bananas and personal preference.
- 1 container (8 oz / 227g) Frozen Whipped Topping, thawed (like Cool Whip), or 2 cups homemade sweetened whipped cream: Thaw in the refrigerator for a few hours before use for best consistency.
- Approx. 30-40 Vanilla Wafers (like Nilla Wafers): These provide the classic crunchy base and layers.
- Optional Garnish: Extra banana slices, a sprinkle of cinnamon, chocolate shavings, or a drizzle of caramel sauce: For that extra touch of elegance and flavor.
Instructions
- Prepare the Pudding Base: In a medium-sized mixing bowl, whisk together the instant vanilla pudding mix and cold milk. Whisk vigorously for about 2 minutes, or until it begins to thicken. Set aside in the refrigerator to firm up further while you prepare the next components – about 5-10 minutes.
- Cream the Cheese and Sugar: In a separate large mixing bowl, using an electric hand mixer (or a stand mixer with the paddle attachment), beat the softened cream cheese until it’s smooth and creamy, with no lumps. This usually takes about 1-2 minutes on medium speed. Gradually add the granulated sugar and vanilla extract, continuing to beat until the mixture is light, fluffy, and well combined. Scrape down the sides of the bowl as needed to ensure everything is incorporated.
- Combine Pudding and Cream Cheese Mixture: Gently fold the thickened vanilla pudding (from step 1) into the cream cheese mixture. Use a spatula to mix until just combined and smooth. Be careful not to overmix, as this can cause the pudding to become too thin.
- Fold in Bananas and Whipped Topping: Gently fold the mashed ripe bananas into the pudding-cream cheese mixture. Then, carefully fold in the thawed whipped topping (or homemade whipped cream) until it’s evenly incorporated and the mixture is light and airy. Again, avoid overmixing.
- Assemble the Cups: You’ll need about 6-8 individual serving cups, small glasses, or ramekins.
- Place 1-2 whole vanilla wafers at the bottom of each cup. You can also crush some wafers for a different texture.
- Spoon a layer of the banana cream mixture over the wafers.
- Add a few thin slices of fresh banana (optional, but adds extra banana flavor and texture).
- Place another 1-2 vanilla wafers on top of the banana slices (or sprinkle crushed wafers).
- Spoon another layer of the banana cream mixture.
- Repeat layering if your cups are tall enough, ending with a layer of the banana cream mixture.
- Chill and Garnish: Cover the cups with plastic wrap and refrigerate for at least 30 minutes to an hour before serving. This allows the flavors to meld and the dessert to set properly. The wafers will also soften slightly, creating a wonderful cake-like texture.
- Serve: Just before serving, garnish as desired. A dollop of extra whipped topping, a fresh banana slice, a sprinkle of cinnamon, a few mini chocolate chips, or a drizzle of caramel sauce can make them look even more appealing.
Nutrition
- Serving Size: one normal portion
- Calories: 450
- Sugar: 35g
- Fat: 25g
- Carbohydrates: 55g
- Protein: 6g


