Ingredients
Scale
Here is the simple yet powerful list of ingredients you’ll need to create this masterpiece. Each component plays a crucial role in building layers of classic Italian flavor.
- 4 (6-ounce) boneless, skinless chicken breasts: The star of the show. Using medium-sized breasts ensures they cook quickly and evenly.
- 2 tablespoons extra virgin olive oil: This is used for cooking and adds a rich, fruity undertone that is quintessentially Italian.
- 1 ½ teaspoons dried oregano: Provides a pungent, earthy, and slightly bitter note that is a cornerstone of Italian seasoning.
- 1 ½ teaspoons dried basil: Adds a sweet, peppery, and slightly minty flavor that complements the other herbs perfectly.
- 1 teaspoon garlic powder: Offers a deep, savory garlic flavor without the risk of burning fresh garlic in a hot pan.
- 1 teaspoon onion powder: Lends a subtle, sweet, and savory depth that rounds out the entire seasoning blend.
- ½ teaspoon salt: Essential for enhancing all the other flavors and helping to keep the chicken moist.
- ½ teaspoon black pepper: Provides a gentle heat and pungent spice to balance the herbs.
- ¼ teaspoon red pepper flakes (optional): For those who enjoy a little kick of warmth and spice. Adjust to your personal preference.
- 1 tablespoon fresh parsley, chopped (for garnish): Adds a final touch of fresh, bright, and clean flavor, along with a beautiful pop of color.
Instructions
Follow these detailed steps to achieve perfectly cooked, juicy, and flavorful Italian herb chicken every single time. The key is in the preparation and the cooking technique.
- Prepare the Chicken: Place the chicken breasts on a cutting board and cover them with a piece of parchment paper or plastic wrap. This prevents any mess and protects the meat. Using a meat mallet, the flat side of a heavy pan, or even a rolling pin, gently pound the chicken breasts until they are an even thickness of about ½ to ¾ inch. This is the single most important step for ensuring the chicken cooks evenly and stays moist, preventing the thinner parts from drying out while the thicker parts cook through.
- Create the Seasoning Blend: In a small bowl, combine the dried oregano, dried basil, garlic powder, onion powder, salt, black pepper, and optional red pepper flakes. Use a fork or a small whisk to mix them together thoroughly. This ensures that every bite of chicken gets an equal distribution of the delicious herb coating.
- Season the Chicken Generously: Pat the chicken breasts completely dry with a paper towel. A dry surface is crucial for getting a beautiful golden-brown sear. Drizzle a small amount of the olive oil over the chicken, just enough to act as a binder for the seasonings. Sprinkle the herb mixture generously and evenly over all sides of each chicken breast. Use your hands to press the seasoning into the meat, making sure it’s fully coated.
- Heat the Pan: Place a large skillet (cast iron or stainless steel works best) over medium-high heat. Add the remaining olive oil to the pan. Allow the pan and oil to get hot. You’ll know it’s ready when the oil shimmers slightly or when a drop of water sizzles and evaporates instantly upon contact. A hot pan is essential for creating that perfect crust.
- Sear the Chicken: Carefully place the seasoned chicken breasts in the hot skillet, making sure not to overcrowd the pan. If necessary, cook them in two batches. Leave at least an inch of space between each breast. This allows them to sear properly rather than steam. Cook for 5-7 minutes on the first side without moving them. Resisting the urge to peek or flip them too early is key to developing a deep, golden-brown crust.
- Flip and Finish Cooking: Using tongs, flip the chicken breasts over. Cook for another 5-7 minutes on the second side, or until the chicken is cooked through and the internal temperature reaches 165°F (74°C) on an instant-read thermometer. Using a thermometer is the most reliable way to guarantee perfectly cooked, juicy chicken without any guesswork.
- Rest the Chicken: Once cooked, transfer the chicken breasts from the skillet to a clean cutting board or plate. Let them rest for at least 5-10 minutes before slicing or serving. This crucial resting period allows the juices to redistribute throughout the meat, ensuring that every slice is moist and tender. If you cut into it immediately, the juices will run out onto the board, leaving you with dry chicken.
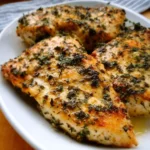
- Garnish and Serve: After resting, slice the chicken against the grain. Garnish with the freshly chopped parsley for a burst of freshness and color. Serve immediately and enjoy the incredible flavors.
Nutrition
- Serving Size: one normal portion
- Calories: 285
- Sodium: 350mg
- Fat: 9g
- Carbohydrates: 2g
- Protein: 45g