")

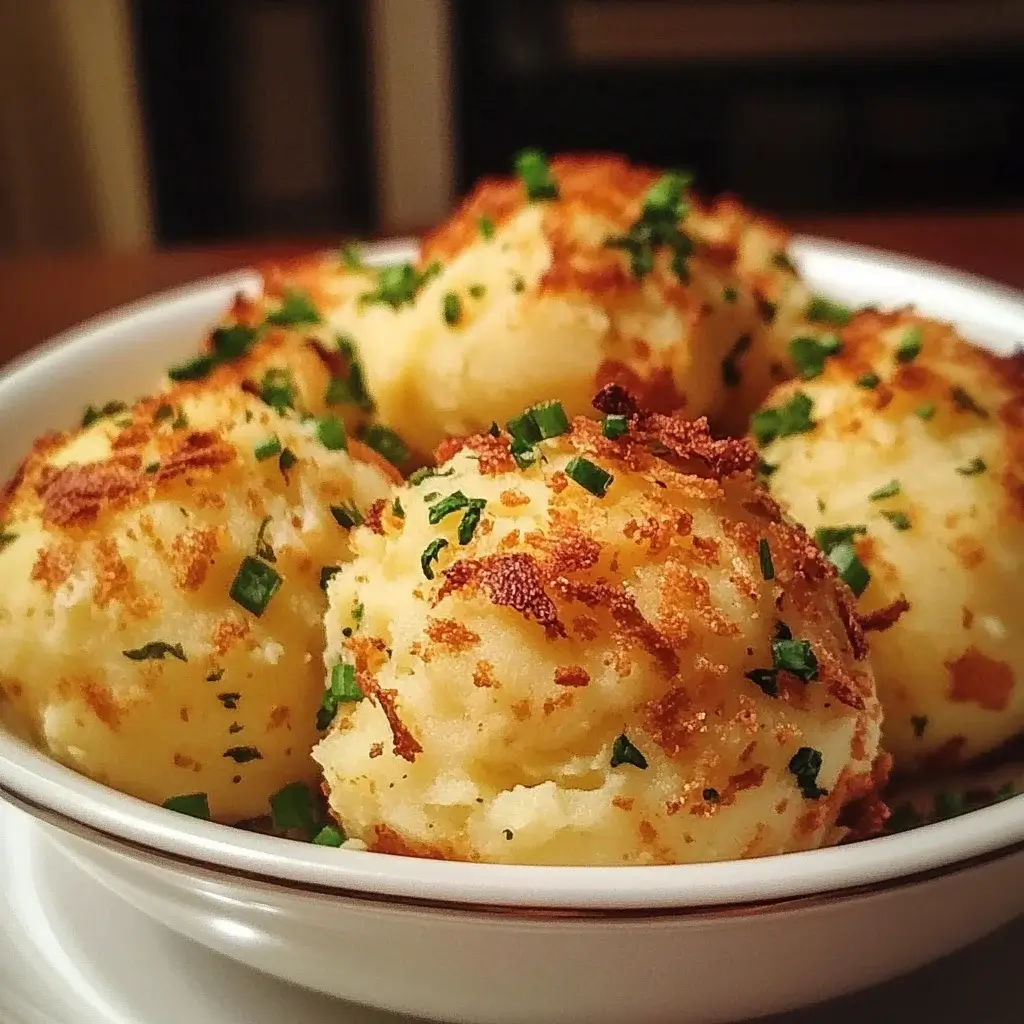

There are certain recipes that just feel like a warm hug, and these Quick Mashed Potato Balls are definitely one of them in our house. I remember the first time I made them; it was a chilly Tuesday evening, and I had a container of leftover mashed potatoes from Sunday dinner sitting rather forlornly in the fridge. Inspiration struck – why not transform them into something exciting? I’d seen recipes for potato croquettes before, but they often seemed fiddly. I wanted something quick. Whipping up a batch of these golden orbs turned out to be incredibly simple, and the reaction was immediate. My kids, usually picky eaters, devoured them, their eyes wide with delight at the crispy coating giving way to the warm, cheesy, fluffy potato inside. My husband declared them “dangerously addictive,” and they’ve since become a staple for using up leftovers, a go-to party appetizer, and even a fun side dish for weeknight meals. There’s something incredibly satisfying about taking simple leftovers and turning them into a star attraction. The crunch, the creamy interior, the savory flavor – it’s pure comfort food magic, and the speed with which they come together makes them a true kitchen hero. Whether you’re looking for a clever way to repurpose leftovers or just craving a delicious, satisfying snack, these Quick Mashed Potato Balls are a guaranteed crowd-pleaser. They’ve brought so much simple joy to our family table, and I’m thrilled to share how you can make them too. They bridge the gap between humble ingredients and impressive results, proving that delicious food doesn’t need to be complicated or time-consuming. From game days to holiday gatherings, or simply as a treat after a long day, these little bites never fail to hit the spot. The versatility is another huge plus – you can tweak the seasonings, experiment with different cheeses, and choose your favorite dipping sauce to make them uniquely yours. It’s a recipe that invites creativity while remaining fundamentally easy and rewarding.
Ingredients
- 3 cups Cold Mashed Potatoes: Firm, chilled leftover mashed potatoes work best as they hold their shape better. If making fresh, allow them to cool completely and ensure they aren’t too wet. Using varieties like Russet or Yukon Gold yields a fluffy interior.
- 1 large Egg, lightly beaten: Acts as a binder, helping the potato mixture stick together and providing structure.
- 1 cup Shredded Cheddar Cheese: Adds sharp, savory flavor and contributes to the creamy, melty interior. Feel free to substitute with mozzarella, Monterey Jack, Gruyere, or a blend.
- 1/4 cup All-Purpose Flour (plus more for dusting): Helps to absorb excess moisture in the potato mixture and provides the first layer for the breading, ensuring the egg wash adheres properly.
- 2 tablespoons Chopped Fresh Chives or Green Onions (Optional): Adds a mild oniony flavor and a pop of fresh color. Parsley also works well.
- 1/2 teaspoon Garlic Powder: Provides a subtle savory depth that complements the potato and cheese.
- Salt and Black Pepper to taste: Essential seasonings to enhance the overall flavor. Adjust based on how seasoned your original mashed potatoes were.
- 2 large Eggs, lightly beaten (for egg wash): Creates the sticky layer that helps the breadcrumbs adhere uniformly for a crispy coating.
- 1 ½ cups Breadcrumbs (Plain or Panko): Forms the outer crispy crust. Panko breadcrumbs tend to yield an airier, crispier texture, while plain breadcrumbs give a more traditional coating. Seasoned breadcrumbs can also be used for extra flavor.
- Vegetable Oil or Canola Oil for frying: Choose a neutral oil with a high smoke point suitable for deep frying or shallow frying. You’ll need enough for about 1-2 inches depth in your pan if deep frying, less for shallow frying.
Instructions
- Prepare the Potato Mixture: In a large bowl, combine the cold mashed potatoes, 1 lightly beaten egg, shredded cheddar cheese, 1/4 cup all-purpose flour, optional chives/green onions, garlic powder, salt, and pepper. Gently mix until just combined. Be careful not to overmix, as this can make the potatoes gummy. The mixture should be firm enough to hold its shape. If it seems too wet, you can add a tablespoon more flour, but do so sparingly. Taste and adjust seasoning if necessary.
- Chill the Mixture: Cover the bowl with plastic wrap and refrigerate the potato mixture for at least 30 minutes, or up to an hour. Chilling is a crucial step; it helps the mixture firm up significantly, making the balls much easier to shape and preventing them from falling apart during frying. Don’t skip this!
- Set Up Breading Station: While the mixture is chilling, prepare your breading station. You’ll need three shallow dishes or plates. Place about 1/2 cup of all-purpose flour in the first dish. In the second dish, whisk the remaining 2 large eggs to create an egg wash. In the third dish, place the breadcrumbs (Panko or plain). Arrange the dishes in order: flour, egg wash, breadcrumbs. This assembly line makes the coating process smooth and less messy.
- Shape the Potato Balls: Once the potato mixture is well-chilled, remove it from the refrigerator. Lightly flour your hands to prevent sticking. Using a small cookie scoop (about 1.5 tablespoons) or your hands, portion the mixture and roll it into uniform balls, approximately 1 to 1.5 inches in diameter. Consistent size ensures even cooking. Place the shaped balls on a baking sheet lined with parchment paper. This recipe should yield roughly 15-20 potato balls, depending on the size.
- Coat the Potato Balls: Working one ball at a time, gently roll it in the flour, shaking off any excess. Then, dip it completely into the beaten egg wash, allowing any excess egg to drip off. Finally, roll the ball in the breadcrumbs, pressing lightly to ensure an even coating all over. Place the coated potato ball back onto the parchment-lined baking sheet. Repeat with the remaining potato balls. Ensuring a thorough coating at each stage is key to achieving that perfect crispy exterior.
- Prepare for Cooking (Frying Method): If deep frying, pour vegetable or canola oil into a heavy-bottomed pot or Dutch oven to a depth of about 2-3 inches. Heat the oil over medium-high heat until it reaches 350-375°F (175-190°C). Use a thermometer for accuracy. If the oil is too cool, the potato balls will absorb too much oil and become greasy. If it’s too hot, the outside will burn before the inside is heated through. If shallow frying, add about 1/2 inch of oil to a large skillet and heat over medium-high heat.
- Fry the Potato Balls: Carefully place a few coated potato balls into the hot oil, being cautious not to overcrowd the pot/pan (this lowers the oil temperature). Fry in batches for about 2-4 minutes, turning gently occasionally, until they are golden brown and crispy on all sides. The exact time will depend on the size of the balls and the oil temperature.
- Drain and Serve: Using a slotted spoon or spider strainer, carefully remove the golden-brown potato balls from the hot oil. Transfer them to a plate or wire rack lined with paper towels to drain any excess oil. Let them cool slightly for a minute or two before serving, as the inside will be very hot. Serve warm with your favorite dipping sauces.
(Alternative Baking Method: Preheat oven to 400°F (200°C). Place coated potato balls on a parchment-lined baking sheet. Lightly spray or brush them with oil. Bake for 15-20 minutes, flipping halfway through, until golden brown and heated through. They may not be quite as evenly browned or crispy as fried, but it’s a healthier option.)
(Alternative Air Frying Method: Preheat air fryer to 380°F (195°C). Lightly spray the air fryer basket and the coated potato balls with cooking spray. Place balls in a single layer in the basket, working in batches if necessary. Air fry for 8-12 minutes, shaking the basket halfway through, until golden brown and crispy.)
Nutrition Facts
- Servings: Makes approximately 15-20 balls (Serves 4-6 as an appetizer)
- Calories per Serving (approx. 3-4 balls): 250-350 kcal (Note: Calories vary significantly based on potato ball size, amount of cheese, and cooking method – frying absorbs more oil than baking or air frying).
- Carbohydrates: Provides energy, primarily from the potatoes and breadcrumb coating. Mashed potatoes are a good source of complex carbohydrates.
- Protein: Contributes moderate protein from the eggs and cheese, important for muscle maintenance and satiety.
- Fat: Content varies greatly with cooking method. Frying adds considerable fat from the oil, while cheese also contributes saturated fat. Baking or air frying significantly reduces fat content.
- Sodium: Primarily from added salt and cheese. Be mindful if using already well-seasoned leftover mashed potatoes.
- Fiber: Potatoes, especially with skin left on in the original mash (if applicable), contribute some dietary fiber, beneficial for digestion.
(Disclaimer: Nutritional information is an estimate only and can vary based on specific ingredients, portion sizes, and cooking methods used. For precise information, consult a nutritional calculator with your exact ingredients.)
Preparation Time
- Total Time: Approximately 50-60 minutes
- Prep Time: 15-20 minutes (mixing and shaping)
- Chilling Time: 30 minutes (essential for firming)
- Cook Time: 10-15 minutes (frying/baking/air frying in batches)
This timeline assumes you are starting with cold, leftover mashed potatoes. If making mashed potatoes from scratch first, factor in that additional time (approx. 30-40 minutes). The hands-on time is relatively short, making this a genuinely “quick” recipe in terms of active effort, especially considering the delicious payoff. The chilling time is passive but crucial for the best results.
How to Serve
These Quick Mashed Potato Balls are incredibly versatile! Here are some fantastic ways to serve them:
- Classic Appetizer:
- Arrange them attractively on a platter.
- Serve alongside a variety of dipping sauces. Popular choices include:
- Ketchup (a kid-friendly favorite)
- Ranch dressing (cool and creamy)
- Sour cream and chives (classic potato pairing)
- Garlic aioli (rich and flavorful)
- Spicy mayo or Sriracha aioli (for a kick)
- Marinara sauce (especially good if using mozzarella)
- Honey mustard (sweet and tangy)
- Brown gravy (for a truly decadent bite)
- Comfort Food Side Dish:
- Serve them as a fun and texturally interesting alternative to regular mashed potatoes or fries.
- They pair wonderfully with:
- Roasted Chicken or Turkey
- Meatloaf or Salisbury Steak
- Pork Chops (grilled or pan-seared)
- Steak dinners
- Fish and Chips (as a substitute for regular chips)
- Alongside a hearty stew or chili
- Party Finger Food:
- Perfect for game days, potlucks, holiday gatherings, or cocktail parties.
- Easy for guests to grab and eat while mingling.
- Consider making mini versions for easier handling at large events.
- Kid-Friendly Snack or Meal:
- Their crispy exterior and soft interior make them appealing to children.
- Serve with mild dips like ketchup or plain yogurt.
- Pair with chicken nuggets or fish sticks for an easy kid’s meal.
- Enhanced Presentation:
- Garnish the serving platter with fresh parsley or extra chopped chives.
- Offer toppings like crispy bacon bits, extra shredded cheese (melted slightly under a broiler if desired), or a dollop of sour cream directly on each ball before serving.
- Light Lunch Option:
- Serve a small portion alongside a fresh green salad with vinaigrette for a balanced and satisfying light meal.
No matter how you serve them, ensure they are served warm for the best texture and melty cheese experience. Reheat gently in an oven or air fryer if needed to maintain crispiness.
Additional Tips
- Start with COLD Mashed Potatoes: This is arguably the most crucial tip. Warm or room temperature mashed potatoes are too soft and will be difficult to shape and likely fall apart during cooking. Leftovers that have been refrigerated overnight are ideal. If making fresh mashed potatoes, spread them in a shallow dish and chill thoroughly first.
- Potato Consistency Matters: Ensure your mashed potatoes aren’t too “wet.” If they were made with a lot of milk or butter, they might be too loose. If needed, you can mix in a tablespoon or two of instant potato flakes (unprepared) or a little extra flour to help firm them up before chilling.
- Experiment with Cheeses: While cheddar is classic, don’t be afraid to mix it up! Try sharp provolone, smoky gouda, spicy pepper jack for a kick, creamy mozzarella for extra meltiness, or even a bit of Parmesan or Gruyere for nutty depth. A blend often yields fantastic results.
- Boost the Flavor: Enhance the basic recipe by adding other ingredients to the potato mixture. Consider adding cooked and crumbled bacon bits, finely diced jalapeños (seeds removed for less heat), a pinch of smoked paprika, onion powder, or different fresh herbs like dill or parsley.
- Uniform Size for Even Cooking: Use a small ice cream scoop or cookie scoop (around 1.5 tablespoons) to portion the potato mixture. This ensures all the balls are roughly the same size, so they cook evenly and look professional.
- Don’t Skip the Chill Time: Reiterating this because it’s vital! Chilling the potato mixture after mixing and before shaping (or after shaping, before breading) helps solidify the fats and starches, making the balls much easier to handle and preventing blowouts during frying. 30 minutes is a minimum.
- Master the Breading: For an extra crispy coating, consider a double breading technique. After the first pass through flour-egg-breadcrumbs, dip the ball back into the egg wash and then again into the breadcrumbs. This creates a thicker, sturdier, and crunchier crust. Panko breadcrumbs generally provide superior crunch compared to standard fine breadcrumbs.
- Maintain Oil Temperature: Whether deep frying or shallow frying, keeping the oil temperature consistent (around 350-375°F or 175-190°C) is key. Use a thermometer. If the oil is too cool, the balls absorb excess grease. If it’s too hot, the outside burns before the inside heats through. Fry in small batches to avoid dropping the oil temperature too much.
Frequently Asked Questions (FAQ)
1. Can I use instant mashed potatoes for this recipe?
Yes, you can use instant mashed potatoes. However, prepare them according to package directions but use slightly less liquid (milk/water) than called for to ensure they are thick and sturdy. Let them cool completely in the refrigerator before proceeding with the recipe, just like regular mashed potatoes.
2. Why are my mashed potato balls falling apart when I fry them?
There are a few common reasons:
Mixture too wet: Your initial mashed potatoes might have been too loose, or you added too much liquid binder. Try adding a bit more flour or instant potato flakes next time.
Not chilled enough: The chilling step is crucial for firming the mixture. Ensure you chill for at least 30 minutes.
Oil temperature too low: If the oil isn’t hot enough, the balls sit in it too long before the crust forms, allowing them to absorb oil and potentially disintegrate. Use a thermometer to ensure 350-375°F (175-190°C).
Overcrowding the pan: Frying too many balls at once drastically lowers the oil temperature. Fry in small batches.
Handling too roughly: Be gentle when placing them in the oil and turning them.
3. Can I make these Quick Mashed Potato Balls gluten-free?
Absolutely! Substitute the all-purpose flour used in the mixture and for dredging with a good quality gluten-free all-purpose flour blend. Use gluten-free breadcrumbs (plain, Panko-style, or crushed gluten-free crackers/cereal) for the final coating. Ensure your other ingredients (like cheese or seasonings) are certified gluten-free if needed.
4. Can I make mashed potato balls ahead of time?
Yes, you have a couple of options:
Prepare and Chill: Mix, shape, and coat the balls. Place them on a parchment-lined baking sheet, cover tightly with plastic wrap, and refrigerate for up to 24 hours before frying or baking.
Cook and Reheat: Fry or bake the balls as directed. Let them cool completely, then store in an airtight container in the refrigerator for up to 3 days. Reheat in a preheated oven (around 350°F/175°C) or an air fryer for 5-10 minutes until heated through and crispy again. Avoid microwaving, as it makes them soggy.
5. Can I freeze mashed potato balls?
Yes, freezing works well.
Freeze Uncooked: Shape and coat the balls. Place them on a baking sheet in a single layer and freeze until solid (about 1-2 hours). Transfer the frozen balls to a freezer-safe bag or container. They can be fried or baked directly from frozen, adding a few extra minutes to the cooking time.
Freeze Cooked: Let cooked potato balls cool completely. Freeze them in a single layer on a baking sheet, then transfer to a freezer bag. Reheat from frozen in a preheated oven or air fryer until hot and crispy. They can be stored frozen for up to 2-3 months.
6. What’s the best oil for frying potato balls?
Choose a neutral-flavored oil with a high smoke point. Good options include vegetable oil, canola oil, peanut oil, or grapeseed oil. Avoid oils with strong flavors like extra virgin olive oil for deep frying.
7. How do I bake them instead of frying for a healthier option?
Preheat your oven to 400°F (200°C). Prepare and coat the potato balls as directed. Place them in a single layer on a baking sheet lined with parchment paper. Lightly spray or brush the balls with oil (this helps them brown and crisp up). Bake for 15-20 minutes, carefully flipping them halfway through, until they are golden brown and heated thoroughly. They won’t be identical in texture to fried, but still delicious.
8. What other fillings can I add besides cheese?
Get creative! Besides different cheeses and bacon bits, you could add:
Finely chopped cooked ham or sausage
Corn kernels
Finely diced sautéed onions or mushrooms
Different herbs like rosemary or thyme
A small cube of mozzarella in the very center for an extra cheesy “lava” effect.
Just ensure any additions are finely chopped and not too wet, so they don’t compromise the structure of the balls.

Quick Mashed Potato Balls
Ingredients
- 3 cups Cold Mashed Potatoes: Firm, chilled leftover mashed potatoes work best as they hold their shape better. If making fresh, allow them to cool completely and ensure they aren’t too wet. Using varieties like Russet or Yukon Gold yields a fluffy interior.
- 1 large Egg, lightly beaten: Acts as a binder, helping the potato mixture stick together and providing structure.
- 1 cup Shredded Cheddar Cheese: Adds sharp, savory flavor and contributes to the creamy, melty interior. Feel free to substitute with mozzarella, Monterey Jack, Gruyere, or a blend.
- 1/4 cup All-Purpose Flour (plus more for dusting): Helps to absorb excess moisture in the potato mixture and provides the first layer for the breading, ensuring the egg wash adheres properly.
- 2 tablespoons Chopped Fresh Chives or Green Onions (Optional): Adds a mild oniony flavor and a pop of fresh color. Parsley also works well.
- 1/2 teaspoon Garlic Powder: Provides a subtle savory depth that complements the potato and cheese.
- Salt and Black Pepper to taste: Essential seasonings to enhance the overall flavor. Adjust based on how seasoned your original mashed potatoes were.
- 2 large Eggs, lightly beaten (for egg wash): Creates the sticky layer that helps the breadcrumbs adhere uniformly for a crispy coating.
- 1 ½ cups Breadcrumbs (Plain or Panko): Forms the outer crispy crust. Panko breadcrumbs tend to yield an airier, crispier texture, while plain breadcrumbs give a more traditional coating. Seasoned breadcrumbs can also be used for extra flavor.
- Vegetable Oil or Canola Oil for frying: Choose a neutral oil with a high smoke point suitable for deep frying or shallow frying. You’ll need enough for about 1-2 inches depth in your pan if deep frying, less for shallow frying.
Instructions
- Prepare the Potato Mixture: In a large bowl, combine the cold mashed potatoes, 1 lightly beaten egg, shredded cheddar cheese, 1/4 cup all-purpose flour, optional chives/green onions, garlic powder, salt, and pepper. Gently mix until just combined. Be careful not to overmix, as this can make the potatoes gummy. The mixture should be firm enough to hold its shape. If it seems too wet, you can add a tablespoon more flour, but do so sparingly. Taste and adjust seasoning if necessary.
- Chill the Mixture: Cover the bowl with plastic wrap and refrigerate the potato mixture for at least 30 minutes, or up to an hour. Chilling is a crucial step; it helps the mixture firm up significantly, making the balls much easier to shape and preventing them from falling apart during frying. Don’t skip this!
- Set Up Breading Station: While the mixture is chilling, prepare your breading station. You’ll need three shallow dishes or plates. Place about 1/2 cup of all-purpose flour in the first dish. In the second dish, whisk the remaining 2 large eggs to create an egg wash. In the third dish, place the breadcrumbs (Panko or plain). Arrange the dishes in order: flour, egg wash, breadcrumbs. This assembly line makes the coating process smooth and less messy.
- Shape the Potato Balls: Once the potato mixture is well-chilled, remove it from the refrigerator. Lightly flour your hands to prevent sticking. Using a small cookie scoop (about 1.5 tablespoons) or your hands, portion the mixture and roll it into uniform balls, approximately 1 to 1.5 inches in diameter. Consistent size ensures even cooking. Place the shaped balls on a baking sheet lined with parchment paper. This recipe should yield roughly 15-20 potato balls, depending on the size.
- Coat the Potato Balls: Working one ball at a time, gently roll it in the flour, shaking off any excess. Then, dip it completely into the beaten egg wash, allowing any excess egg to drip off. Finally, roll the ball in the breadcrumbs, pressing lightly to ensure an even coating all over. Place the coated potato ball back onto the parchment-lined baking sheet. Repeat with the remaining potato balls. Ensuring a thorough coating at each stage is key to achieving that perfect crispy exterior.
- Prepare for Cooking (Frying Method): If deep frying, pour vegetable or canola oil into a heavy-bottomed pot or Dutch oven to a depth of about 2-3 inches. Heat the oil over medium-high heat until it reaches 350-375°F (175-190°C). Use a thermometer for accuracy. If the oil is too cool, the potato balls will absorb too much oil and become greasy. If it’s too hot, the outside will burn before the inside is heated through. If shallow frying, add about 1/2 inch of oil to a large skillet and heat over medium-high heat.
- Fry the Potato Balls: Carefully place a few coated potato balls into the hot oil, being cautious not to overcrowd the pot/pan (this lowers the oil temperature). Fry in batches for about 2-4 minutes, turning gently occasionally, until they are golden brown and crispy on all sides. The exact time will depend on the size of the balls and the oil temperature.
- Drain and Serve: Using a slotted spoon or spider strainer, carefully remove the golden-brown potato balls from the hot oil. Transfer them to a plate or wire rack lined with paper towels to drain any excess oil. Let them cool slightly for a minute or two before serving, as the inside will be very hot. Serve warm with your favorite dipping sauces.
Nutrition
- Serving Size: one normal portion
- Calories: 350