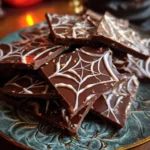
Ingredients
Here is the simple list of components you’ll need to weave your own delicious web of chocolatey goodness. The quality of your ingredients, especially the chocolate, will directly impact the final taste and texture, so choose the best you can for a truly gourmet result.
- 12 ounces (about 340g) high-quality dark or semi-sweet chocolate: This forms the rich, dark base of your bark, resembling a spooky night sky. Using baking chocolate bars (like Ghirardelli or a good couverture chocolate) rather than chips will yield a smoother melt and a more satisfying “snap” when broken. Look for a cacao percentage between 60% and 72% for a deep, balanced flavor.
- 4 ounces (about 113g) high-quality white chocolate: This is your “ink” for drawing the spiderwebs. Good quality white chocolate, made with real cocoa butter, is essential. It will melt into a fluid, pipeable consistency and provide a creamy, vanilla-like contrast to the darker base.
- 1 teaspoon coconut oil or vegetable shortening, divided: This is the secret ingredient for perfectly smooth, glossy chocolate. You’ll use a small amount in both the dark and white chocolate to help them melt evenly and prevent seizing, ensuring a flawless finish.
- Optional: Halloween-themed sprinkles, candy eyeballs, or edible glitter: While the spiderweb design is stunning on its own, a scattering of festive sprinkles (think oranges, purples, and blacks), a few spooky candy eyeballs peering out from the webs, or a dash of edible silver glitter can elevate the fun and visual appeal, especially for kids.
Instructions
Follow these detailed steps carefully to ensure your chocolate melts perfectly and your spiderweb design is sharp and impressive. The key is to work with confidence and a little bit of speed once the chocolate is melted.
Step 1: Prepare Your Workstation
Before you even think about melting chocolate, get everything in place. This process moves quickly once it starts. Line a large, rimmed baking sheet (approximately 13×18 inches) with parchment paper or a silicone baking mat. This is crucial for preventing the chocolate from sticking and allowing for easy removal and cleanup. Make sure the parchment paper lies flat. If it curls, you can use a tiny dab of water or oil under the corners to help it adhere to the pan. Set it aside.
Step 2: Melt the Dark Chocolate Base
This is the foundation of your bark. You have two primary methods for melting:
- Microwave Method (Easier): Chop your dark chocolate into small, uniform pieces. This helps it melt evenly. Place the chopped chocolate and ½ teaspoon of the coconut oil into a microwave-safe bowl. Microwave on 50% power for 30-second intervals, stirring thoroughly with a rubber spatula after each interval. It’s vital to use reduced power and stir frequently to prevent the chocolate from scorching. Continue until the chocolate is about 90% melted, with just a few small lumps remaining. Remove from the microwave and stir continuously until the residual heat melts the remaining lumps, leaving you with a smooth, glossy river of chocolate.
- Double Boiler Method (More Control): If you don’t have a microwave or prefer a gentler heating method, a double boiler is perfect. Fill a small saucepan with about an inch of water and bring it to a gentle simmer over medium-low heat. Place your chopped dark chocolate and ½ teaspoon of coconut oil in a heatproof bowl (glass or metal) that fits snugly over the saucepan without touching the water. The steam from the simmering water will gently melt the chocolate. Stir constantly until it is completely smooth. This method provides excellent temperature control and minimizes the risk of burning.
Step 3: Spread the Chocolate Canvas
Once your dark chocolate is perfectly melted and smooth, pour it onto the center of your prepared baking sheet. Using an offset spatula or the back of a spoon, spread the chocolate into an even, thin layer, about ⅛ to ¼ inch thick. You don’t need to spread it to the very edges of the pan; a rustic, rectangular shape is part of the charm. Work quickly but gently to create a uniform canvas for your web design.
Step 4: Melt the White Chocolate for the Web
Immediately begin melting your white chocolate, as the dark chocolate base needs to be wet for the design to work. White chocolate is more delicate and prone to overheating than dark chocolate, so be extra cautious.
Chop the white chocolate into very fine pieces. Place it in a small, microwave-safe bowl with the remaining ½ teaspoon of coconut oil. Microwave on 50% power in 15- to 20-second intervals, stirring well after each one. It will melt much faster than the dark chocolate. Stop heating when it is mostly melted and stir until completely smooth and fluid. Alternatively, use the double boiler method with the same precautions.
Step 5: Create the Spiderweb Design
This is the most creative and impressive part of the process!
- Transfer the White Chocolate: Carefully pour the melted white chocolate into a small piping bag, a squeeze bottle with a fine tip, or a small, sturdy plastic sandwich bag. If using a plastic bag, snip a tiny corner off to create a small opening for piping.
- Pipe the Circles: Working quickly while the dark chocolate is still wet, pipe the white chocolate into concentric circles on top of the dark chocolate base. Start with a small circle in the center, then pipe progressively larger circles around it, leaving about an inch of space between each ring. Don’t worry about perfect circles; slight imperfections will make it look more organic.
- Drag the “Webs”: Now, take a toothpick, a wooden skewer, or the tip of a sharp knife. Starting from the center dot, gently drag the tip outwards towards the edge of the chocolate, pulling through all the white chocolate circles. This creates the first line of your web. Wipe the tip of your tool clean. Turn the pan slightly and repeat, dragging another line from the center outwards. Continue this process, dragging lines from the center out, spacing them evenly around the circle like the spokes of a wheel, until you’ve gone all the way around.
- Refine the Web (Optional): For an even more intricate design, you can now drag lines in the opposite direction. Starting from the outer edge of the bark, drag your toothpick inwards toward the center, positioning these lines between the ones you just made. This creates a beautiful, layered web effect.
Step 6: Add Toppings and Chill
If you’re using sprinkles or candy eyeballs, now is the time to add them. Gently scatter them over the wet chocolate. The design is the star, so a light touch is often best.
Once you’re happy with your creation, carefully transfer the baking sheet to the refrigerator. Let the bark chill for at least 30-45 minutes, or until it is completely firm to the touch. You can also let it set at cool room temperature for a few hours, which can sometimes result in a glossier finish.
Step 7: Break and Serve
Once the bark is fully hardened, lift it from the baking sheet using the parchment paper. You can either use your hands to break it into rustic, irregular shards or place it on a cutting board and use a large, sharp knife to cut it into more uniform pieces. Your spooky, delicious Spiderweb Chocolate Bark is now ready to be devoured!
Nutrition
- Serving Size: one normal portion
- Calories: 210